Welcome to Black Ops Royale
Part 1: Black Ops Royale Tactical Summary
Part 2: After Infil: Weapons, Archetypes, and Upgrading
- Loot and Inventory: No Loadouts. Upgradeable Weapons
- Weapon Rarity
- Initial Details: Weapon Build Archetypes
- Additional Details: Weapon Attachment Kits
Part 3: A Deeper Dive into Weapon Archetypes
- Critical Intel: Weapon Archetype Build Themes
- Black Ops Royale: Global Weapon Class Benefits
- Black Ops Royale: Weapon Archetype Themes
- Assault Rifle Archetype Themes
- SMG Archetype Themes
- Shotgun Archetype Themes
- Light Machinegun Archetype Themes
- Marksman Rifles Archetype Themes
- Sniper Rifles Archetype Themes
- Pistol Archetype Themes
- Exceptions to the Rule: Exotic Weapons
Part 4: Cerebral Link: Your Heads-Up Display
Part 5: Black Ops Royale Perks System
Part 6: Black Ops Royale Equipment
Part 7: Black Ops Royale Match Features
- Map Navigation
- Movement Across Water and Tidal Flats
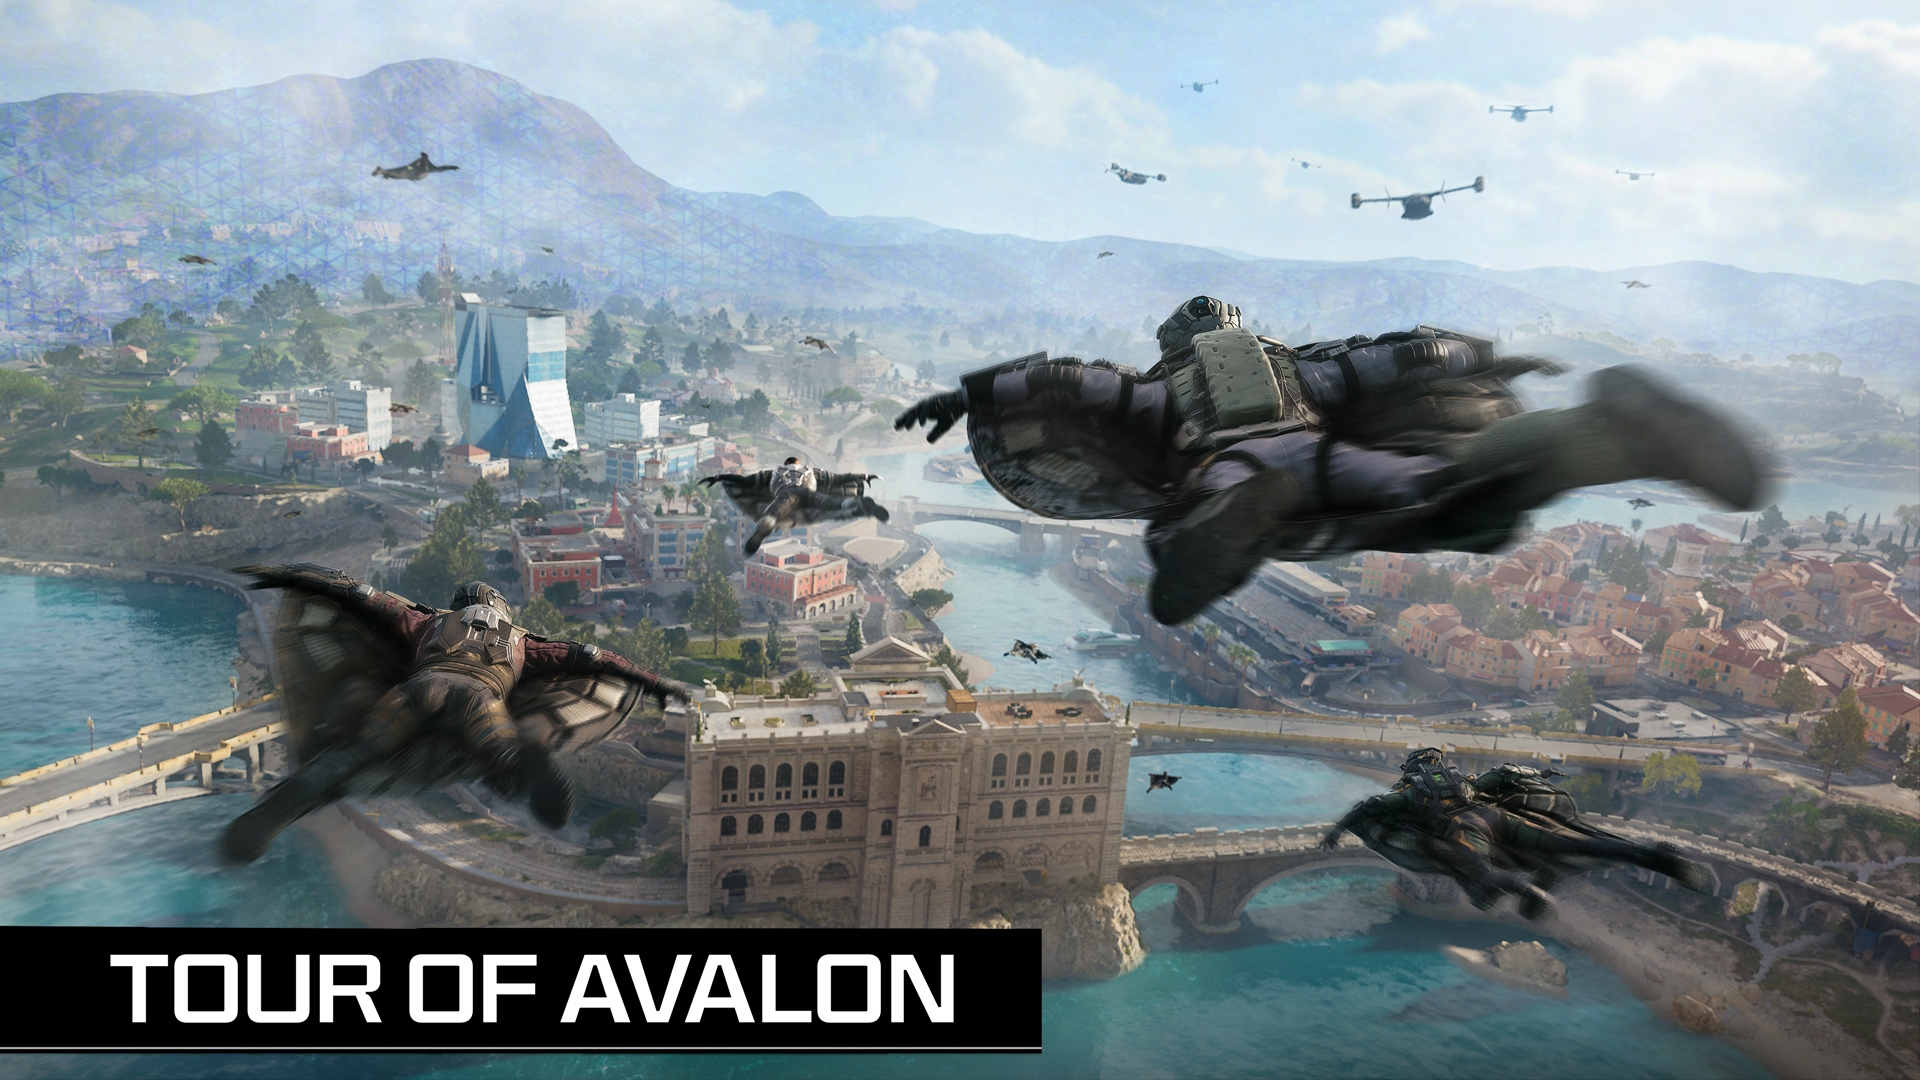
- Tidal Flats: Tour of Avalon
- Gulag Gone: The Redeploy System
- Vehicles in Avalon
- Electrical Field: The Collapse
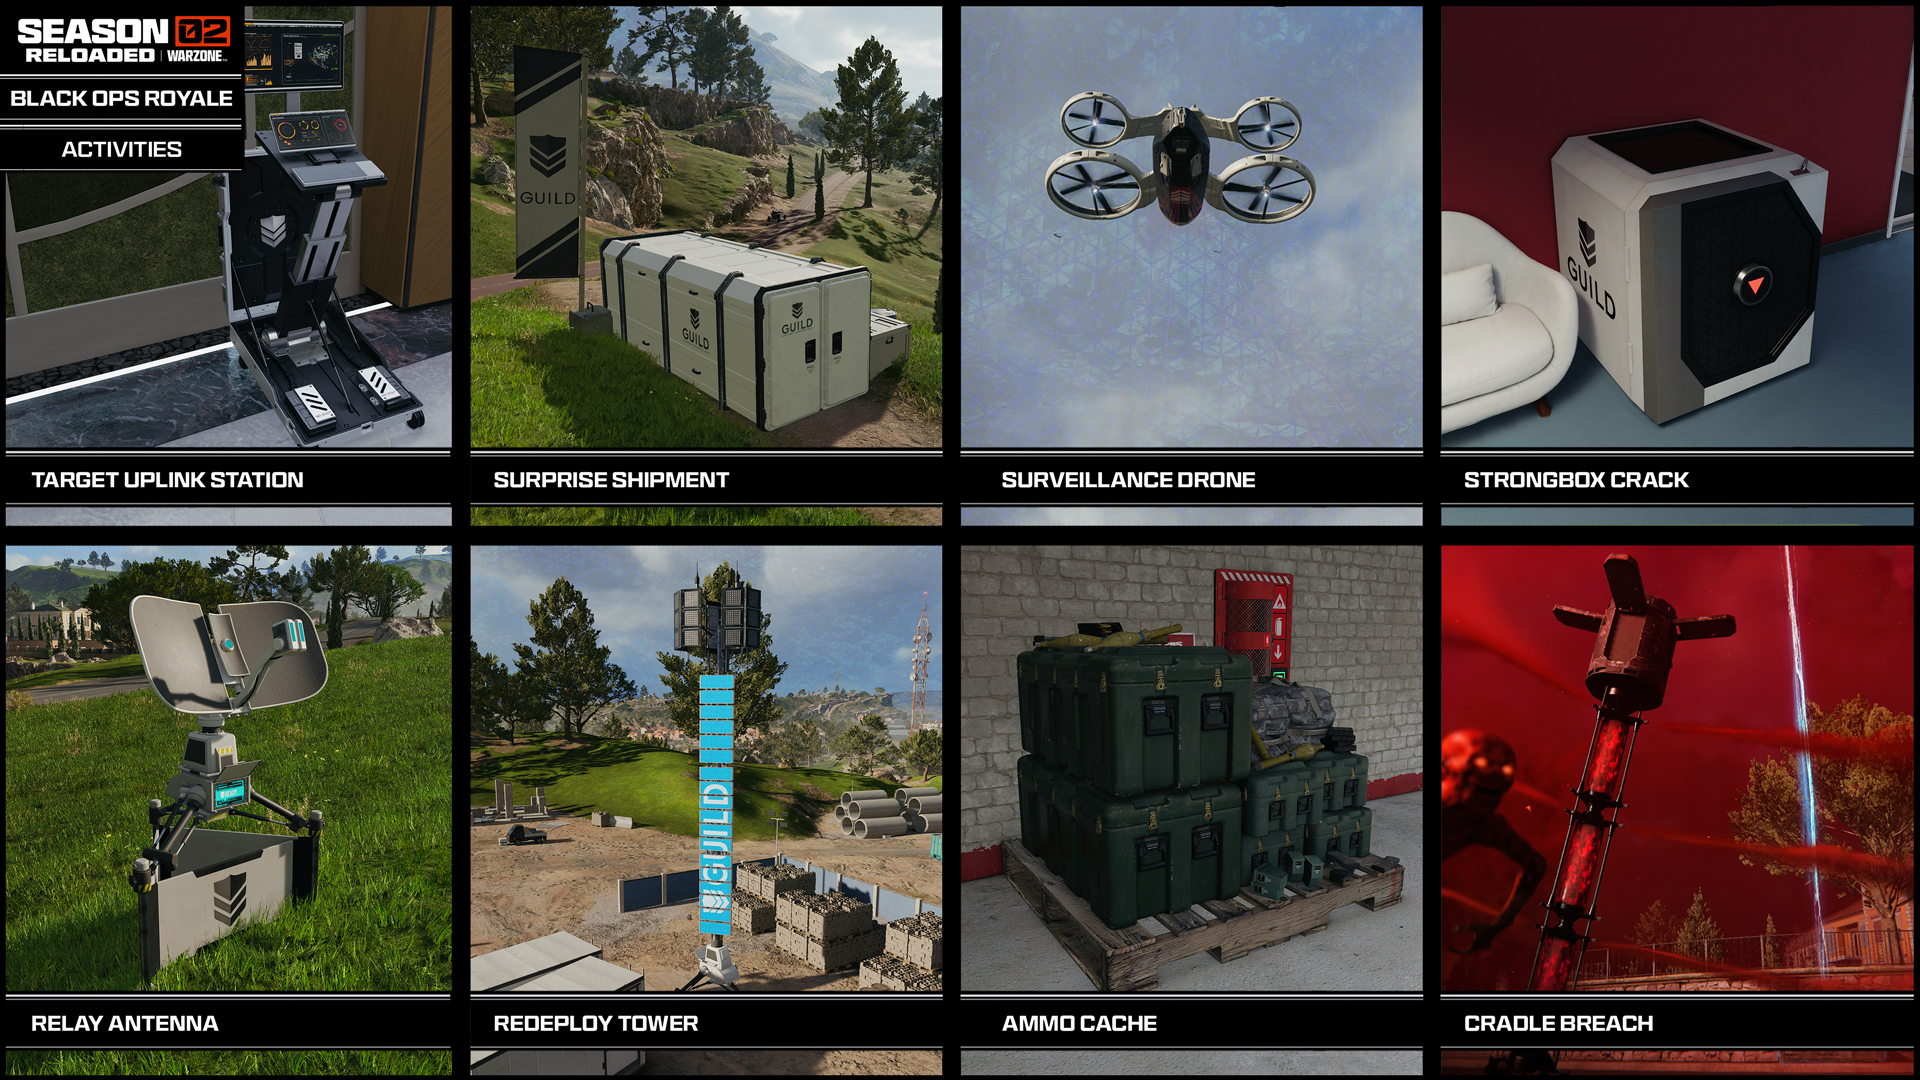
Part 8: Enhanced Objectives and More: Activities
- Activity: Target Uplink Station
- Activity: Surprise Shipment
- Activity: Surveillance Drone
- Activity: Strongbox Crack
- Activity: Relay Antenna
- Activity: Redeploy Tower
- Activity: Supply Drops
- Additional Interactions: Ammo Cache
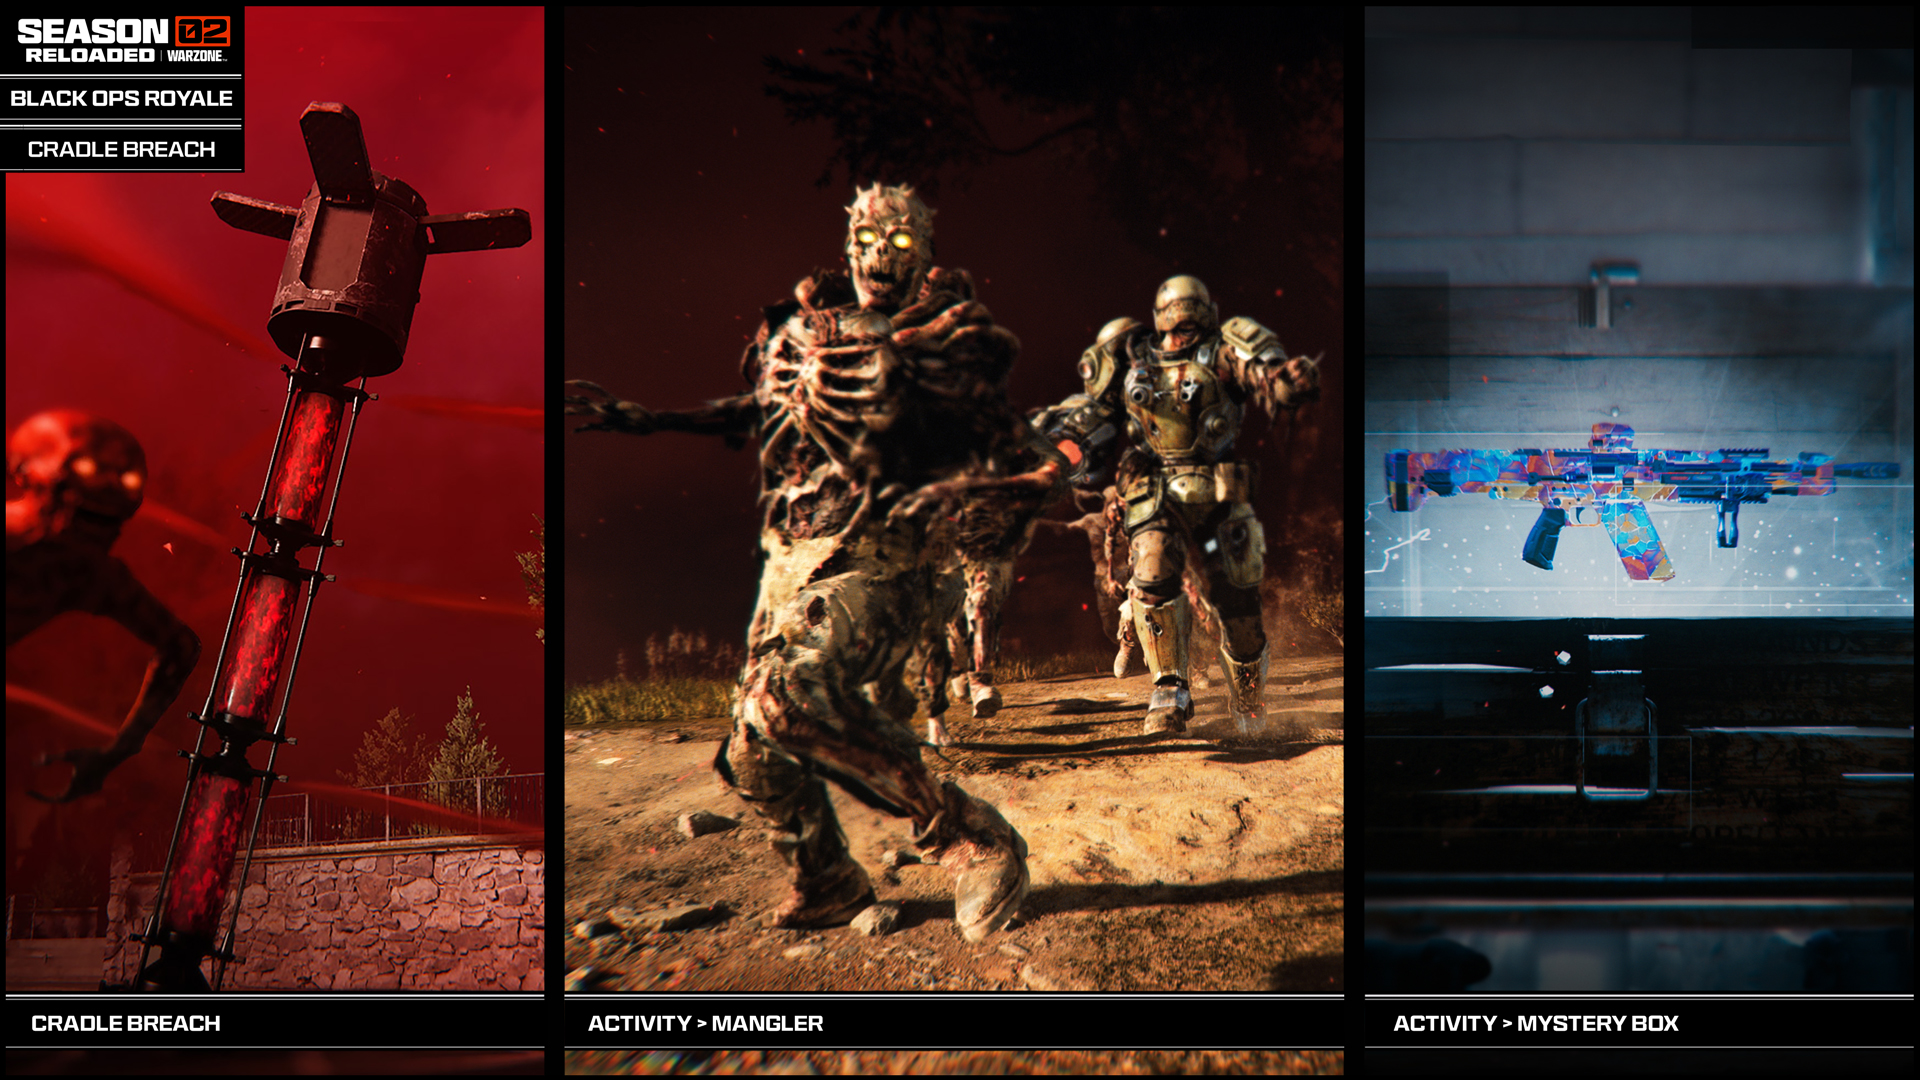
Part 9: Cradle Breaches
- Cradle Gas Activity: Cradle Breach
- Cradle Breach Activity: Mangler
- Cradle Breach Activity: Mystery Box
Part 10: Additional Intel
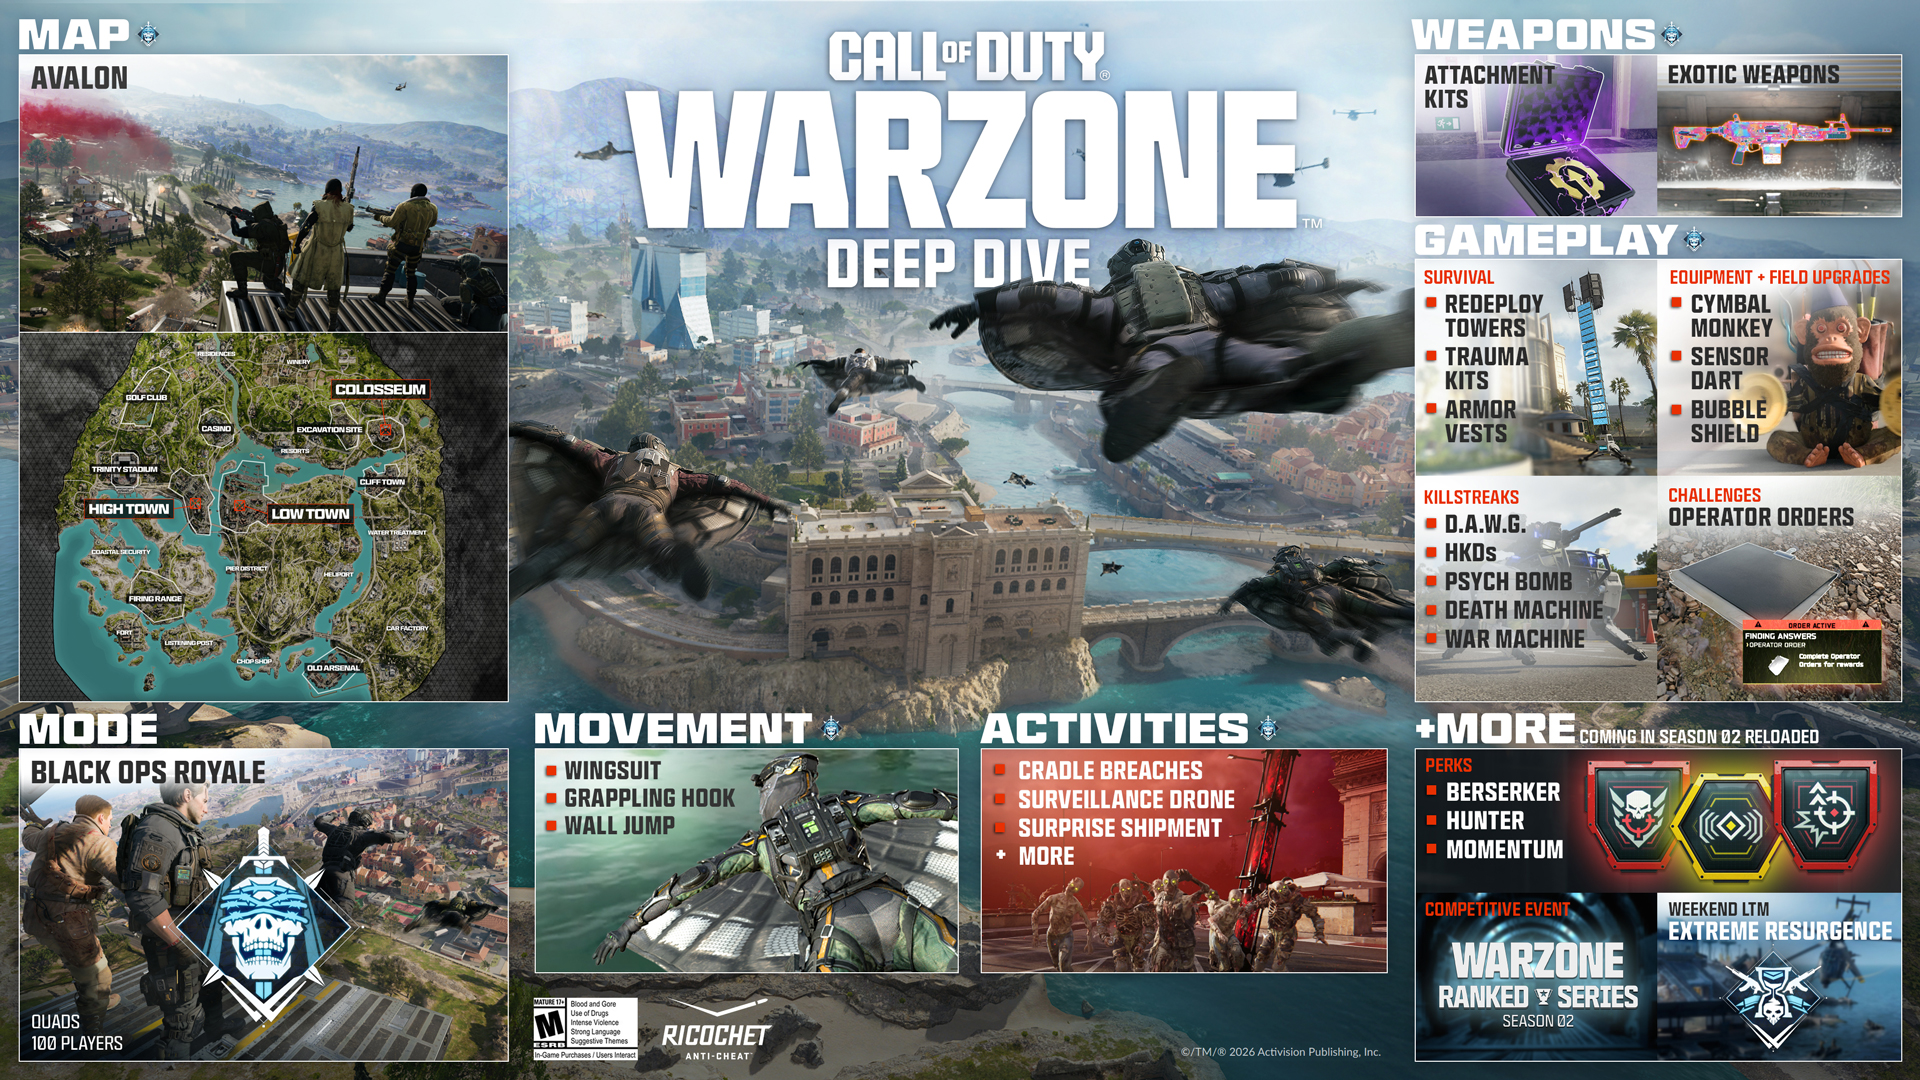
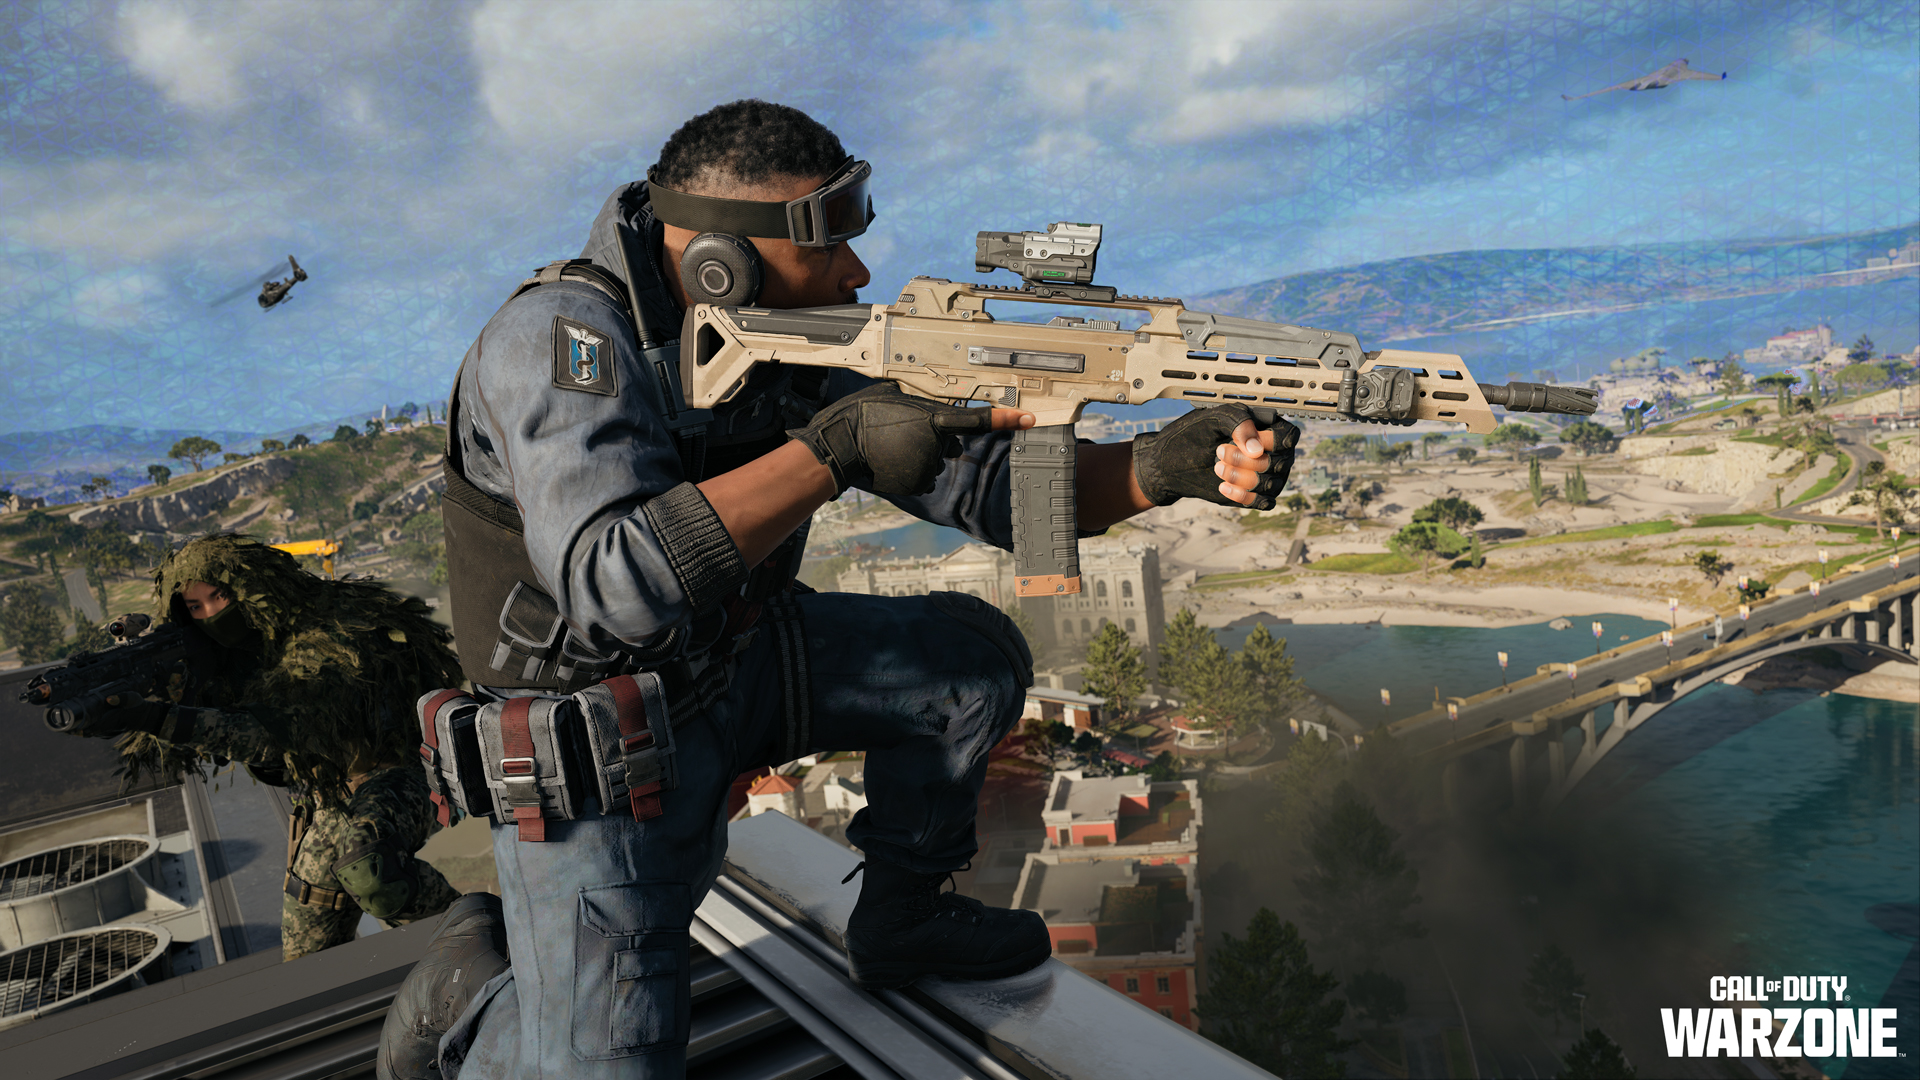
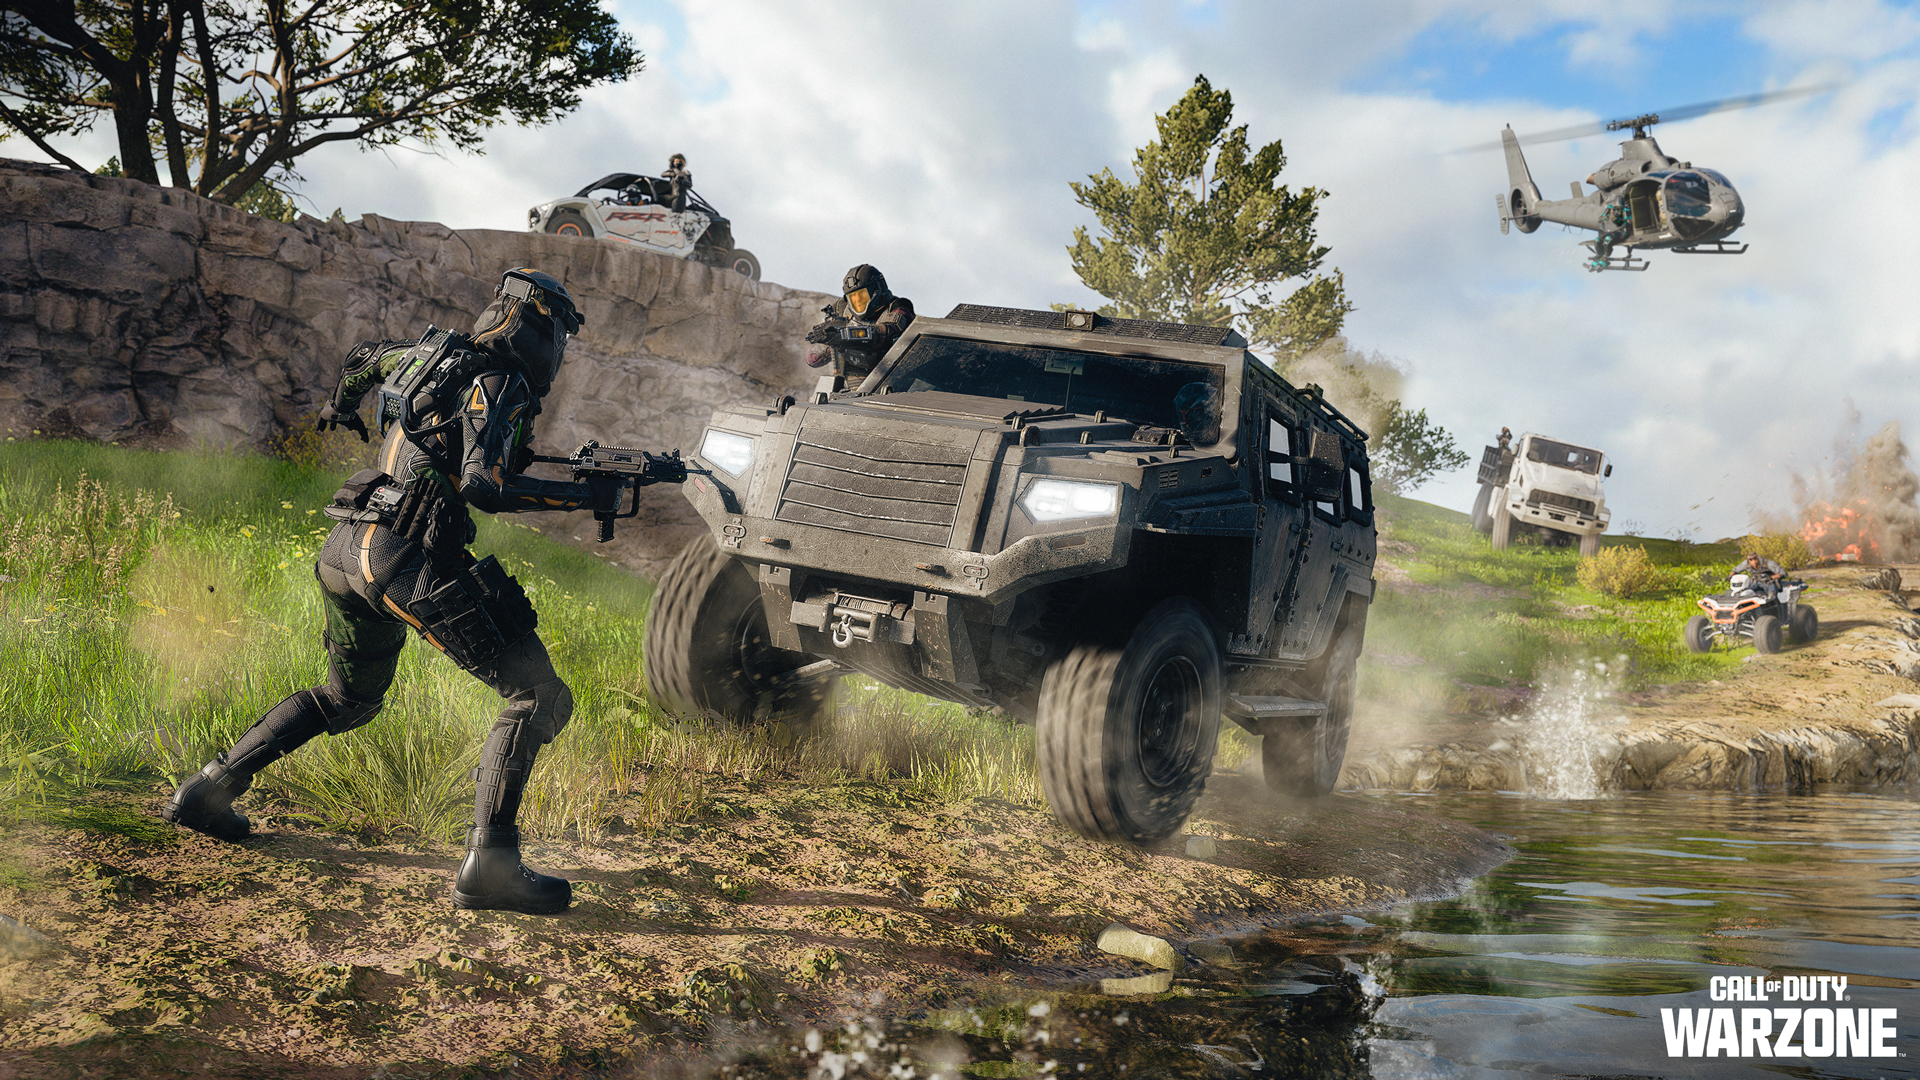
Scavenge to survive, and fight through high-stakes chaos to gain the upper hand in Black Ops Royale. Drop into Avalon, gear up, upgrade weapons, and rely on your instincts in an all-new and unique Call of Duty: Warzone experience rooted in Call of Duty’s first Battle Royale. The evolution of Blackout launches on Thursday, March 12 at 9PM PT, or midnight Friday March 13 at (12AM ET) on the East Coast.
Welcome to Black Ops Royale
BLACK OPS ROYALE SUMMARY
Black Ops Royale: This is an original Blackout-inspired Battle Royale with no Loadouts, no Gulag, and no Buy Stations. Wingsuit in, scavenge to survive, upgrade weapons through rarity, master Cradle Breaches, and outlast 24 rival squads on Avalon’s massive map.
Weapons, Archetypes, and Upgrading: After infil, it’s pure scavenger warfare: scramble to find Black Ops 7 weapons with fixed Build Archetypes and five-attachment upgrade paths. Hunt for Attachment Kits to raise weapon Rarity, unlocking your preset build, and push your arsenal to Legendary before the competition does.
A Deeper Dive into Weapon Archetypes: Weapon Archetypes define how every gun functions in Black Ops Royale, pairing class-wide Global Benefits with tuned Build Themes that stack through rarity upgrades. Learn the Themes, master the kits, and turn base ground loot into Legendary or even Exotic match-winning firepower.
Cerebral Link: Your Heads-Up Display: Black Ops Royale’s Cerebral Link HUD keeps the familiar Call of Duty®: Warzone™ layout while adding critical intel: visible health values, weapon Rarity and Archetype, full Attachment upgrade paths, and an expanded Backpack Menu supporting additional equipment slots. Faster swaps, clearer data, sharper decision-making — all at a glance.
Black Ops Royale Perk System: The original Call of Duty BR Perk system returns and includes a flexible twist: no fixed slots, just five swappable, consumable boosts you activate when the moment demands. Loot them, swap them with your squad, and time them wisely — each temporary advantage can shift the balance of a firefight or the fate of your squad throughout the match.
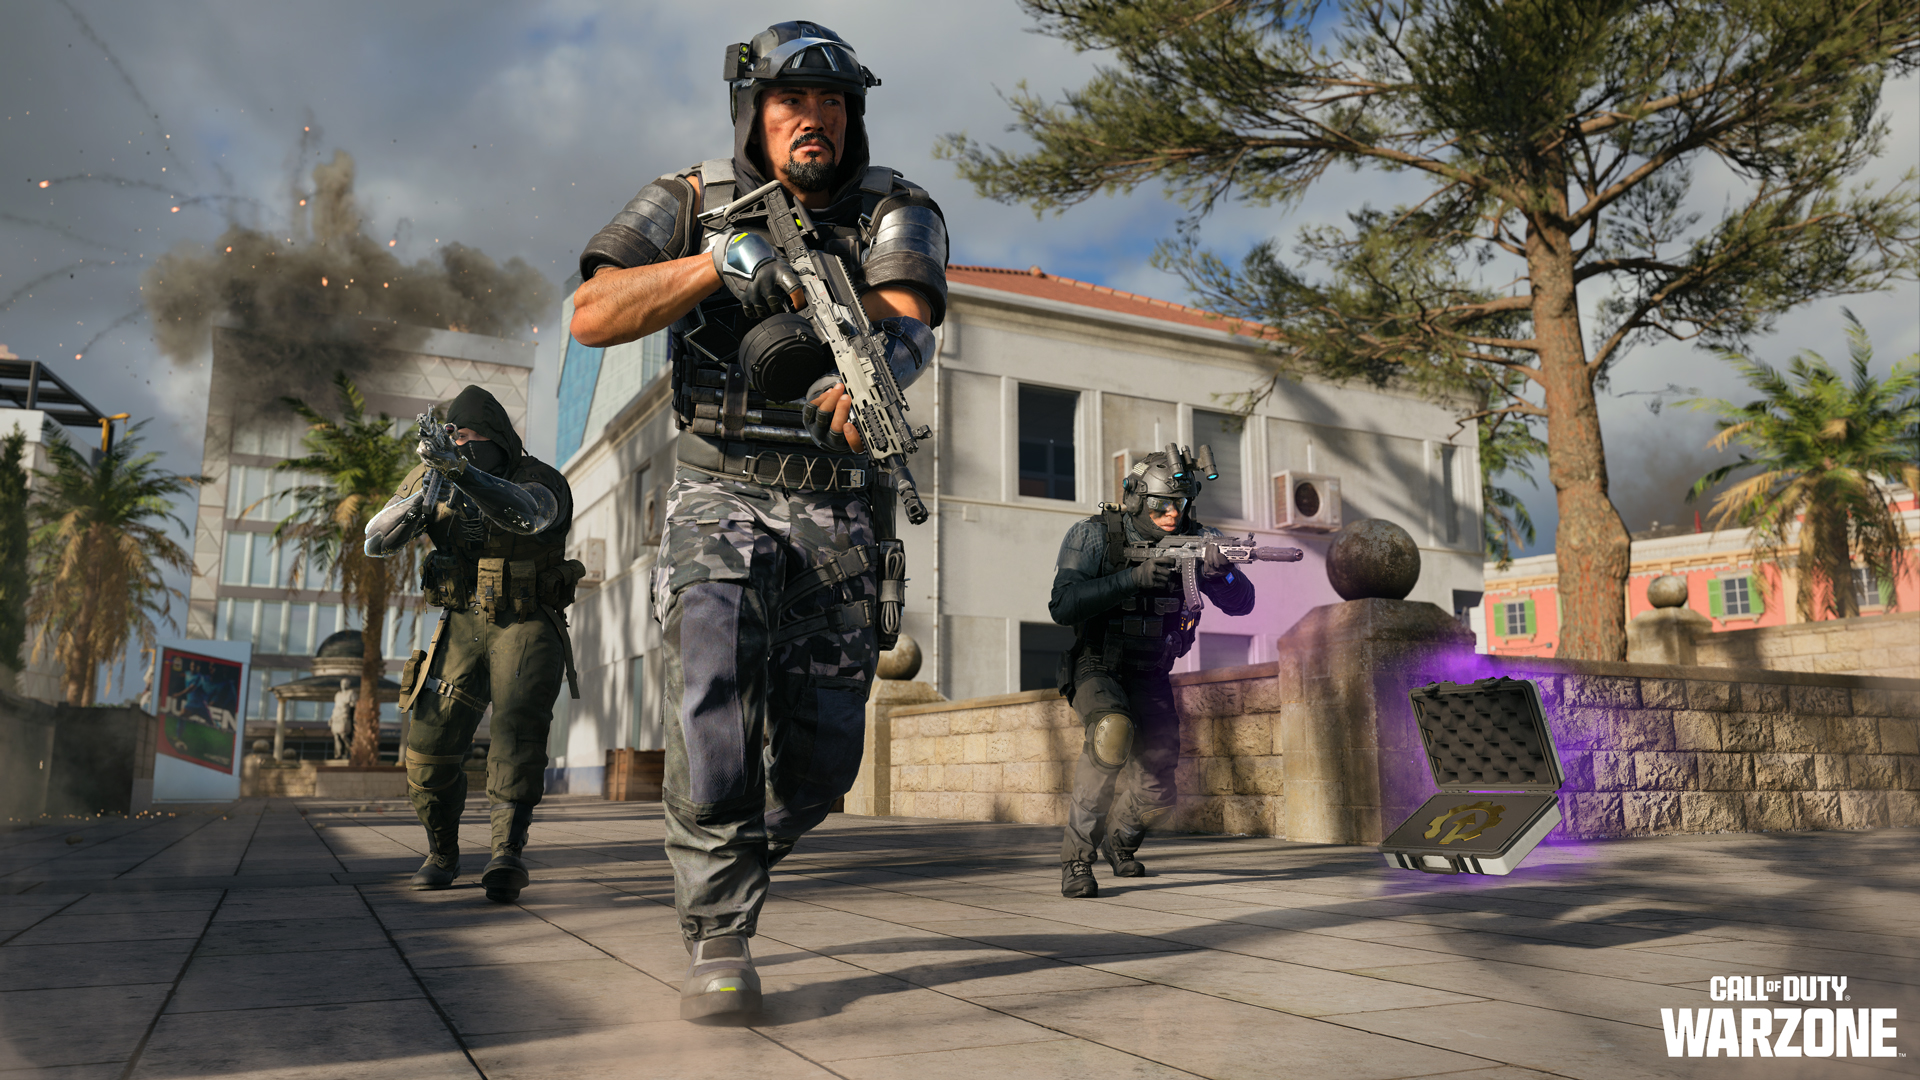
Black Ops Royale Equipment: Arm yourself with a full Blackout-inspired arsenal: carry two types of Equipment at once and use returning favorites like the Grappling Hook, Sensor Dart, and Trauma Kit, plus potent Killstreaks and the Tiered Armor Vest system. Scavenge smartly and deploy the right tool at the right moment to survive.
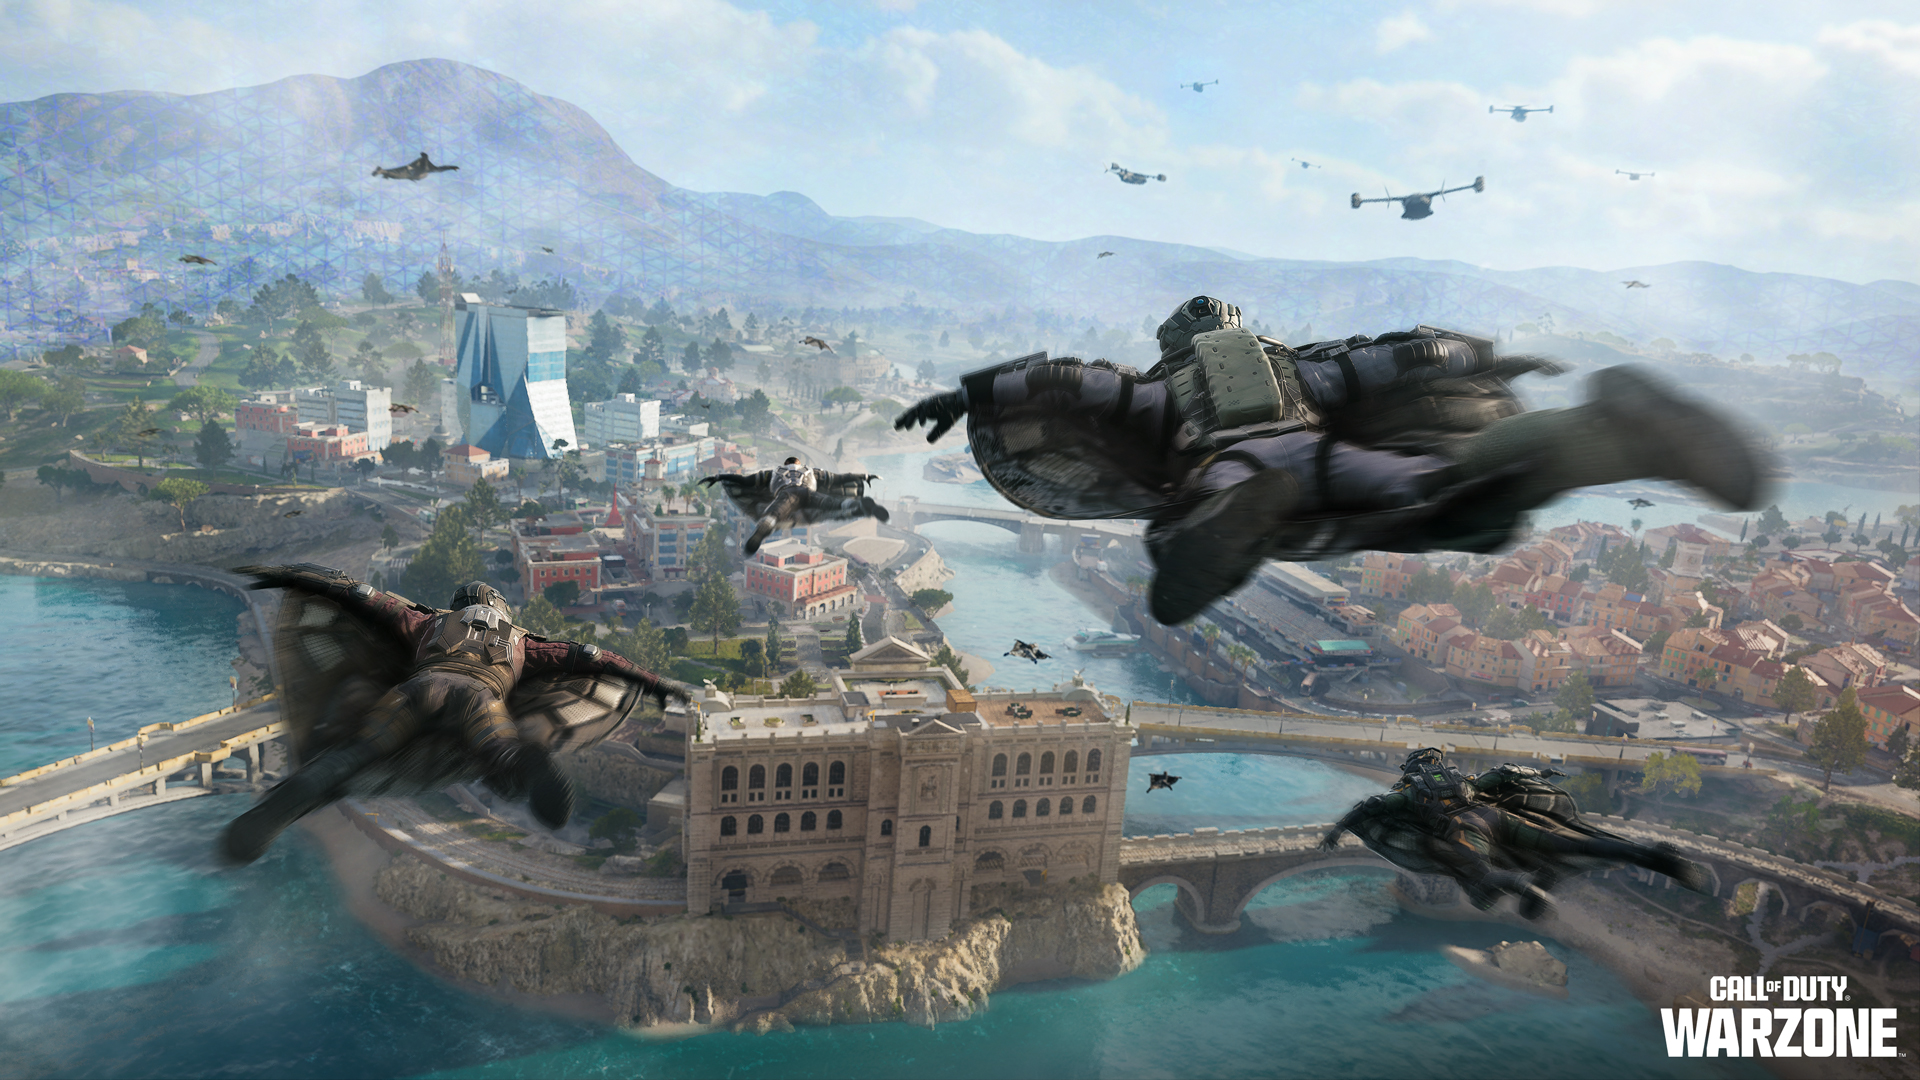
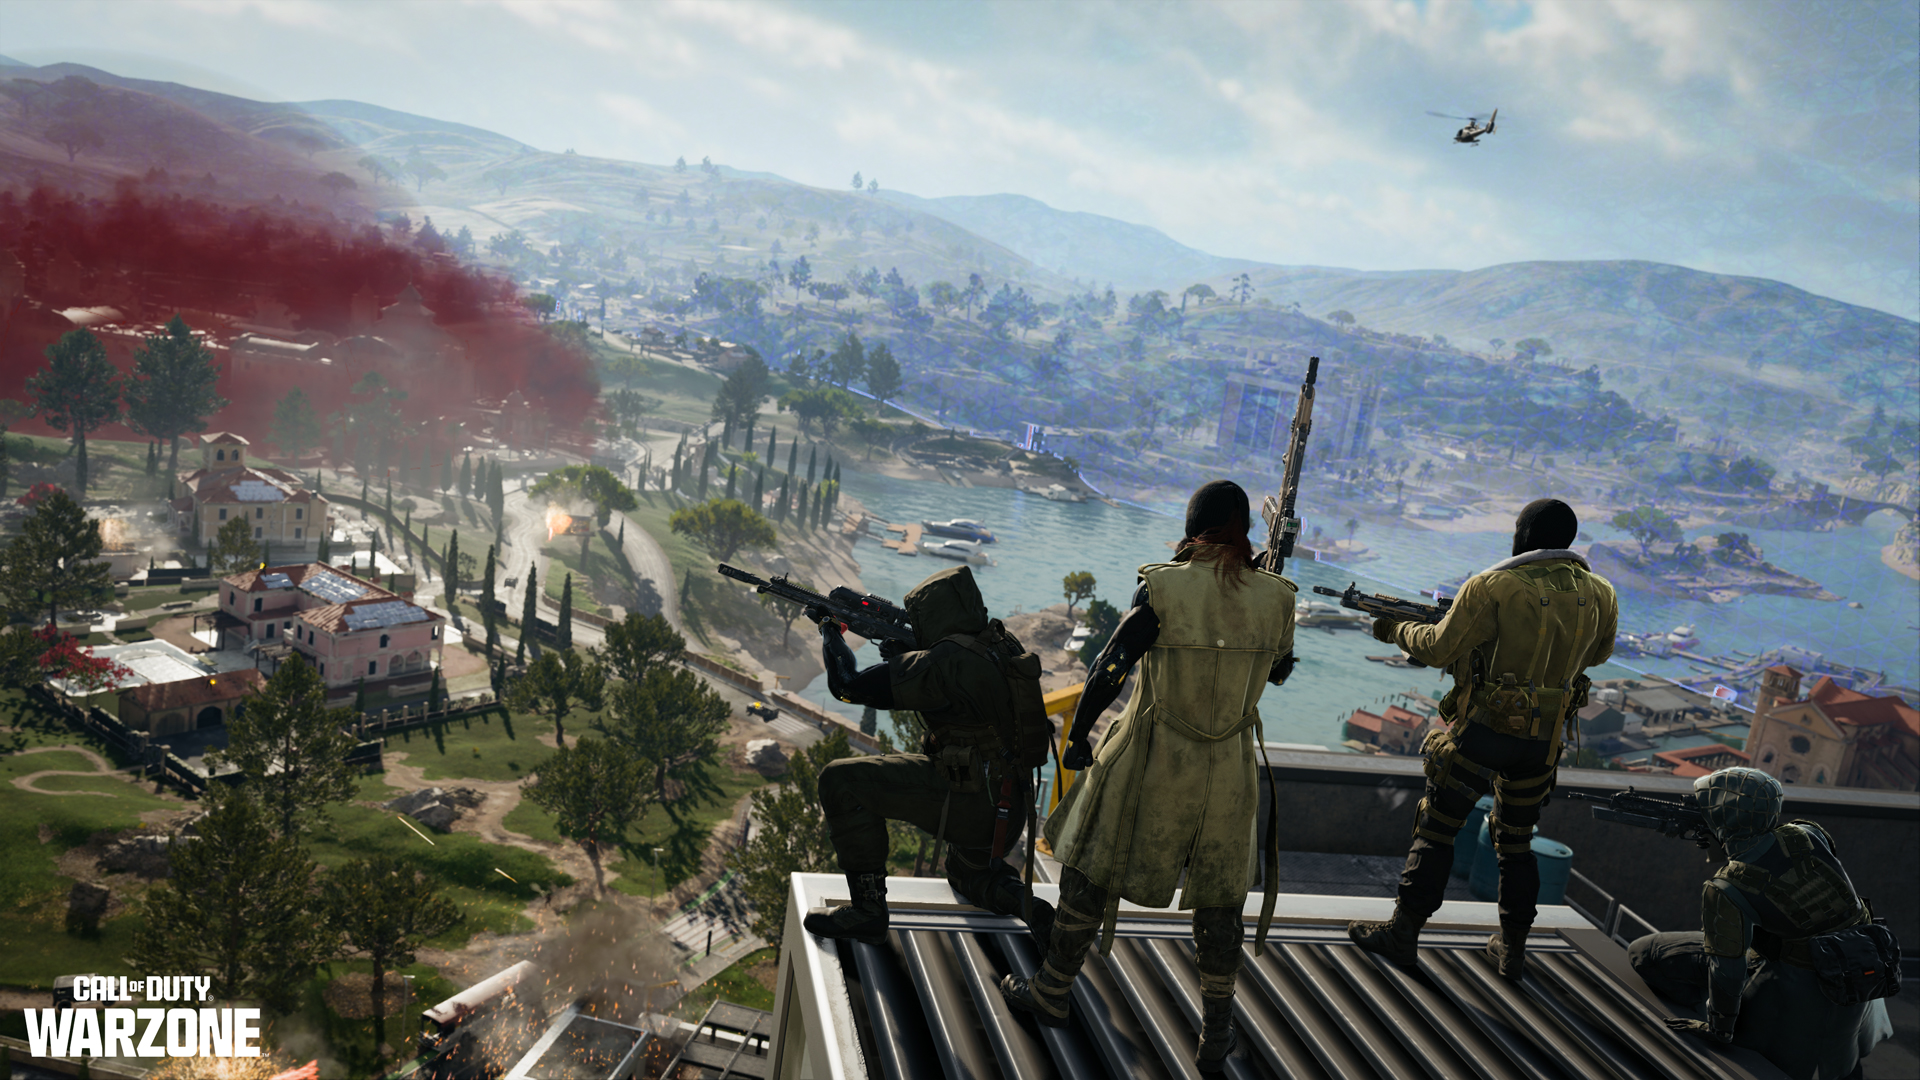
Black Ops Royale Match Features: Black Ops Royale reshapes match flow with wingsuit infil, wall-jumping Omnimovement, swimmable waterways, and crossable tidal flats. No Gulag — redeploy via Tokens or captured Towers. Command land, sea, and air vehicles, outmaneuver rivals, and stay ahead of the ever-closing Collapse.
Activities: Avalon’s optional Activities add to looting with purposeful risk: hunt bounties, crack Strongboxes for Armor, capture Relays for UAV sweeps and redeploys, or fight through Guild defenses for premium rewards. Choose your objective, secure the advantage, and dictate the pace of the match.
Cradle Breaches shroud parts of Avalon in red gas, spawning hallucinated zombie hordes and revealing desirable loot invisible outside the zone. Brave the chaos to face a Mangler Boss or unlock a Mystery Box for the best armor, weaponry, and other top-tier rewards — if you survive.
Integrations and Launch Timing: Black Ops Royale ties directly into Black Ops 7 and Call of Duty: Warzone progression, with exclusive Challenges, Missions, and camo unlocks — plus the cross-mode Counter Skies Event Pass (March 17 – April 2). Earn the Swordfish A1, new Attachments, Operator Skins, and more when the mode launches March 12 at 9PM PT.
“Up to 100 wingsuited players with one goal: be the last team standing. Once you hit the ground, you’ll have to scavenge for weapons and other resources to strategize your survival. In addition to the numerous opponents beware of the collapse which slowly shrinks the area of combat forcing fights to the death. Oh, and don’t forget the zombies…”
– Call of Duty Blog, describing the original Black Ops 4: Blackout, October 12, 2018.
A new big map, and a rebuilt and updated mode inspired by the Call of Duty Battle Royale experience that started it all.
Call of Duty: Warzone players: Welcome to Avalon. And to Black Ops Royale!
Note: Looking for Black Ops 7: Season 02 Reloaded Comms? Expect a new Roadmap and Blog later this week on March 4.
Part 1: Black Ops Royale Tactical Summary

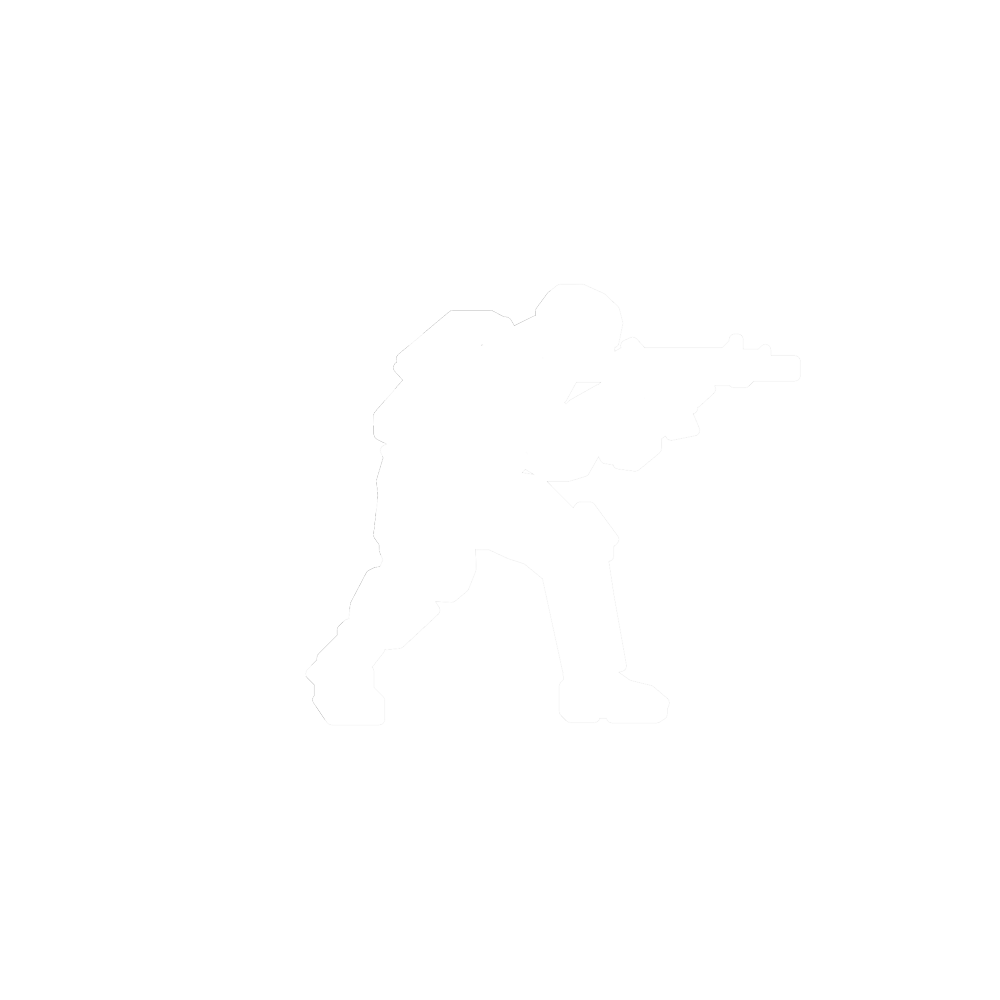
Call of Duty’s original Battle Royale experience returns as Black Ops Royale, bringing the intensity of the original mode to Call of Duty: Warzone, but with modern updates and modifications for a truly Black Ops experience. What follows is an in-depth first look at the gameplay present in Black Ops Royale.
How to Play the Black Ops Royale Way
What is Black Ops Royale?
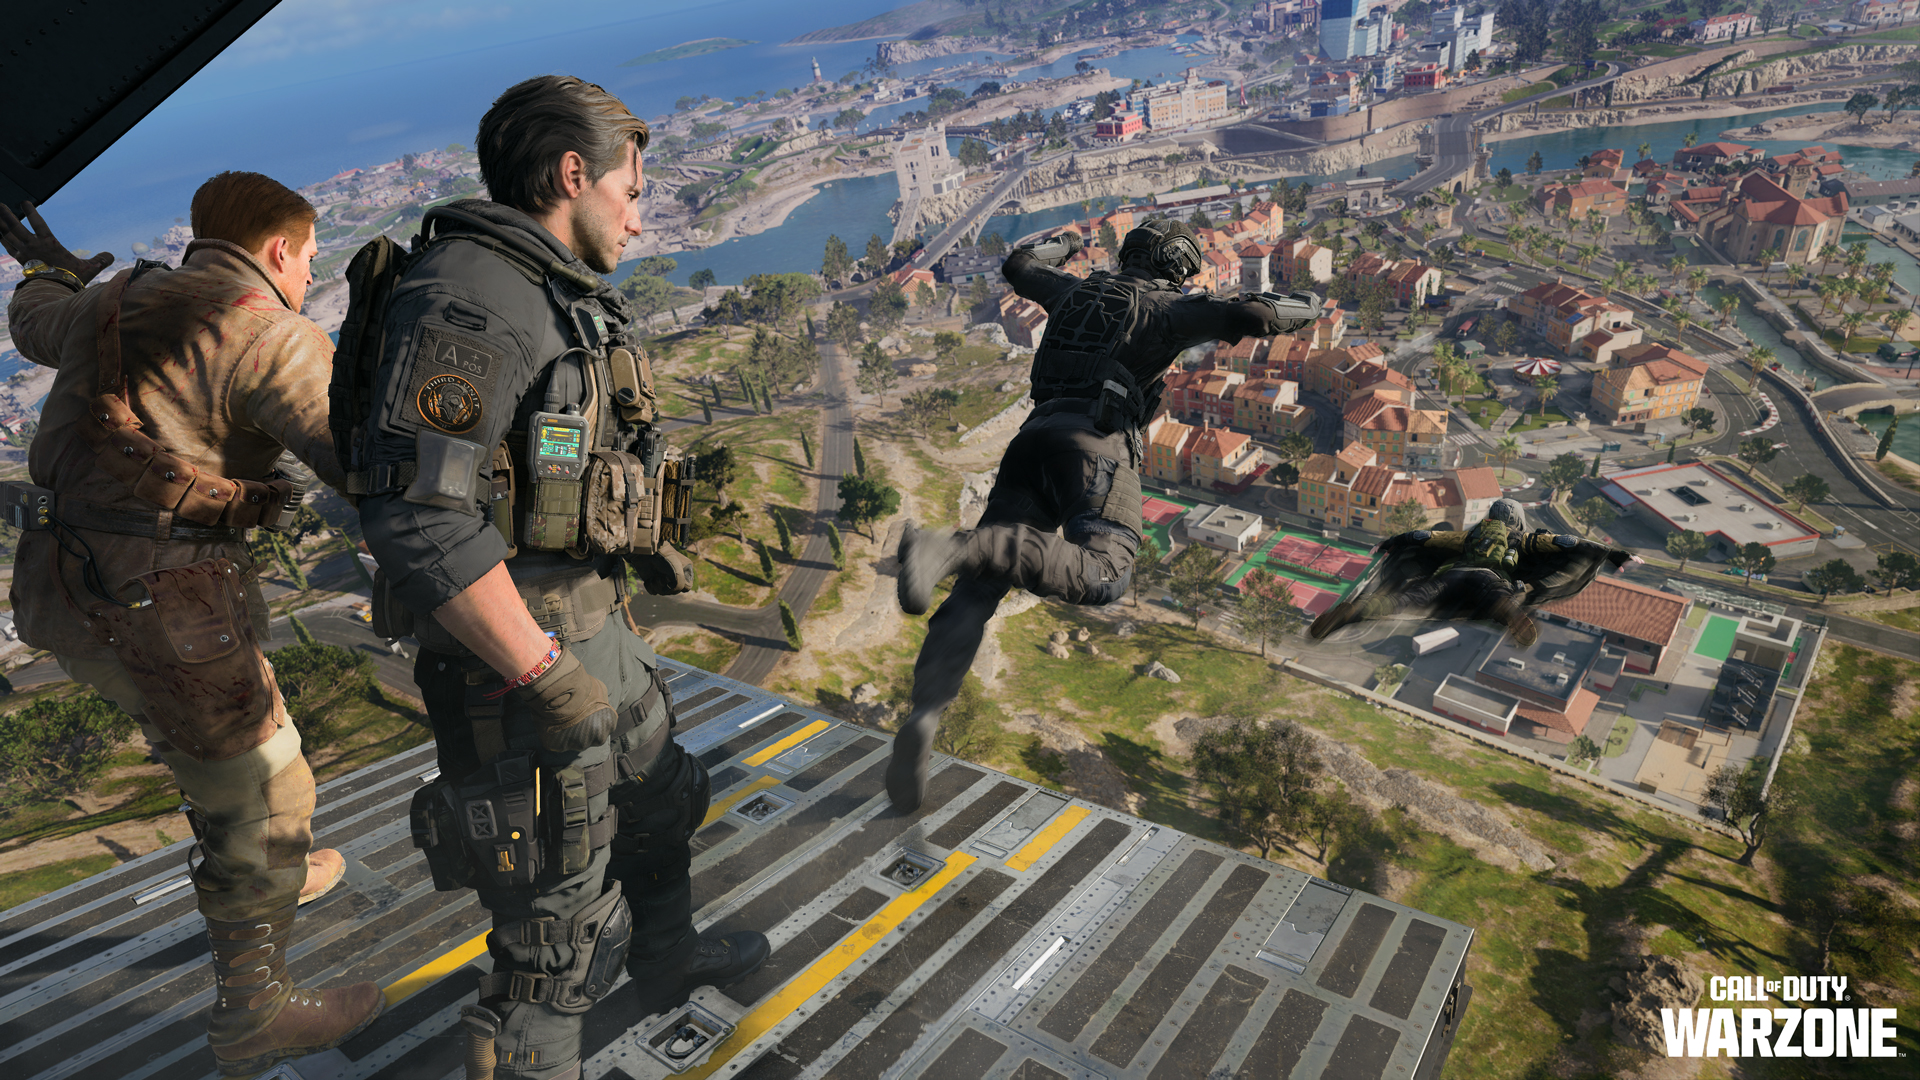
This is a free-to-play Battle Royale experience with new rules influenced by the original Blackout: Black Ops Royale is on a new map with gameplay that rewards scavenging for greater gear and eventual domination of all rival squads. There are clear influences from the core Blackout experience — like bullet drop and weapon handling, as well as the armor system and use of the Trauma Kit — capturing the Blackout pacing, traversal, and combat feel in a modern way. This isn’t a remake; it’s a unique experience that pays homage to the Blackout core gameplay while keeping the flow of a match feeling right for Call of Duty: Warzone players.
How many Players and Squads?
There will be 100 players in 25 Quad teams to begin with, dropping into Avalon, with a visible circle denoting an ever-shrinking perimeter. The location of this electrified boundary shifts to another part of the map at the start of each match to ensure the entire map is playable across games.
What makes this Battle Royale Mode different?
Unlike the usual Call of Duty: Warzone BR modes, there are no Loadouts, with all players beginning on an equal footing. You drop into the fray with only a pistol and a Wingsuit. There are no Buy Stations. There is no Gulag. There is no in-game cash. You’re here to gear up, control the chaos, and annihilate all rivals.
- Gear Up: Seek out critical weapon and armor upgrades. Chase high-tier power wherever it appears.
- Control the Chaos: Cradle Breaches hold unknown threats and unmatched rewards.
- Annihilate All Rivals: Strike fast with the Wingsuit. Convert your arsenal into victory as the last team alive.
How do I Gear Up proficiently?
Find a weapon, Armor, and Equipment from ground loot and Supply Boxes, and be on the lookout for Consumable Perks, as well as equipment to level up your armor.
Each weapon has preset archetypes, and if you find one that fits your playstyle, you can upgrade it using Attachment Kits found in the world, rather than scavenging for individual Attachments. Increasing rarity adds attachments and improves stats, all the way up to Legendary. You immediately feel the impact as you upgrade.
There are both low and high-risk areas to scavenge in; you’re here to earn your way to success. Every match will feel different. There’s no guaranteed path to a specific weapon. You need to adapt to what you find.
What happens if I’m eliminated?
You have two chances to redeploy: either by using a scavenged Redeploy Token allowing you to jump back into the match, or your team can activate a Redeployment Tower.
How do I obtain the best loot?
By successfully scavenging and upgrading your armaments, tactically using Equipment including the Blackout elements integrated into Black Ops Royale, such as the Wingsuit, Grappling Hook, Sensor Dart, RC-XD, Trauma Kit, and both the Perk and Armor systems.
You’re also here to control the chaos and claim high-tier loot in Cradle Breaches, the spiritual successor to Blackout’s zombie zones.
Infil: Scavenge to Survive
Drop into “Operation: Eclipse” from a formation of VTOLs alongside your adversaries with nothing more than a Wingsuit, two plates of attached armor, a knife and a Jäger 45 pistol: This is Blackout-inspired gameplay where scavenging is the key to survival. You’re here to loot with haste before the enemy outplays you. Your first plan is usually obtaining a more powerful weapon.
Big Map Update: Avalon
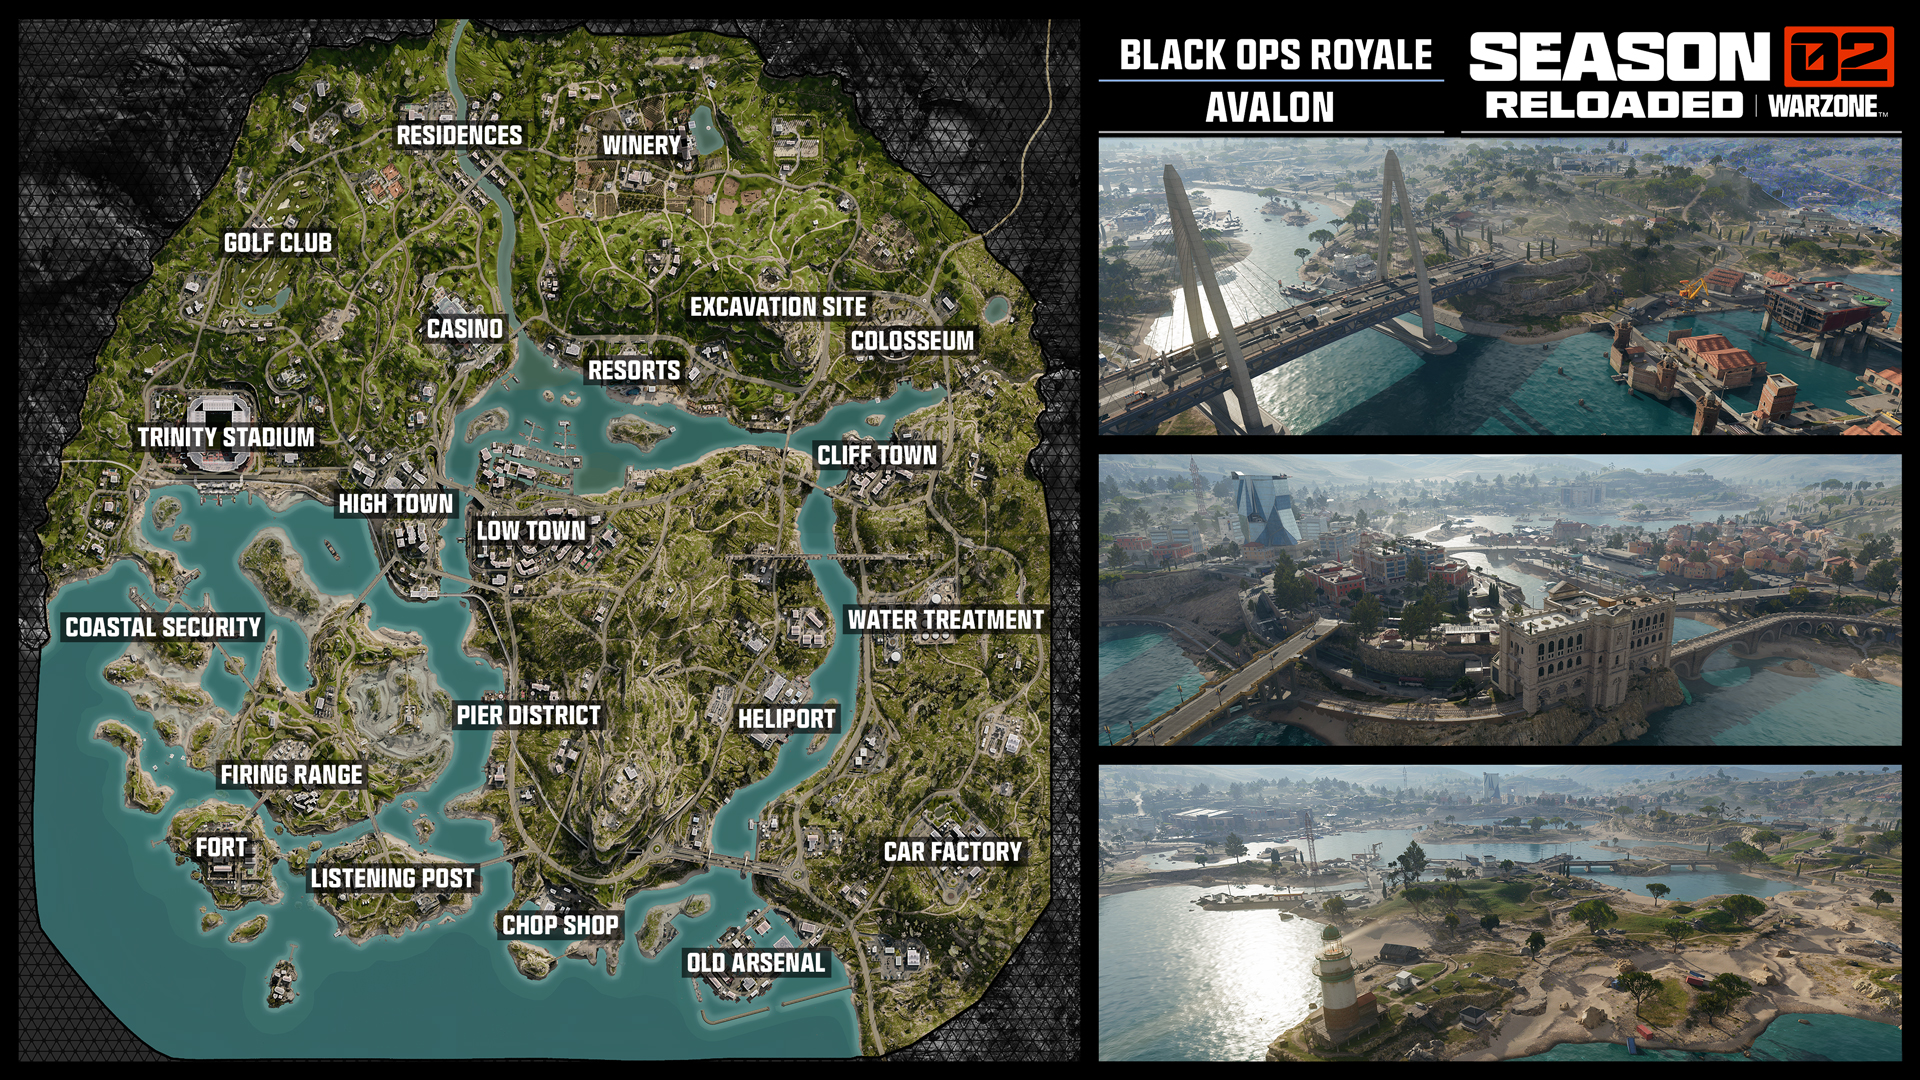
First introduced as the large-scale Endgame map in Call of Duty: Black Ops 7, Avalon is the “Big Map” in Call of Duty: Warzone, expanding the map pool alongside Verdansk, Rebirth Island, and Haven’s Hollow. Avalon’s massive landscape is defined by connected locations and purpose-built combat zones, all taking place without the ominous red fog present in Endgame.
This lets the vibrant and colorful world of Avalon shine, featuring a mix of dense city sectors, tactically diverse interior spaces, exposed routes where faster traversal may be advantageous, and extended sightlines. The team at Treyarch has made efforts to reduce water prevalence in the map, adding sections of exposed sand to connect islands, and new land areas that connect major land masses to streamline player movement for a better Battle Royale gameplay experience.
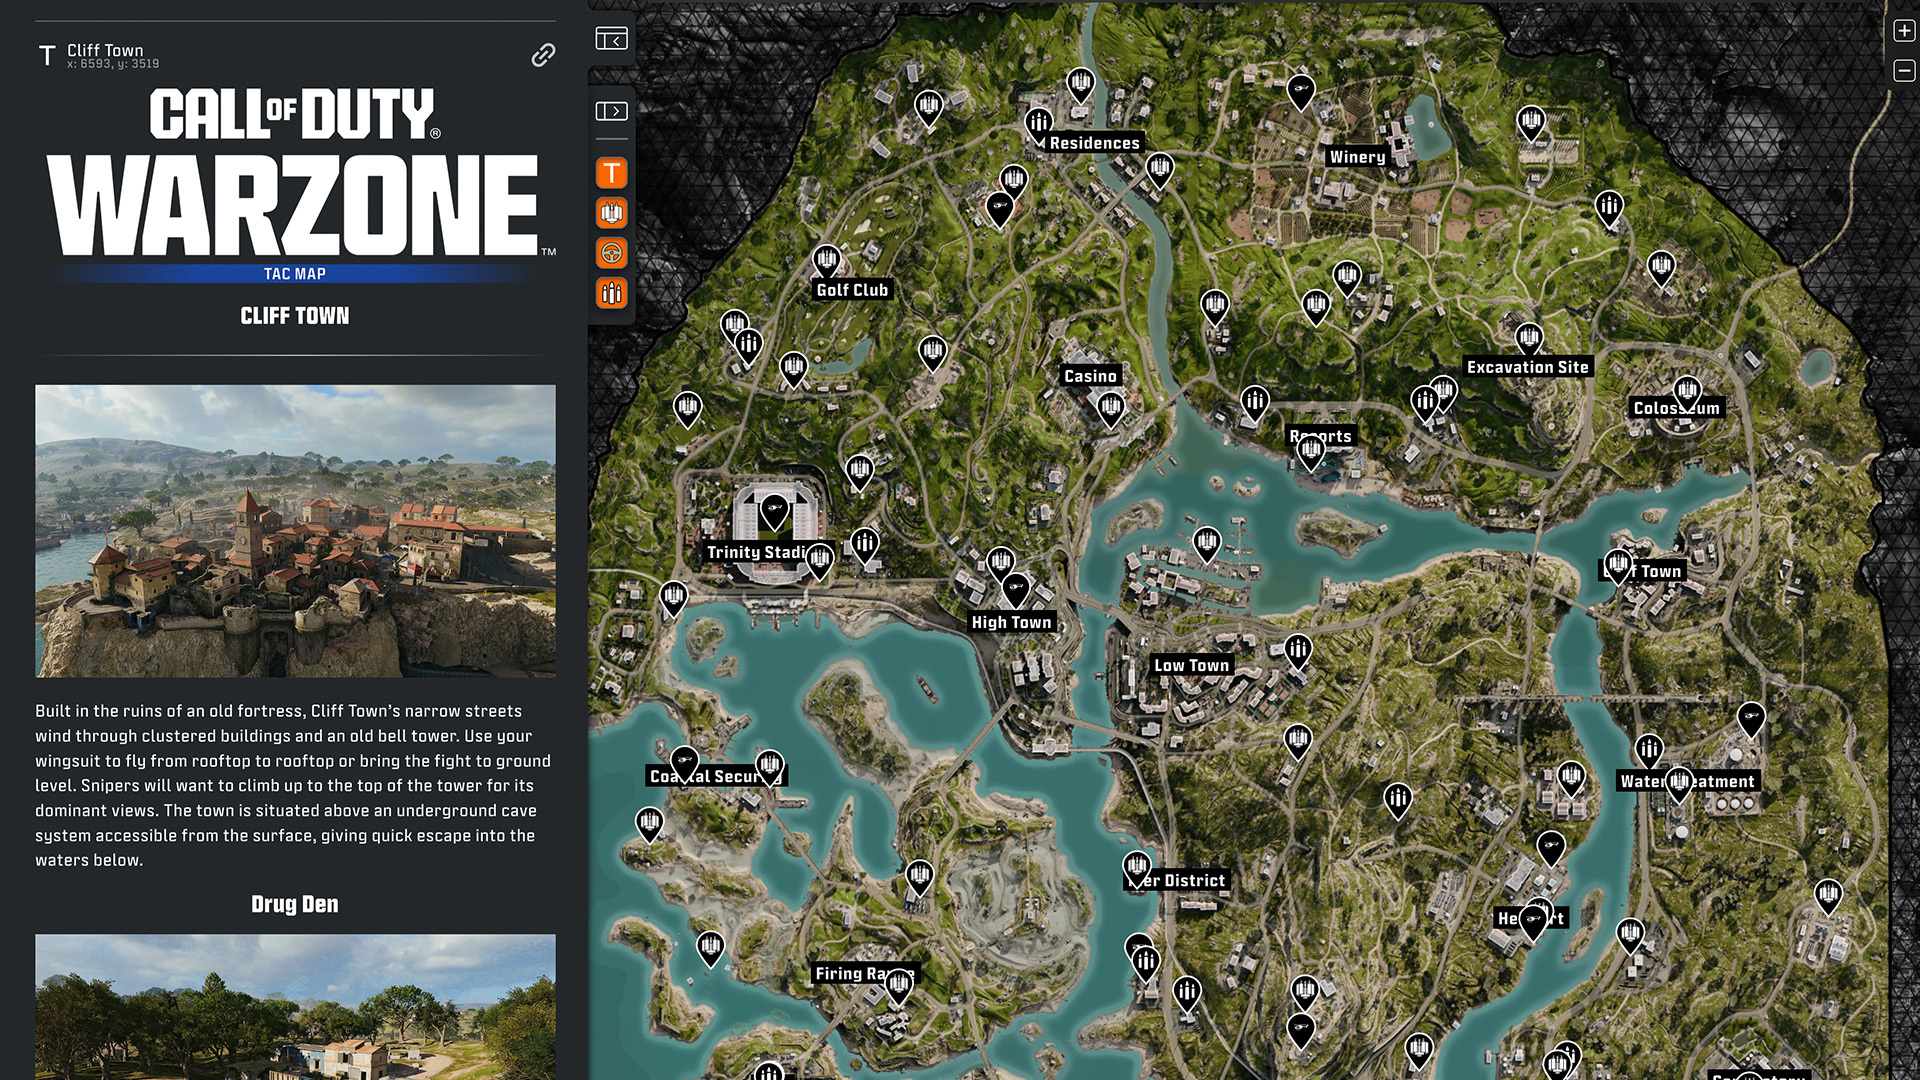
Are you ready to learn the ins and outs of Avalon from the Firing Range to the Excavation Site? Then check out the interactive Black Ops Royale map in the free Tac-Atlas available now, along with the Tour of Avalon Blog.
Part 2: After Infil: Weapons, Archetypes, and Upgrading
Loot and Inventory: No Loadouts. Upgradeable Weapons.
The early game involves a focused search within your drop point for loot — either loose or in Guild-branded or regular supply boxes — securing weapons, armor plates and upgrades, Tacticals, Lethals, Field Upgrades, Killstreaks, and Consumable Perks as you go. All normally looted weapons are from Black Ops 7.
There are two aspects about any weapon you use in this mode that are vitally important to your continued survival:
- The weapon’s Rarity.
- The weapon’s Build Archetype.
Weapon Rarity
As usual, looted weapons have a rarity value, and as you scavenge during the early match, these are predominantly “Common” Rarity (appearing with a gray outline around the weapon before you pick it up and framing the info box on your HUD).
There are five main, color-coded rarity values to a weapon. The rarer the weapon, the more predetermined Attachments there are on the weapon.
- Common (Grey): One Attachment.
- Uncommon (Green): Two Attachments.
- Rare (Blue): Three Attachments.
- Epic (Purple): Four Attachments.
- Legendary (Orange): Five Attachments (maximum for normally secured weapons).
All weapons in Black Ops Royale have already received five predetermined Attachments, each with an easy-to-understand description of what advantage each Attachment gives to that weapon once you pick it up.
All five of the predetermined Attachments appear above the weapon icon in your HUD (and each time you inspect the weapon, check the Tac-Map > Upgrade Path menu, or upgrade the weapon). However, only the Attachments highlighted in this icon are visually fixed to the weapon, and active as you pick it up. The remaining greyed-out Attachments show you how the weapon will be upgraded and are automatically added to the weapon as you increase its Rarity as the match continues.
Attachment Kits: Attachments are predetermined to the weapon you pick up and are not swapped out individually.
This means you increase the Rarity of your weapon — and therefore the number of Attachments you unlock from its predetermined list — as the match progresses by finding and using Attachment Kits. You immediately feel the impact of the upgrade as you find Attachment Kits.
The (optional but recommended) end goal is to utilize a Legendary (Orange) weapon with all five Attachments unlocked.
Initial Details: Weapon Build Archetypes
In Black Ops Royale, the five predetermined Attachments you can fix onto a looted weapon have been bench-tested and designed to perform in a particular way: Every armament is designated for a particular style of play, and the grouping of Attachments match that style of play. This is known as the Weapon Build Archetype.
The Archetype is denoted by a Build Theme that appears above the Weapon name in your HUD.
Build Themes have a narrative-inspired name. Examples include “CQB”, “Raider”, “Covert”, “Viper”, “Heavy Metal”, or “Stalker”. These descriptors allow you to gain an initial understanding of what type of Attachments the gun will have before you read the enhancement description under each individual Attachment.
The more you play Black Ops Royale, the more you’ll learn the weapon build and its specific advantages, so you can look out for a named Build you know suits your playstyle. Or you can consult the table later in this Blog.
The Archetypes you find are constructed to take advantage of a particular weapon’s capabilities. A recommended plan is to pick the one that mimics your style of play.
- Location Randomized: Weapon Builds aren’t locked into a specific supply box or location.
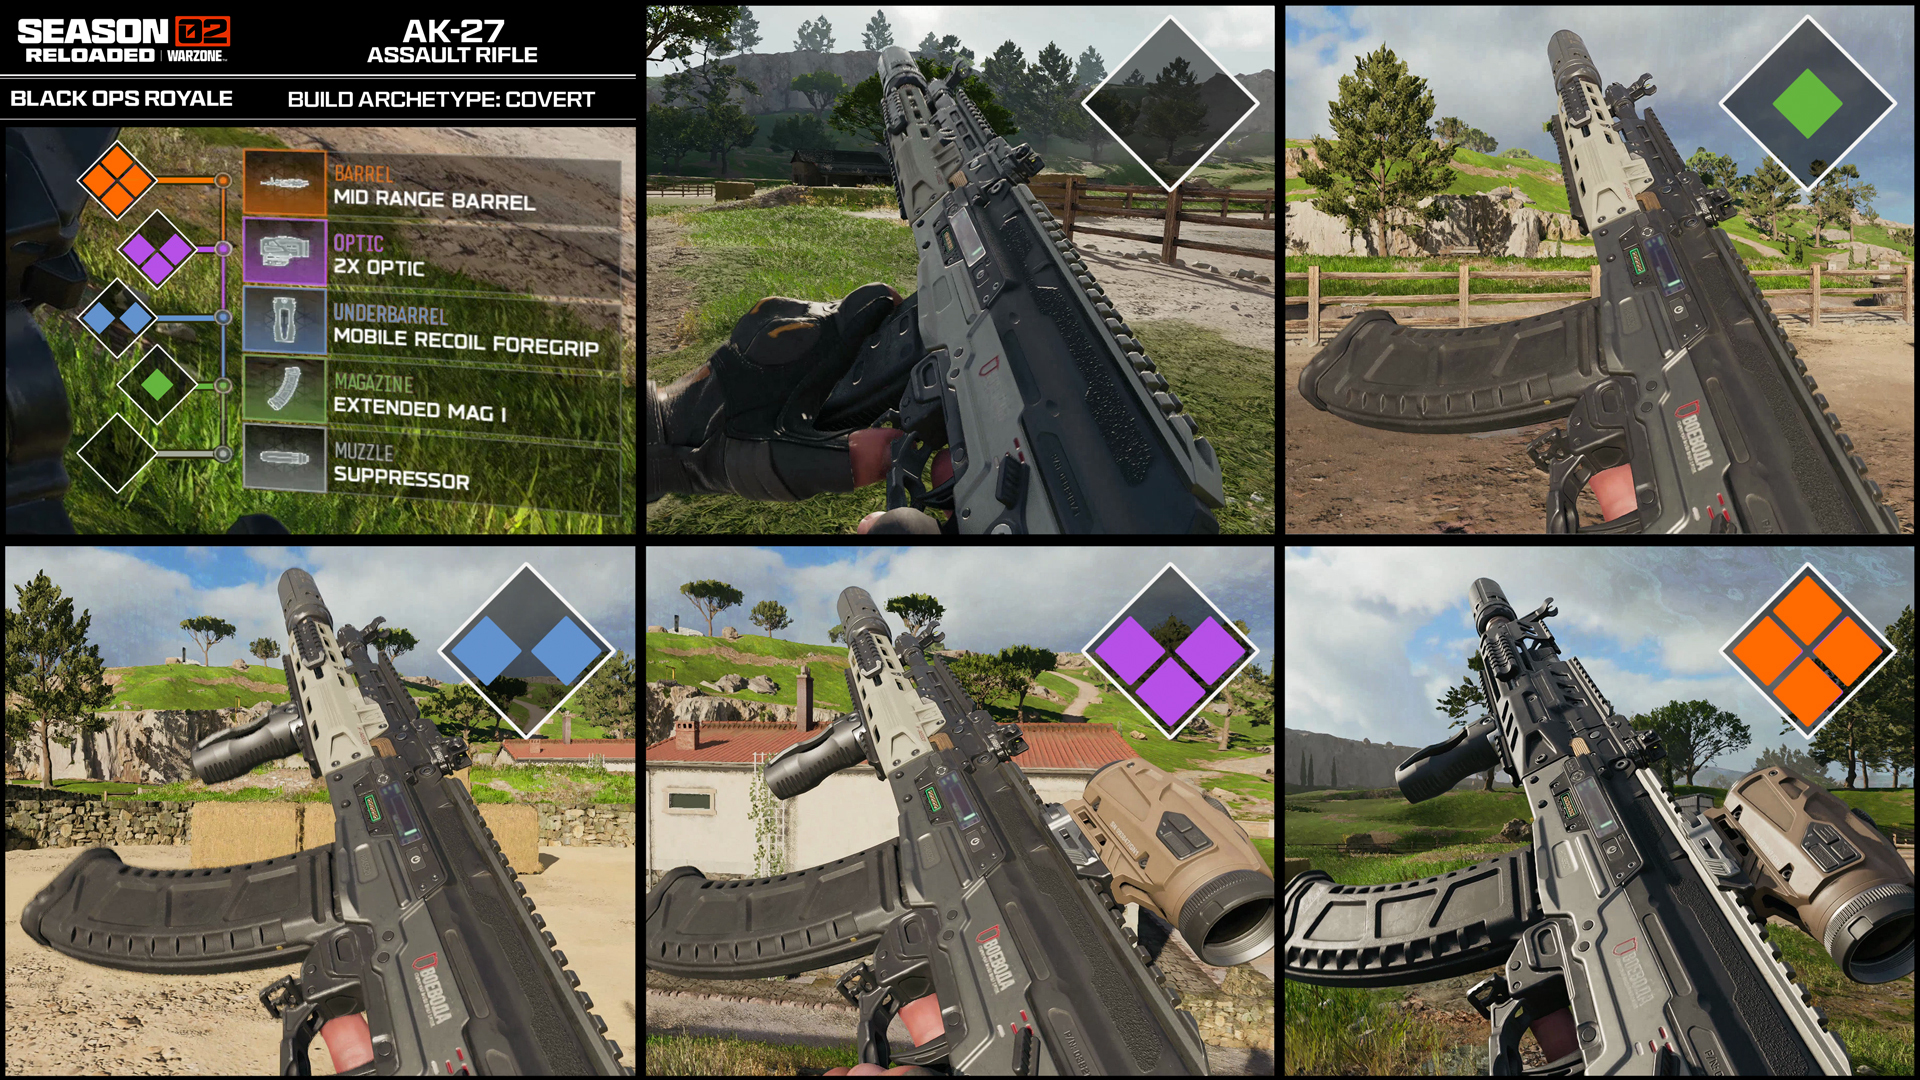
- Example Build: A stealth-focused build — such as the “Covert” Archetype for the AK-27 — focuses on Silencer type and Magazine size but has three other Attachments that complement the Stealth playstyle.
- Attachments Intel: Your HUD displays all the predetermined Attachments you can unlock by upgrading it with Attachment Kits.
- Weapon Choice: While each weapon is locked into an upgrade path, you can still choose between different builds across all Black Ops 7 weapons by finding them across Avalon.
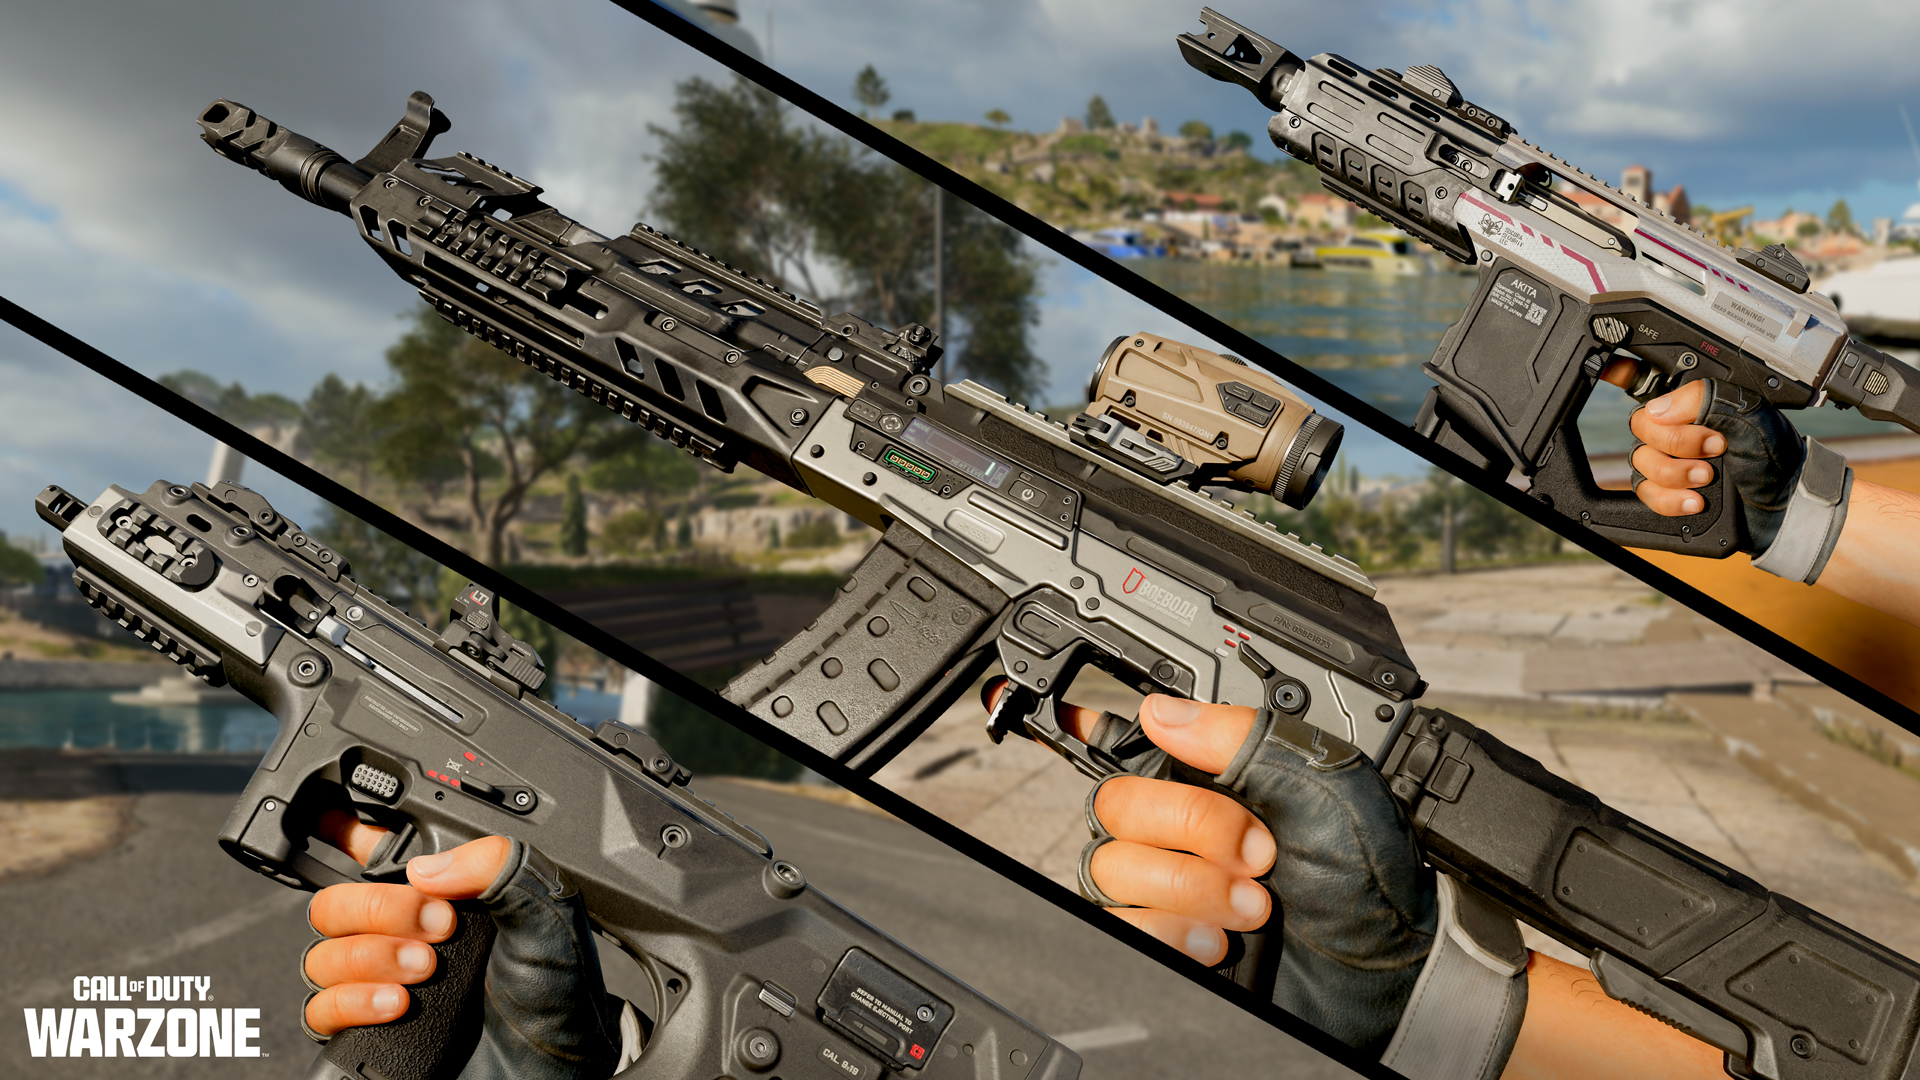
Additional Details: Weapon Attachment Kits
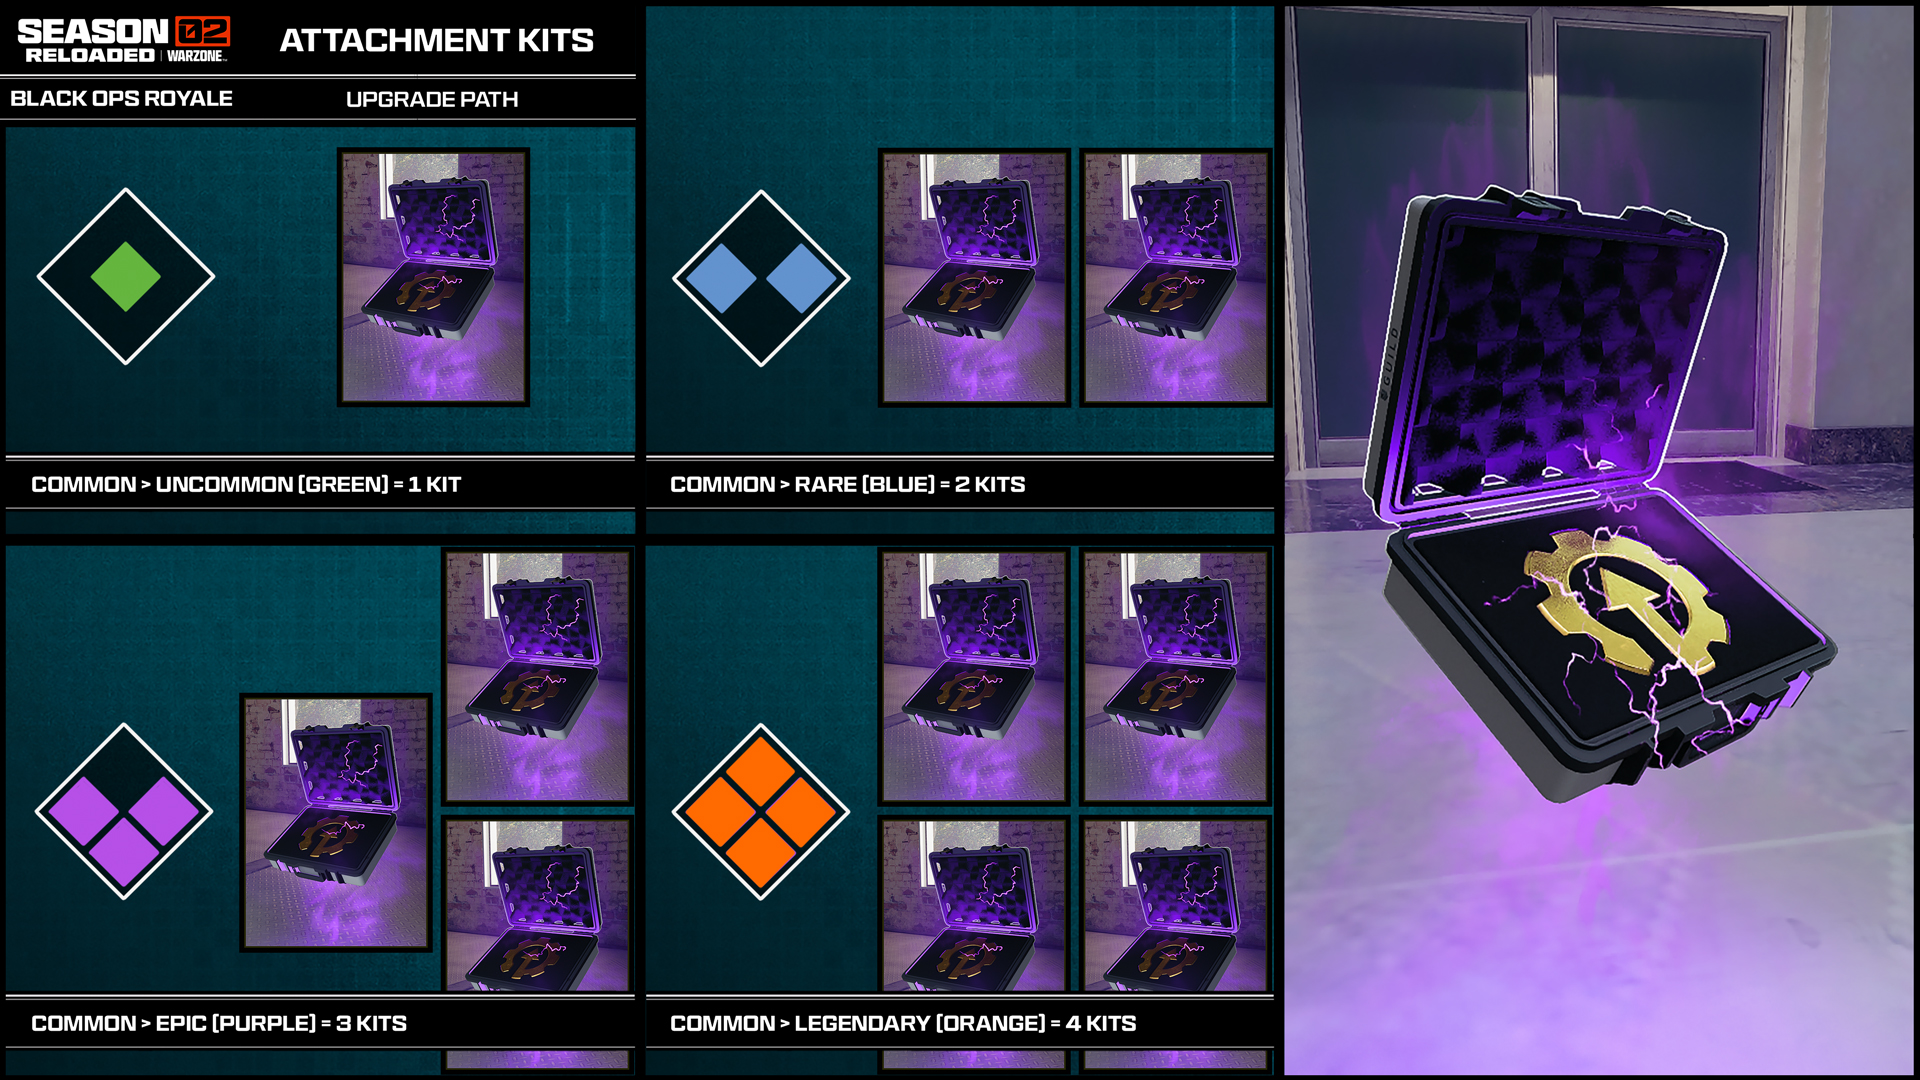
After dropping into Avalon and securing a weapon among the ground loot that matches your playstyle, and you’ve noted the advantages of the five Attachments available to that weapon, it’s time to upgrade! The search is on; focused on Attachment Kits.
- Attachment Kits are found as ground loot, within Supply Boxes, or as Activity rewards are Attachment Kits.
- They are easily spotted due to the purple glow around them.
- Attachment Kits automatically increase the Rarity and add the next Attachment to the weapon.
- The more Attachment Kits you find, the more potent the weapon becomes as the rarity level increases, and more Attachments are automatically unlocked for it.
- If you see an Attachment Kit, grab it while holding the gun you wish to upgrade (which can include your Infil pistol); the Kit immediately adds an Attachment to the weapon you are carrying, and adds a Rarity level to it.
- To fully max out a weapon, secure as many Attachment Kits as you need to allow all five of a weapon’s predetermined Attachments to be used.
- For a Common (Gray) Rarity weapon with one Attachment already available, secure a total of four more Attachment Kits to max it out to Legendary (Orange) status.
Part 3: A Deeper Dive into Weapon Archetypes
Critical Intel: Weapon Archetype Build Themes
Recap: Before we showcase all the Weapon Build Archetypes you can scavenge in Black Ops Royale, let’s recap what we’ve learned so far:
Archetype Themes for Weapon Classes
- Each weapon class (i.e., Assault Rifles, Snipers, LMGs, etc.) features a distinct Archetype Theme (either two or three per class). A Theme is built around playstyles that naturally fit the class. These are listed below.
- Individual weapons within a class will draw from one of the Archetypes. With all of Black Ops 7’s weapon classes, you can expect over 40 Archetype Themes, with over 20 initially available as ground loot, with more added and adjusted during the Season.
- As previously explained, at each rarity tier, weapons gain a new Attachment along a predefined progression path that reinforces the selected Archetype Theme.
- The chosen Attachments have been customized and tuned for each Archetype to deliver impactful benefits you can immediately feel.

Global Class Benefits
- In addition to the Archetype Attachment benefits, weapons gain general Global Class Benefits at every rarity tier after Common (Grey).
- Global Class Benefits apply regardless of the individual Archetype Theme and consistently Stack at each rarity tier, starting at Uncommon (Green).
A Note on Recoil: Fully automatic weapons feature increased recoil at Common (Grey) rarity compared to the same weapons in other Call of Duty: Warzone modes. Upgrade these using Attachment Kits to improve this recoil and increase the potency of these weapons.
A Note on Bullet Velocity (and Bullet Drop): In addition to the Global Weapon Class Benefits you receive as you upgrade a weapon, expect bullet drop to significantly improve for all weapons at two specific rarity levels:
- For most gun types, you will experience decreased Bullet Drop and increased Bullet Velocity at Rare (Blue) and Legendary (Orange) levels.
- For Sniper Rifles, you will experience decreased Bullet Drop and increased Bullet Velocity at Uncommon (Green) and Epic (Purple) rarity levels.
Bullet Velocity and Bullet Drop upgrades will be noticeable during your match.
Study the following lists and tables, as they show the Global Class Benefits, and the Archetype Build Themes of all weapons available as ground loot.
Black Ops Royale: Global Weapon Class Benefits
Each Weapon Class has a set of Class bonuses applied to it at Uncommon (Green) Rarity. These stack as you upgrade your chosen weapon to a higher rarity. This means a fully upgraded (Legendary/Orange) weapon would stack the following benefits four times:
- No Benefits at Common Rarity (Grey).
- One set of Benefits at Uncommon Rarity (Green), as shown below.
- Two sets of Benefits stacked Rare Rarity (Blue).
- Three sets of Benefits stacked at Epic Rarity (Purple).
- Four sets of Benefits stacked at Legendary Rarity (Orange).
All statistical increases are based on improvements from the Common (Grey) version of the weapon and may not reflect the weapon as used in other Call of Duty: Warzone modes. Use the following Global Class Benefits to pick weapons that work with your preferred playstyle. Note that the three “+” signs next to the benefit indicate the following, and all specific percentages are subject to adjustment:
- “+” = Very Minor benefit (around 5%)
- “++” = Minor benefit (around 10%)
- “+++” = Moderate benefit (around 15%)
Assault Rifles: Global Benefits (at Uncommon Rarity)
- ++% Horizontal & Vertical Recoil Control
- ++% Faster Reload Speed
Submachine Guns: Global Benefits (at Uncommon Rarity)
- ++% Horizontal & Vertical Recoil Control
- ++% Faster Reload Speed
Shotguns: Global Benefits (at Uncommon Rarity)
- +% Better Hipfire Spread
- +% Better ADS Spread
- ++% Faster Reload Speed
Light Machineguns: Global Benefits (at Uncommon Rarity)
- ++% Horizontal & Vertical Recoil Control
- ++% Faster Reload Speed
Marksman Rifles: Global Benefits (at Uncommon Rarity)
- ++% Horizontal & Vertical Recoil Control
- ++% Faster Reload Speed
- ++% Improved Aiming Idle Sway
Sniper Rifles: Global Benefits (at Uncommon Rarity)
- +% Faster Rechambering Speed
- ++% Improved Aiming Idle Sway
- +++% Improved Flinch Resistance
Pistols: Global Benefits (at Uncommon Rarity)
(Usually the Jäger 45 you are equipped with at Infil)
- ++% Faster Reload Speed
Black Ops Royale: Weapon Archetype Themes
At the most basic level, each Weapon has its own basic handling characteristics that are distinct from one another. For example, a base EGRT-17 AR handles in a different way compared to a base Peacekeeper Mk1 AR. You should already have a preferred weapon based on playing other modes. With Black Ops Royale, you can scavenge for an Archetype of that weapon. Here are the available Archetype Themes, followed by more detailed explanations and general stats that increase when using and upgrading that Archetype:
Assault Rifles
Expect the following Archetypes*:
- M15 MOD 0: CQB, Recon
- AK-27: Covert, Recon
- MXR-17: Covert, Recon
- DS20 Mirage: CQB, Covert
- Peacekeeper Mk1: CQB, Covert
- Maddox RFB: Covert, Recon
- EGRT-17: CQB, Recon
Submachine Guns
Expect the following Archetypes*:
- Ryden 45K: Burner, Stalker
- Razor 9mm: Burner, Stalker
- Dravec 45: Stalker, Mantis
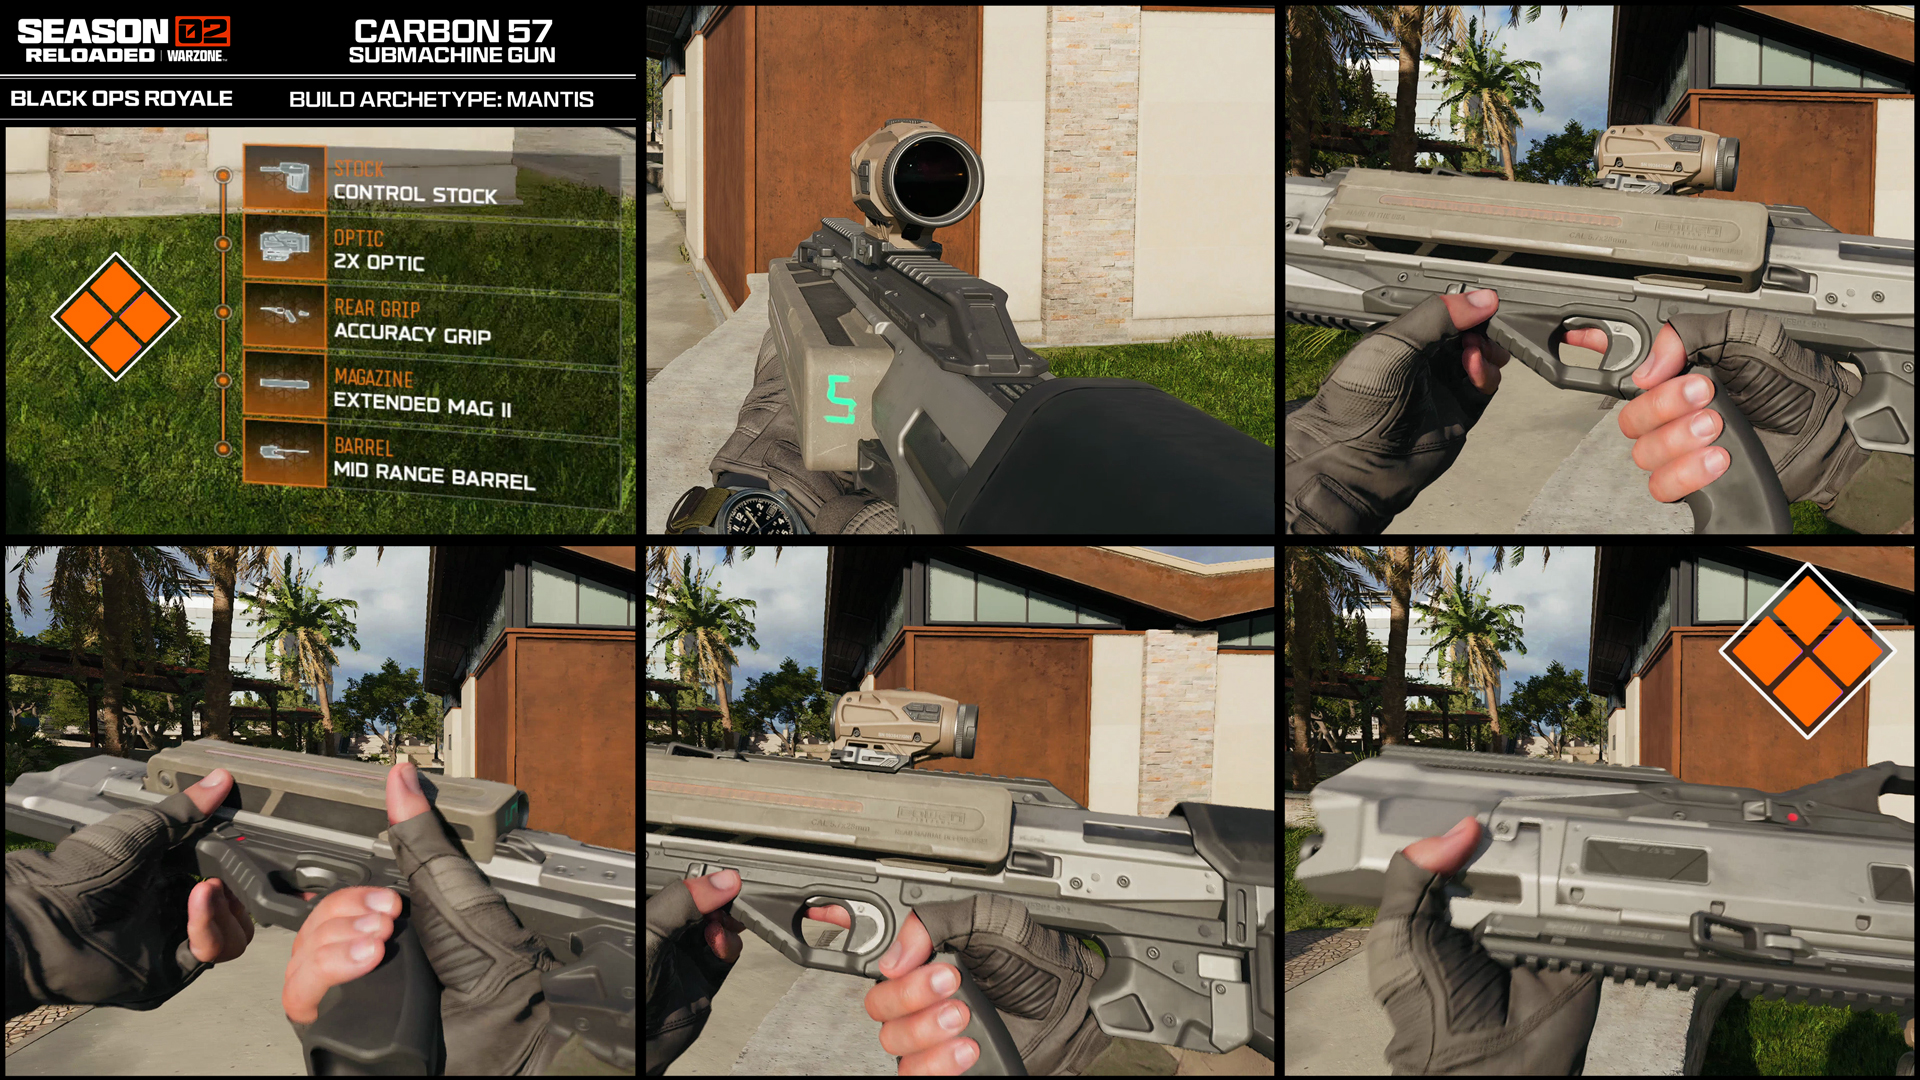
- Carbon 57: Stalker, Mantis
- Sturmwolf: Stalker, Mantis
- Kogot-7: Burner, Stalker
- REV-46: Burner, Stalker
Shotguns
Expect the following Archetypes*:
- M10 Breacher: Raider, Bug Out
- Echo 12: Raider, Striker
Light Machineguns
Expect the following Archetypes*:
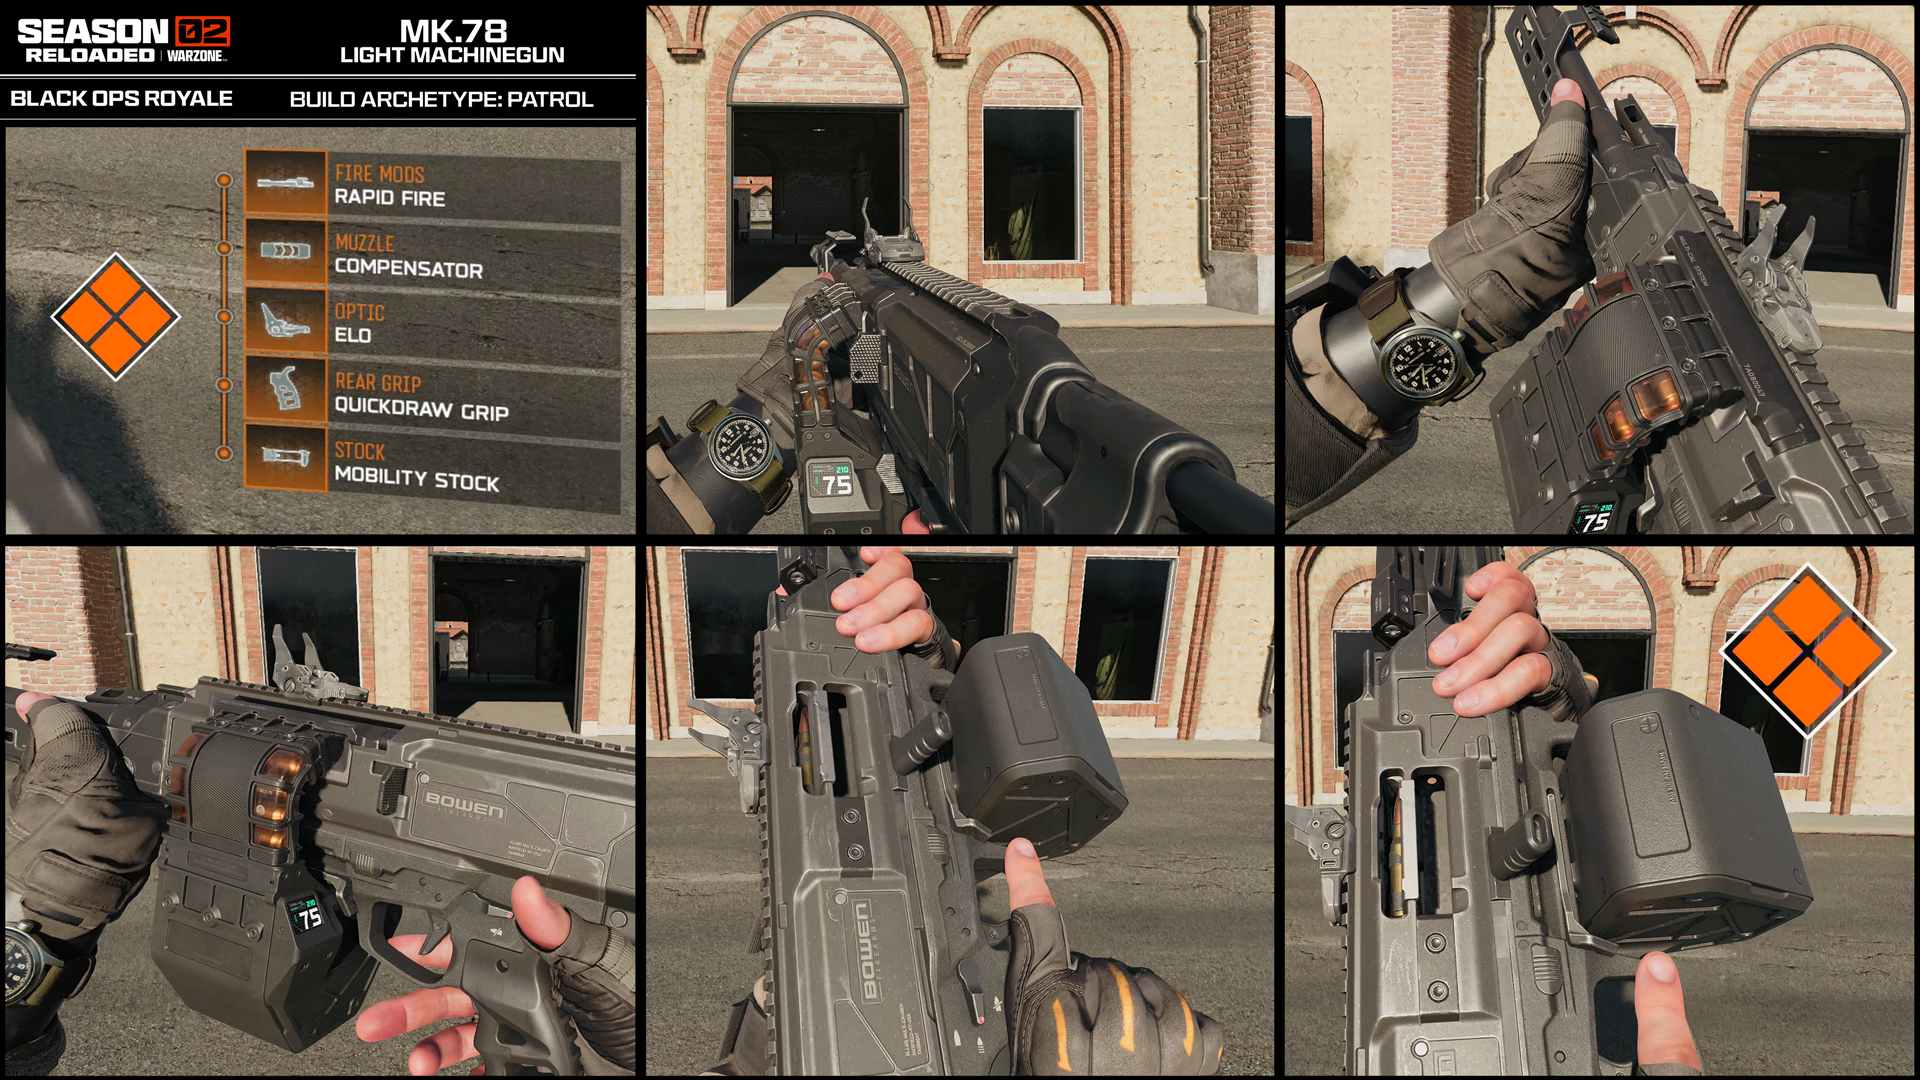
- MK.78: Heavy Metal, Patrol
- XM325: Heavy Metal, Patrol
- Sokol 545: Heavy Metal, Lockdown
Marksman Rifles
Expect the following Archetypes*:
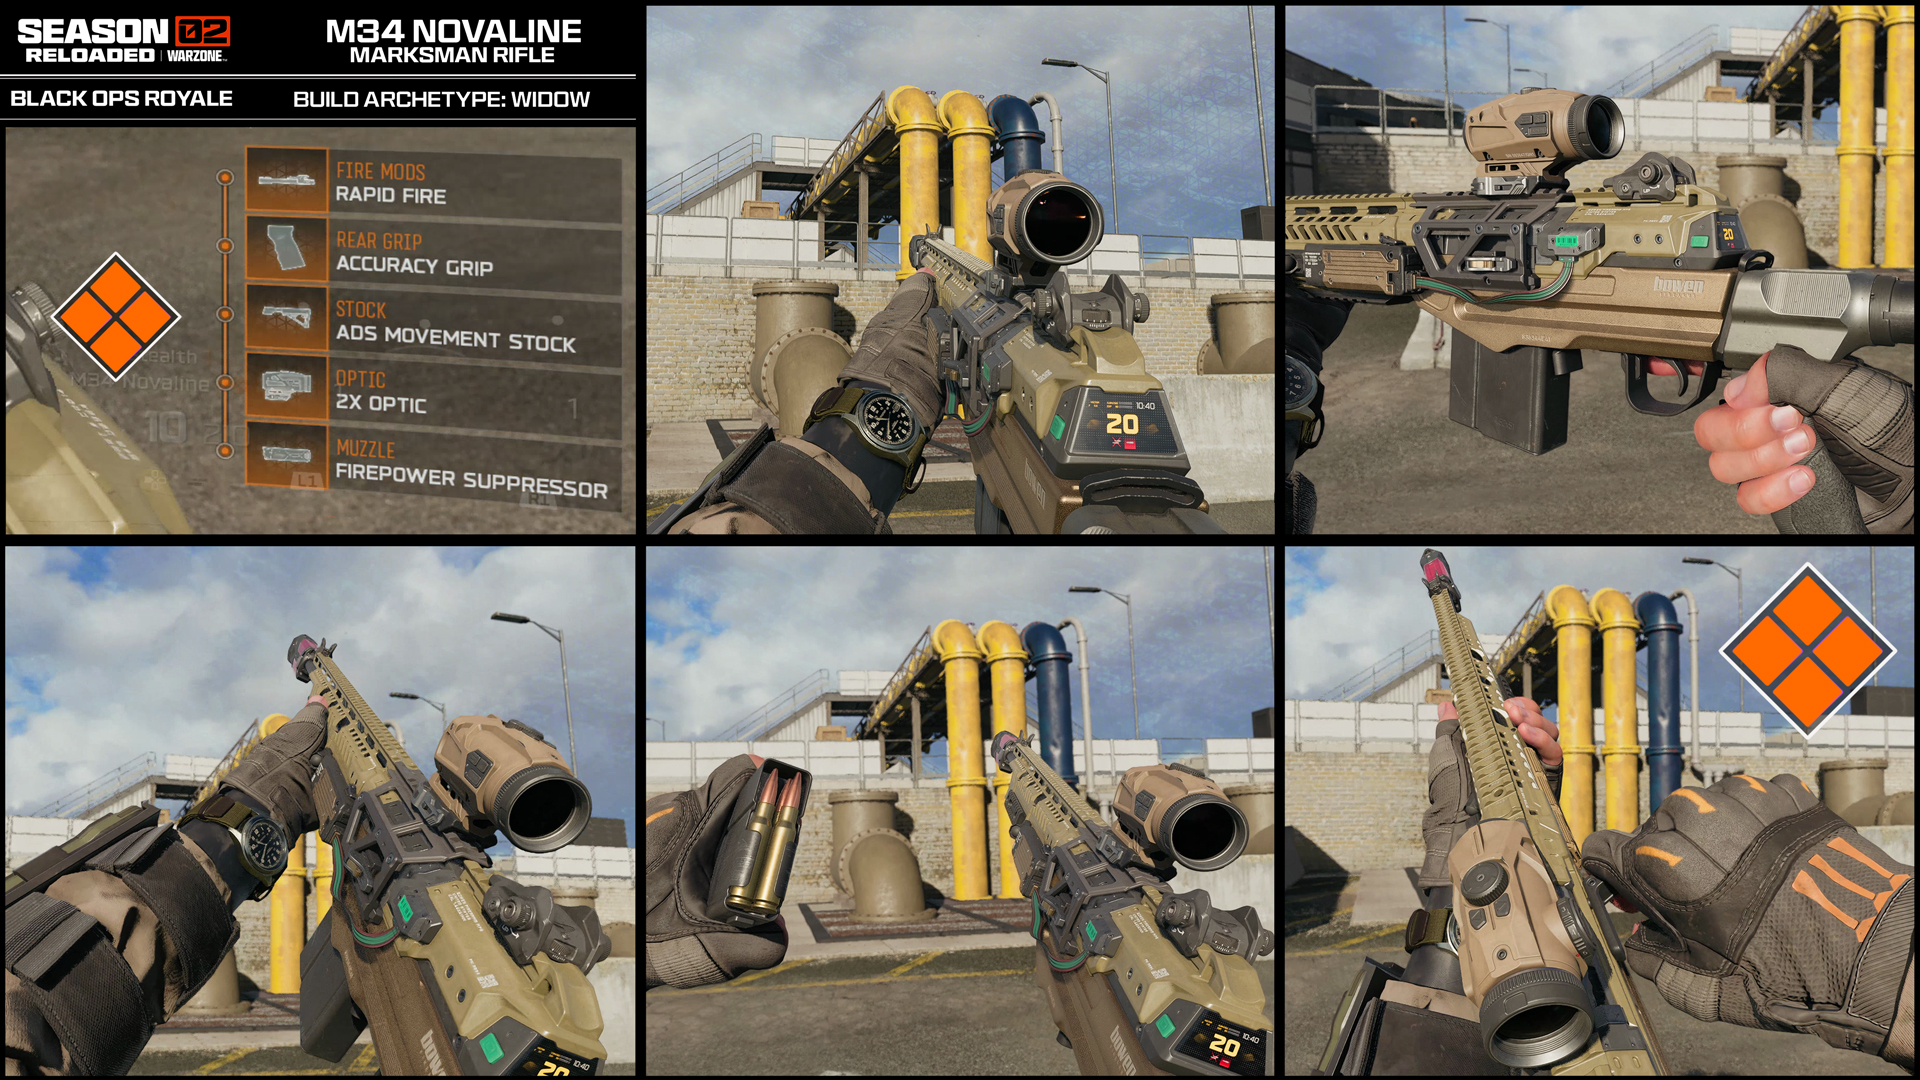
- M34 Novaline: Scout, Widow
Sniper Rifles
Expect the following Archetypes*:
- VS Recon: Viper
- Hawker HX: Redacted
Pistols
Expect the following Archetypes*:
- Jäger 45: CQB
- Coda 9: Akimbo
- Velox 5.7: Sentinel
Launchers, Specials and Melee
While Launchers and other weaponry is in Black Ops Royale, they do not feature Archetype Themes. Note that your Infil Pistol can be upgraded as well.
(* Weapons found in Ground Loot will be constantly adjusted as the Season progresses. Therefore, you may not find certain listed weapons or Archetype Themes until later in the Season).
The following Archetype Themes, along with playstyle descriptions, are planned to be available, though some Themes and Weapons will become accessible as the Season progresses:
Assault Rifle Archetype Themes (3)
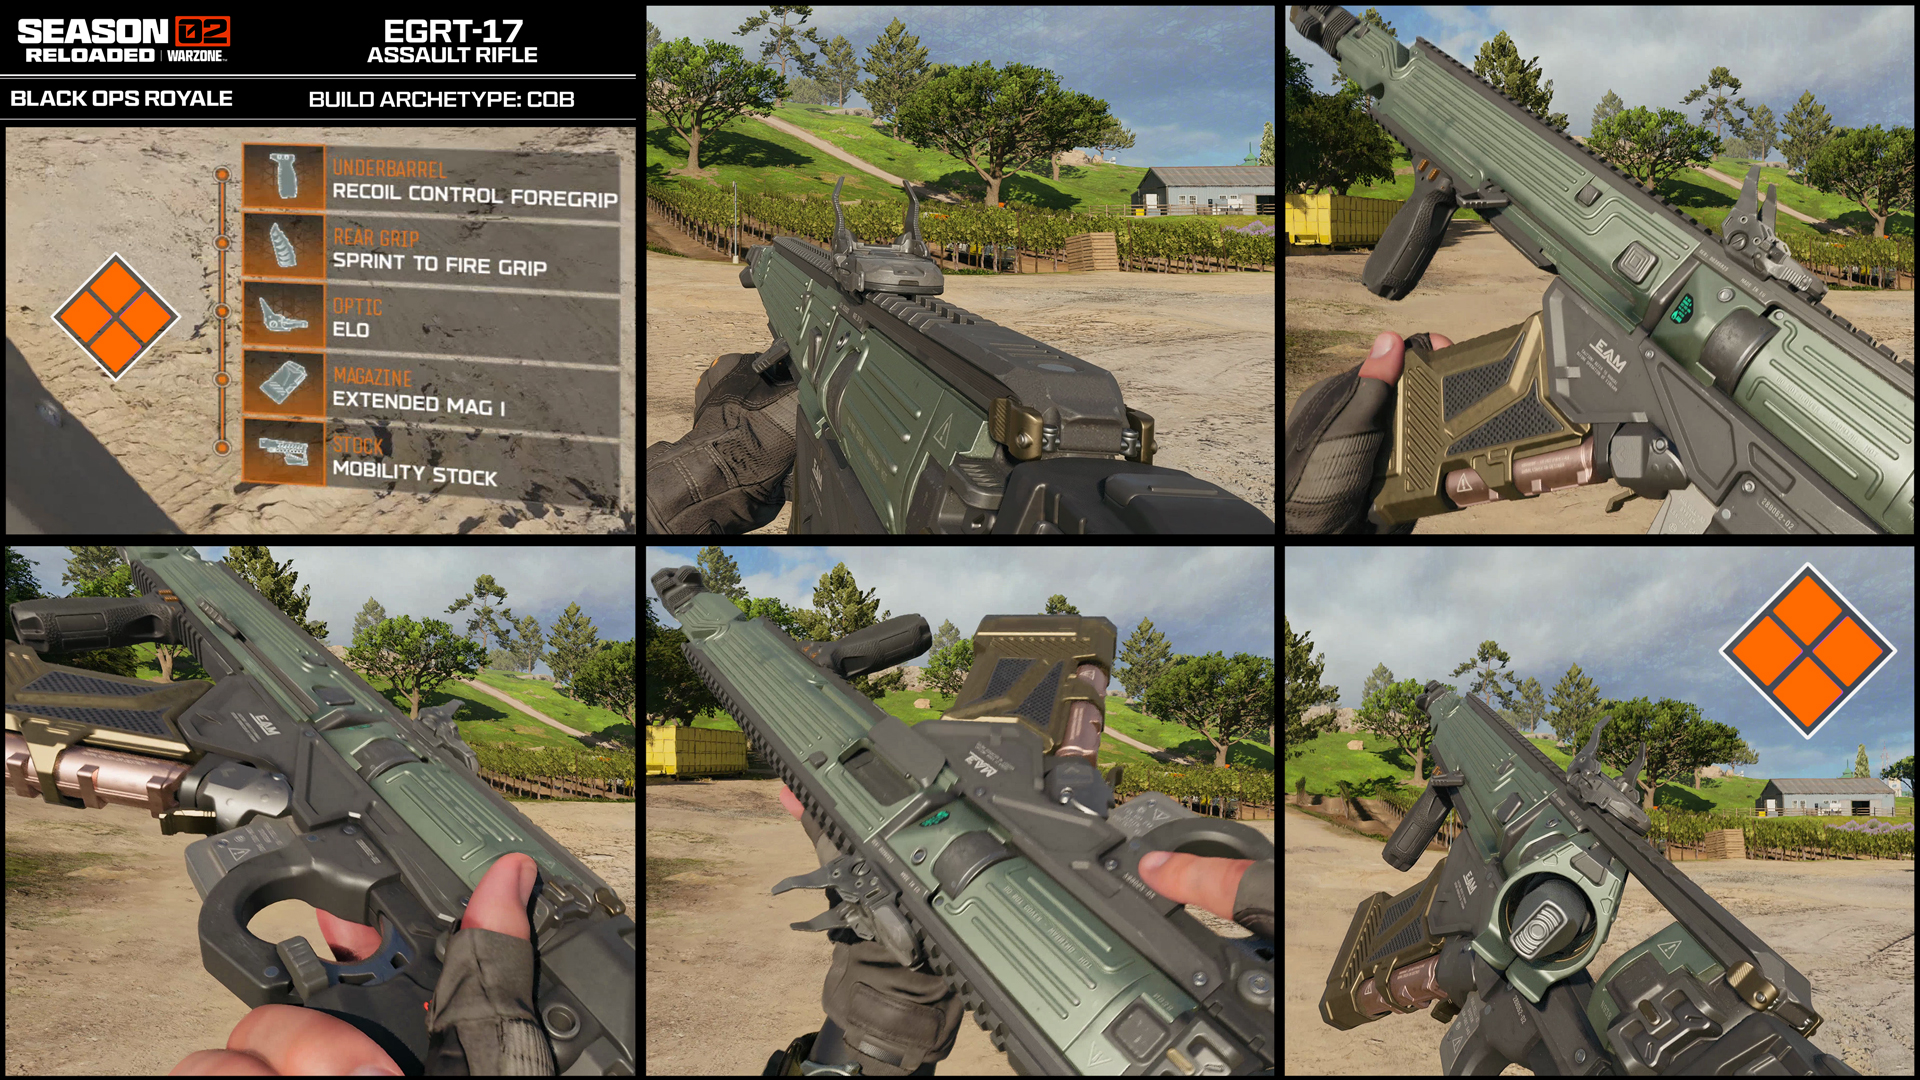
Assault Rifle Archetype Theme: CQB
Playstyle: Front line and aggressive, bridging the gap between an AR and SMG.
Available on: M15 MOD 0, DS20 Mirage, Peacekeeper Mk1, EGRT-17
Increased Stats via Attachment Kit Upgrades: ADS Speed, Sprint to Fire Speed, Sprint Speed, Aim Walking Speed, Horizontal Recoil Control, 45 Round Mag, Red Dot Optic.
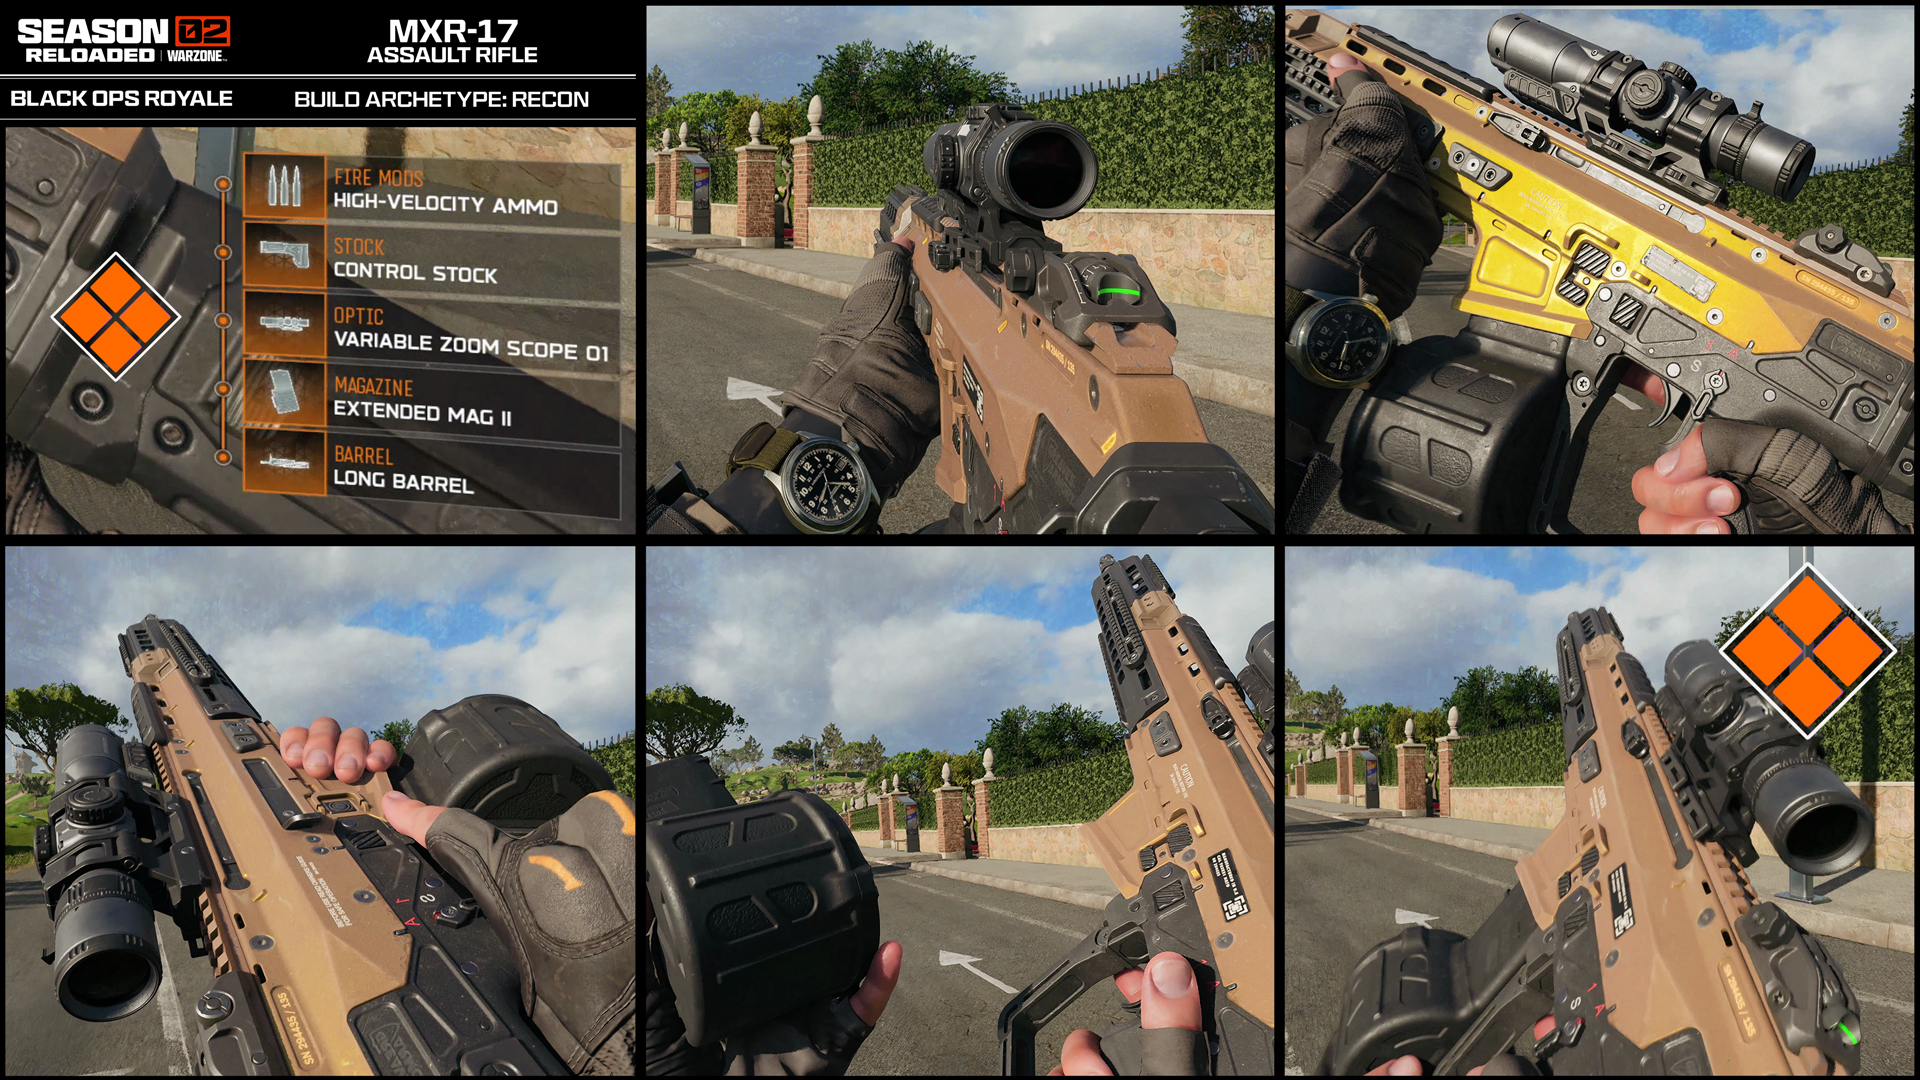
Assault Rifle Archetype Theme: Recon
Playstyle: Veteran long-range player, built for holding positions and challenging at range.
Available on: M15 MOD 0, AK-27, MXR-17, Maddox RFB, EGRT-17
Increased Stats via Attachment Kit Upgrades: Vertical Recoil Control, Horizontal Recoil Control, Bullet Velocity, All Damage Ranges, Flinch Resistance, 3x Scope, 60 Round Mag.
Assault Rifle Archetype Theme: Covert
Playstyle: Focuses on staying off the radar, moving through Avalon and maintaining accuracy.
Available on: AK-27, MXR-17, DS20 Mirage, Peacekeeper Mk1, Maddox RFB
Increased Stats via Attachment Kit Upgrades: Suppressor, Mid-Damage Range, Aiming Movement Speed, Vertical Recoil Control, Non-Sprint Speed, ADS Speed, 45 Round Mag, 2x scope, Laser.
SMG Archetype Themes (3)
SMG Archetype Theme: Burner
Playstyle: Close quarter combat, with fast movement and impressive reaction times.
Available on: Ryden 45K, Razor 9mm, Kogot-7, REV-46
Increased Stats via Attachment Kit Upgrades: ADS Speed, Sprint to Fire Speed, Rate of Fire, Sprint Movement Speed, Hipfire Spread, Iron Sight, 40 Round Mag.
SMG Archetype Theme: Stalker
Playstyle: For those who wish to tactically flank and stay off the radar.
Available on: Ryden 45K, Razor 9mm, Dravec 45, Carbon 57, Sturmwolf, Kogot-7, REV-46
Increased Stats via Attachment Kit Upgrades: Suppressed fire, Aiming Movement Speed, Horizontal Recoil Control, Non-Sprint Speed, Damage Range, Hybrid Scope (1x vs 2x) or MM Optic, 40 Round Mag.
SMG Archetype Theme: Mantis
Playstyle: Transforms the SMG into a mini Assault Rifle while focusing its effectiveness at the longest range that SMGs can be effective at.
Available on: Dravec 45, Carbon 57, Sturmwolf
Increased Stats via Attachment Kit Upgrades: Damage Range, Bullet Velocity, Vertical Recoil Control, Horizontal Recoil Control, Flinch Resistance, 2x scope, 50 Round Mag.
Shotgun Archetype Themes (3)
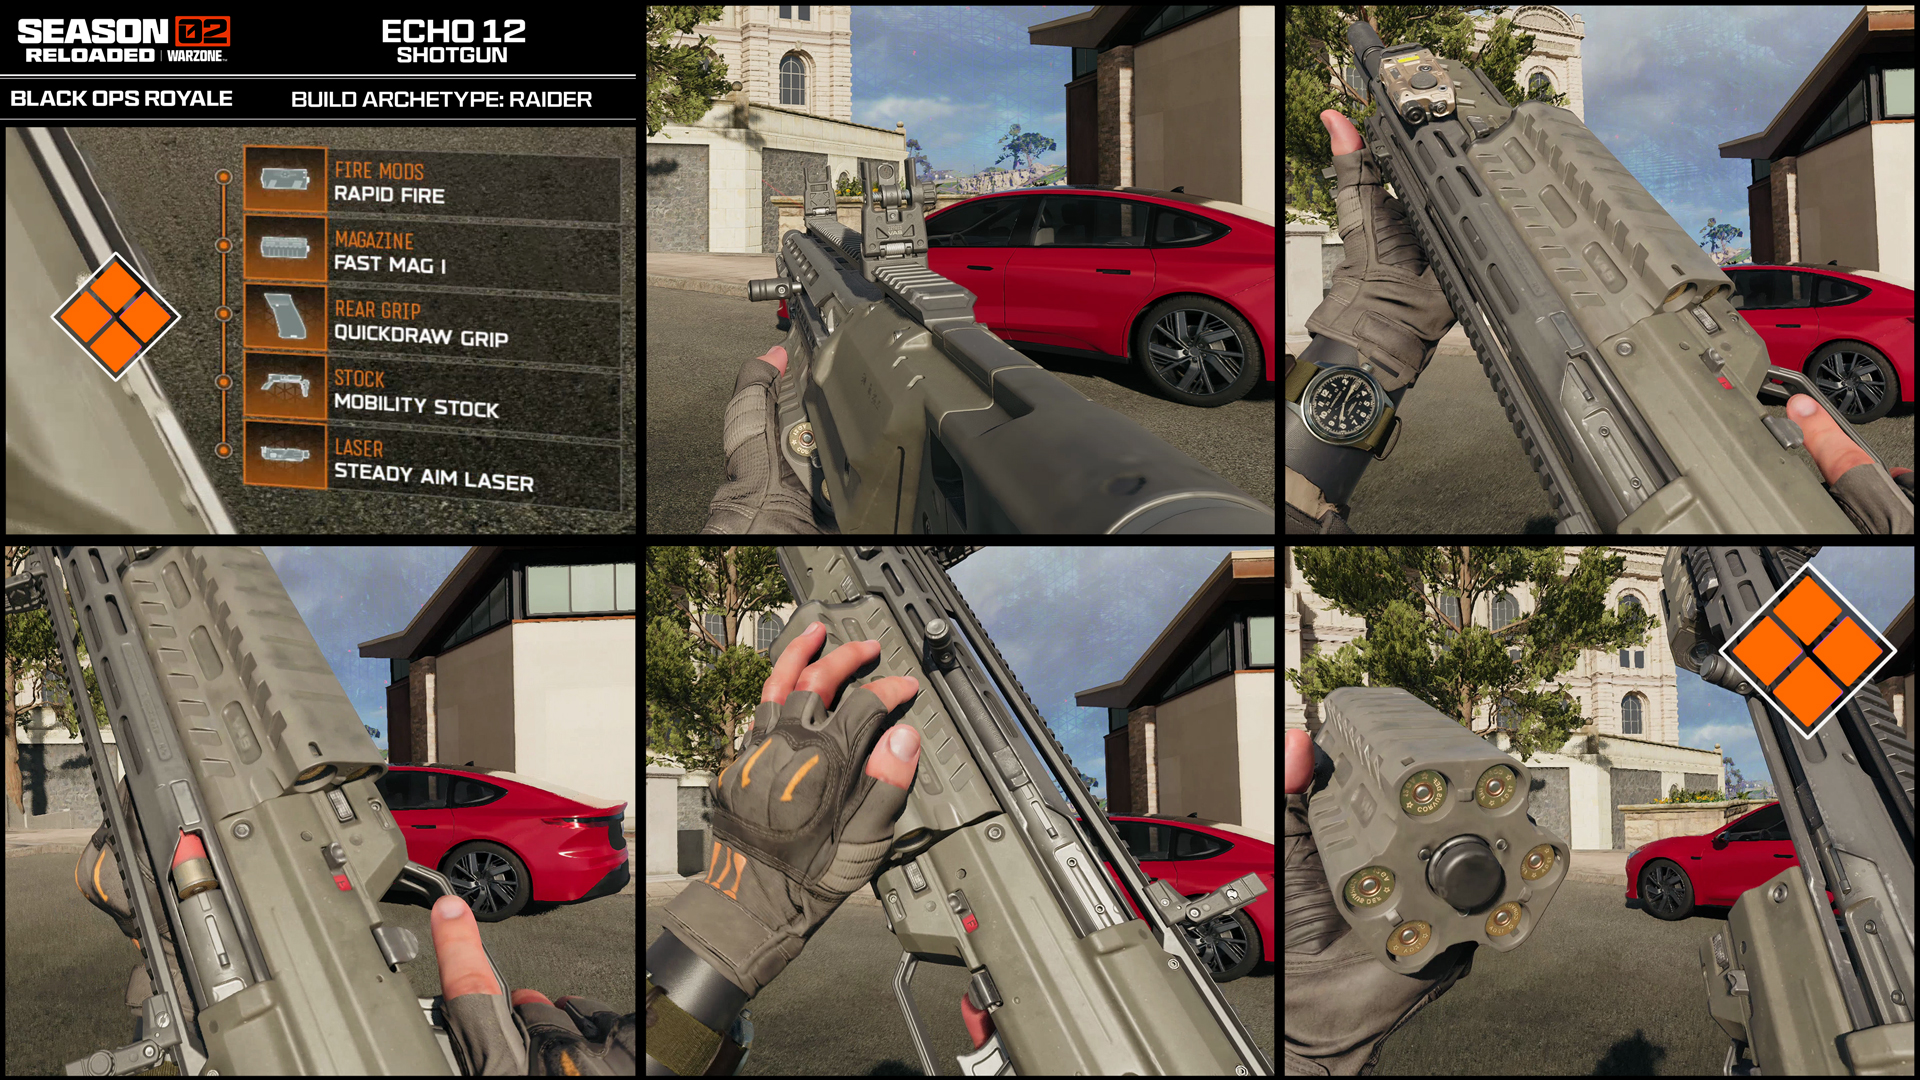
Shotgun Archetype Theme: Raider
Playstyle: Aggressive rushing in to overwhelm the enemy.
Available on: M10 Breacher, Echo 12
Increased Stats via Attachment Kit Upgrades: Sprint Speed, Sprint to Fire Speed, Aimed Walking Speed, Hipfire Spread, ADS Speed, Fire Rate
Shotgun Archetype Theme: Bug Out
Playstyle: Steady, composed, specializes in maximizing combat readiness.
Available on: M10 Breacher
Increased Stats via Attachment Kit Upgrades: Damage Range, ADS Pellet Spread, Vertical Recoil, Aiming Movement Speed, Magazine Size.
Shotgun Archetype Theme: Striker
Playstyle: Range versatility. Good damage up close, and noticeably more effective mid-range.
Available on: M10 Breacher
Increased Stats via Attachment Kit Upgrades: Aiming Movement Speed, ADS Pellet Spread, Damage Range, ADS Speed.
Light Machinegun Archetype Themes (3)
LMG Archetype Theme: Lockdown
Playstyle: Deadly when dug in and holding a defensive position, but less mobile.
Available on: Sokol 545
Increased Stats via Attachment Kit Upgrades: Suppressed Fire, Aiming Movement Speed, ADS Speed, Horizontal Recoil, Movement Speed, Rate of Fire.
LMG Archetype Theme: Patrol
Playstyle: Focusing on faster, more mobile engagement.
Available on: MK.78, XM325
Increased Stats via Attachment Kit Upgrades: Sprint Speed, Sprint to Fire Speed, Aimed Movement Speed, Vertical Recoil Control, Hipfire Spread, Red Dot Optic.
LMG Archetype Theme: Heavy Metal
Playstyle: Maximized for long range engagements.
Available on: MK.78, XM325, Sokol 545
Increased Stats via Attachment Kit Upgrades: Vertical and Horizontal Recoil, Damage Range, Flinch Resistance, ADS Speed, Bullet Velocity.
Marksman Rifles Archetype Themes (2)
Marksman Rifles Archetype Theme: Scout
Playstyle: Focus on mobility, quick target identification, and engagement.
Available on: M34 Novaline
Increased Stats via Attachment Kit Upgrades: Damage Range, Magazine Size, Aiming Idle Sway, Flinch Resistance.
Marksman Rifles Archetype Theme: Widow
Playstyle: Stealth focused. Strike with purpose.
Available on: M34 Novaline
Increased Stats via Attachment Kit Upgrades: Suppressed fire, Aiming Movement Speed, ADS Speed, Vertical Recoil Control, Fire Rate.
Sniper Rifles Archetype Themes (2)

Sniper Rifles Archetype Theme: Viper
Playstyle: Impressively bold, powerful, one-shot deadliness.
Available on: VS Recon
Increased Stats via Attachment Kit Upgrades: Bullet Velocity, Flinch Resistance, Aiming Idle Sway, Vertical Recoil Control, Rechamber Speed.
Sniper Rifles Archetype Theme: Redacted
Playstyle: Favoring shooting and moving while trying to hide your position.
Available on: Hawker HX
Increased Stats via Attachment Kit Upgrades: Suppressed fire, Bullet Velocity, Damage Range, Rechamber Speed, ADS Speed, Flinch Resistance.
Pistols Archetype Themes (3)
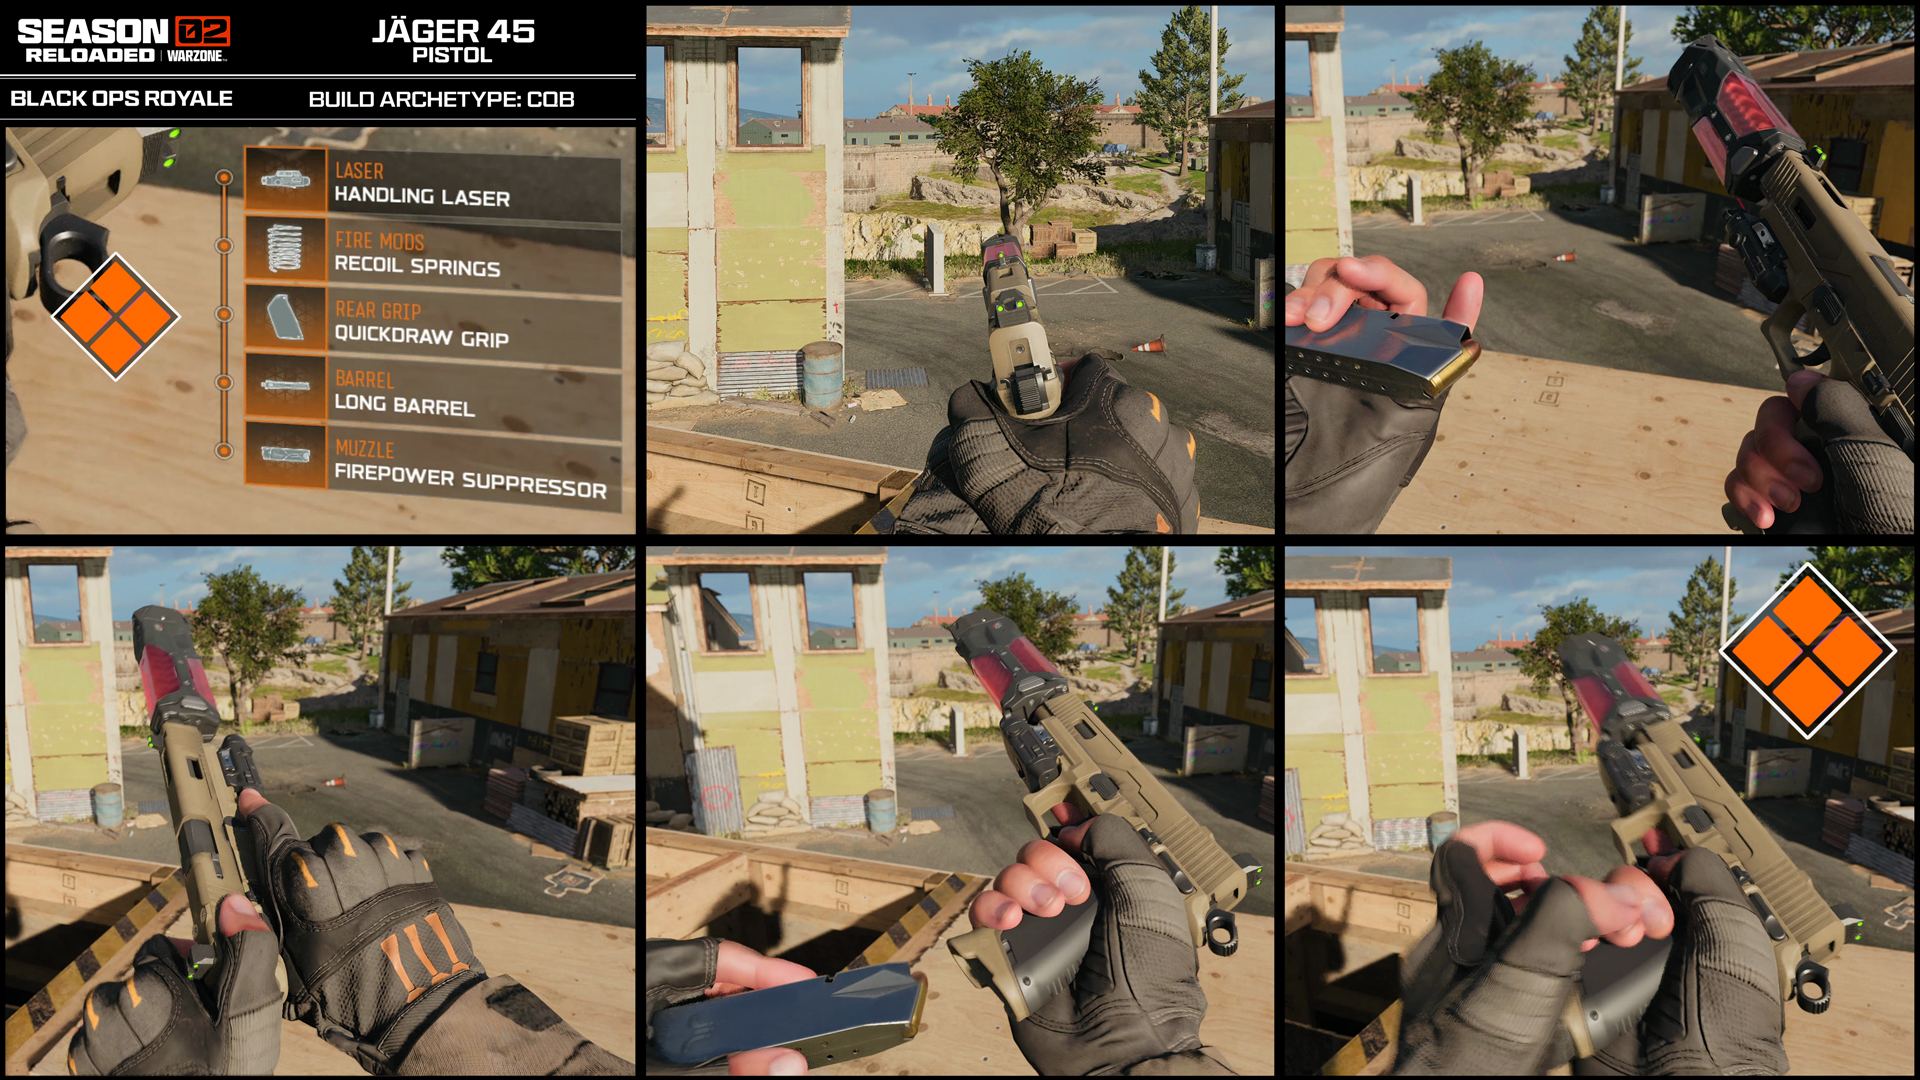
Pistol Archetype Theme: CQB
Playstyle: Quickdraw pistol designed for close-range engagements.
Available on: Jäger 45
Increased Stats via Attachment Kit Upgrades: ADS Speed, Sprint to Fire Speed, Sprint Speed, Fire Rate, Magazine Size.
Pistol Archetype Theme: Akimbo
Playstyle: Dual-wield pistols constructed for rapid engagements.
Available on: Coda 9
Increased Stats via Attachment Kit Upgrades: Dual Wield, Hipfire Spread, Sprint to Fire Speed, Sprint Speed, Damage Range, Magazine Size.
Pistol Archetype Theme: Sentinel
Playstyle: Designed for stealth encounters while excelling at range.
Available on: Velox 5.7
Increased Stats via Attachment Kit Upgrades: Suppressed Fire, Damage Range, Vertical Recoil, Aiming Movement Speed, Magazine Size, 1x Optic.
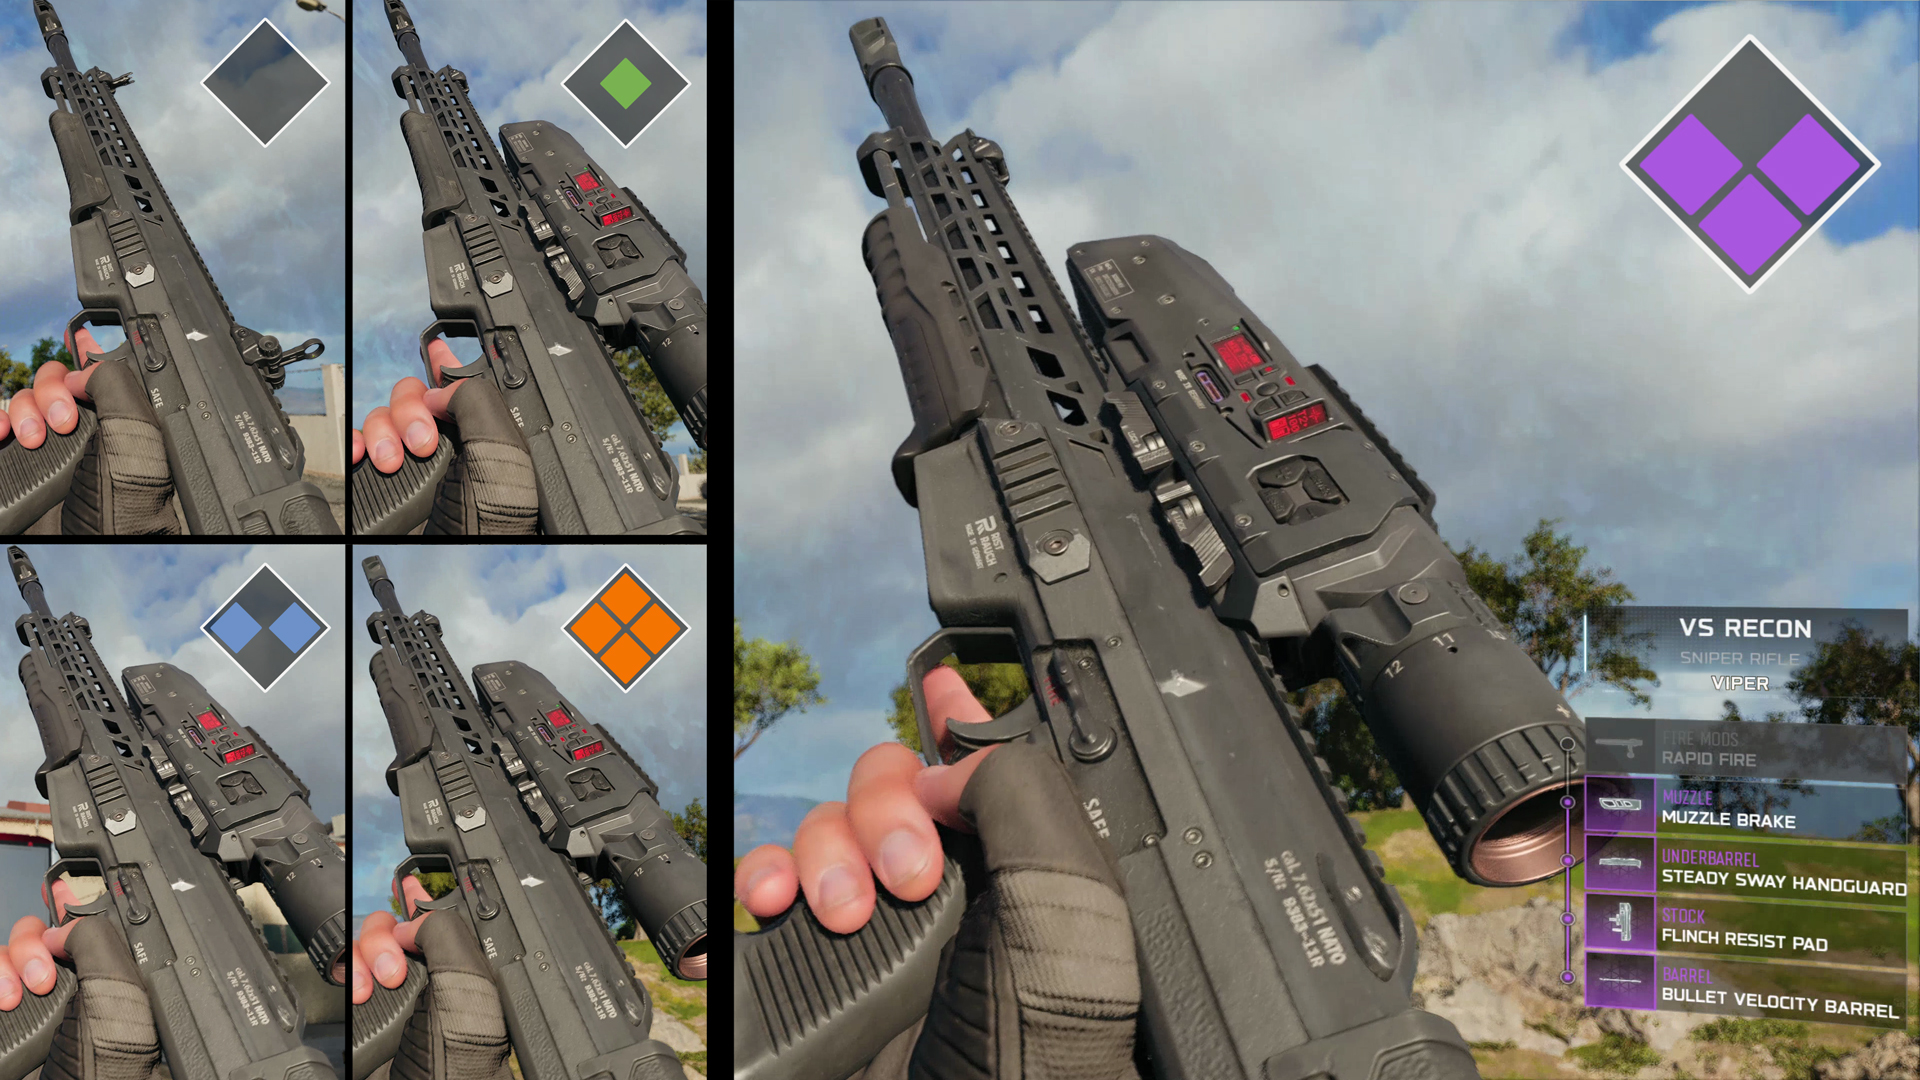
Archetype Example: Building a Better Sniper Rifle
Now that you’re able to plan your preferred Archetype Themes before a match, let’s drop into Avalon and focus on building the very best sniper rifle that suits a particular playstyle. In this example, we’re planning on dropping enemies with one shot!
Enter the “Viper Rifle”: We drop into Avalon with our squad and begin to scavenge for appropriate loot. We soon secure a Common Rarity (Grey) VS Recon that comes with the “Viper” Archetype Build.
Note: Here are the improvements to a base VS Recon that a Common “Viper” VS Recon provides. Aso note that percentage values are subject to adjustment and designed to showcase how potent an Archetype can become when fully upgraded!
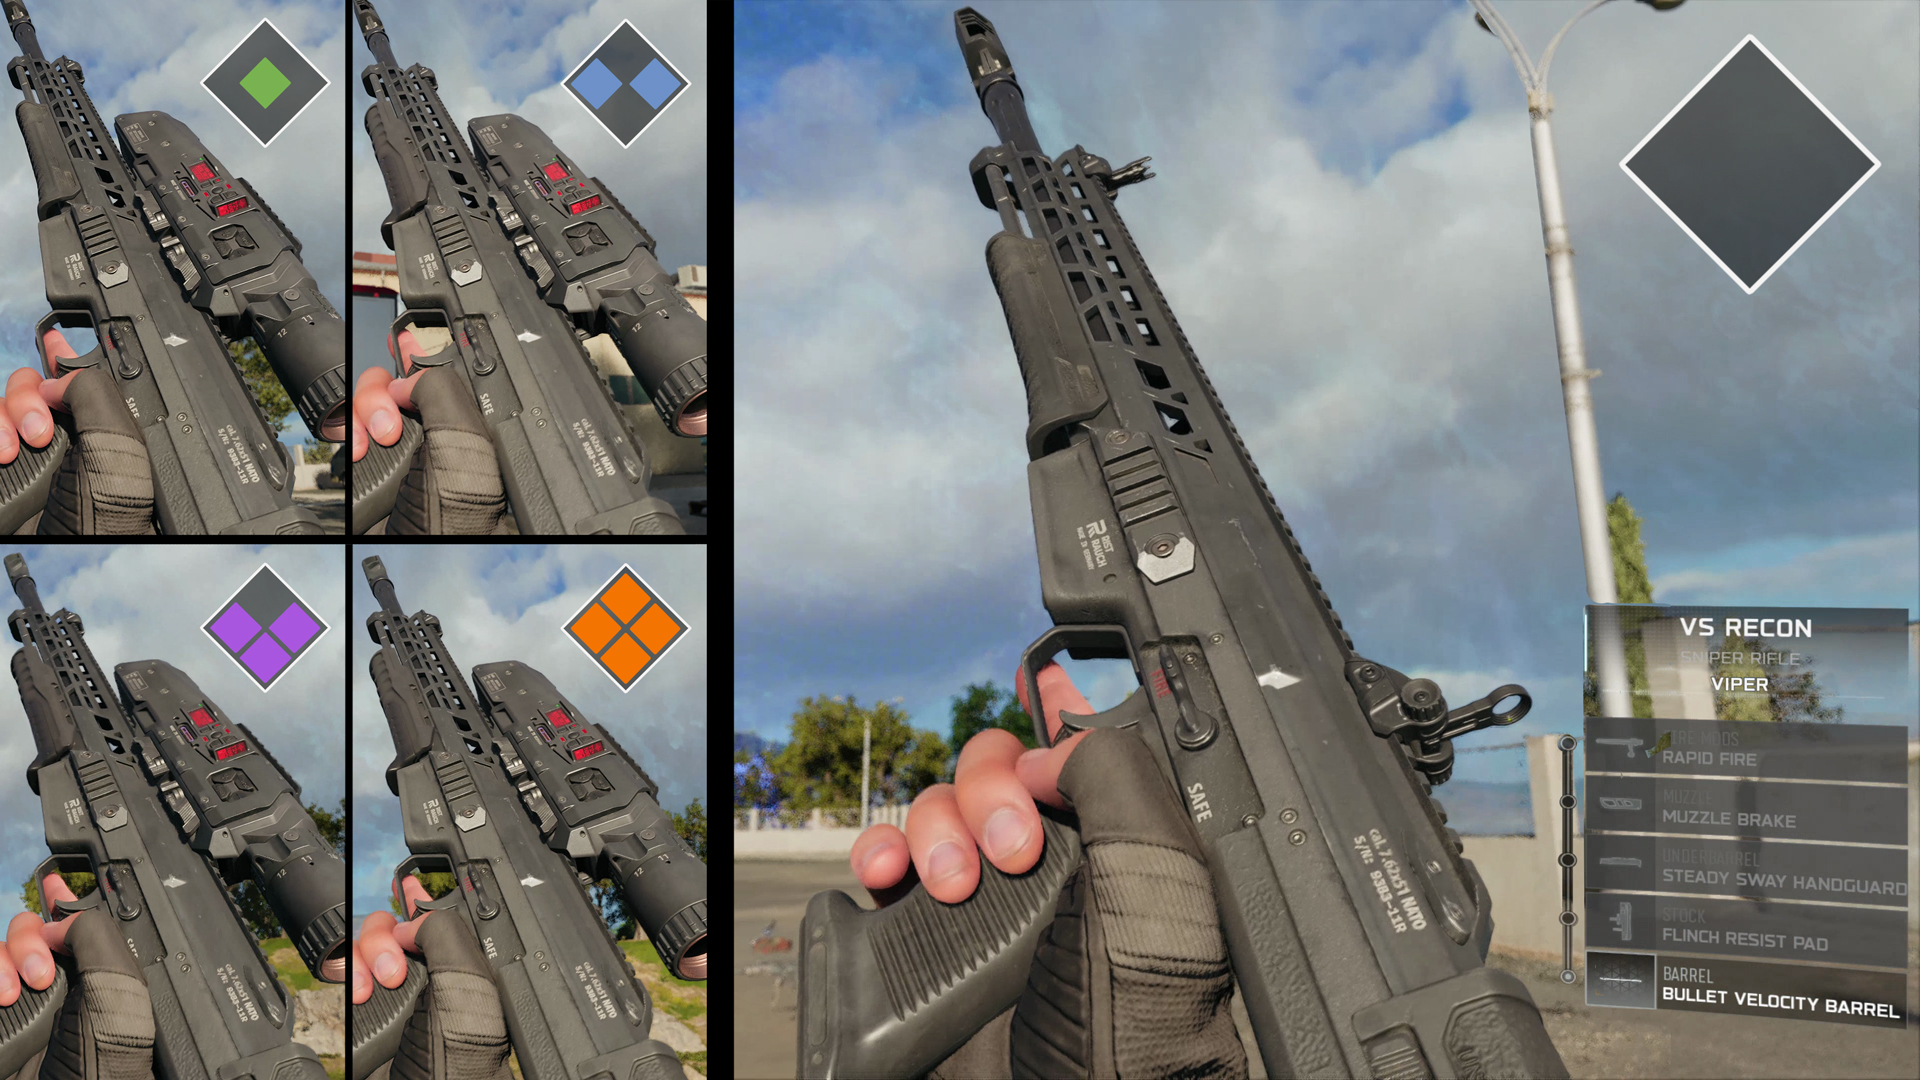
“Viper” VS Recon Upgrade Path: Common (Grey)
- Global Weapon Benefits: None
- Archetype Benefits: First Attachment: 23” G-Force Barrel (Bullet Velocity Barrel)
- 30 percent improved Bullet Velocity
The hunt is on for additional Attachment Kits to fully upgrade the “Viper VS Recon” to its fullest potential, stacking stat increases along the way. Here’s what happens when we upgrade to Uncommon (Green):
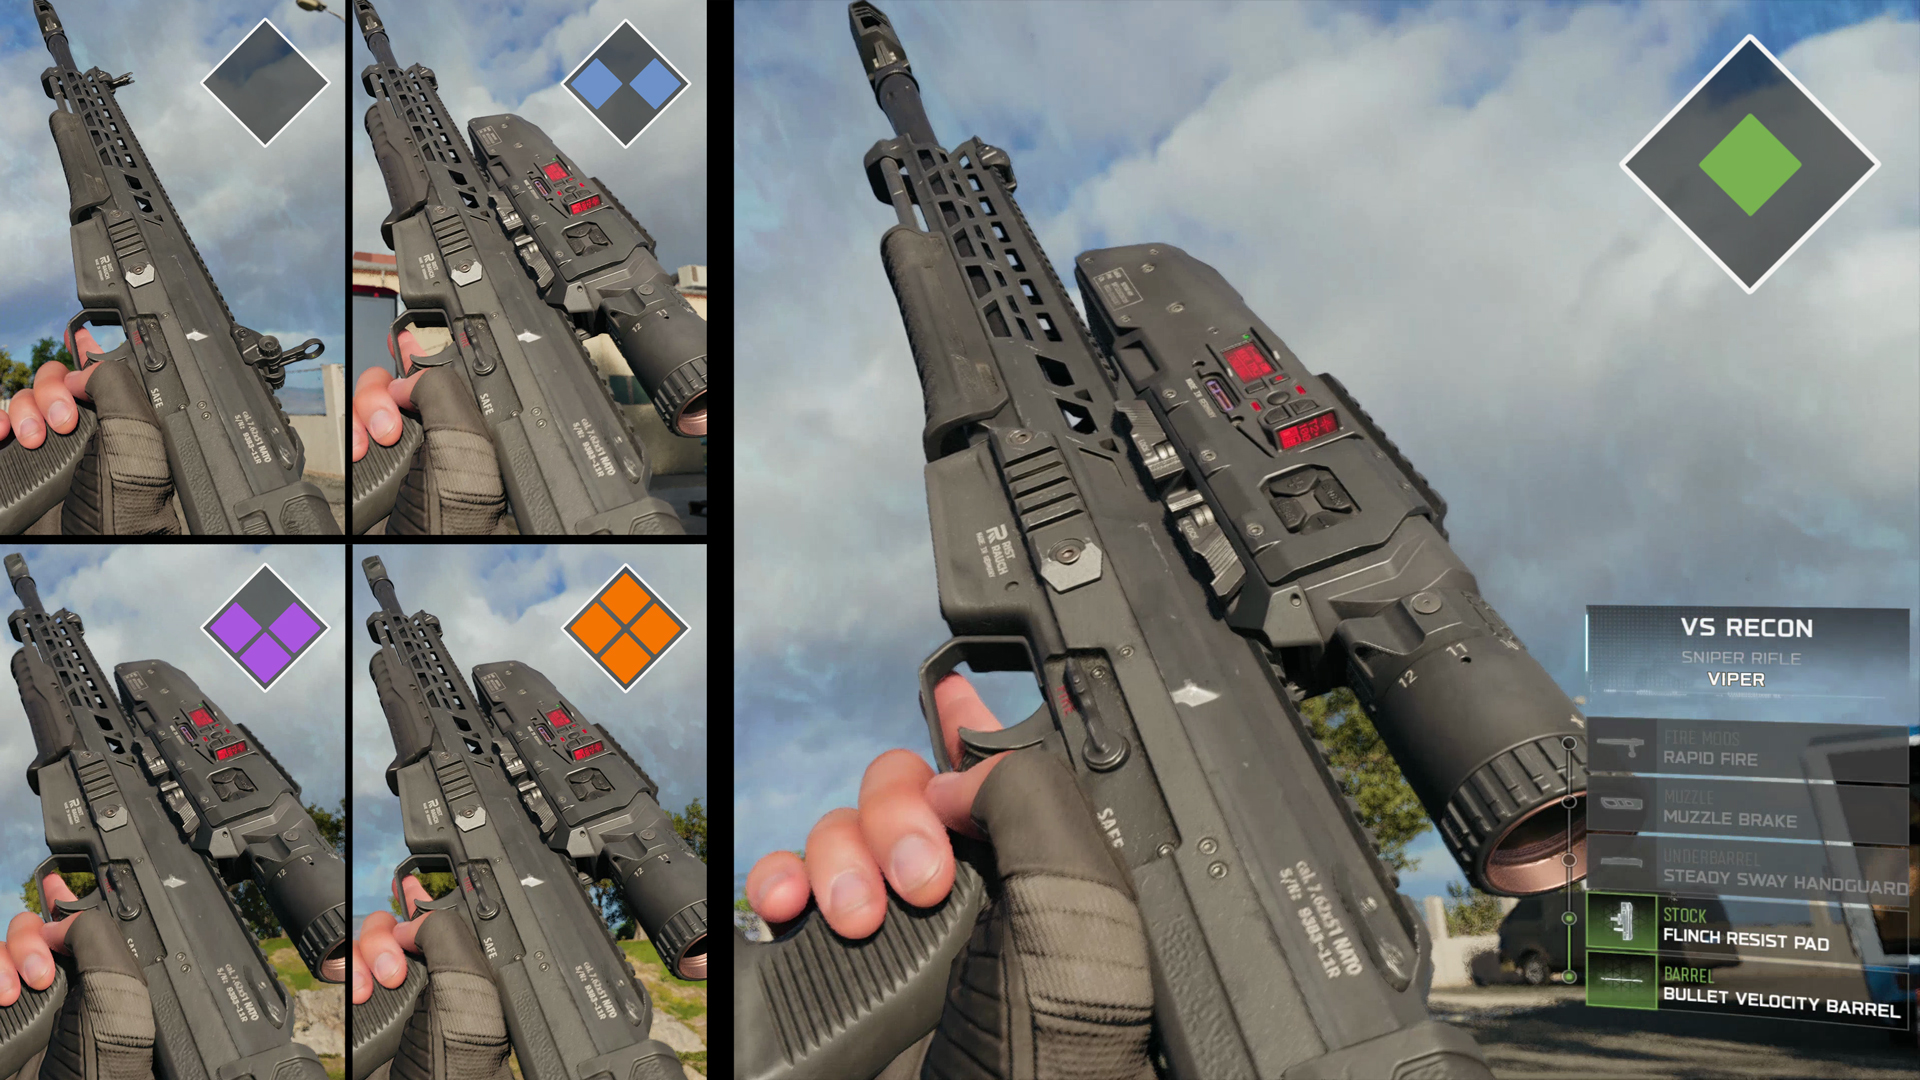
“Viper” VS Recon Upgrade Path: Uncommon (Green)
- Global Weapon Benefits:
- +5 percent Faster Rechambering Speed
- +10 percent Improved Aiming Idle Sway
- +15 percent Improved Flinch Resistance
- Archetype Benefits: First Attachment: 3” G-Force Barrel (Bullet Velocity Barrel)
- +30 percent improved Bullet Velocity
- Archetype Benefits: Second Attachment: Stabilized Heavy Pad (Flinch Resist Pad Stock)
- +40 percent increased Flinch Resistance
- Stackable Benefit:
- +55 percent improved Flinch Resistance (Global Benefit plus Second Attachment Benefit)
The match continues, and so does the search for additional Attachment Kits. Here’s what happens when we upgrade to Rare (Blue); the Sniper really starts to increase in the pinpoint accuracy department:
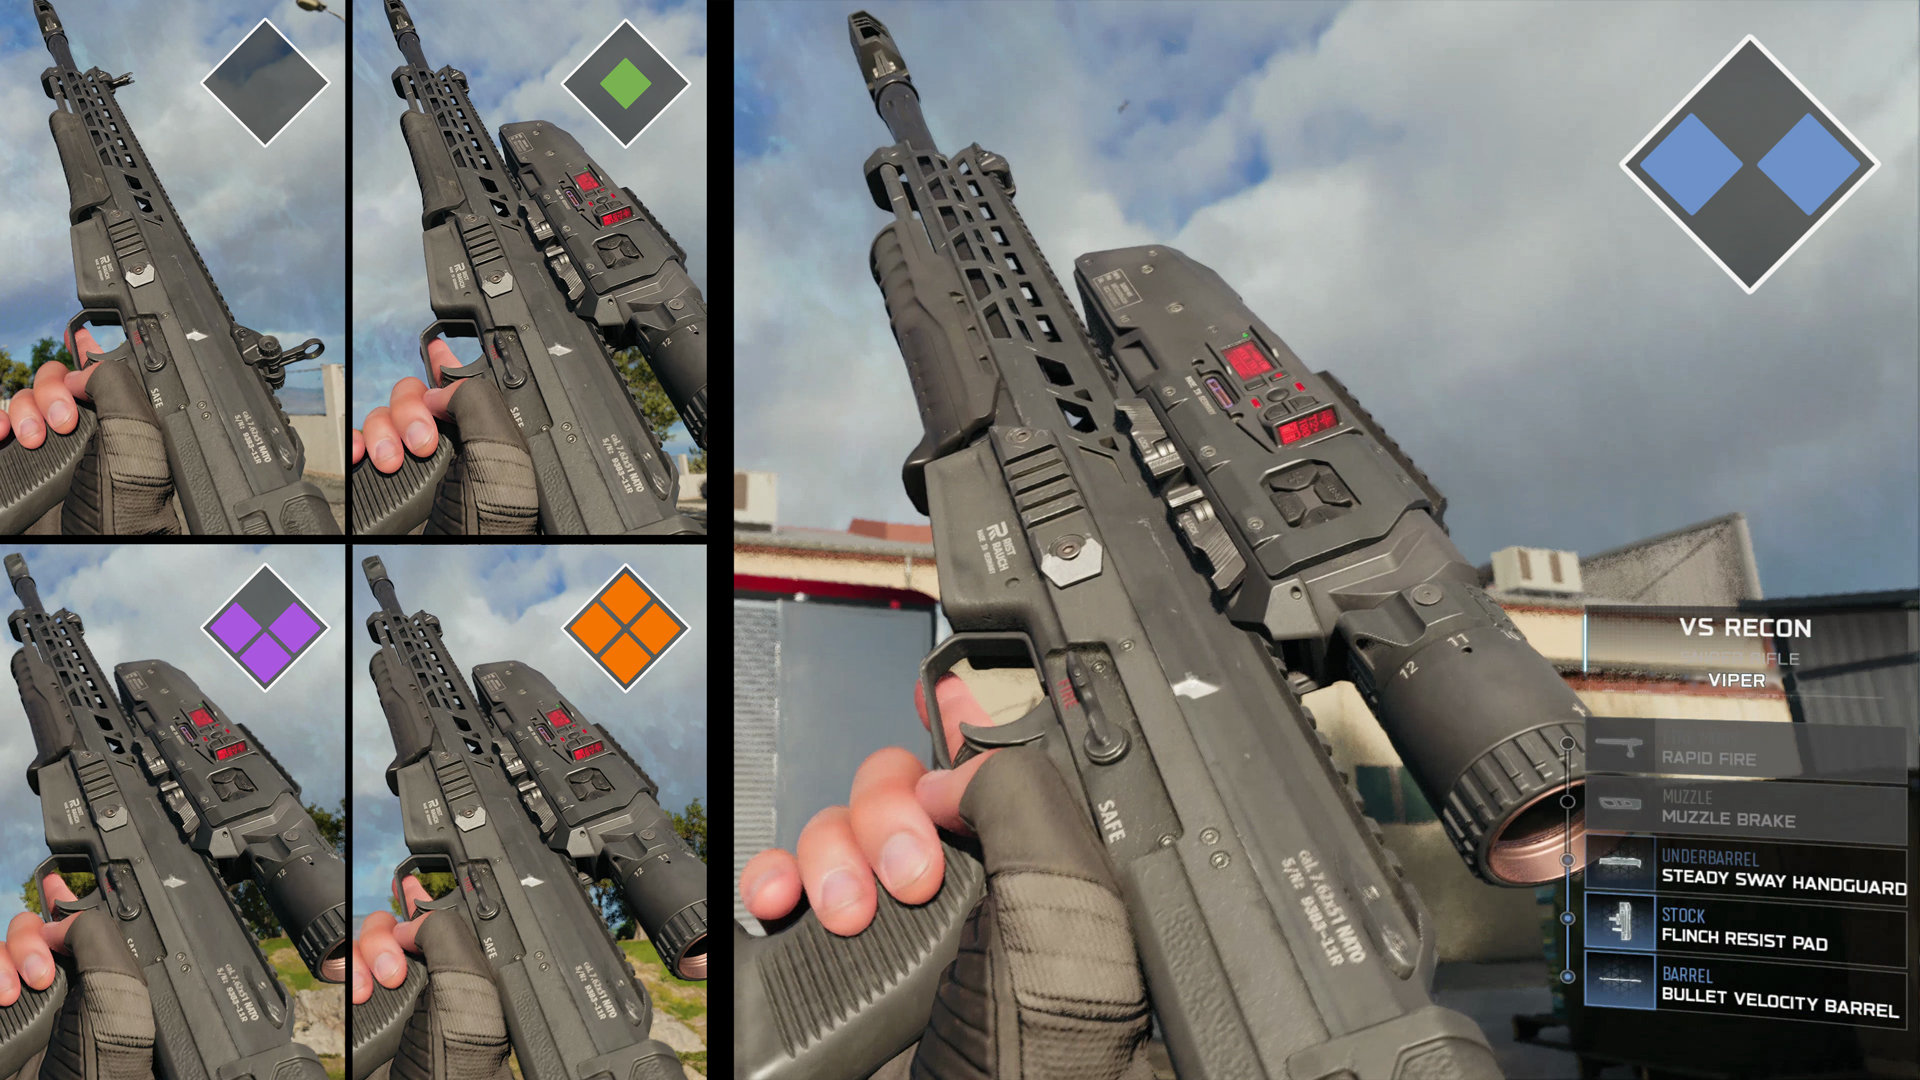
“Viper” VS Recon Upgrade Path: Rare (Blue)
- Global Weapon Benefits (Stacking once):
- +10 percent Faster Rechambering Speed
- +20 percent Improved Aiming Idle Sway
- +30 percent Improved Flinch Resistance
- Archetype Benefits: First Attachment: 3” G-Force Barrel (Bullet Velocity Barrel)
- +30 percent improved Bullet Velocity
- Archetype Benefits: Second Attachment: Stabilized Heavy Pad (Flinch Resist Pad Stock)
- +40 percent increased Flinch Resistance
- Archetype Benefits: Third Attachment: Sway Grip (Steady Sway Handguard Underbarrel)
- +40 percent Reduced Aiming Idle Sway
- Stackable Benefit:
- +70 percent improved Flinch Resistance (Global Benefit plus Second Attachment Benefit)
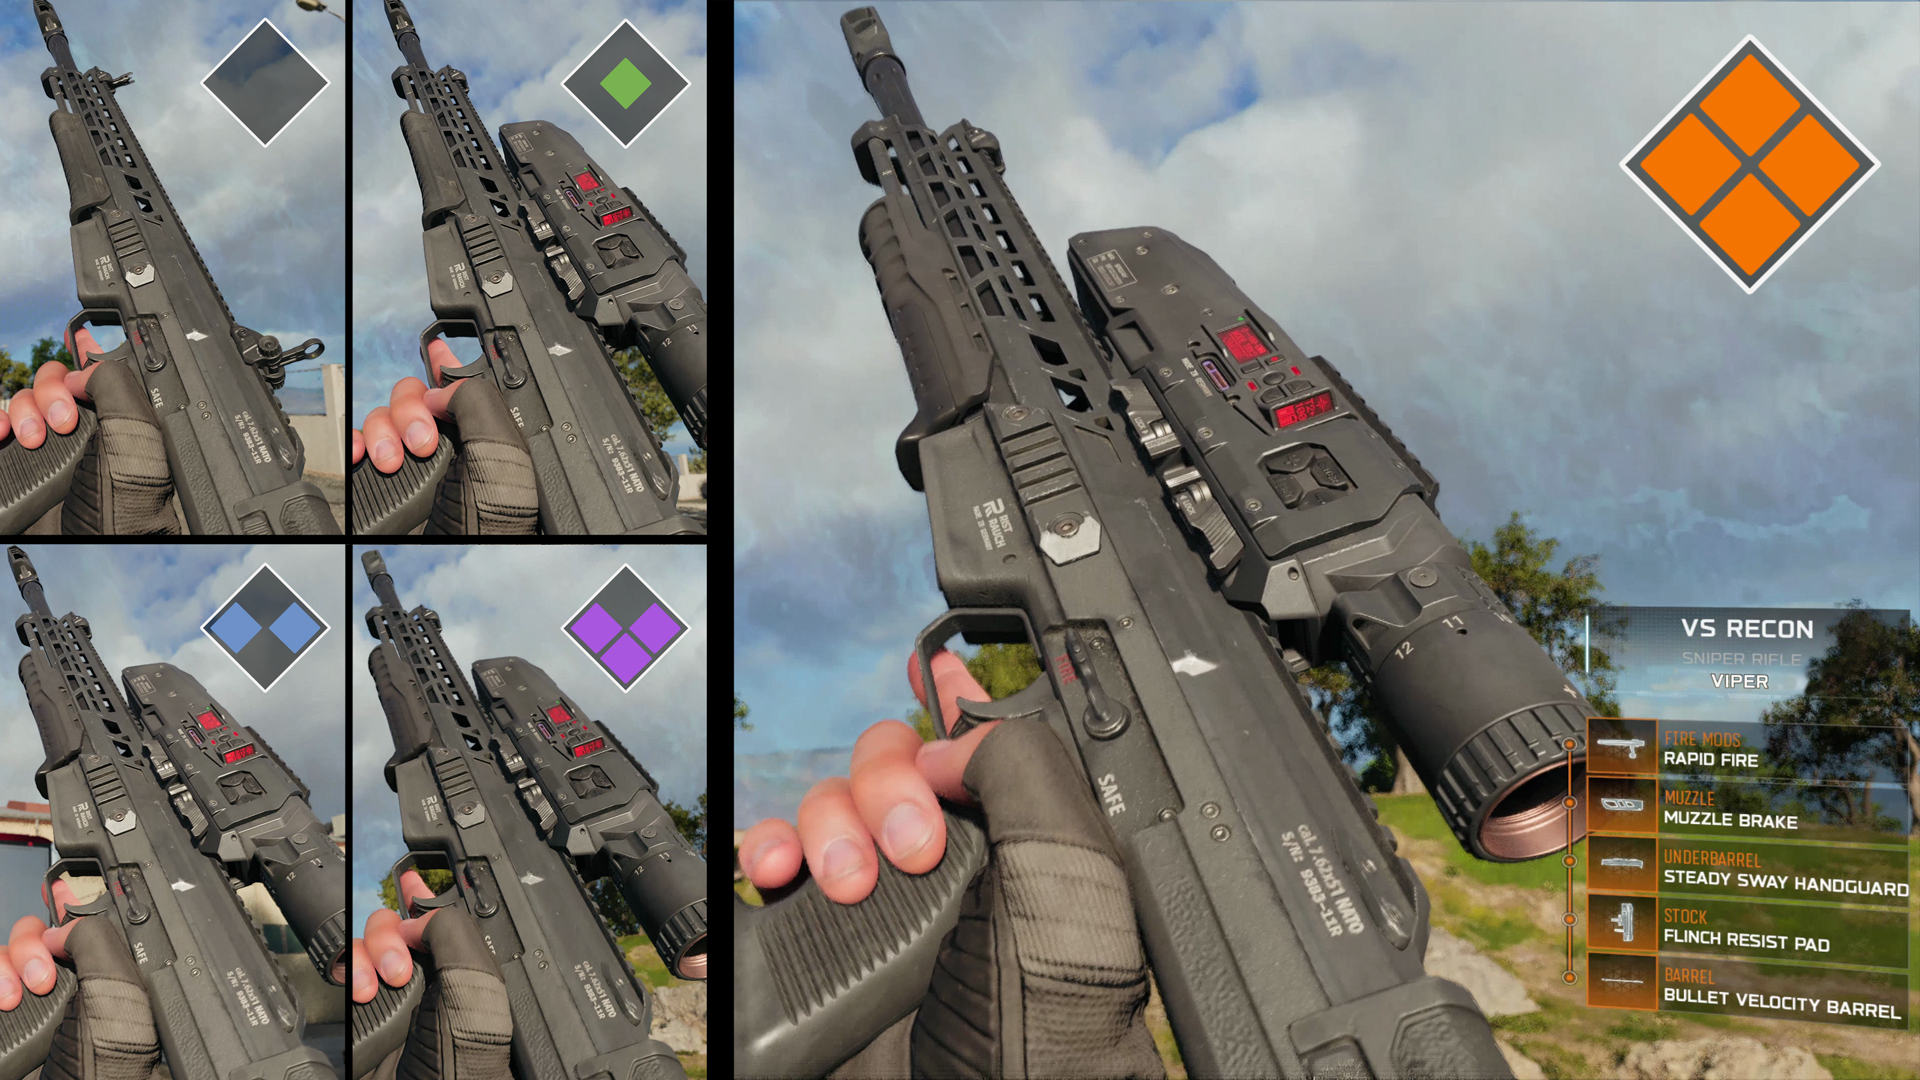
With another Attachment Kit added to the VS Recon, it becomes a refined precision sniper built to drop targets in a single, punishing shot. Here’s what happens when we upgrade to Epic (Purple):
“Viper” VS Recon Upgrade Path: Epic (Purple)
- Global Weapon Benefits (Stacking twice):
- +15 percent Faster Rechambering Speed
- +30 percent Improved Aiming Idle Sway
- +45 percent Improved Flinch Resistance
- Archetype Benefits: First Attachment: 3” G-Force Barrel (Bullet Velocity Barrel)
- +30 percent improved Bullet Velocity
- Archetype Benefits: Second Attachment: Stabilized Heavy Pad (Flinch Resist Pad Stock)
- +40 percent increased Flinch Resistance
- Archetype Benefits: Third Attachment: Sway Grip (Steady Sway Handguard Underbarrel)
- +40 percent Reduced Aiming Idle Sway
- Archetype Benefits: Fourth Attachment: Muzzle Brake (Muzzle)
- +40 percent Reduced First Shot Vertical Recoil
- Stackable Benefit:
- +85 percent improved Flinch Resistance (Global Benefit plus Second Attachment Benefit)
What happens when the maximum Attachment Kits are added and the VS Recon “Viper” is fully upgraded? It becomes a perfected precision sniper engineered to erase targets in a single, unstoppable shot. Here’s what happens when you finish upgrading, and reach Legendary Rarity (Orange):
“Viper” VS Recon Fully Upgraded: Legendary (Orange)
- Global Weapon Benefits (Stacking twice):
- +20 percent Faster Rechambering Speed
- +40 percent Improved Aiming Idle Sway
- +60 percent Improved Flinch Resistance
- Archetype Benefits: First Attachment: 3” G-Force Barrel (Bullet Velocity Barrel)
- +30 percent improved Bullet Velocity
- Archetype Benefits: Second Attachment: Stabilized Heavy Pad (Flinch Resist Pad Stock)
- +40 percent increased Flinch Resistance
- Archetype Benefits: Third Attachment: Sway Grip (Steady Sway Handguard Underbarrel)
- +40 percent Reduced Aiming Idle Sway
- Archetype Benefits: Fourth Attachment: Muzzle Brake (Muzzle)
- +40 percent Reduced First Shot Vertical Recoil
- Archetype Benefits: Fifth Attachment: Quick Bolt (Rapid Fire, Fire Mod)
- +30 percent Rechamber Speed
- Stackable Benefit:
- +100 percent improved Flinch Resistance (Global Benefit plus Second Attachment Benefit)
Exceptions to the Rule: Exotic Weapons
Under normal circumstances, the upgrade path of a weapon ends at Legendary (Orange) rarity, but there are certain circumstances during a match where you might uncover weaponry with more devastating and unique abilities. These weapons have more than five attachments (usually eight), have the Ultra (gold) rarity level, are already fully upgraded, and may have unique abilities. These are known as Exotic Weapons and are highly prized. In fact, there may only be one available per match! Can you find it?
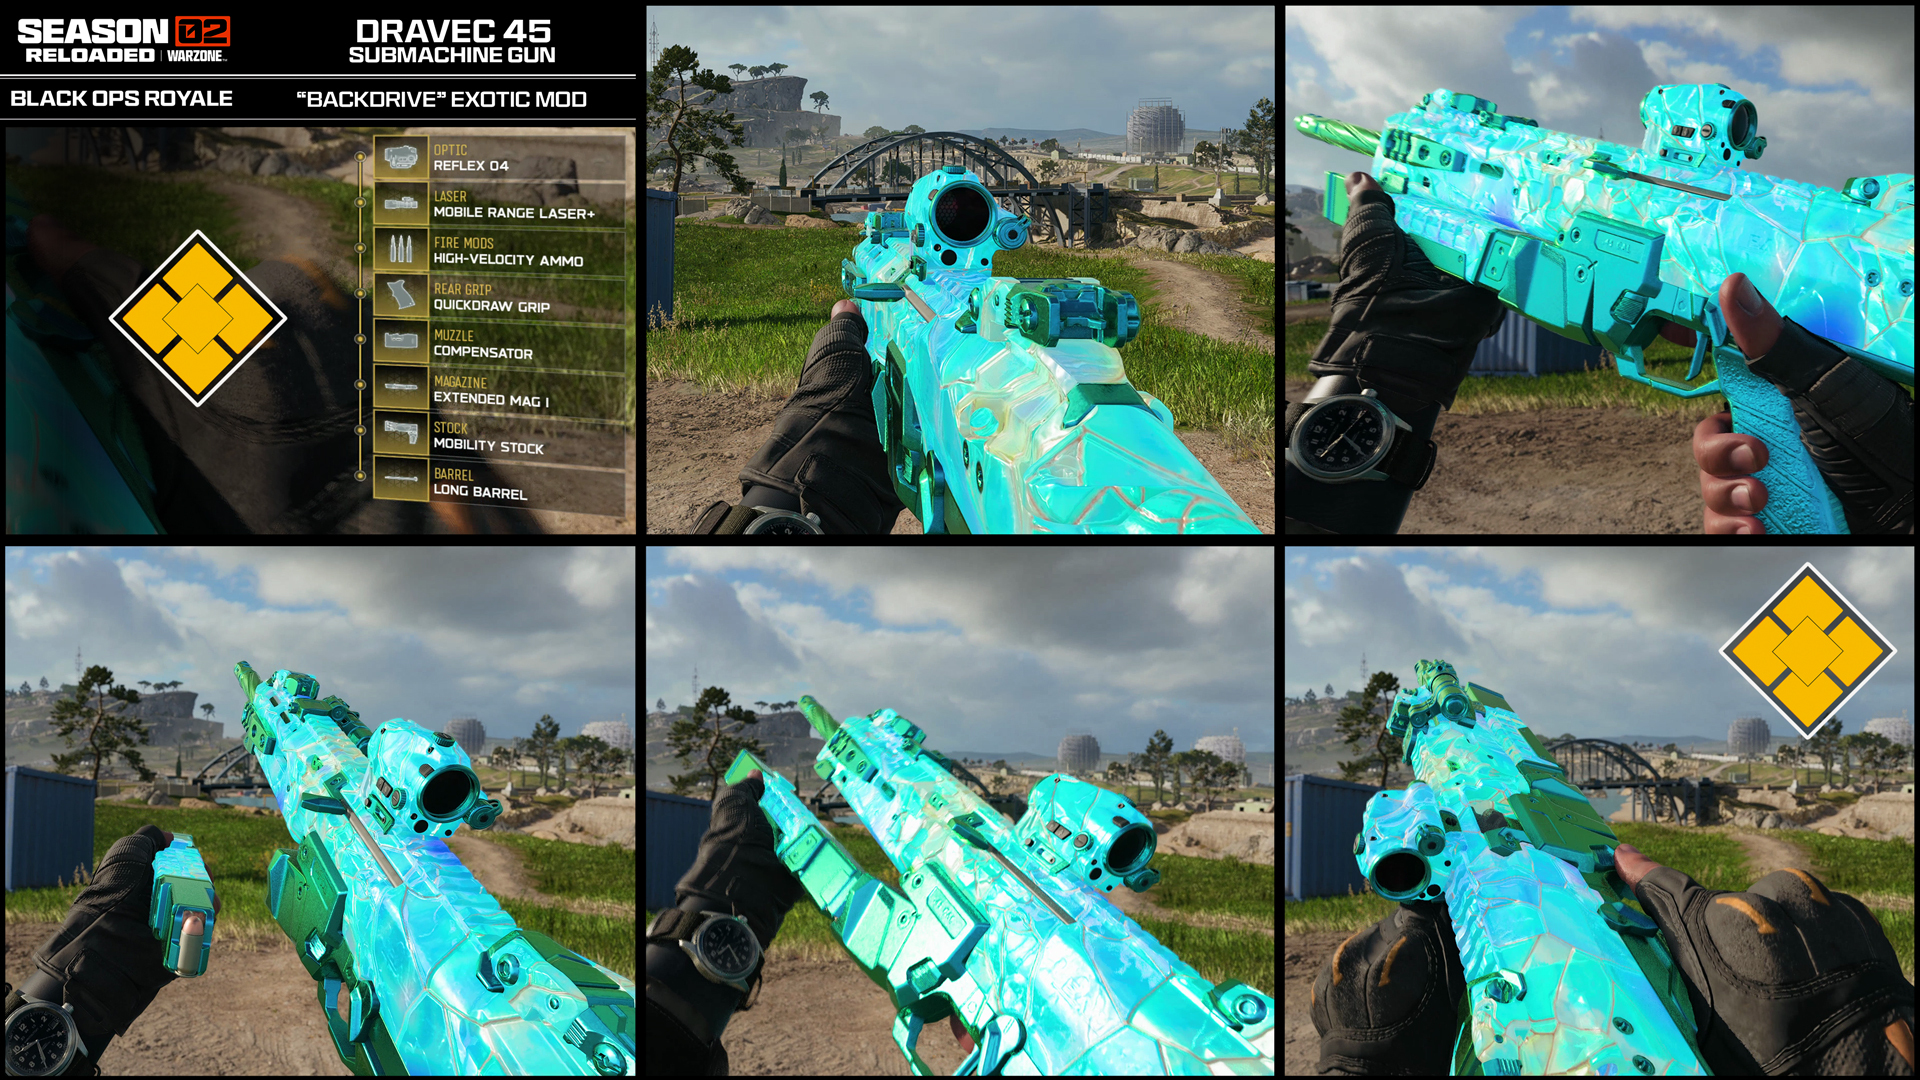
Exotic Example: “Backdrive” Dravec 45 Submachine Gun
The Backdrive is the takedown specialist’s dream; it features eight helpful attachments specifically tailored to enhance this weapon type, along with additional abilities:
- 45% Improved Damage Range
- 40% Faster Reload Speed
- 30% Faster Jog, Sprint & ADS Move Speed
- 80 Round Mag
- 50% Faster ADS Speed
- 70% Faster Sprint to Fire Speed
- Reflex Optic
- 10% Faster Fire Rate
- 40% Reduced Recoil
Part 4: Cerebral Link: Your Heads-Up Display
Your Main C-Link HUD

Your Cerebral Link HUD overlay has been streamlined and adjusted but is mostly familiar to Call of Duty: Warzone players. Expect the following familiar and adjusted HUD elements to utilize as the match begins:
- Top-Middle: Compass and POI Intel: Your compass direction and name of the POI you’re currently in.
- Top-Left: Your Mini-Map, timing to the next Circle Collapse, and any Activities or Missions you’re currently engaged in.
- Bottom-Left: Your team’s health and armor, including the plates you have equipped and have in reserve, any Redeploy Tokens you or your team has, and your health, shown as a bar as well as in units.
- Bottom-Middle: Access to your Quick Inventory Menu. The five small square boxes indicate the Perk Slots you are running.
- Bottom-Right: Your chosen weapon, its type and color-coded Rarity (and therefore potency). Additionally, the Tacticals and Lethals held, circled around the Field Upgrades and Killstreaks. You can carry up to two of each piece of Equipment, and swap between them.
HUD Intel Updates Summary: The Black Ops Royale heads up display is almost identical to a regular Call of Duty: Warzone HUD, with the following main adjustments:
- Your Health is displayed (in units) in white markers.
- Your additional, temporary Health above maximum, accessed via the Trauma Kit or specific Perks, is displayed (in units) in yellow markers.
- The Rarity/color of your carried weapon and Build type descriptor.
- Your carried weapon’s Attachments (the five available in the upgrade path) are visible when you pick up your weapon or access the Tac-Map Menu.
- Inventory has been modified to allow you to carry up two Lethals, two Tacticals, two Field Upgrades, and two Killstreaks. All must be of a different type (you cannot carry two Frag Grenades, for example).
- Hot swap: Hover over an item in your inventory to see the button to quick swap that slot. Expect to learn rapid button combos to make accessing and swapping equipment extremely intuitive.
Quick Menu: Updated Inventory
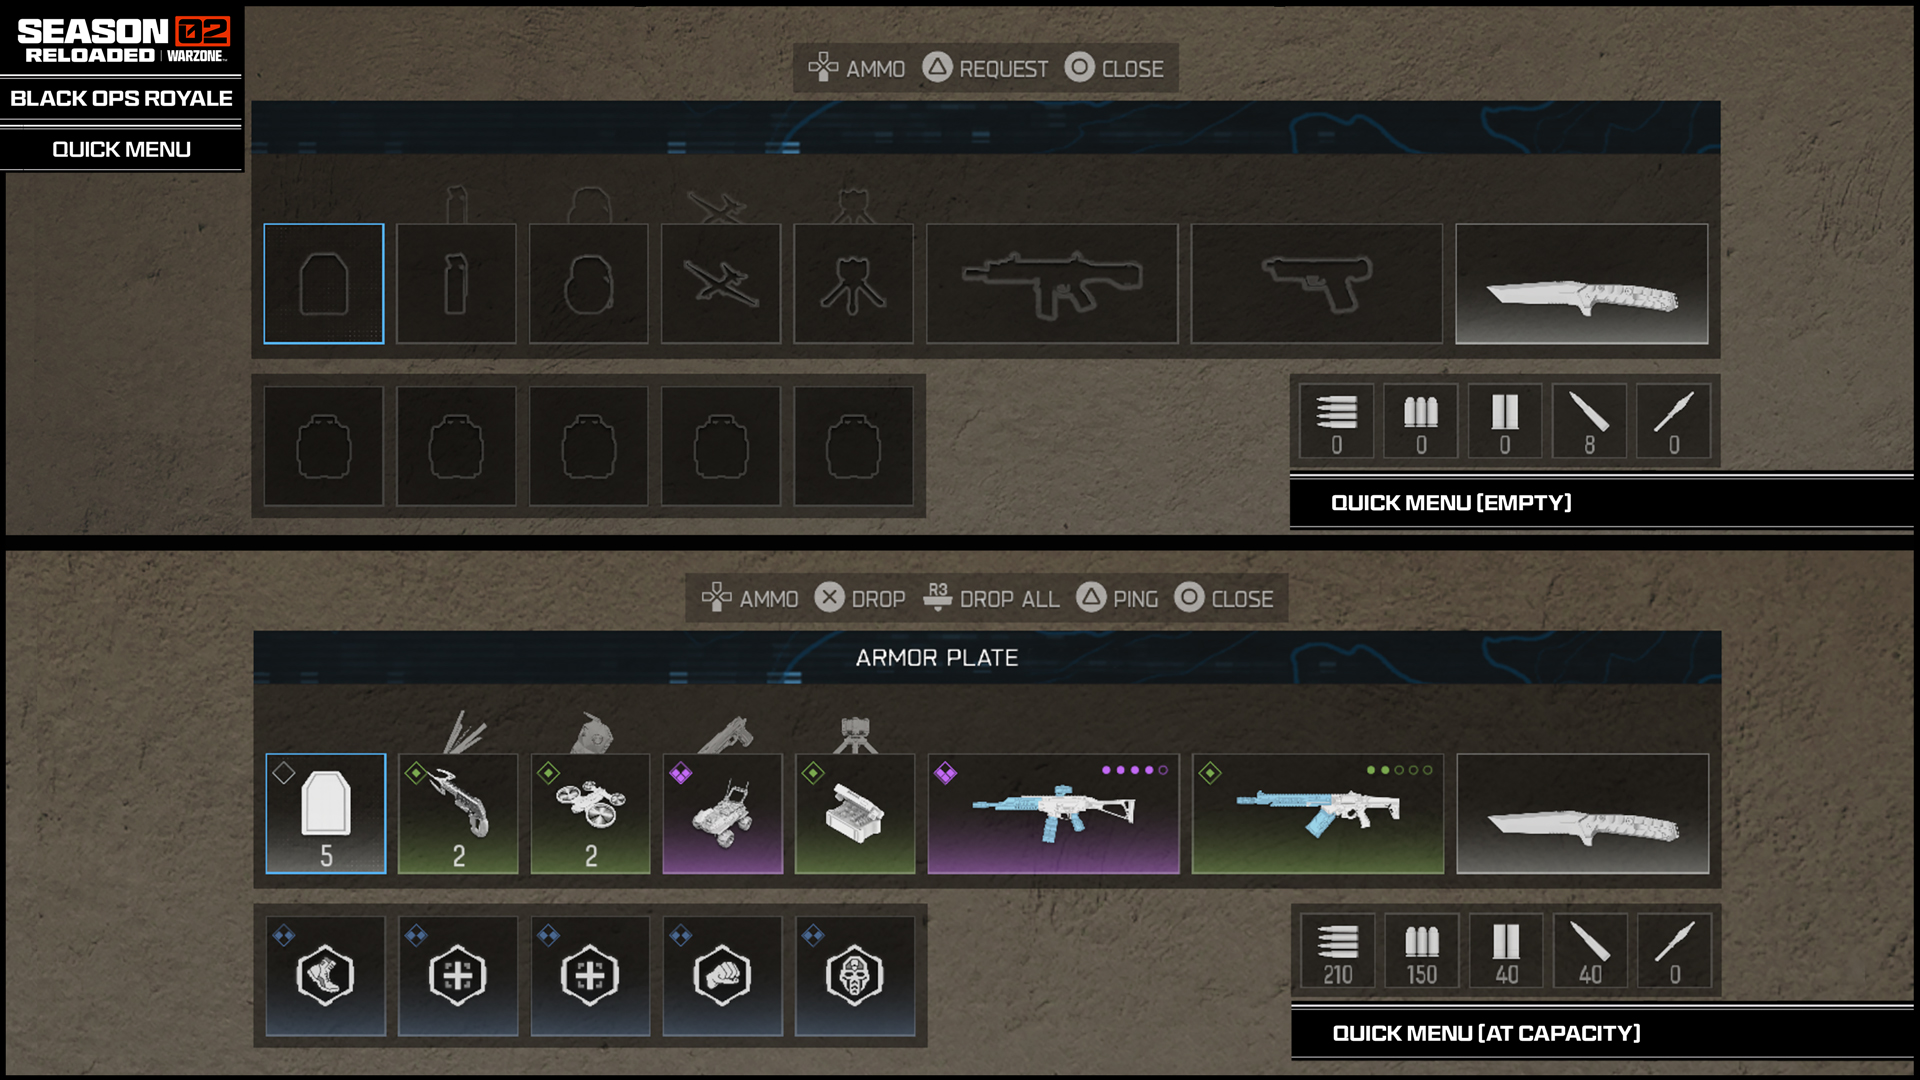
Your inventory system is streamlined via the Quick Menu (also known as the Inventory Menu) and features familiar elements from the original Blackout GUI. Your carrying capacity has been modified in this mode to allow the following:
- Equipment Menu: You have quick access to an Equipment menu inside your HUD, which shows the following:
- Armor Plates and number carried
- Tacticals and number carried if applicable
- Lethals and number carried if applicable
- Killstreaks
- Field Upgrades and number carried if applicable
- Your three weapons (up to two guns and the current rarity of each, and your Melee)
- Up to five Perk placement slots (that you can switch out as needed)
- This menu is primarily used to quickly drop any items you may not need or your teammates could utilize, such as Armor Plates or weapons.
Tac-Map Menu and Upgrade Path Intel
Tac-Map: Access your Tac-Map Menu for more clarity regarding the Avalon AO, including locations of Activities. Additional Tac-Map Data is also available: Hover over any icon on your Tac-Map to gain more specific details within the Tac-Map screen.
Upgrade Path: Critical information on the Upgrade Path of your Primary and Secondary Weapons, including the Attachments you’ve unlocked for each.
Scoreboard and Stats: As usual, these offer insights into you and your squad’s score, as well as how well you are performing with each weapon, and in the match.
Note: Additional combat information is now available during the loading screen, showing your K/Ds, Top Ten placements, and Games Played in this mode.
Part 5: Black Ops Royale Perk System
Perks Overview
Perks are found as ground loot, in supply boxes, or as rewards, and activated when you want to use them. Your main HUD and Inventory HUD both show the Perks you are carrying, and those you have activated, as well as those you are waiting to activate. After activation, Perks last for a duration, after which the benefits run out.
- There are no “Slots” for Black Ops Royale Perks. Instead, you can grab, carry, and usually utilize Perks as you pick them up, or after storing or accessing them from your Quick Menu.
- Perks can be gathered, swapped between teammates, and specific Perk combinations can be utilized during the early, middle, or late game stages, a key strategy to success.
- Your maximum of five carried Perks are quickly and intuitively swappable and activated from your Inventory menu, though you can have more than five active at one time.
- You can apply a Perk and then close out the Inventory menu, or queue a second or additional Perks, then immediately click on the next Perk you want to apply, allowing you to “hot swap” and click on several Perks and then close out of the Inventory menu.
- Once acquired, Perks have three states to them: they can be saved for later in the match, saved for a teammate and dropped for them, or activated.
- When you find a Perk kit on the ground, you have two options: To Equip or Stow: It’s important to stow it, as the Equip option starts the Perk’s effects immediately.
- Because Perks are consumable and temporary, you have to make deliberate decisions about when to use them, adding an extra layer of strategy to each encounter.
Available Perks
Note that most Perks last between two and four minutes of match time. In the general duration timing listed below, “Short” indicates a time of around two minutes, “Long” indicates a time of around four minutes, and “Medium” indicates a time between the two, between two and a half and three and a half minutes.
Awareness

Duration: Short.
Effects: Increases the volume of enemy footsteps by a modest amount. You also gain the ability to track enemy footprints.
Notes: This perk is best utilized when you’re about to engage or investigate an area with enemy activity.
Brawler

Duration: Long
Effects: Gain a small amount of additional health when engaged in melee attacks. Provides bonus to your health if you are fully healed. Strong increase in melee damage. Adds the Tactical Sprint ability.
Notes: Excellent resilience and agility improvements. Can be used when in tight confines, or you’re low on ammunition and need to finish off foes with your fists or a knife.
Engineer
Duration: Medium
Effects: Allows you to see enemy equipment, killstreaks, and vehicles through walls. When you’re a driver or a passenger in a vehicle, it will repair itself over time.
Notes: This aids your awareness and supports your team. If you want to avoid equipment and spot it from a distance, equip this Perk.
Iron Lungs
Duration: Long
Effects: Increases the time you can hold your breath while underwater or using certain Optic Scopes. Reduces weapon flinch and idle sway.
Notes: A vital perk for long-range sniping combat, or those attempting to stay submerged for longer periods of time.
Looter

Duration: Short
Effects: Supply boxes within a reasonably proximity are outlined. A modest increase in the chance to find higher-value loot (more special items).
Notes: This support perk enables you to increase the value of opening crates in unlooted areas.
Medic

Duration: Long
Effects: Downed allies return to the fray with impressive bonus health. You can insert Armor Plates more rapidly. You can revive yourself and others more quickly.
Notes: For the support Operator who needs rapid protection and can work with a squad to patch teammates up more proficiently.
Mobility
Duration: Long
Effects: No fall damage. You swap weapons more rapidly and reload more quickly.
Notes: For those seeking more dexterity, and zero chance of cratering after a wingsuit mishap.
Outlander
Duration: Medium
Effects: Reduces the damage you take if caught in a Circle Collapse and increases the movement speed if inside a Circle Collapse, both by a modest amount.
Notes: Adding a minor improvement to your maneuvering within a Circle Collapse can be very beneficial, though it is extremely situational.
Paranoia

Duration: Long
Effects: You can sense when an enemy is looking at you.
Notes: Marks around the screen indicate whether an enemy is facing your direction, allowing you more time to react accordingly and tactically.
Reinforced
Duration: Long
Effects: Explosive and fire-based damage is reduced by a sizable amount and cannot down you if you’re struck while at full health. You gain resistance to Flashbangs and Stuns, and suffer reduced damage from the Hand Cannon, War Machine, and Death Machine.
Notes: Added resilience is always welcomed, providing the enemy utilizes offense specific to this Perk.
Skulker
Duration: Long
Effects: Increases your movement speed by a minor amount. Increases your crouch and prone speed by a modest amount. Increases your swimming speed by an impressive amount.
Notes: Adding mobility to all facets of your movement is always advantageous, especially if you seek to escape or maneuver by water.
Squad Link

Duration: Short
Effects: When you ADS, enemies are automatically pinged. Shooting enemies outlines them briefly. Downed enemies within your general vicinity will be visible through obstacles.
Notes: This powerful Perk must be activated at the most tactically advantageous time, as it only lasts a short time. But it enhances enemy takedowns for you and your squad.
Note on Perks outside of Black Ops Royale Mode: For more information on new Perks coming to modes outside of Black Ops Royale — like the Berserker, Hunter, and Momentum Perks — check out the Season 02 Reloaded blog later this week.
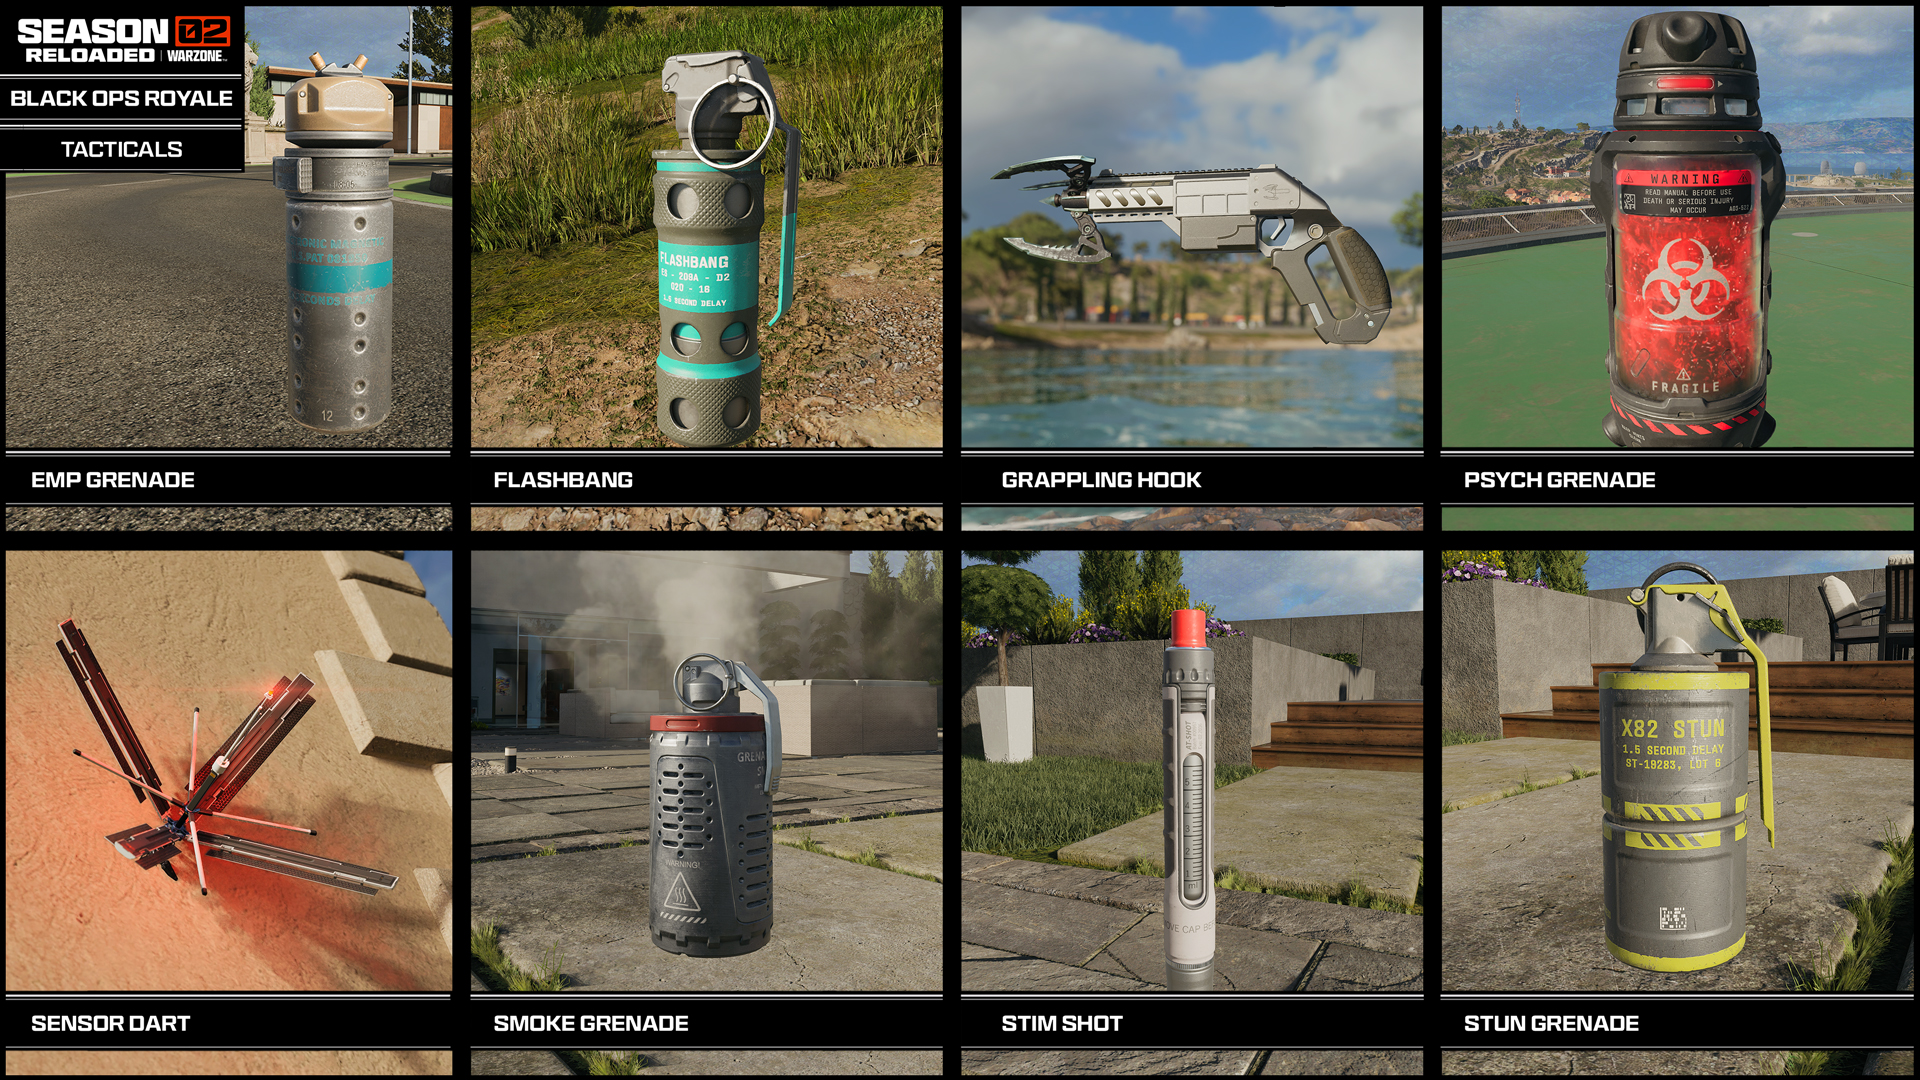
The following Tactical equipment is available within Avalon, during Black Ops Royale matches. Two different sets of Tacticals can be carried at a time and used.
- EMP Grenade: Disables or destroys electronics. Effective against Equipment, Killstreaks, and enemy players. Uncommon loot.
- Flashbang: Blinds and deafens targets temporarily. Common loot.
- Grappling Hook: See below. Uncommon loot.
- Psych Grenade: Explodes on impact, releasing a lingering cloud of hallucinogenic gas. Common loot.
- Sensor Dart: See below. Rare loot.
- Smoke Grenade: Deploys a smoke screen that blocks vision and automated targeting systems. Common loot.
- Stim Shot: Military stimulant that quickly heals combat wounds. Common loot.
- Stun Grenade: Slows victim’s movement and aiming. Common loot.
Returning Equipment Confirmed: Grappling Hook
Returning as a Tactical with multiple uses, increase your maneuverability considerably with the Grappling Hook, as well as the Wingsuit to Grappling Hook combo you might remember from your Blackout days. Hook onto buildings and even moving vehicles or the RC-XD Killstreak, and disconnect to drop into a Wingsuit glide, all with your next target in your sights! Uncommon loot.
Returning Equipment Confirmed: Sensor Dart
Returning as a Tactical is the go-to piece of recon Equipment! Lob out the sensor dart projectile and look for a radar ping where it lands, showing enemies in the vicinity. The trick, of course, is where to throw it: Ideally somewhere hidden as the dart can be destroyed by bullets, explosives, or EMP pulses. Sensor Dart can also be pinned to something moveable like an enemy vehicle, platform, or even a drone or another player! Just be wary near water or strong electrical fields. Rare loot.
Lethals (7)
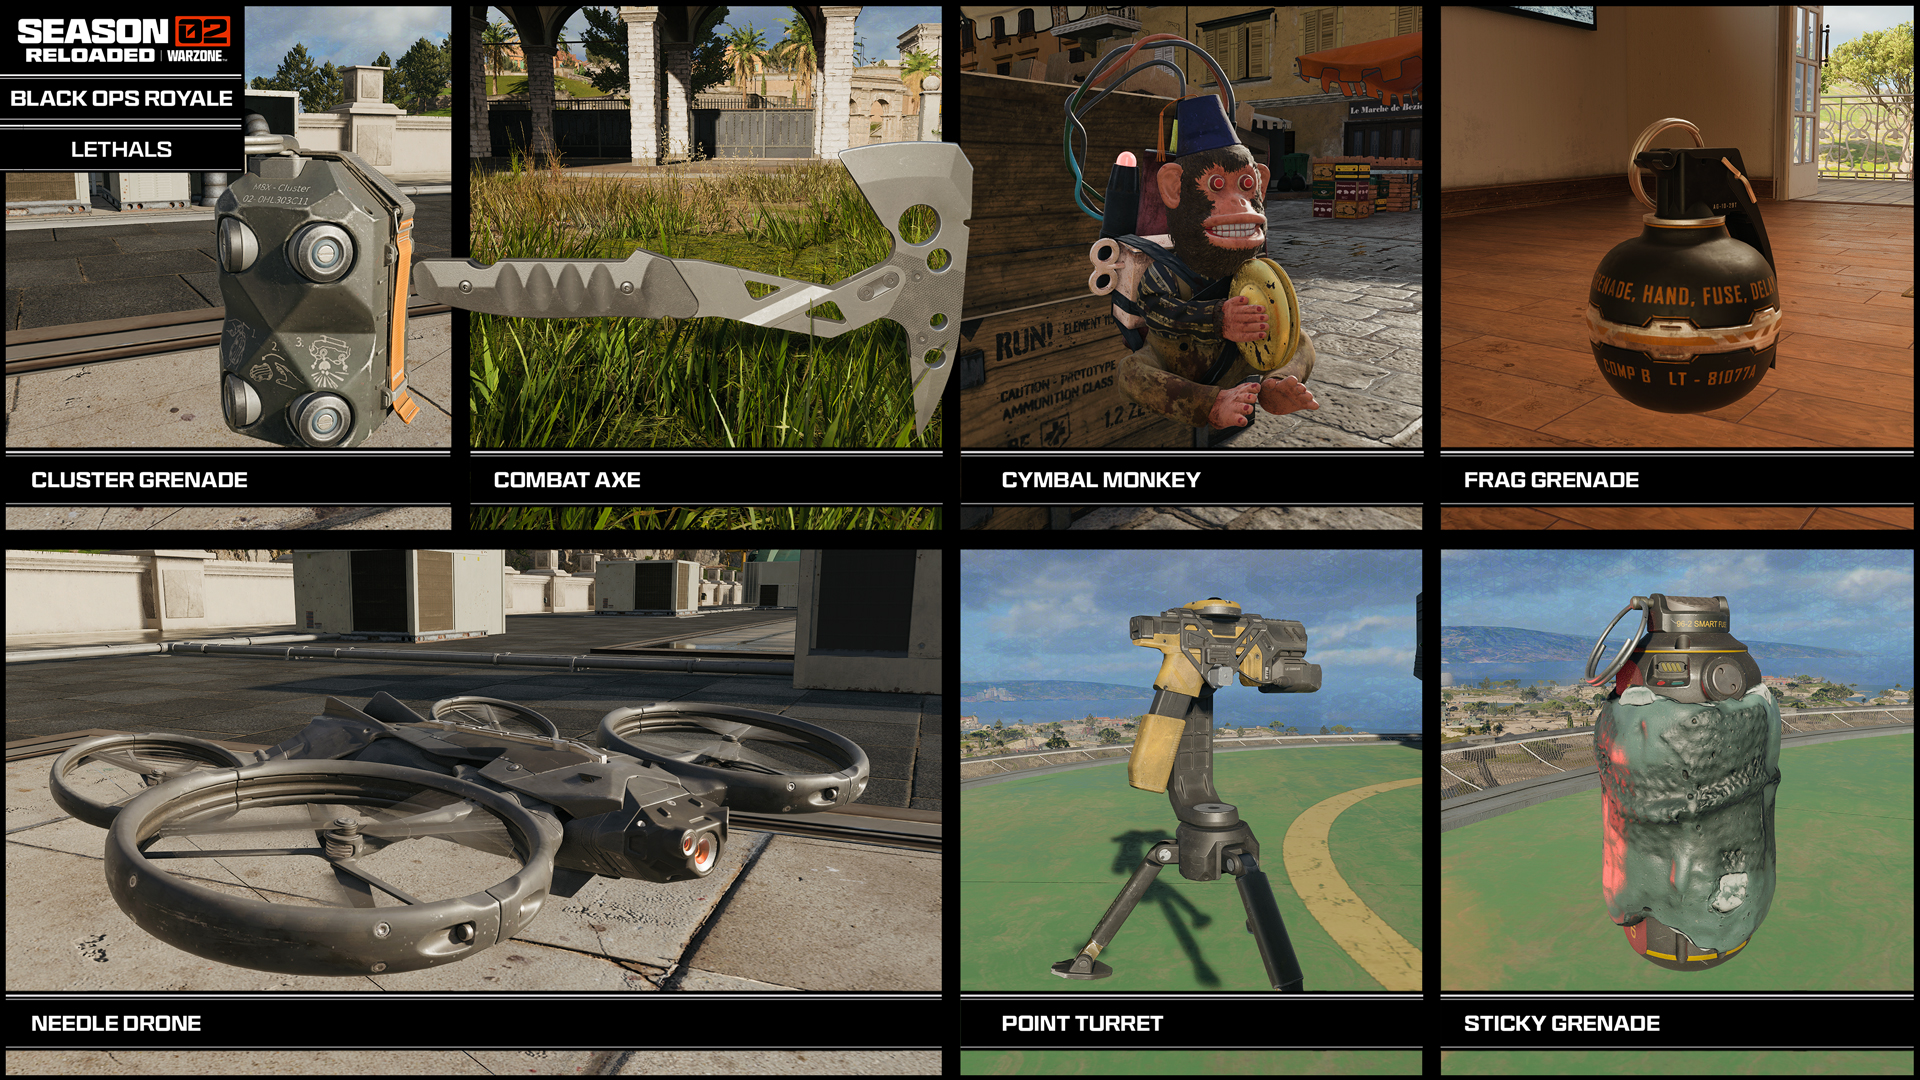
The following Lethal equipment is available within Avalon, during Black Ops Royale matches. Two different sets of Lethals can be carried at a time and used.
- Cluster Grenade: Device that scatters smaller explosives when detonated. Uncommon loot.
- Combat Axe: Thrown axe that can kill enemies in one hit. Bounces off surfaces. Uncommon loot.
- Cymbal Monkey: See below. Rare loot within Cradle Breaches.
- Frag Grenade: Cookable fragmentation grenade. Common loot.
- Needle Drone: Small flying drone that explodes on impact. Toggles between auto or manual control. Rare loot.
- Point Turret: Small deployable sentry turret that automatically shoots at enemies, distracting and damaging them. Rare loot.
- Sticky Grenade: Timed sticky grenade. Common loot.
Returning Equipment Confirmed: Cymbal Monkey
Another classic Blackout throwback, this explosive device — also known as a Monkey Bomb — causes a distracting sound that can lure nearby zombies. It explodes after a short countdown, inflicting damage in the immediate vicinity. Rare loot within Cradle Breaches.
Field Upgrades (7)
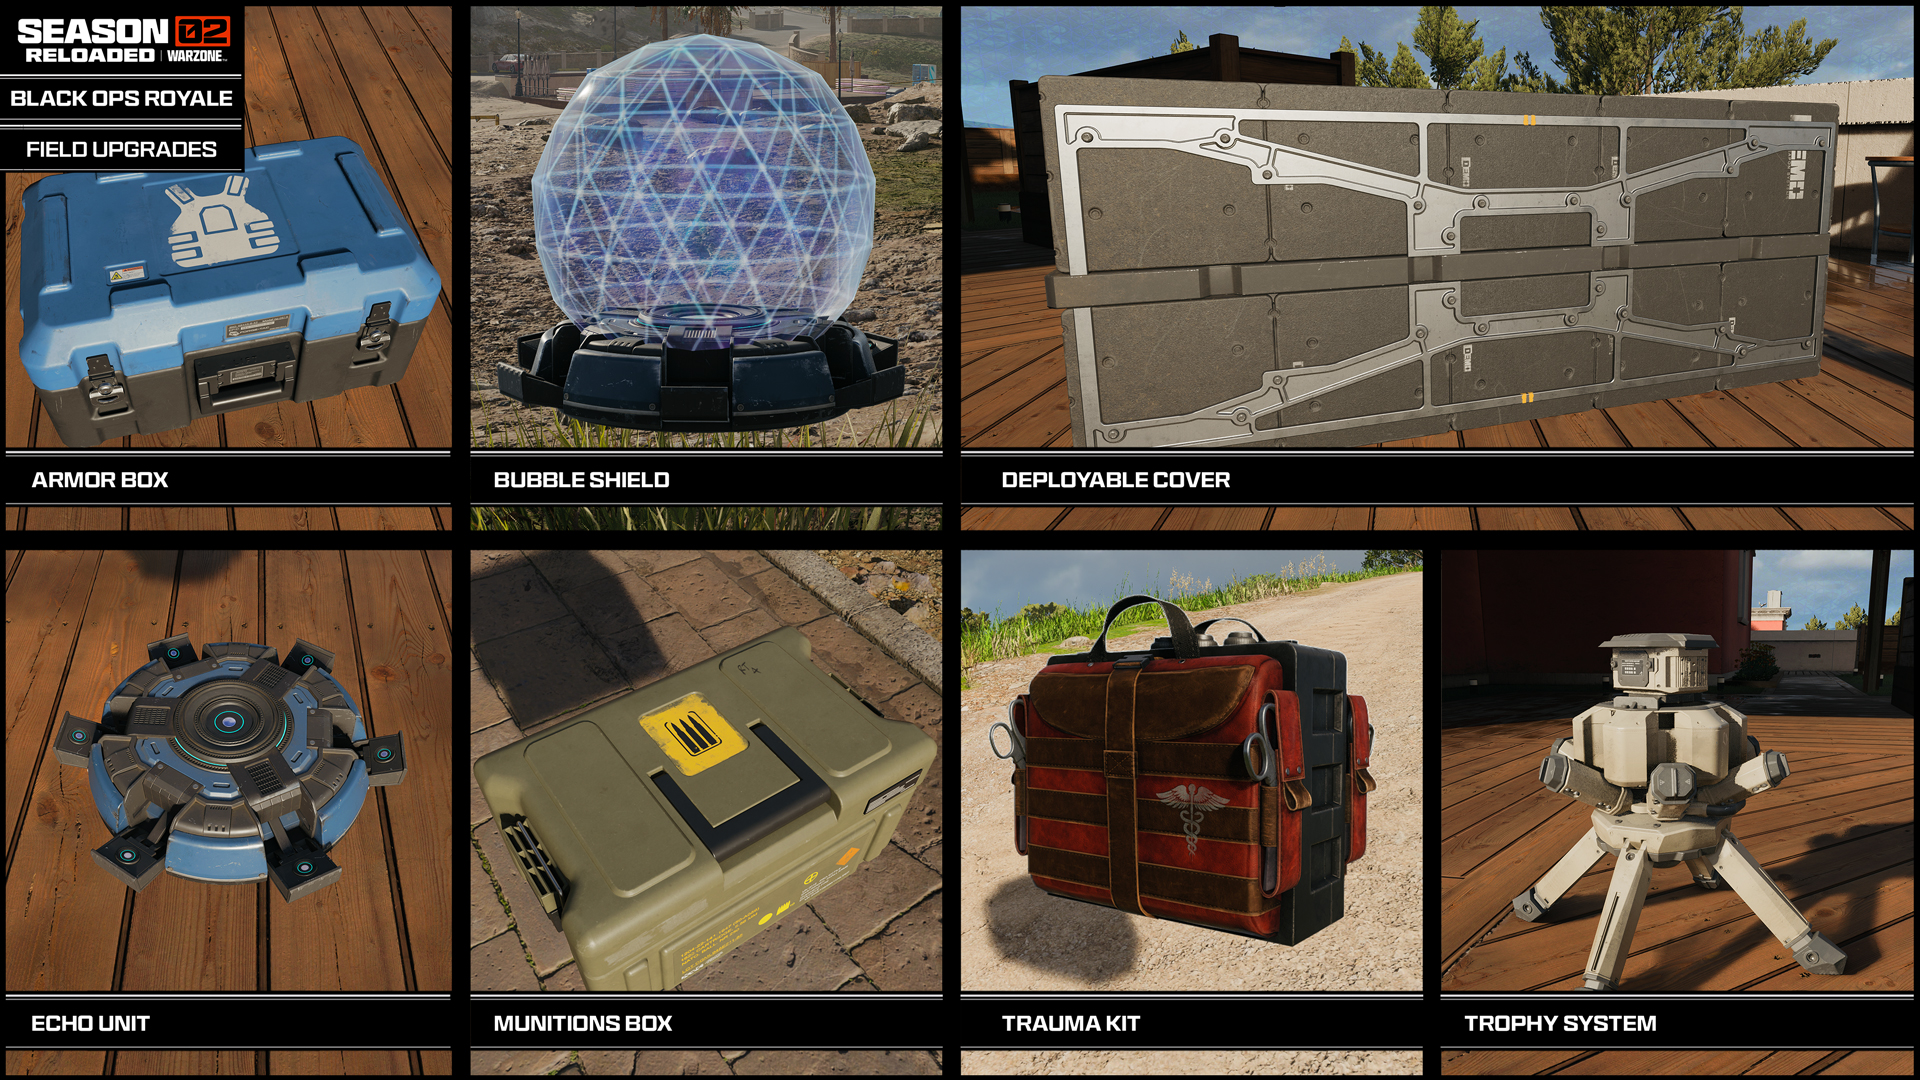
The following Field Upgrades are available within Avalon, during Black Ops Royale matches. Two different Field Upgrades can be carried at a time and used.
- Armor Box: A blue box that allows you to restock the Armor Plates for you and your team. Common loot.
- Bubble Shield: A defensive item that deploys a large, domed Bubble Shield that absorbs incoming ranged and explosive damage from all directions until it has sustained enough damage and disintegrates. Rare loot.
- Deployable Cover: A ballistic shield barricade you can place onto the ground and use as cover or to mount your weapon onto. Common loot.
- Echo Unit: Creates a stationary facsimile of the player to act as a distraction. Destroyed by shooting at the base of the hologram. Common loot.
- Munitions Box: An olive color box for restocking equipment to both you and your squad when placed on the ground, refilling your Primary, Secondary, Tacticals, and Lethals. Uncommon loot.
- Trauma Kit: See below. Uncommon loot.
- Trophy System: Place on the ground or the flat surface of a vehicle, and the system destroys incoming enemy projectiles. Common loot.
Returning Equipment Confirmed: Trauma Kit
Infamous in aiding players during late-match engagements, Trauma Kits are extremely beneficial as they allow you to regain full health as well as bonus health after a three-second usage. This heals you back to full health (150 units) plus an additional 100 temporary units to a new maximum of 250. Once the temporary health is lost, it does not regain. Uncommon loot.
Killstreaks (8)
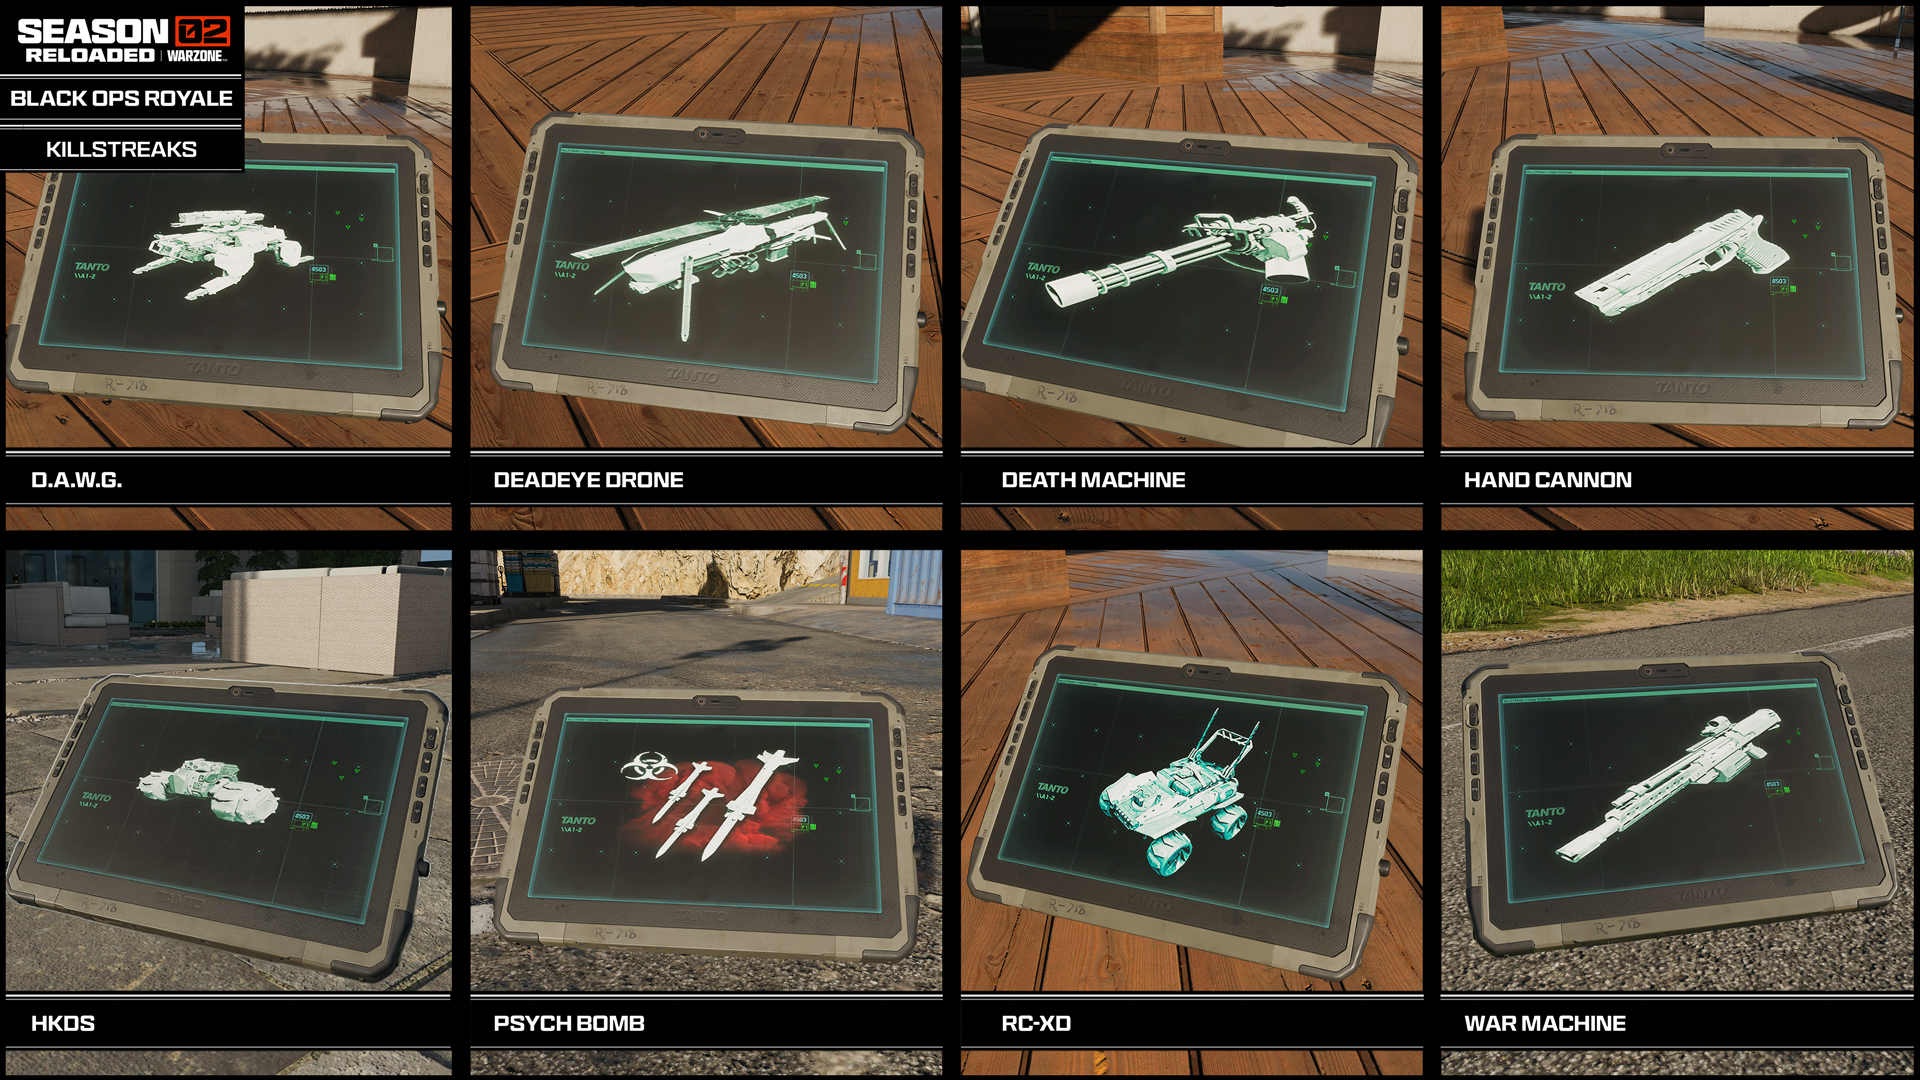
The following Killstreaks are available within Avalon during Black Ops Royale matches. Note that Black Ops Royale Killstreaks mainly focus on personal and protective firepower rather than area-of-effect destruction. One each of two different Killstreaks can be carried at a time and used. All Killstreaks should be considered Uncommon loot.
- D.A.W.G.: Deployable Armored Weaponized Groundcraft featuring a large caliber turret and rocket pod. Very effective against infantry targets. This mobile quadrupedal turret that follows you, firing on enemies.
- Deadeye Drone: Remote piloted aerial drone equipped with small caliber sniper rifle and limited ammunition. This remote armament can be controlled by the player.
- Death Machine: Heavy minigun with a fast fire rate, high penetration, and a large ammunition capacity.
- Hand Cannon: Powerful large caliber handgun with high bullet damage and penetration.
- HKDs: Aerial payload delivers wheeled Hunter Killer Drones which seek targets and explode.
- Psych Bomb: See below.
- RC-XD: Deploy a small remote-controlled, remote detonated explosive vehicle.
- War Machine: Powerful burst-fire grenade launcher with projectiles that explode on impact. Large magazine.
New Equipment Confirmed: Psych Bomb
A powerful cluster strike is called delivering a neurotoxic gas cloud at its impact sites. Expect around five payloads in a circular pattern, in two waves, with the effects of the gas lasting around ten seconds. Any foes caught within these detonations should expect to suffer from hallucinations and limited visibility.
Inventory Items and Tiered Armor Vests
There are certain important items that aren’t utilized like normal Equipment and are either stored in your Inventory Menu to be shared or used later in a match or used immediately upon access. Here’s a list of what to look out for:
- Ammunition: See below. Common loot.
- Armor Satchel: Initial Armor carrying capacity is up to three plates in use as protection, and a further five in reserve. This increases your reserve Armor carrying capacity by three to a maximum of eight. Uncommon loot.
- Tiered Armor Vests; Levels 1, 2, and 3: See below. Rare loot.
- Redeploy Token: Allows you to redeploy if you’re slain. Only one can be carried. Rare loot.
- Safecracker Drive: Allows access to Guild safes across Avalon in the Strongbox Crack Activity. Uncommon loot.
Note on Attachment Kits: Upgrades your held weapon in both rarity and attachments by one level. See early in the blog for further intel. Common loot. These are automatically used and cannot be saved or carried in your Inventory.
Returning Equipment Confirmed: Ammunition

Found across Avalon in Supply Boxes, as ground loot, in Munition Boxes and Ammo Caches, there are five different types of ammunition to uncover and apply to your chosen weapons, keeping additional or unused ammo types in your Inventory menu to drop for teammates or use if you change weapon types. Here’s how the ammo types break down. All ammo is Common loot.
- Assault Rifle/Light Machinegun (AR/LMG)
- Pistol/Submachine Gun (Pistol/SMG)
- Shotgun
- Sniper
- Launcher
Returning Equipment Confirmed: Tiered Armor Vests 1, 2, 3

In Black Ops Royale, you can locate special protective enhancements known as Tiered Armor Vests. These don’t have to be found in a linear progression (i.e., you can find Tier 2 Armor Vest without needing a Tier 1). Each of the three Armor Tiers offers a degree of damage mitigation on top of your usual plate protection:
- Mitigation does not apply if you have no plates equipped.
- Mitigation only applies to damage done to plates, effectively toughening them.
- Mitigation applies to all incoming damage, whether ballistic, explosive, or melee based.
- You cannot equip a lower Armor Tier if you have a higher one equipped.
- Armor Tiers persist until the operator is slain or equips a higher Armor Tier.
- Armor Tiers cannot be dropped or given to another teammate, though they are available to loot from a rival Operator after they are slain.
- Tier 1: Provides moderate mitigation when you have plates. Primarily found as ground loot. Uncommon.
- Tier 2: Provides greater mitigation when you have plates. Rare ground loot. Reward for completing Strongbox Crack (Activity).
- Tier 3: Provides optimal mitigation when you have plates. Very Rare ground loot. Reward for completing Cradle Breach Activity: Cradle Boss.
Part 7: Black Ops Royale Match Features
Map Navigation
A wide variety of vehicles, including a new Helicopter, provide rapid access across the map via land, sea or air. But you start it all in a VTOL:
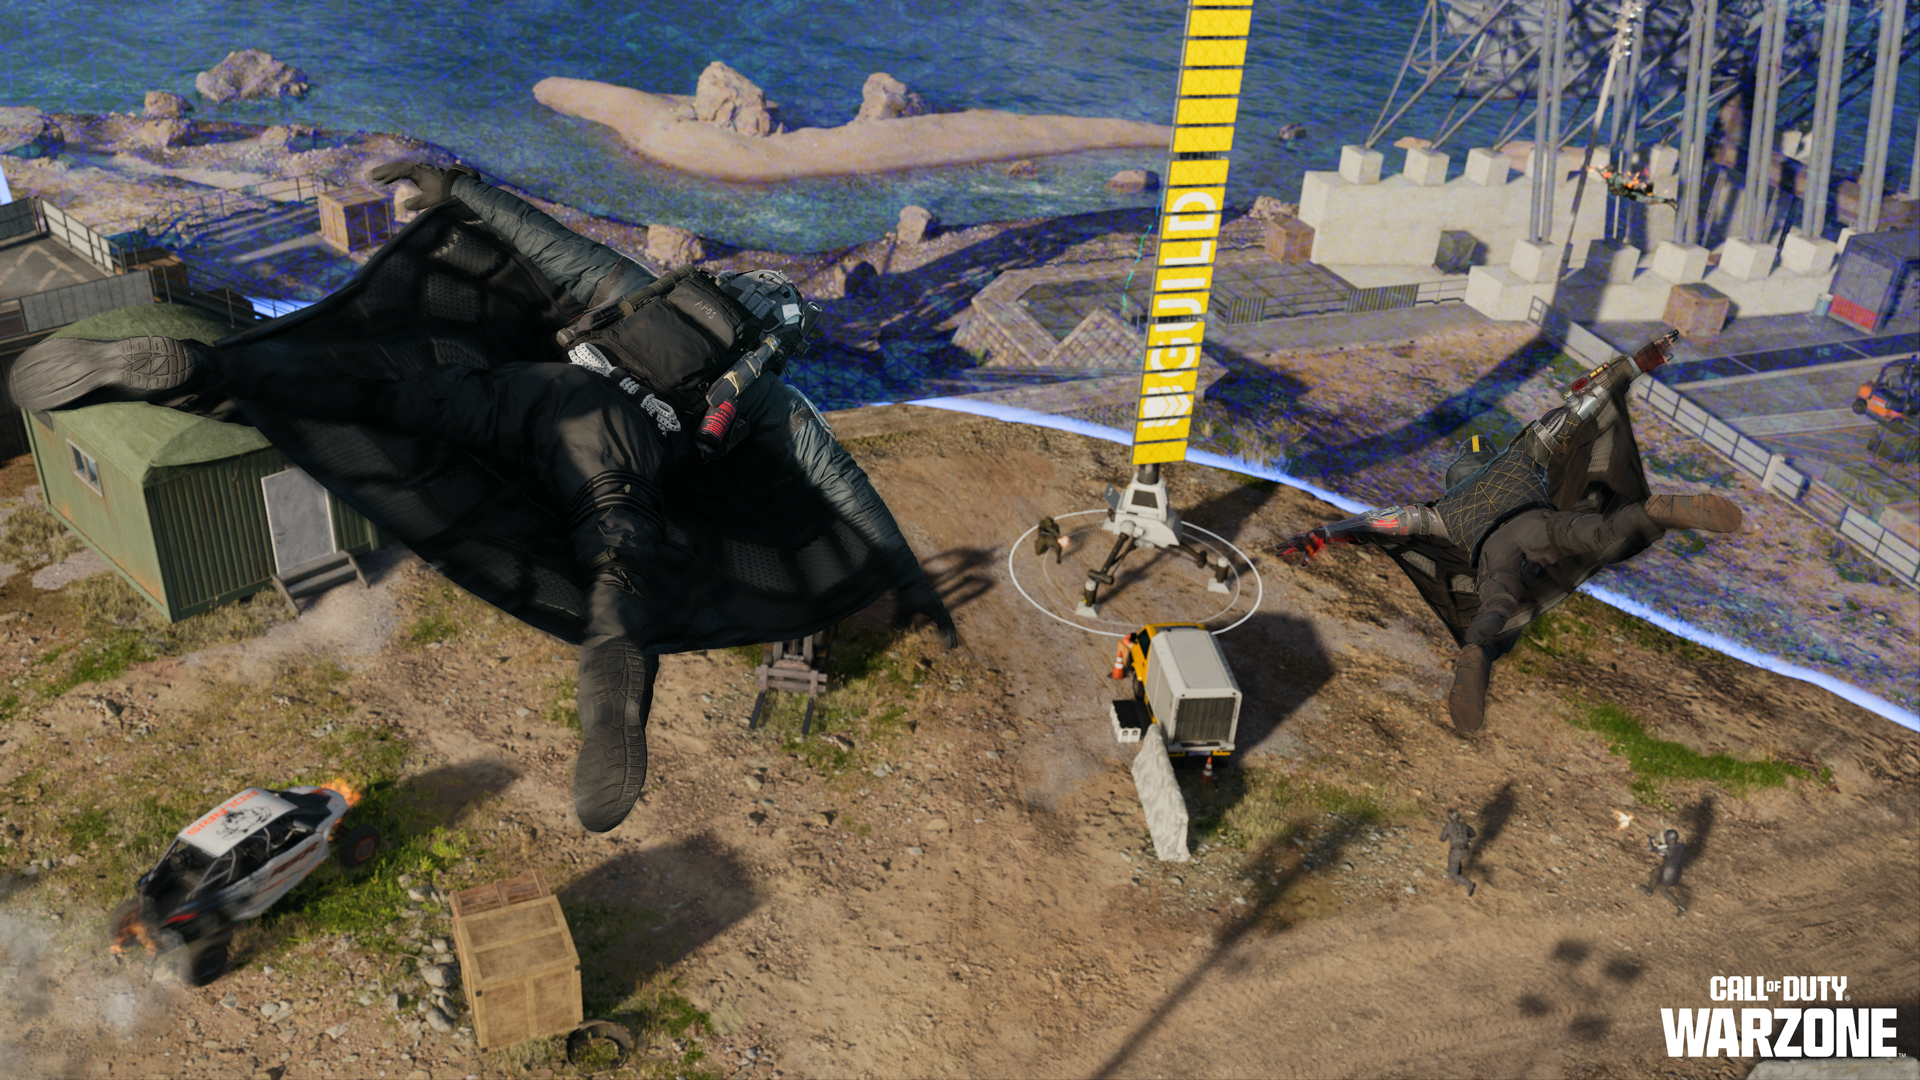
Wingsuit
Your main mode of Infil transportation is the Wingsuit. You are encouraged to utilize the air brake, stowing and reequipping the Wingsuit while airborne, Free Looking to enhance your tactical knowledge of the immediate area, and swift deployment of the Wingsuit if you drop from a high cliff or building.
Ground Movement
When you’re on the ground, expect to use your normal maneuvering, along with aspects of Omnimovement, mainly the innate ability to Wall Jump up vertical surfaces to a degree, which is helpful when mantling or taking evasive moves over defenses.
Movement Across Water and Tidal Flats
Compared to the version of Avalon available to Black Ops 7 Endgame players, Treyarch has ensured increased maneuverability across the entire map, when Black Ops Royale launches and Avalon comes to Call of Duty: Warzone.
Overview
Outside of the newly created areas marked in the map image below, water acts as it usually does: You’re able to swim, switching to a pistol as an offensive weapon while underwater.
However, the rivers and shoreline predominantly in the southwest of Avalon have been heavily modified, featuring numerous ways to cross waterways via sandbanks, fords, tidal flats, and shallow marsh water. Expect areas of new land, additional zip lines, new highpoints to initiate wingsuit glides and even shallow sandbars which allow for infantry, wheeled vehicles, and boat traffic.
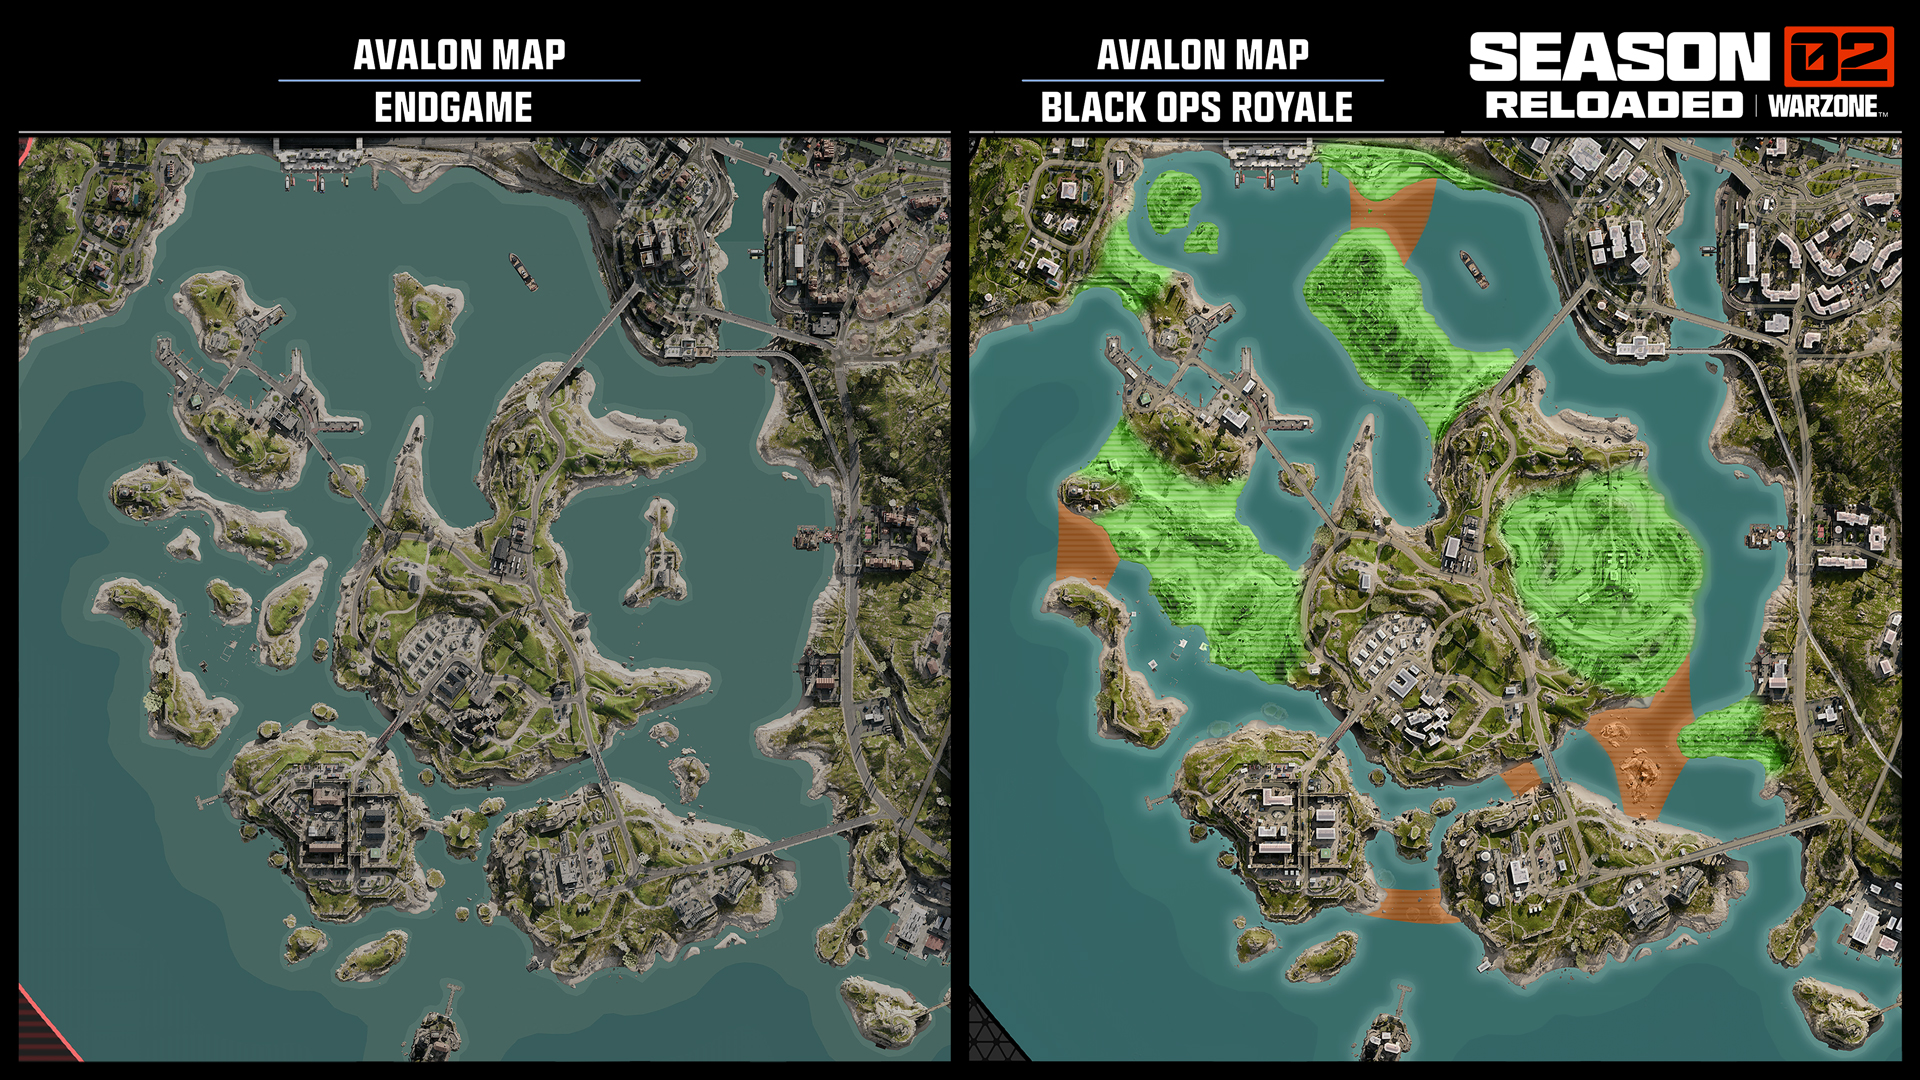
These modifications are of paramount importance to the team at Treyarch: “We made efforts to reduce water prevalence in the map, adding sections of exposed sand to connect islands, and new land areas that connect major land masses to streamline player movement for a better Battle Royale gameplay experience.”
Let’s take a closer look:
Shallow Waterways marked by marsh reeds and protruding boulders, where the buildup of silt allows Operators to wade through water at the same speed as traversing land, and some areas even allow you to drop into a Prone stance. Additionally, vehicles not designed for submerging can cross safely, while aquatic craft like Tactical Rafts and TAVs can still maneuver through unhindered.
Sandbars and tidal flats have been built up considerably across the coastal defense zone in southwest Avalon, but there are additional islands appearing along the rivers of Avalon. This is firm ground, usually sandstone or sandy in nature, with normal traversal rules applying as if you’re maneuvering across dry land.
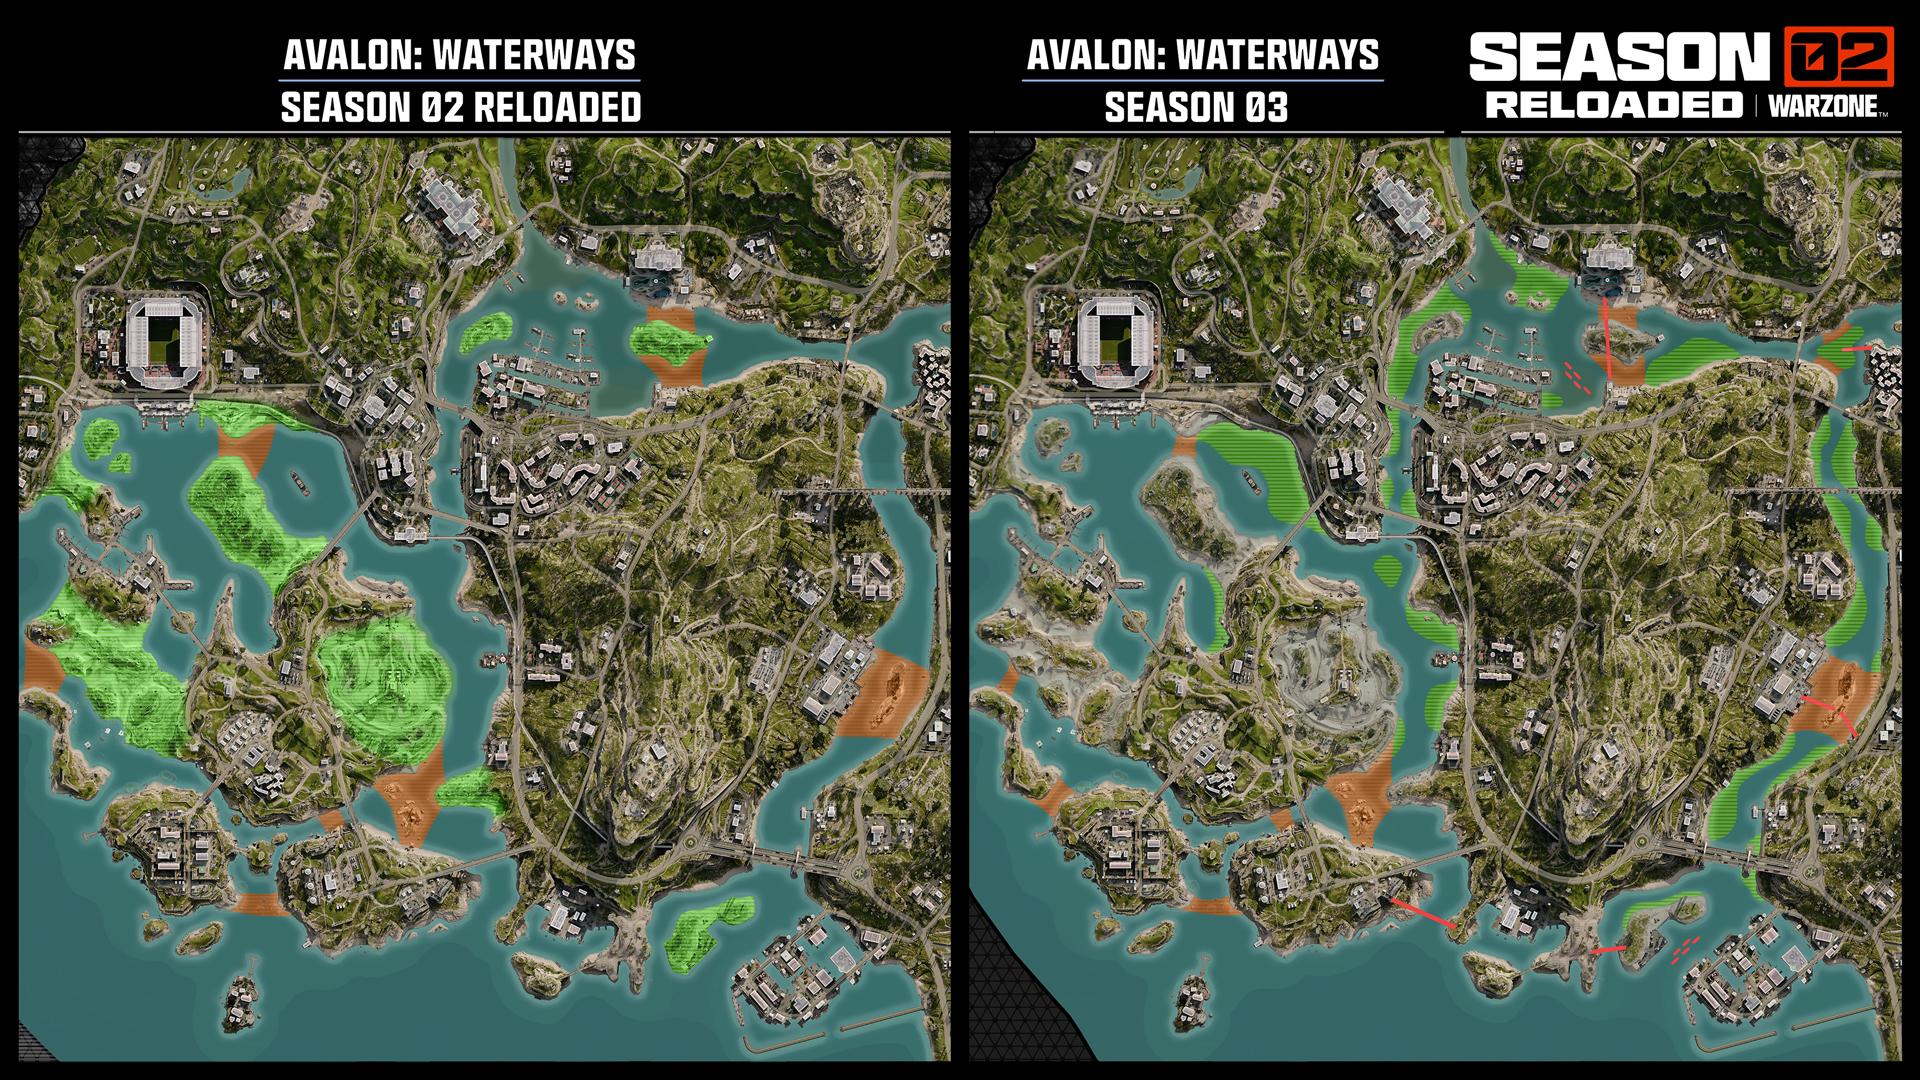
Season 03 Additions: To ensure the very best experience for players, expect Avalon’s transformation to continue. At the start of Season 03, more of these accessible Tidal Flats that increase the flow of battle, and the possibility of additional draining of deeper water, and additional zip lines across difficult-to-traverse areas, and small flotillas of boats, will be added.
Tidal Flats: Tour of Avalon
The following locations denote environments that were previously only accessible via swimming or watercraft, but are now traversable by foot or land vehicle:
Stadium Coast
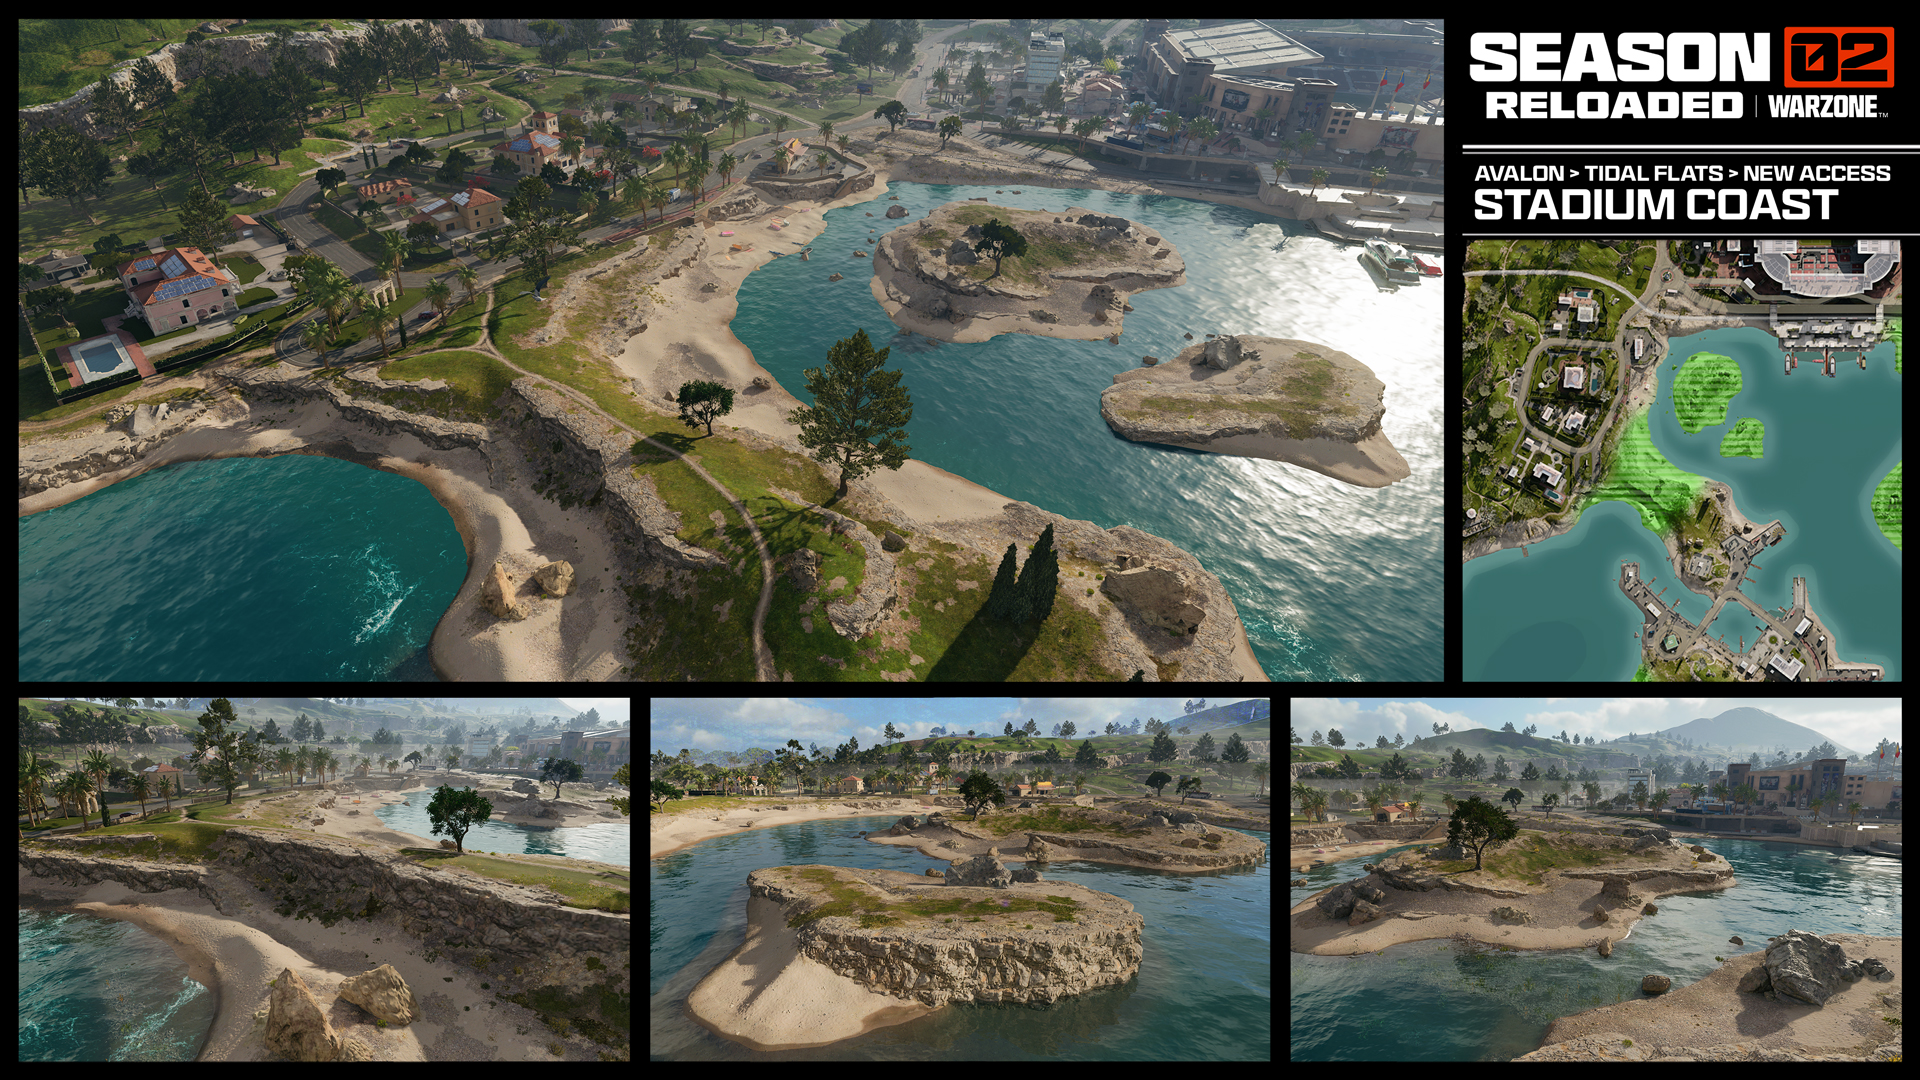
The Coastal Security outpost is no longer an island, with access via a new peninsula near two new islands close to the beach near Trinity Stadium.
Sandbar Ruins
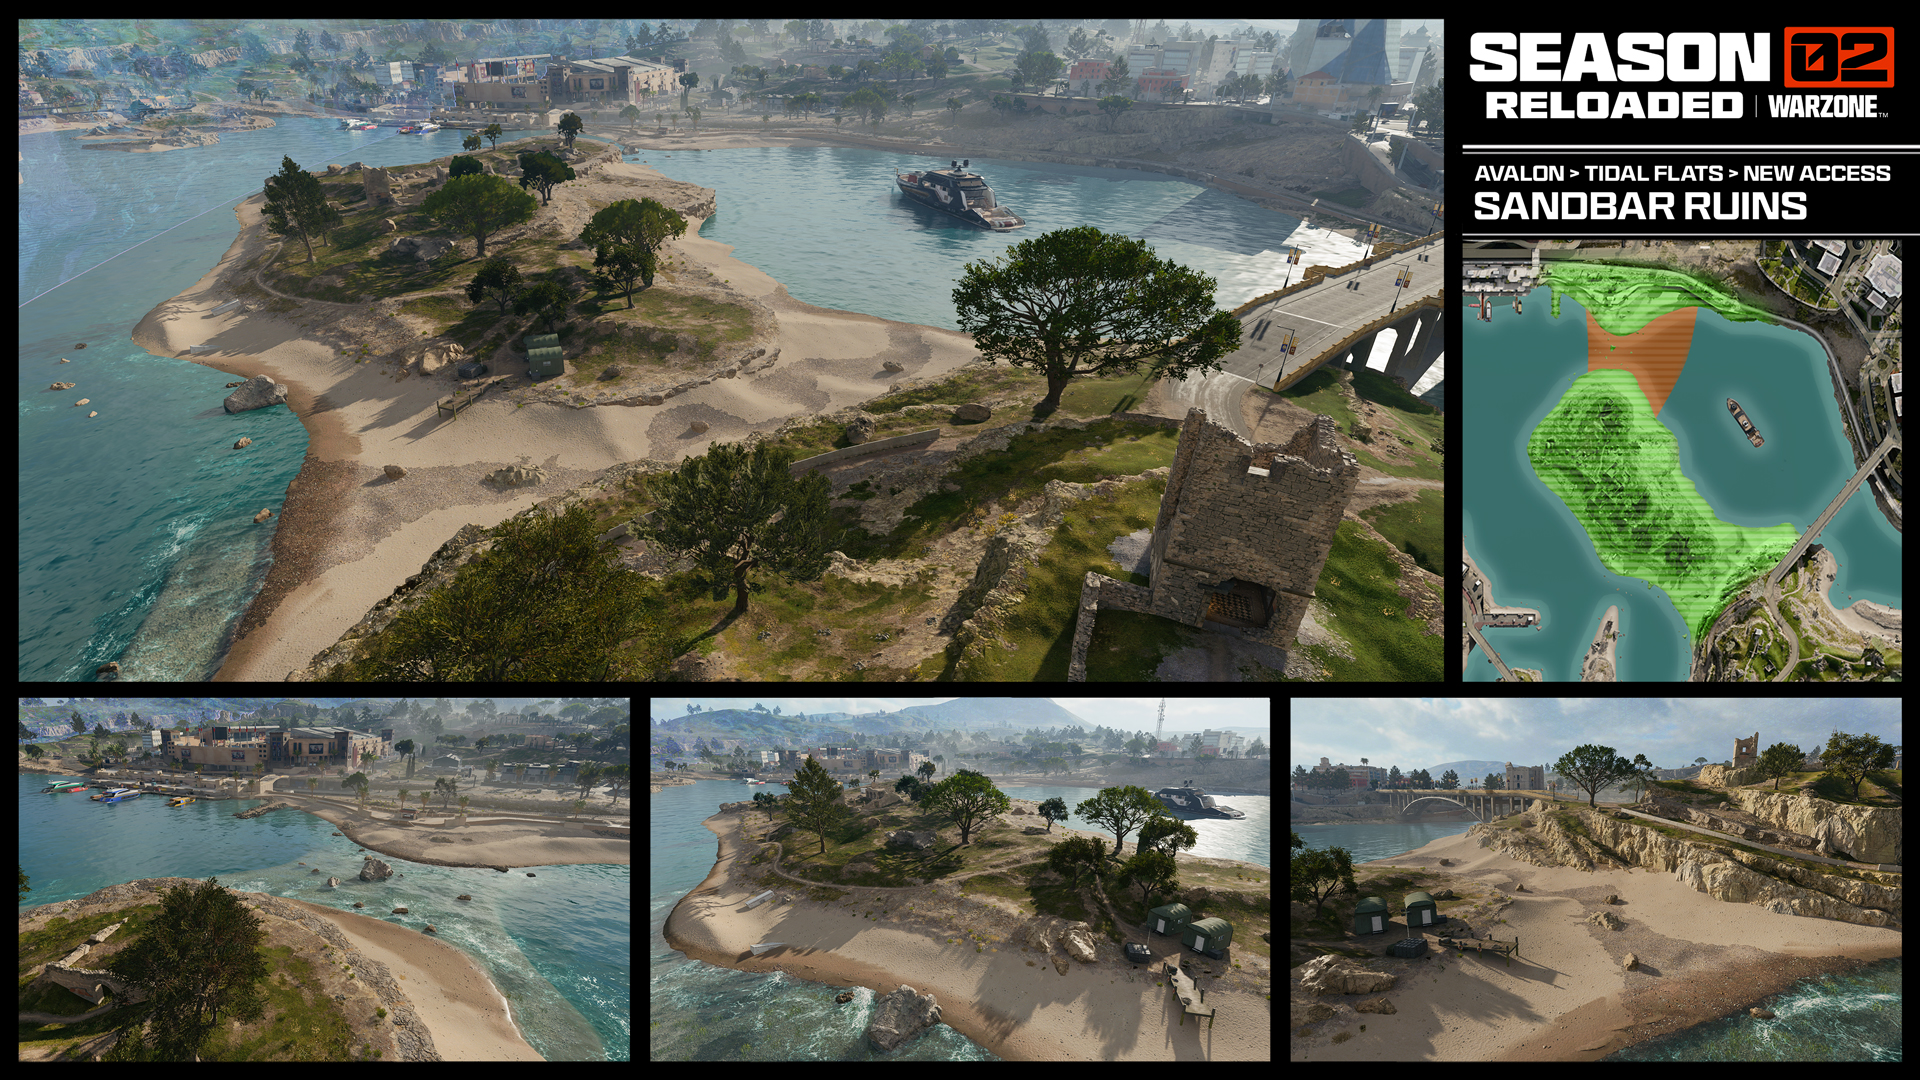
A large sandy abutment transforms a small island with dotted ancient ruins on it, into a sand bar and peninsula that stretches north to shallow waters and across to a new beach area, south of the Trinity Stadium Police Station.
Coastal Security Sandbars
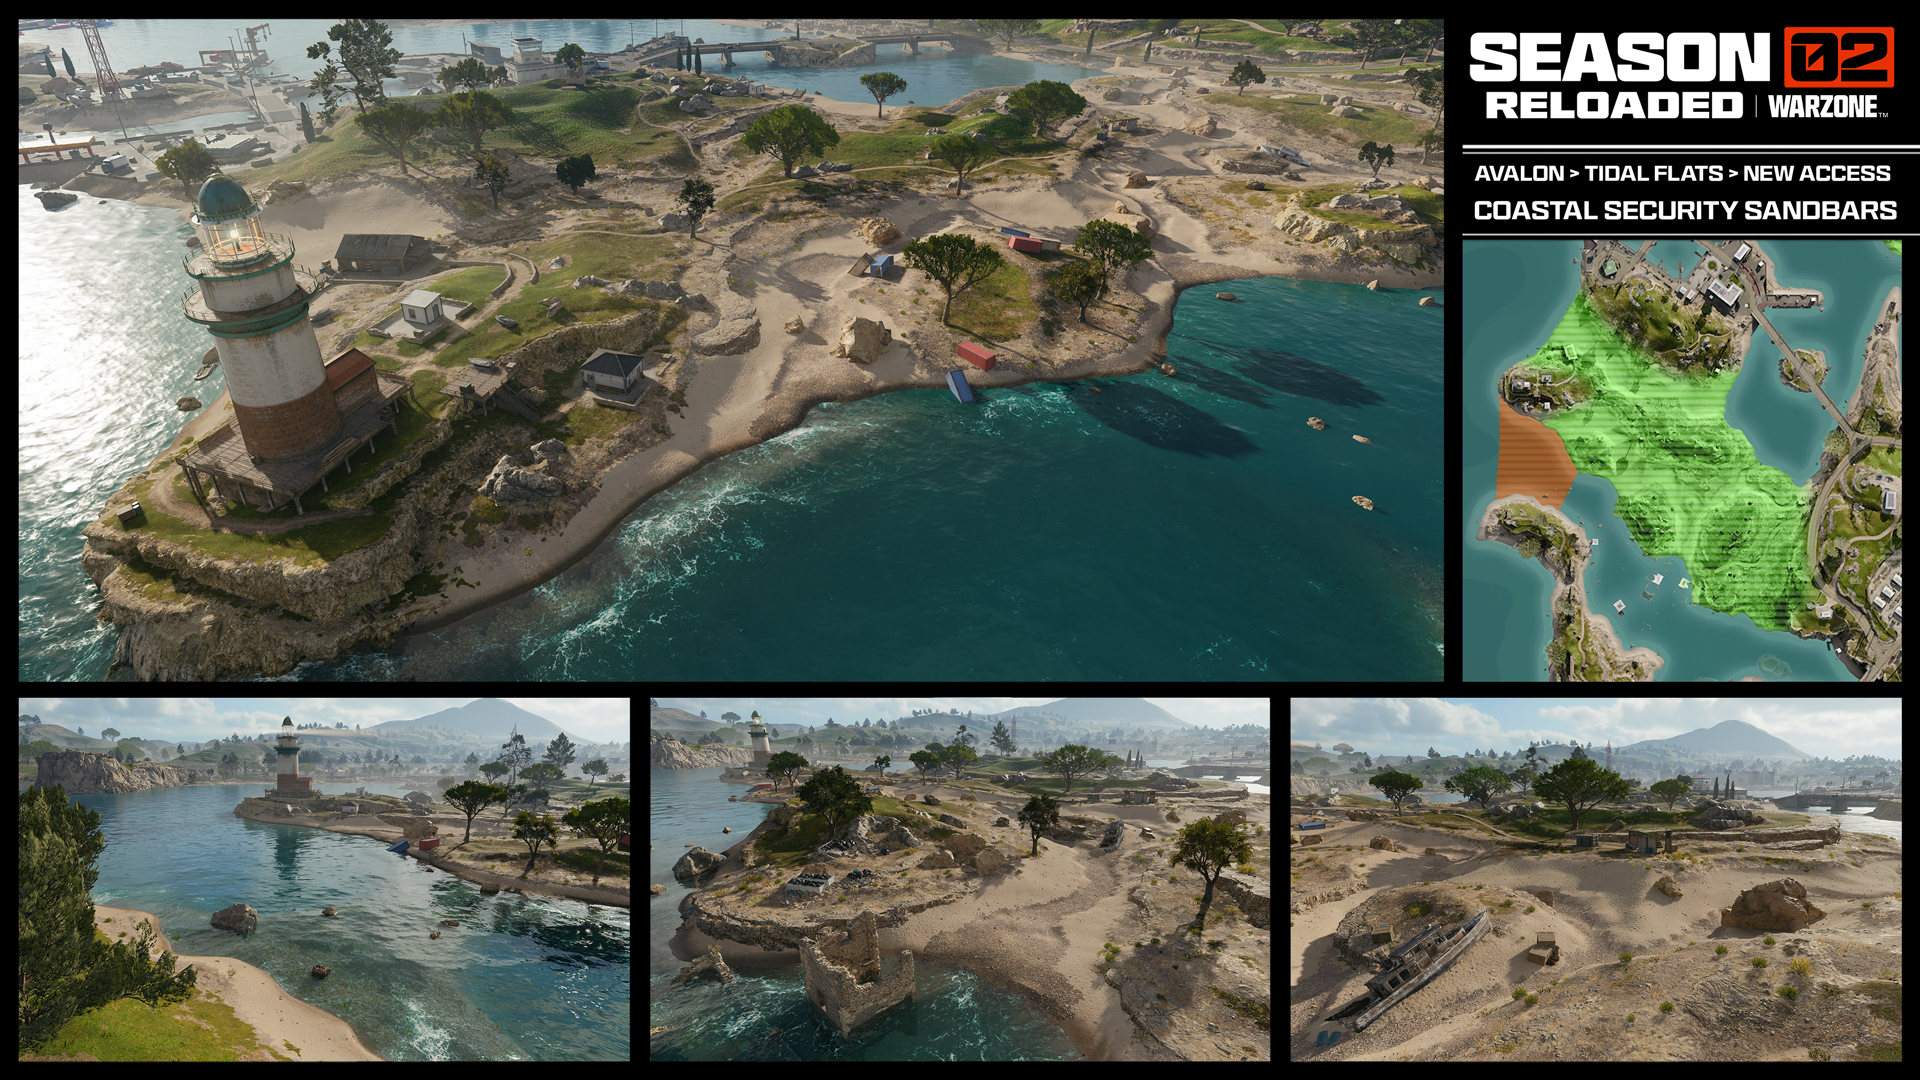
The lighthouse island and larger, Coastal Security area is now landlocked, joined together via a large section of undulating beach and rock outcrops, with access south from the lighthouse via shallow waters to the remote island close to the waterlogged ruins.
Military Outpost
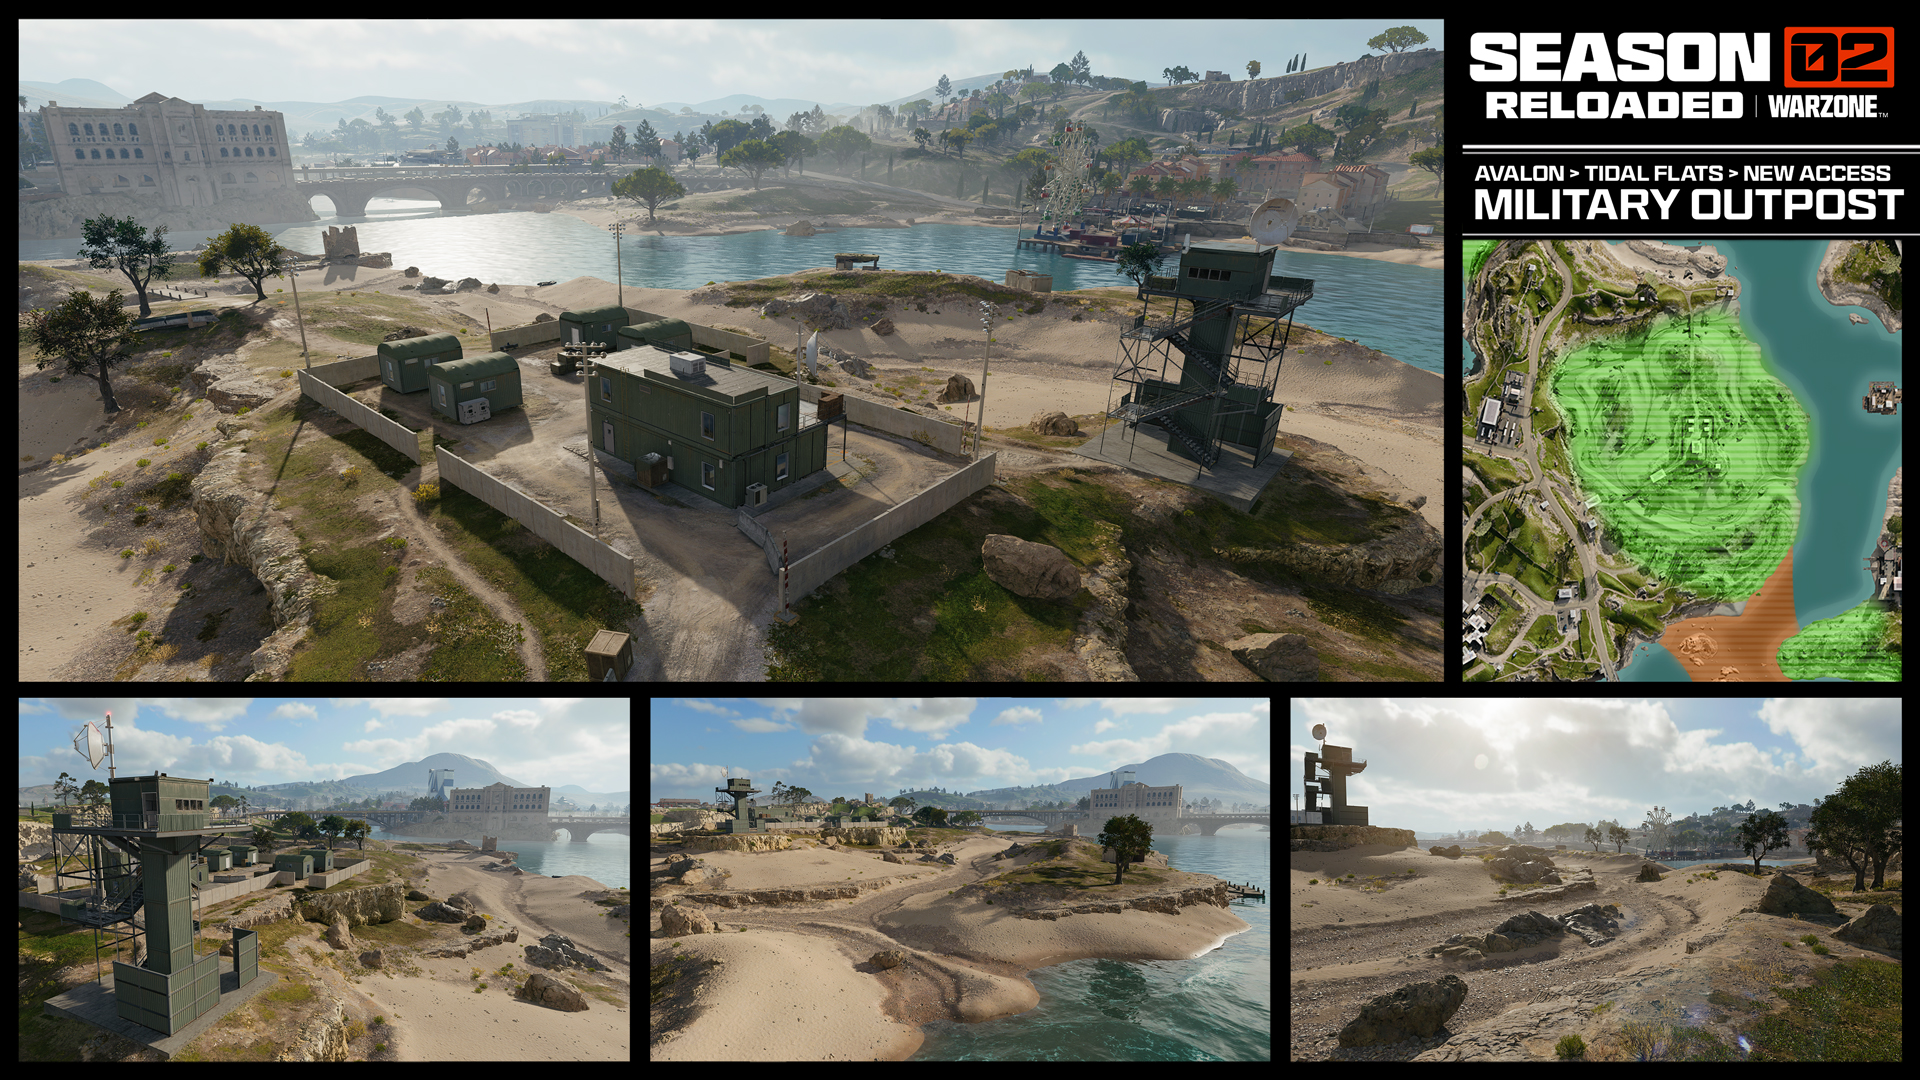
This small military base is no longer on an island and instead is surrounded by sandbars pockmarked with boulders and erosion. The shallow water to the south allows access to the southern area of Pier District.
Listening Post Waterways
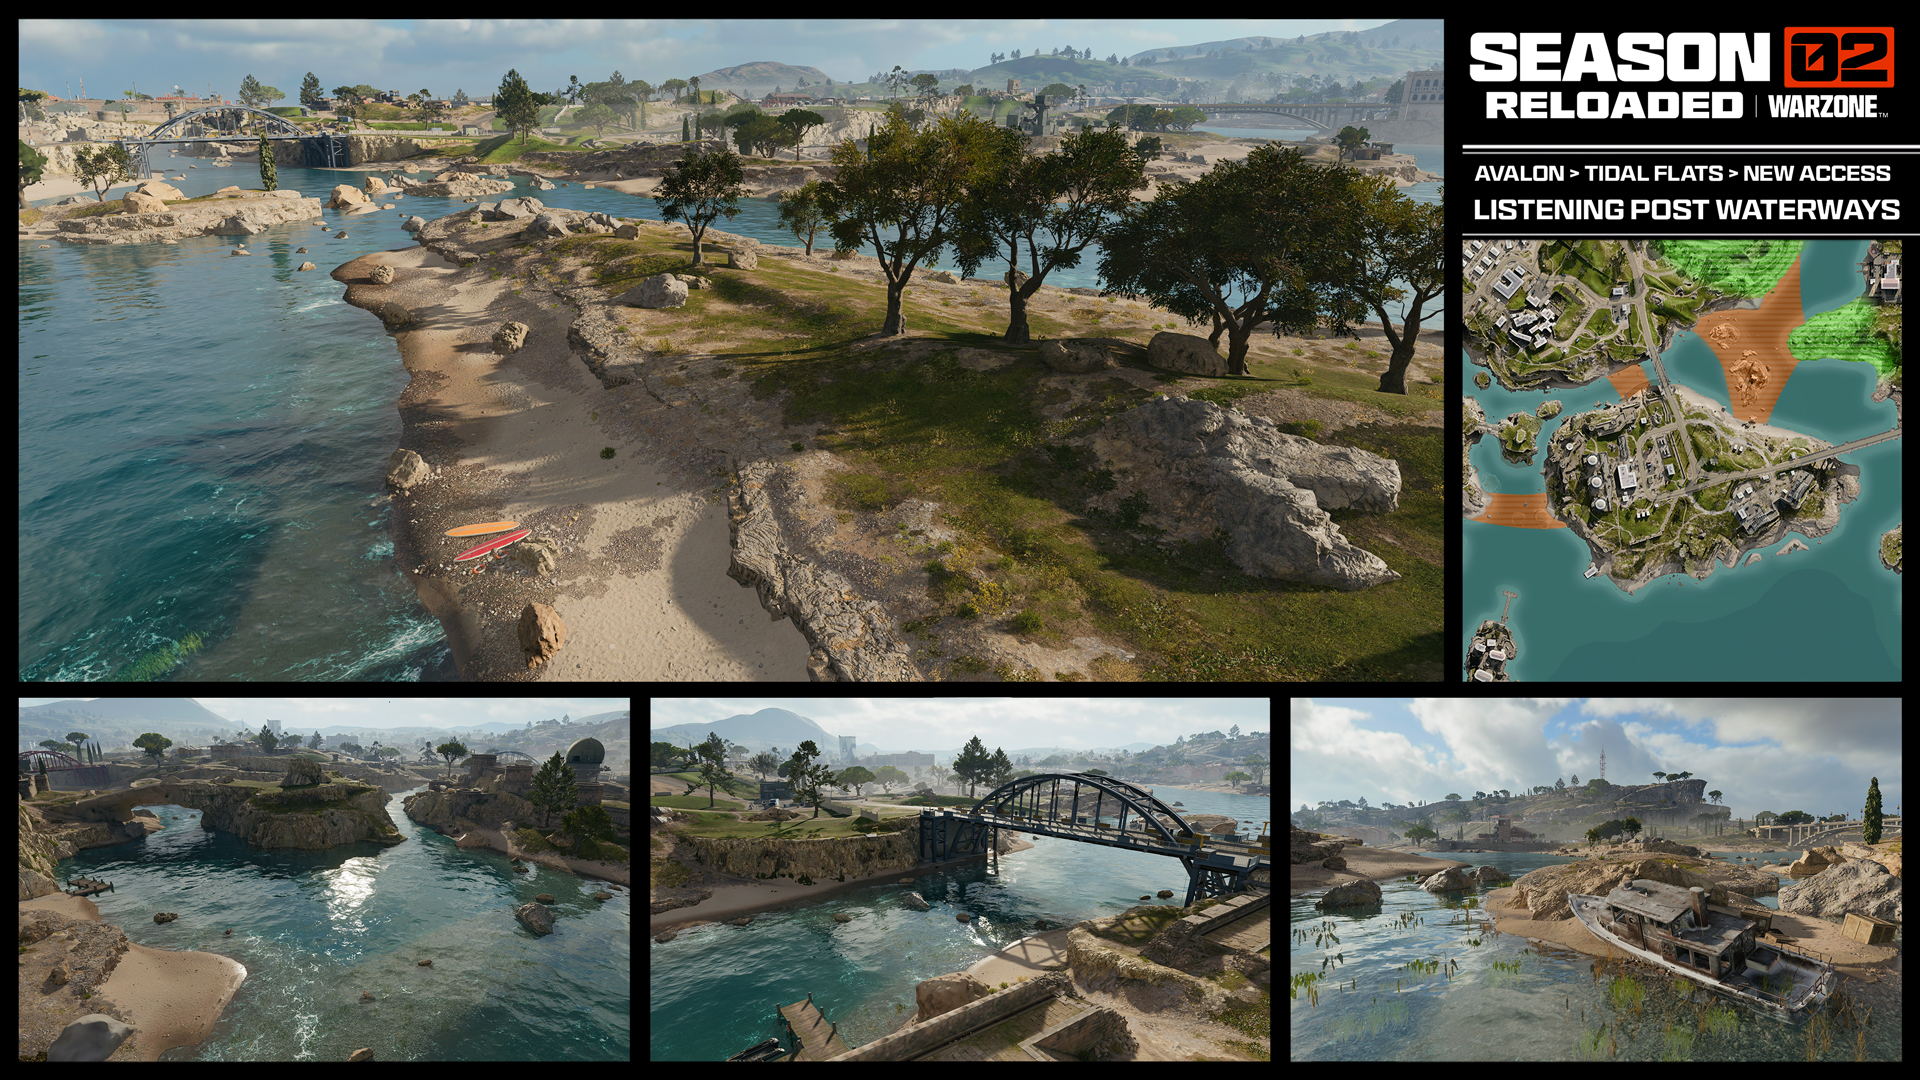
The coastal waters to the west and north of the Listening Post island are now much shallower, allowing access via foot to the Fort, north to Firing Range and the Military Outpost, and a jutting peninsula near the Pier District Fire Station has additional ground to access.
Low Town Island

The small island with the beached boat has doubled in size, with a larger, lower sandy perimeter, along with the previously accessible ziplines.
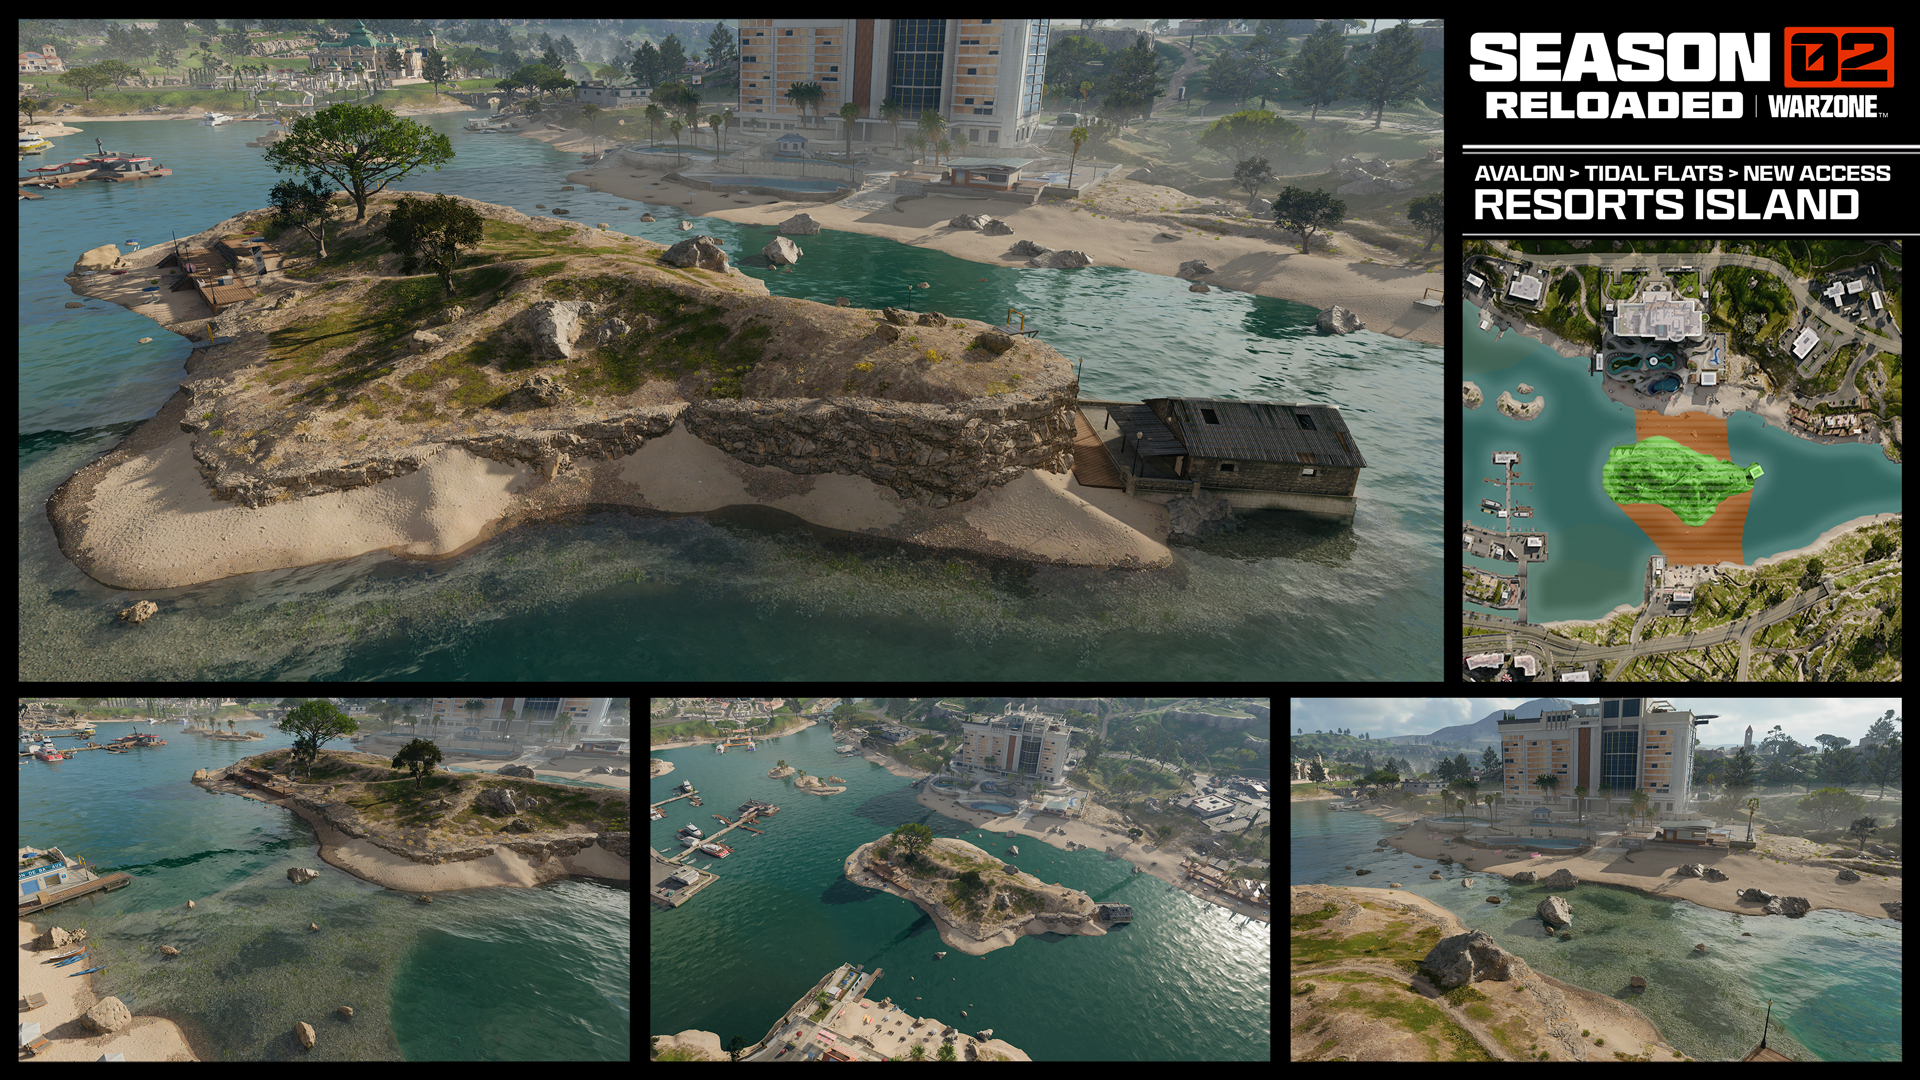
Resorts Island
A rocky island between the Resorts and northern shore east of Low Town has increased in size considerably, with shallow marshland enabling complete access across the river from one side to the other.
Heliport
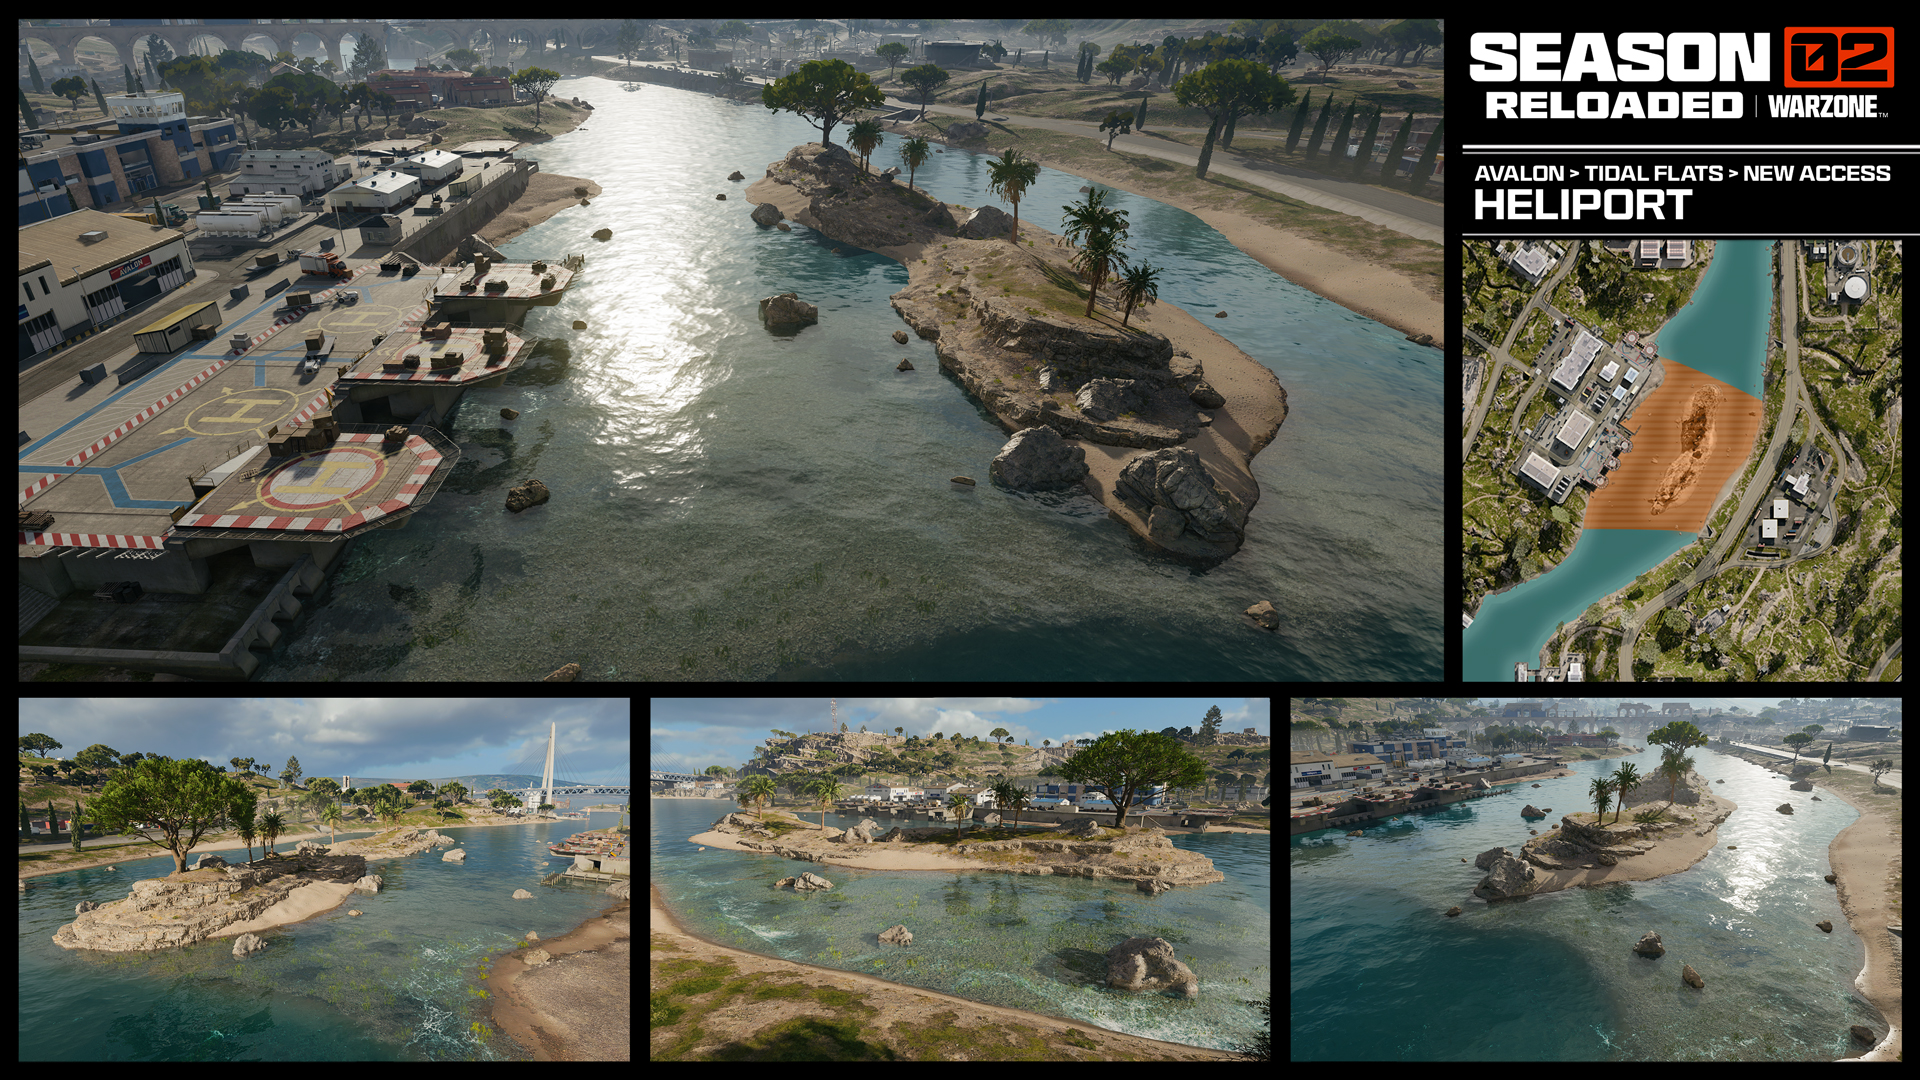
While the thin, rocky island in the river east of the Heliport, and the Gas Station to the west, is the same size as you remember, the waters across this stretch of river have been drained significantly.
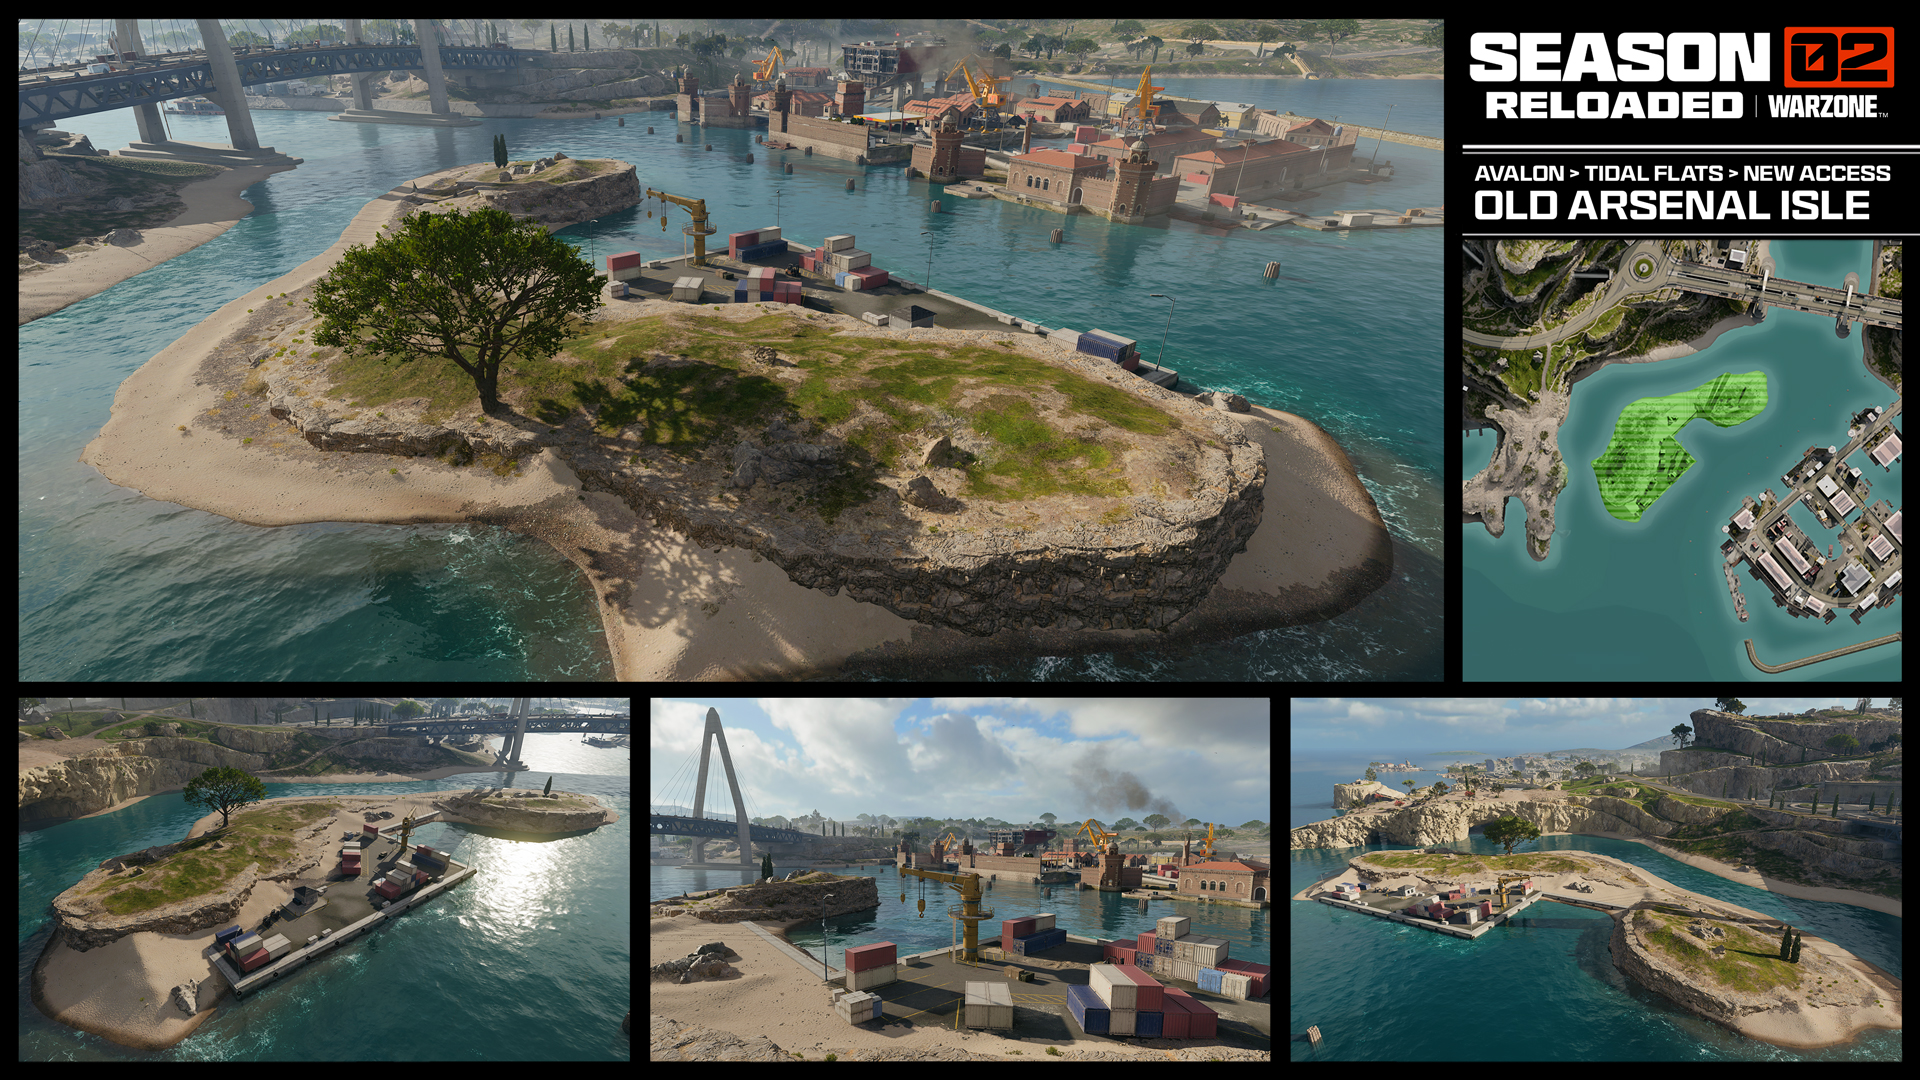
Old Arsenal Isle
Unlike Verdansk, once you’re eliminated there’s no enemy cellmate to take down before returning to a Black Ops Royale match: The Gulag is closed, and there are only two ways to be brought back into battle:
- Redeploy Tokens (Equipment): You begin a match with a single Redeploy Token (shown to the left), and find more available as loot, though your capacity to carry these items is limited to one. If you’re eliminated, you automatically expend a token, there’s a short delay timer before you’re able to drop in, reacquire equipment, and continue the fight!
- Redeploy Towers (Activity): One of the main Activities in Black Ops Royale is the locating and capturing of a Guild Redeploy Tower. Expect these areas to be heavily trafficked, as the team that can capture the tower (activating it and remaining within the capture radius) can redeploy their entire team.
Redeploying requires more coordination, and bringing teammates back is more calculated than using Buy Stations. Lives matter more, and the pacing requires forethought and is slower than other Call of Duty: Warzone modes. Intel is harder to acquire, and there are no UAVs or Advanced UAVs, leading to more cautious team rotations.
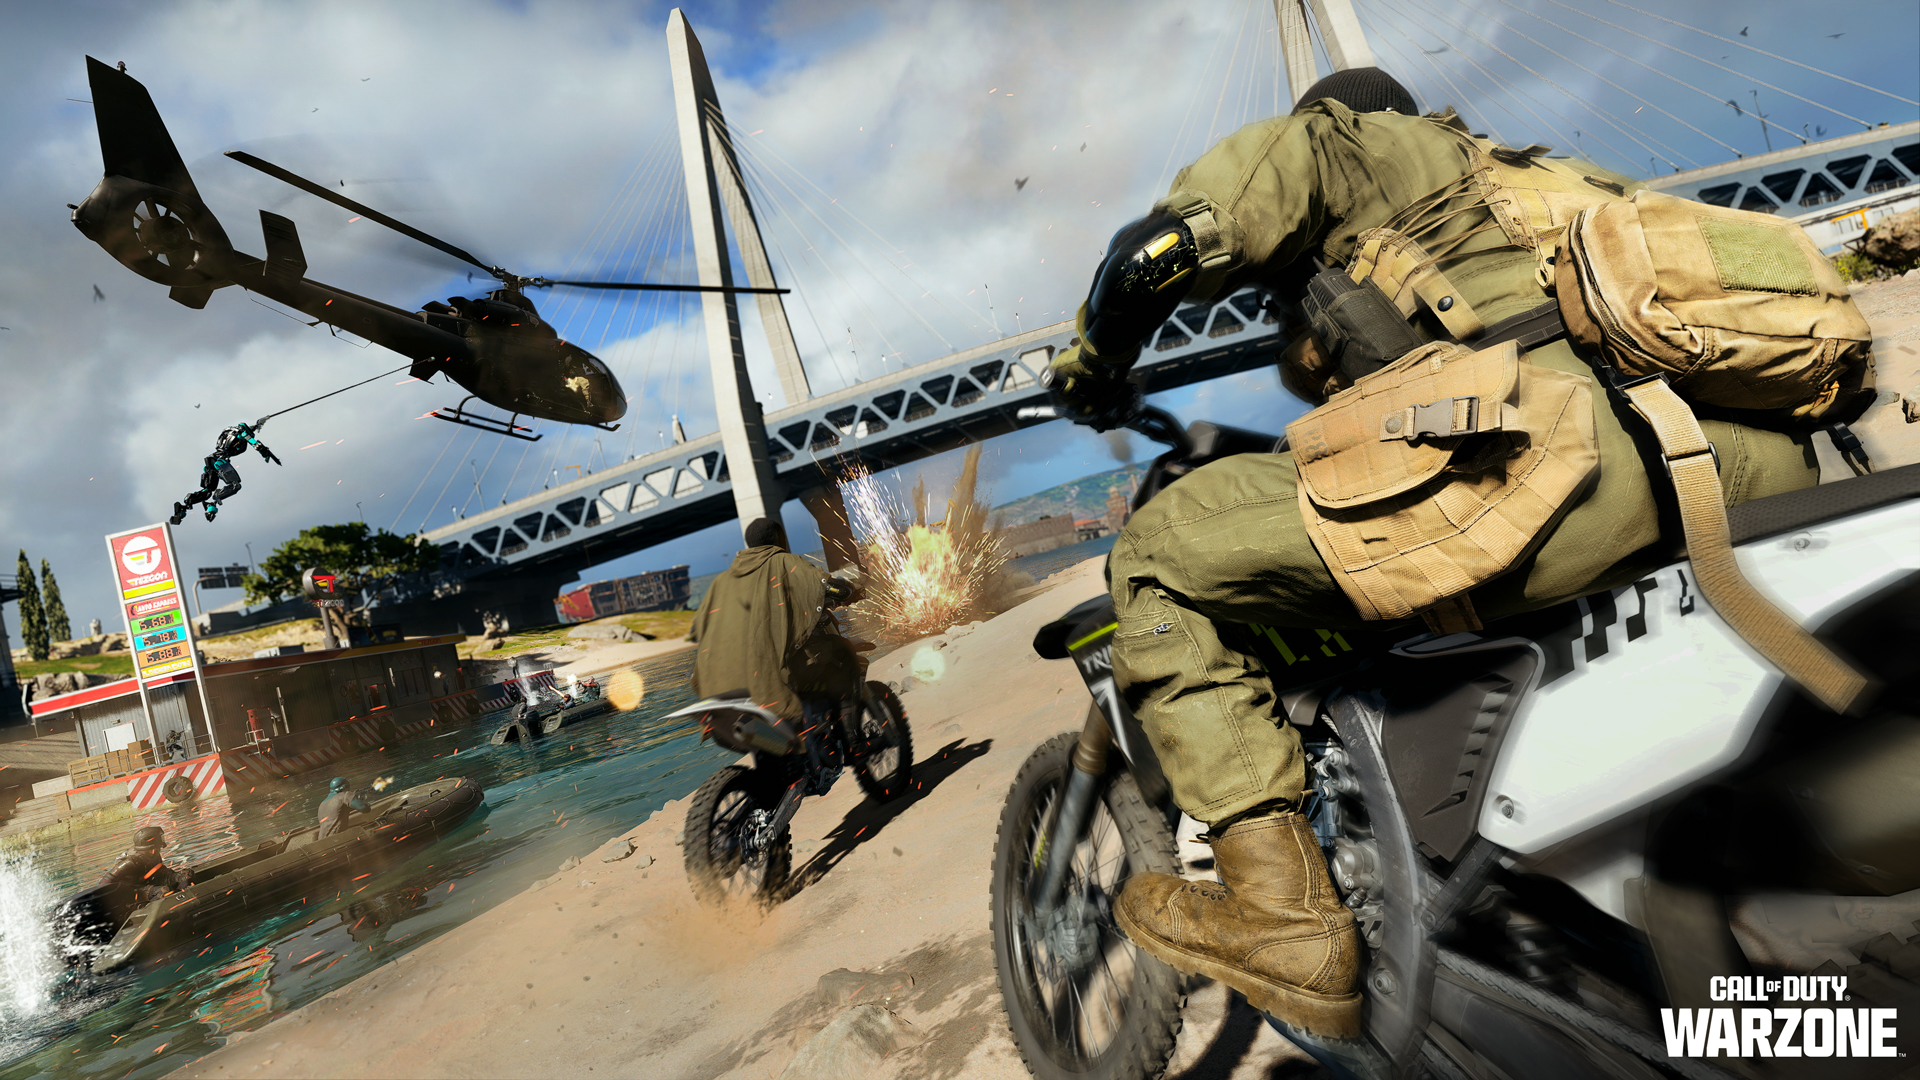
Vehicles in Avalon
A wide selection of vehicles can be commandeered from their parking or mooring spaces and used for rapid traversal. Most of these vehicles are well-known to Call of Duty: Warzone players, but the larger Helicopter is a new addition. Note that:
- Vehicles can be destroyed by use of launchers or hard-hitting weaponry or killstreaks, as well as explosive equipment, both sticky or otherwise, and careless driving resulting in a crash.
- Both the Grappling Hook and Sensor Dart can be fixed to vehicles.
- Vehicles have limitless fuel but suffer damage. Repair the damage if you’ve equipped and are using the Engineer Perk.
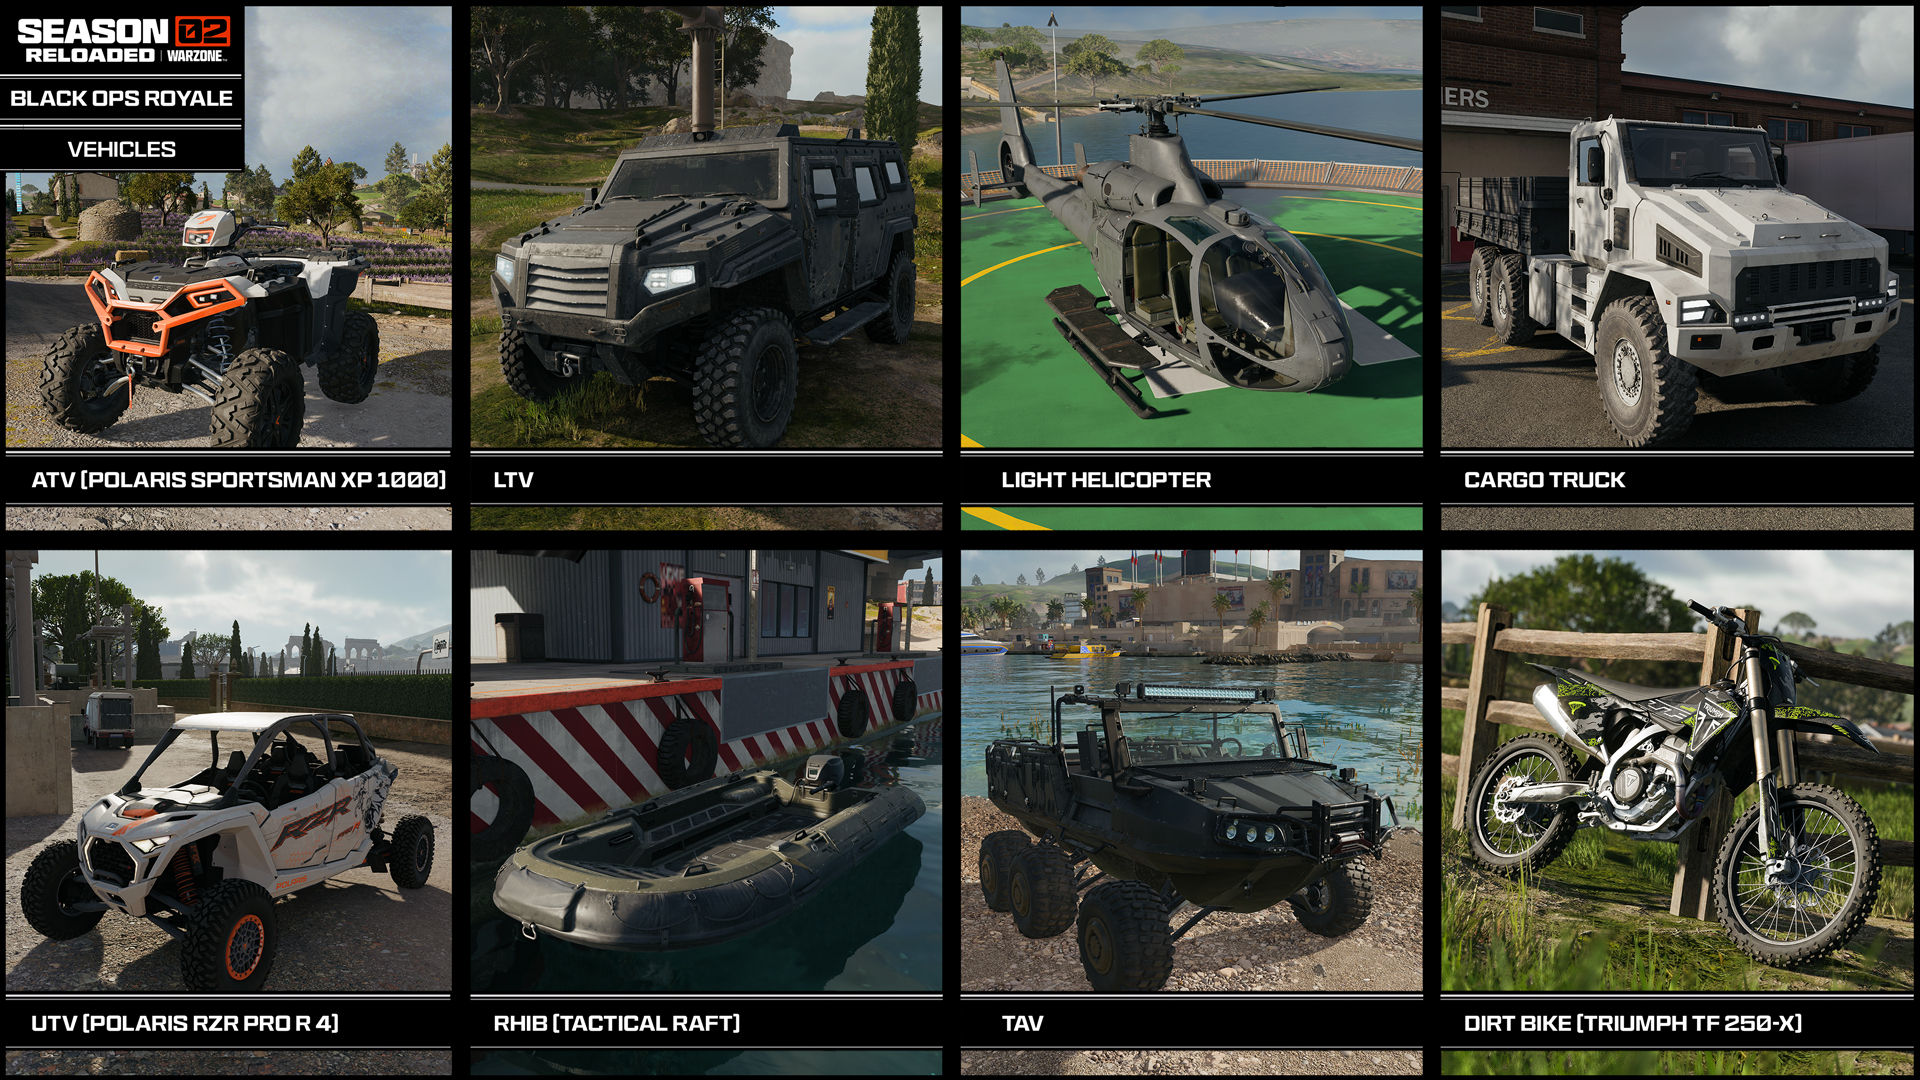
The following vehicles, with a general (and in-game) name along with their default passenger, can be found across Avalon:
ATV (Polaris Sportsman XP 1000)
Occupancy: 2 (1 Driver, 1 Passenger)
Easily navigate over hills and craggy terrain with the lightweight Polaris Sportsman XP 1000, a two-seater ATV that’s highly maneuverable with excellent control. Fit through tight spaces, turn on a dime, and keep moving to evade incoming shots.
LTV
Occupancy: 4 (1 Driver, 3 Passengers)
With room for the whole squad, the heavily armored LTV offers a reliable defensive transport with moderate speed and control during on and offroad traversal. Ideal for heated engagements where durability beats performance.
New: Light Heli (Helicopter)
Occupancy: 5 (1 Driver, 4 Passengers)
Get above the action in this five seat Helicopter equipped with flares to throw off incoming attacks. Ascend, descend, hover, and fly in a fast, highly maneuverable aerial package that’s ideal for squads looking for a long-range vehicle option.
Cargo Truck
Occupancy: 2 (1 Driver, 1 Passenger)
Sit up front in the cab to benefit from the Cargo Truck’s respectable defensive qualities or climb into the long bed in back for a clearer view of incoming threats. Offers moderate speed and control with a large turning radius.
UTV (Polaris RZR Pro R 4)
Occupancy: 4 (1 Driver, 3 Passengers)
For offroad performance, look no further. The four-door Polaris RZR Pro R 4 brings power and maneuverability to the most difficult terrain, offering exceptional control over land that would send other vehicles into a spin.
RHIB (Tactical Raft)
Occupancy: 4 (1 Driver, 3 Passengers)
Navigate Avalon’s waterways with ease using the four-seat Tactical Raft. Found along shorelines, this nautical craft is quick with good control, performing admirably in both open waters and tight river bends or tunnel entrances.
TAV
Occupancy: 2 (1 Driver, 1 Passenger)
While its somewhat sedate pace isn’t the most rapid, exhibiting imprecise control and a moderate speed at best, where the TAV really shines is in its incredible versatility. The vehicle can drive on land or water, so that you can keep up the pursuit no matter where the enemy flees.
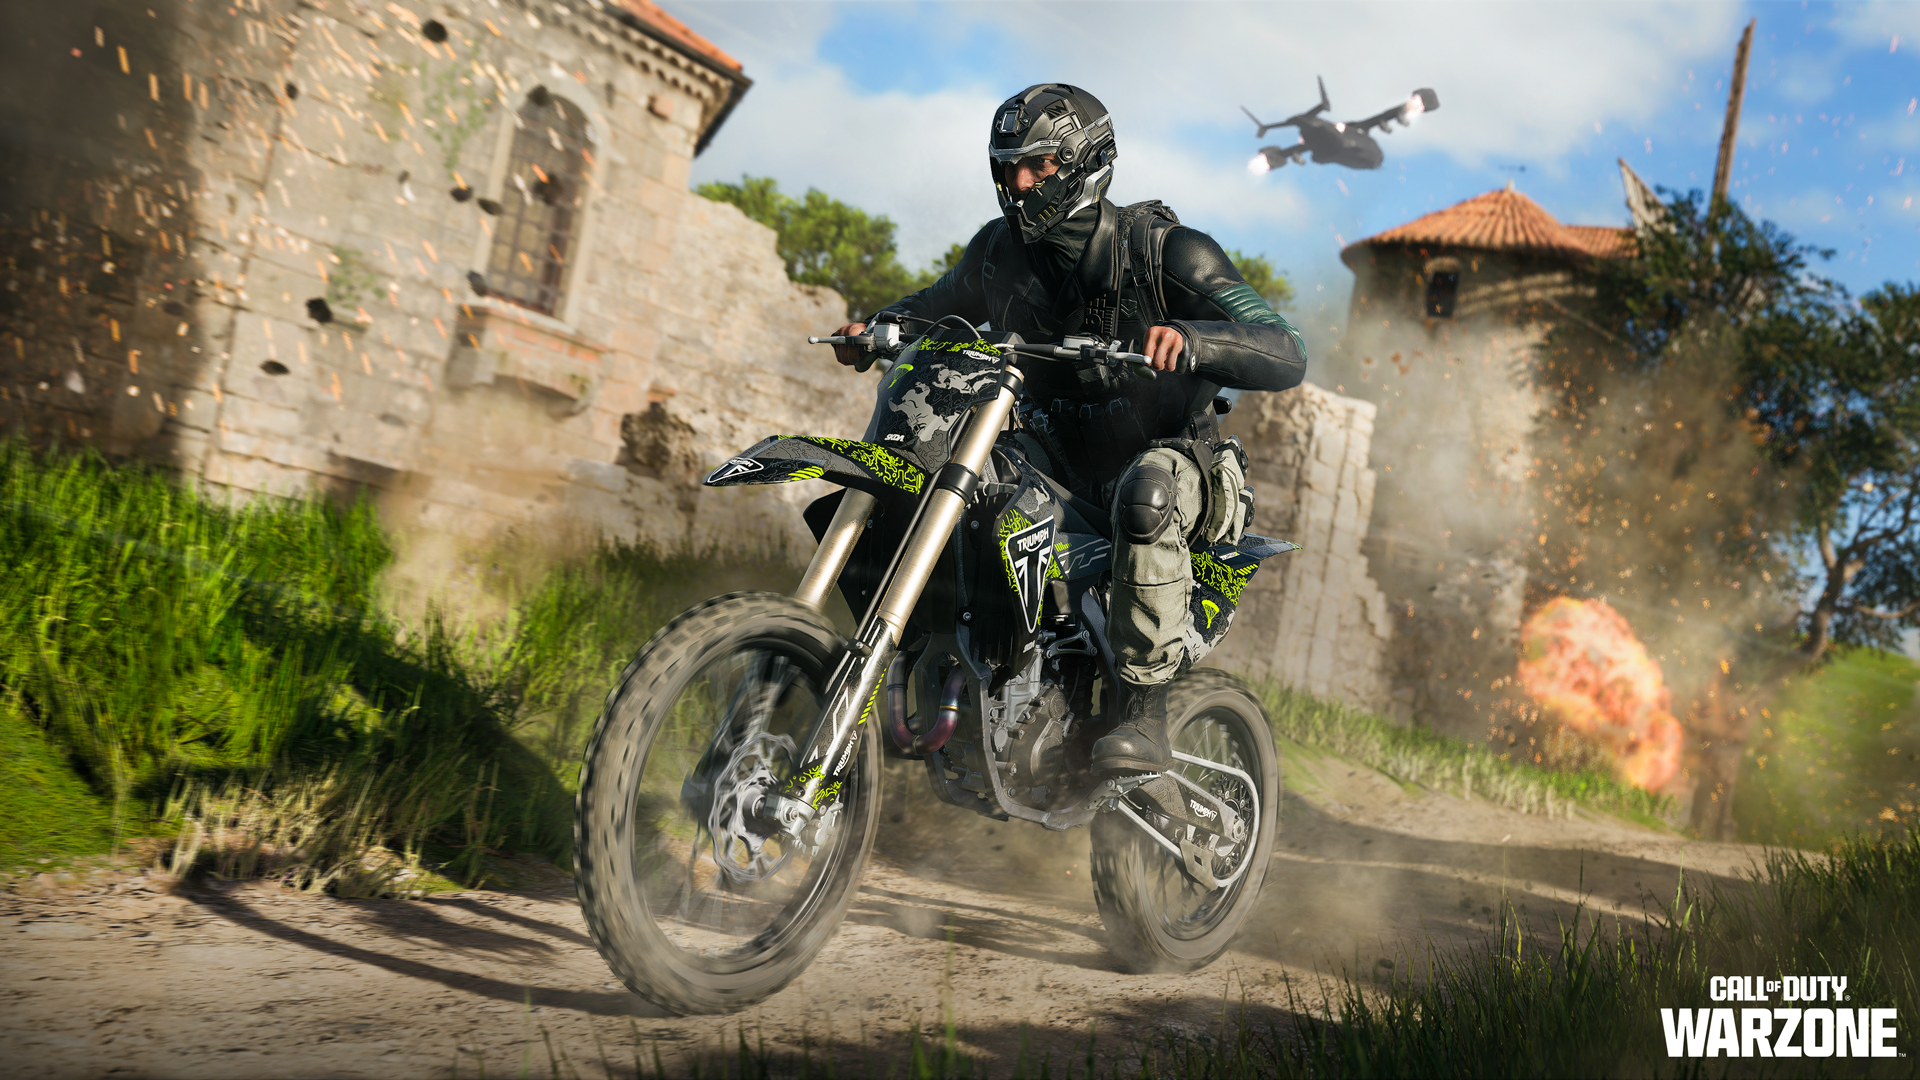
Dirt Bike (Triumph TF 250-X)
A containment field known only as “The Collapse” in the original Blackout is a glowing, crackling energy wall marking the playable area within a Black Ops Royale match. This electromagnetic dome is back, slowly encroaching across Avalon, with visuals that allow Operators to clearly see where the safety boundary ends.
Part 8: Enhanced Objectives and More: Activities
Gaining the upper hand on your opposition just got a whole lot more tactical, as Avalon’s lush and varied landscape is dotted with optional Activities to complete. Acting like Contracts seen in other Call of Duty: Warzone modes, some Activities are new to players, others are familiar to Black Ops 7: Endgame players, and all offer potent rewards.
Speaking of which….
Activities: The rewards you need, when you want them.
Activities are key to providing you with the specific, high-level loot you need to survive and thrive in Black Ops Royale. Activities aren’t initially visible across Avalon, but they do appear as you investigate your immediate area.
This recon is important, as each appearing Activity has an icon, and hovering over that icon in the Tac Map Menu allows you to view more information about the Activity in the bottom-right corner of your screen. This includes the specific, high tier reward you receive for completing that Activity, which is always the same on a per Activity basis.
- For example, if you locate a Strongbox Crack Activity, you’ll see the reward is Level 2 Armor.
- Note that other rewards, usually equipment and ammunition, are also available as part of an Activity reward.
This means you can choose to undertake Activities that grant you helpful rewards, setting you up for end-match success, and ignore Activities that supply you with rewards you already have or don’t need.
Here’s a run-down of Activities in Black Ops Royale:
Activity: Target Uplink Station
Summary: A tactical station where squads can search for player bounties.
Rewards: Bounty Target and enemy loot.
Overview: Find and access a special security terminal, found at various fixed locations across Avalon. An Uplink Station becomes active around two minutes after a match begins, and it identifies a hostile target within its target radius. It prioritizes enemies that have not yet been hunted by rival squads. Once the identification has been completed, the Uplink Station cools down before it can be used again. The hunting squad, the bounty, and the bounty target’s squad are all alerted. The hunting team has three minutes to slay the bounty.
Activity: Surprise Shipment
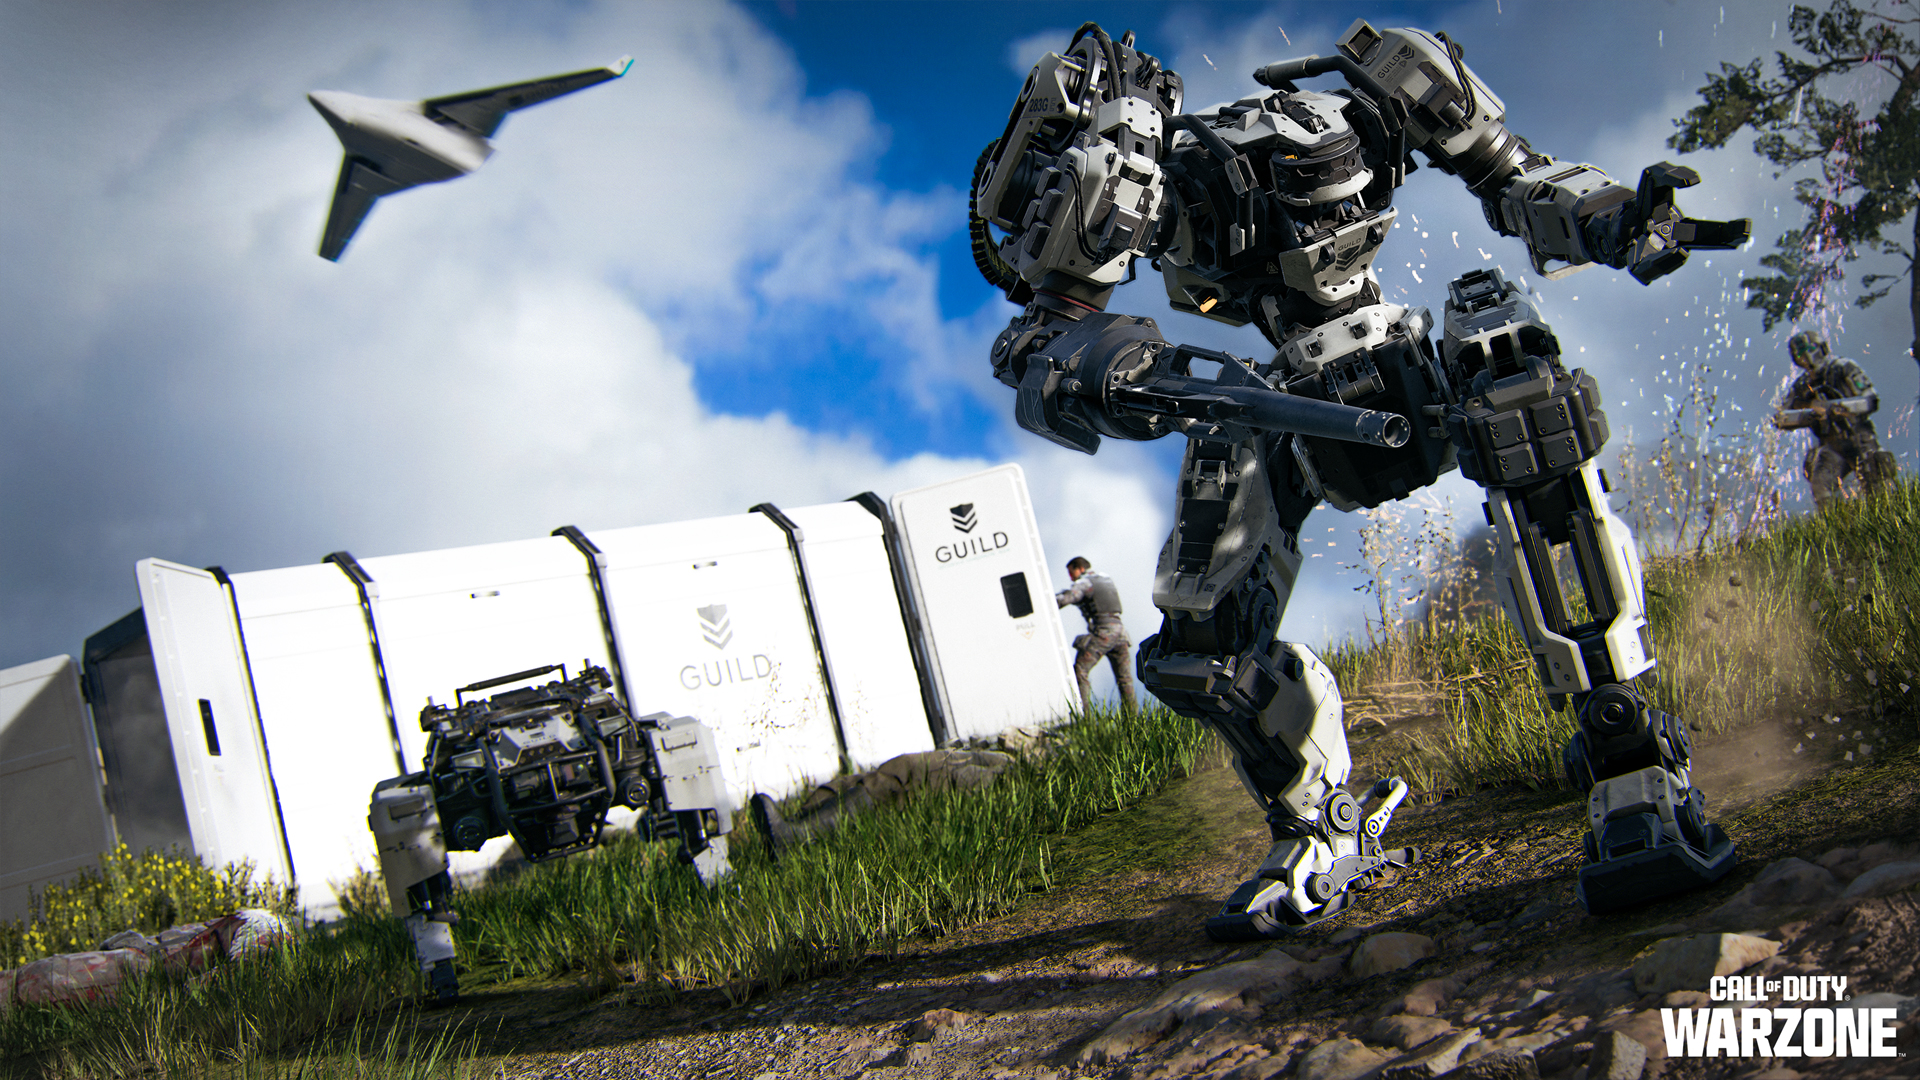
Summary: Secure a reward from a Guild shipment container guarded by robotic enemies.
Rewards: Armor Satchel (and loot).
Overview: Abandoned Guild shipping containers are positioned across Avalon and are active at the start of the match. Each container has a proximity detector on its door lock. Get within mid-range distance, the Activity will commence, and the detector begins beeping. Get within close range and the detector explodes, blowing the container doors open at either end. Inside is one or more of the following hostile Guild enemies:
- Four G-series Guild robots
- A Guild D.A.W.G.
- A Guild Rhino
Remove the robotic Guild threats inside before claiming the loot from a cache inside the container.
Activity: Surveillance Drone
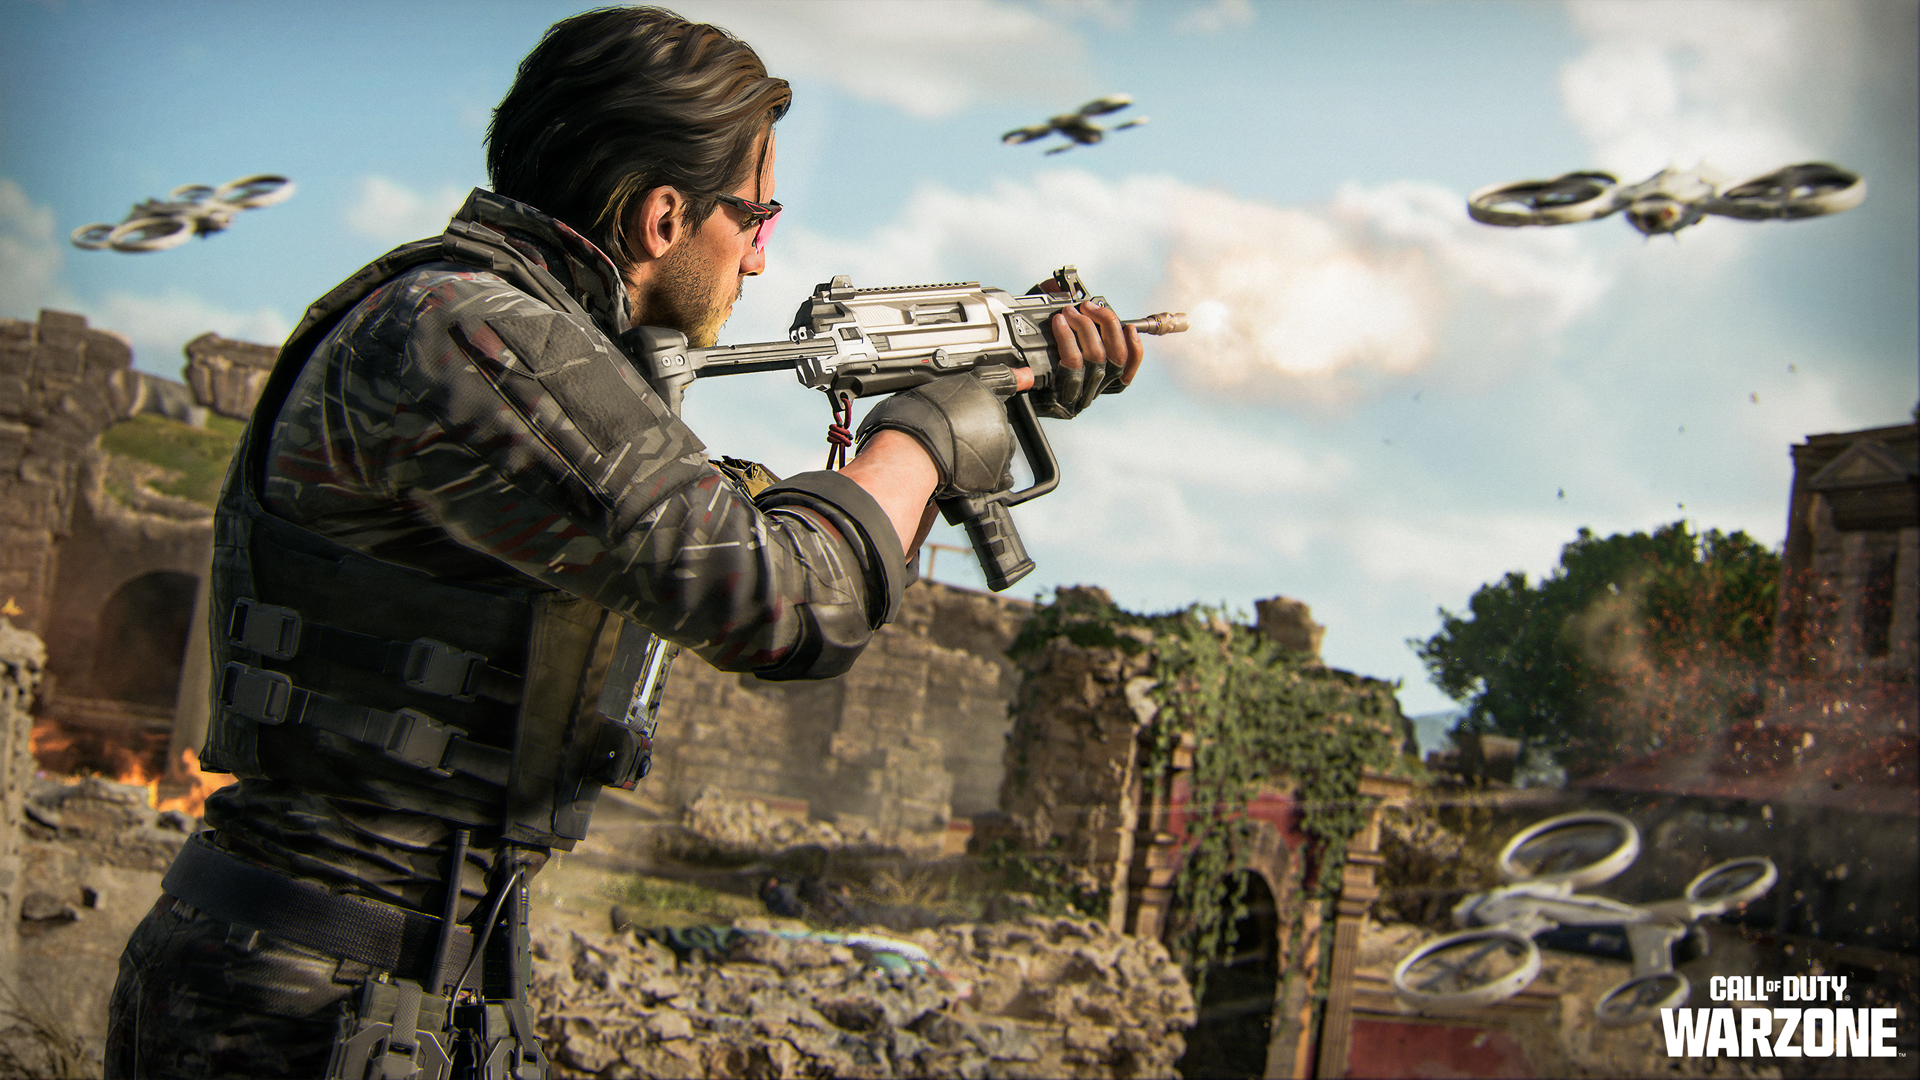
Summary: Destroy a Guild Drone and its defenses to acquire loot.
Rewards: Additional Activity Reveals (and loot).
Overview: Expect to occasionally run into Guild Drones patrolling a specific area of Avalon. The Activity begins when a player approaches this airborne enemy or engages it in combat. When threatened, the Drone retreats and summons additional defensive support Drones that attempt to defeat the attacker. Defeating these support Drones is optional, but likely necessary due to their aggressive nature. But the focus should be to find the Guild Drone, attack it again. This time, it stands its ground, sending out another wave of up to five support Drones. Destroying the Guild Drone at any point concludes this Activity: Inspect the downed drone wreckage for loot.
Activity: Strongbox Crack
Summary: Obtain safecracking software and hack a safe to obtain high-level loot.
Rewards: Armor (Level 2) (and loot).
Overview: This begins as an unmarked Activity and requires you or a squadmate to obtain a Safecracker Drive with software on it. Next, locate a Guild Safe somewhere within Avalon, connecting the device and the safe cracking begins. Expect alarms to alert enemy squads to your presence. Around ten seconds after the hack begins, the safe opens, and the loot within the safe can be claimed by any squad within the vicinity.
Activity: Relay Antenna
Summary: Activate Guild hardware to scan for hostiles and launch a Redeploy Drone.
Rewards: Temporary UAV and Redeploy Drone.
Overview: Location a small satellite dish Relay Antenna within the area of battle and access the flip-up screen on the tripod housing to initiate capture of the device. Bringing this relay under your squad’s control takes around 30 seconds, and once captured, the Relay Antenna becomes beneficial to your team, with the following happening automatically:
- A sequence of UAV pings commences, centered on the Antenna site and expanding across the topography, tagging enemies within the range of the device.
- A Redeploy Drone and wire ascender activate close to the Relay, allowing for rapid redeployment. This stays active for around one minute.
After these activities, the site shuts down for a short period of time to recharge before becoming available to access again.
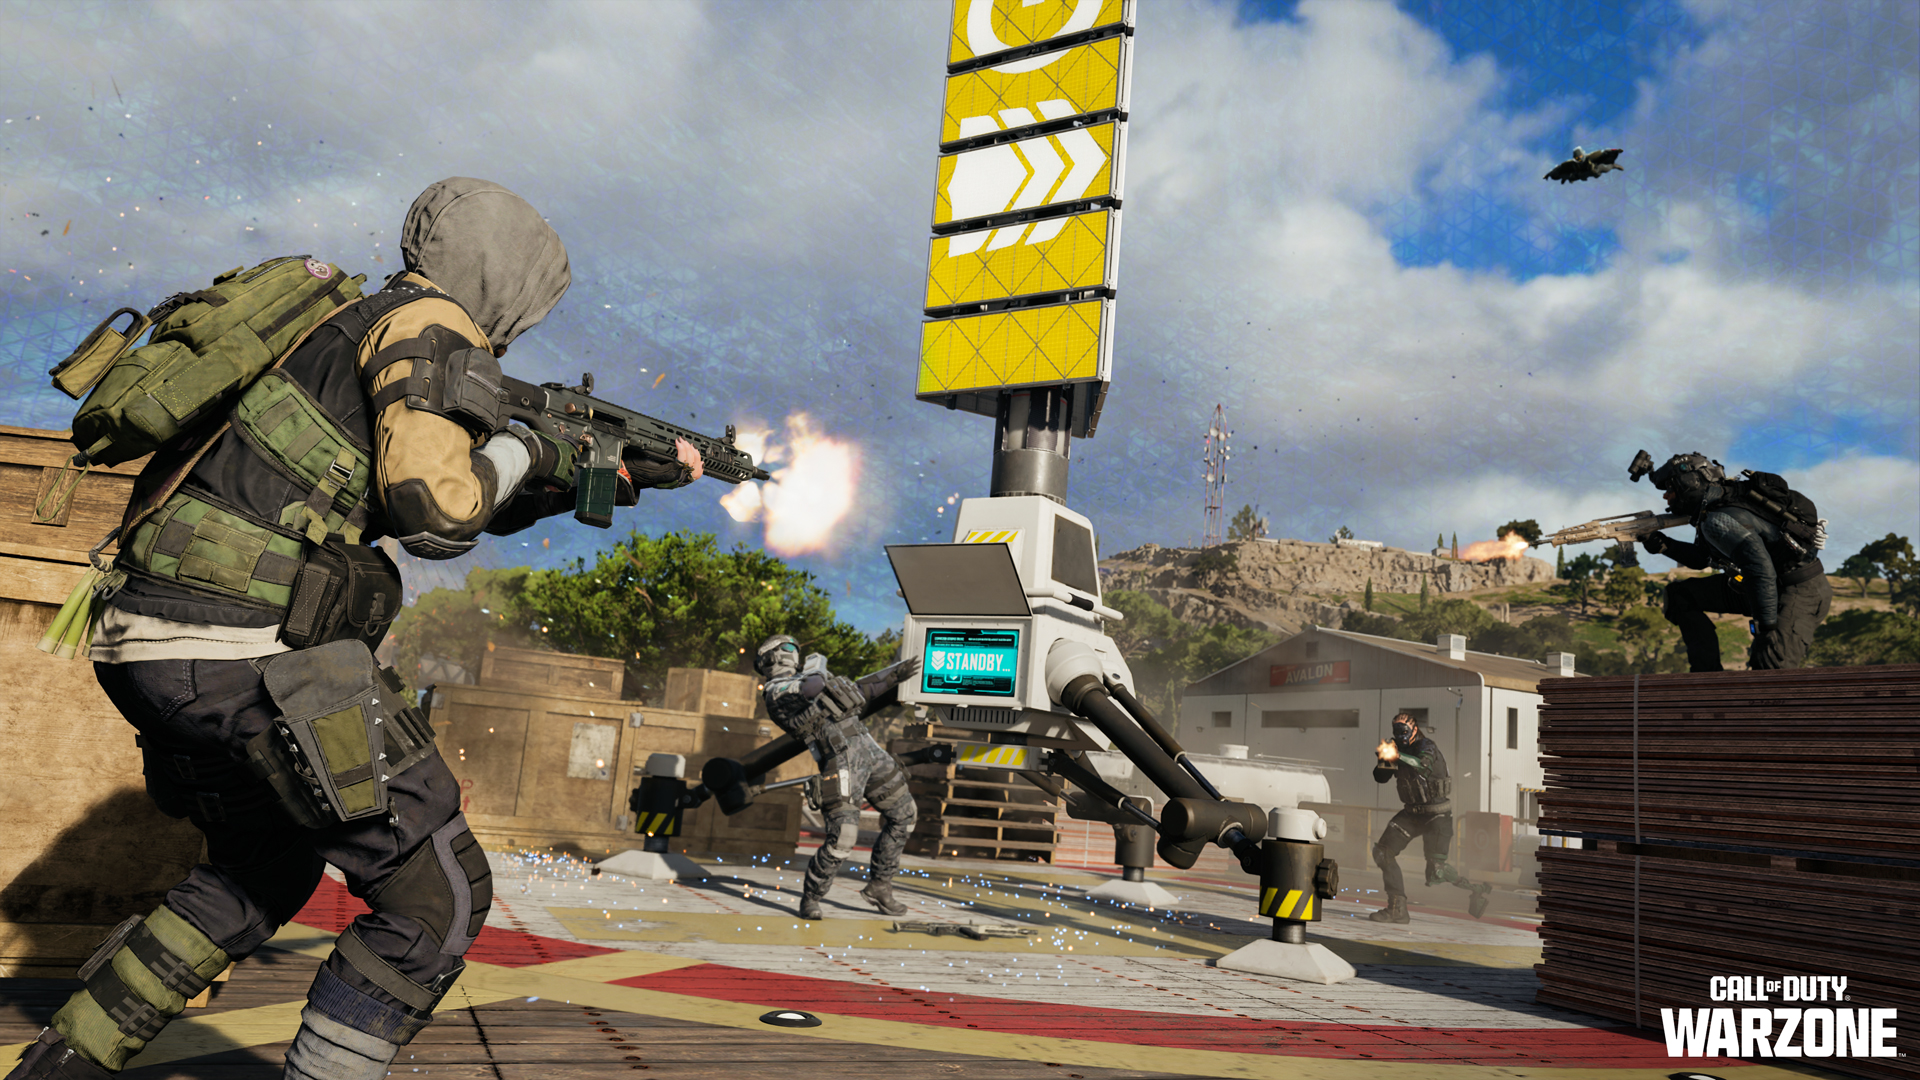
Activity: Redeploy Tower
Summary: Revive previously slain squad mates by activating the tower.
Rewards: Squadmate(s) redeployment.
Overview: Aside from Redeploy Tokens, another method to call back your slain squad mates is to locate and commandeer special Guild comms towers, activating them to act as rift beacons to recall the fallen. Interact with the tower’s terminal and after a countdown — which can be shortened with more squad mates nearby — the tower activates. Via dangerous new technology, a jagged Cradle fissure appears in the sky above the tower, and any previously slain teammates revive and drop from this breach, back into the action. Note the status of a Redeploy Tower depends on its color:
- Blue: The Tower is ready to use.
- Yellow (flashing): The Tower is in use. Expect enemy engagements.
- Grey: The Tower is on a cooldown, recharging between uses.
Activity: Supply Drops
Summary: Care packages dropped across Avalon, containing potent loot when captured.
Rewards: Randomized high-value loot.
Overview: Watch the skies and the on-screen announcements as occasionally, a Guild plane flies across Avalon, dropping weighty supply crates along its straight flight path. Four of these crates are likely to land across the map and contain impressive loot if you can succeed in reaching and accessing them, making them an excellent location to reposition near during late-game maneuvers, or after a redeployment.
Additional Interactions: Ammo Cache
Summary: Locate a stationary pallet of ammunition and equipment.
Rewards: Ammunition and Equipment.
Overview: With the tendency to be found in places where low enforcement or military activity is expected (as well as gas stations), Ammo Caches allow you to refill your inventory just like they have in past Call of Duty: Warzone matches. As well as refilling the ammunition of the weapons you’re carrying, other inventory items (like Tacticals and Lethals) can also be extricated from this ammo refill.
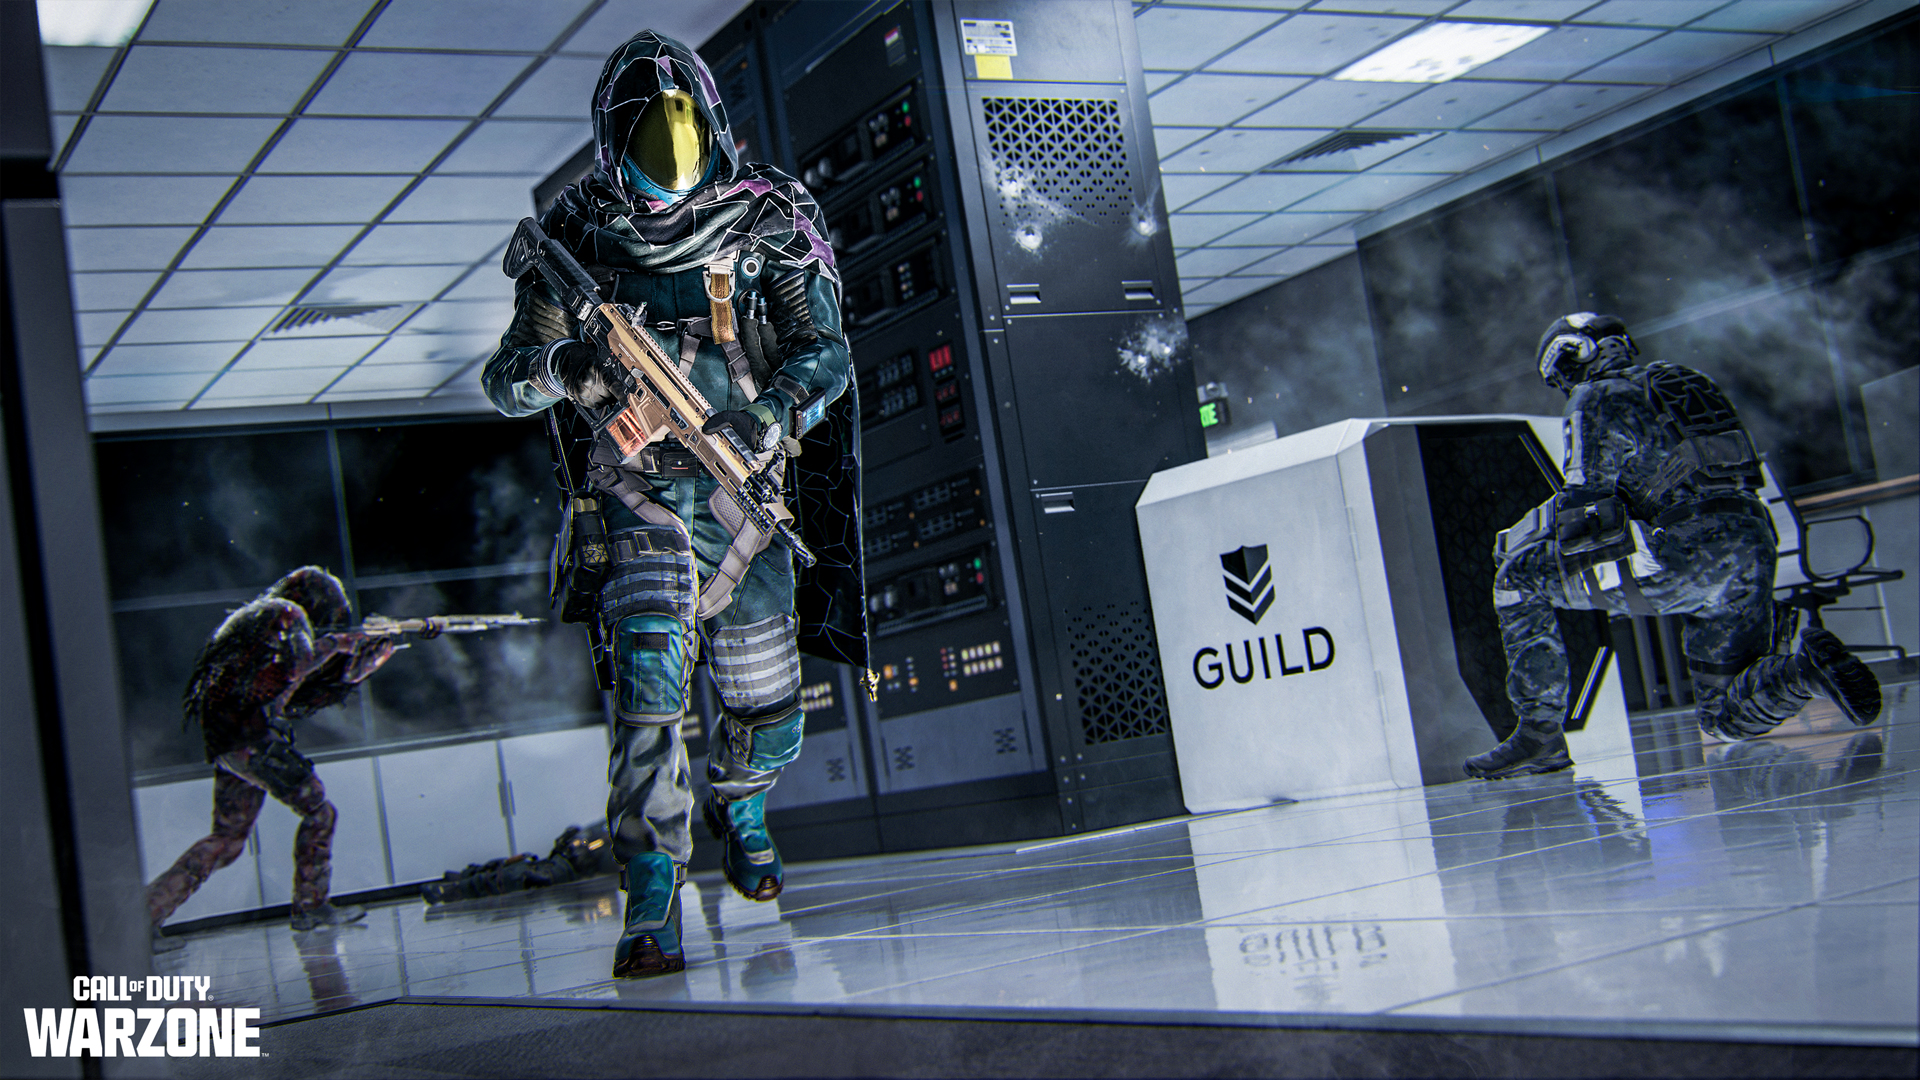
Part 9: Cradle Breaches
Hallucinatory Hordes and High-End Loot
Just like the original Blackout, there are areas of the Big Map that are much more dangerous to explore in Black Ops Royale. These self-contained, contaminated zones of Avalon distort perception, unleashing wild hallucinations… including zombie incursions! These fissures in your squad’s reality are known as Cradle Breaches.
Cradle Gas Activity: Cradle Breach
Summary: A highly dangerous hallucinatory area of the map with potent loot rewards to optionally visit.
Rewards: Randomized Cradle Activity.
Overview: Over the course of a match, expect a Guild stealth bomber to fly across the AO, dropping a Cradle Gas bomb from the skies. Upon impact, these projectiles anchor into the ground and leak an ominous red mist familiar to Endgame players. This fills a region of the map in a dense, red cloud around the bomb site for a few minutes before receding. This is known as a Cradle Breach.
- Aside from your long-range vision being slightly impaired, the red gas is seemingly not dangerous.
- However, your hallucinatory vision is working overtime; revealing hordes of roaming zombies, as well as special high-tier loot caches, which aren’t visible outside the breach.
- A breach also randomly features one of two specific Activities detailed below, and both offer a chance for you to truly test your skills!
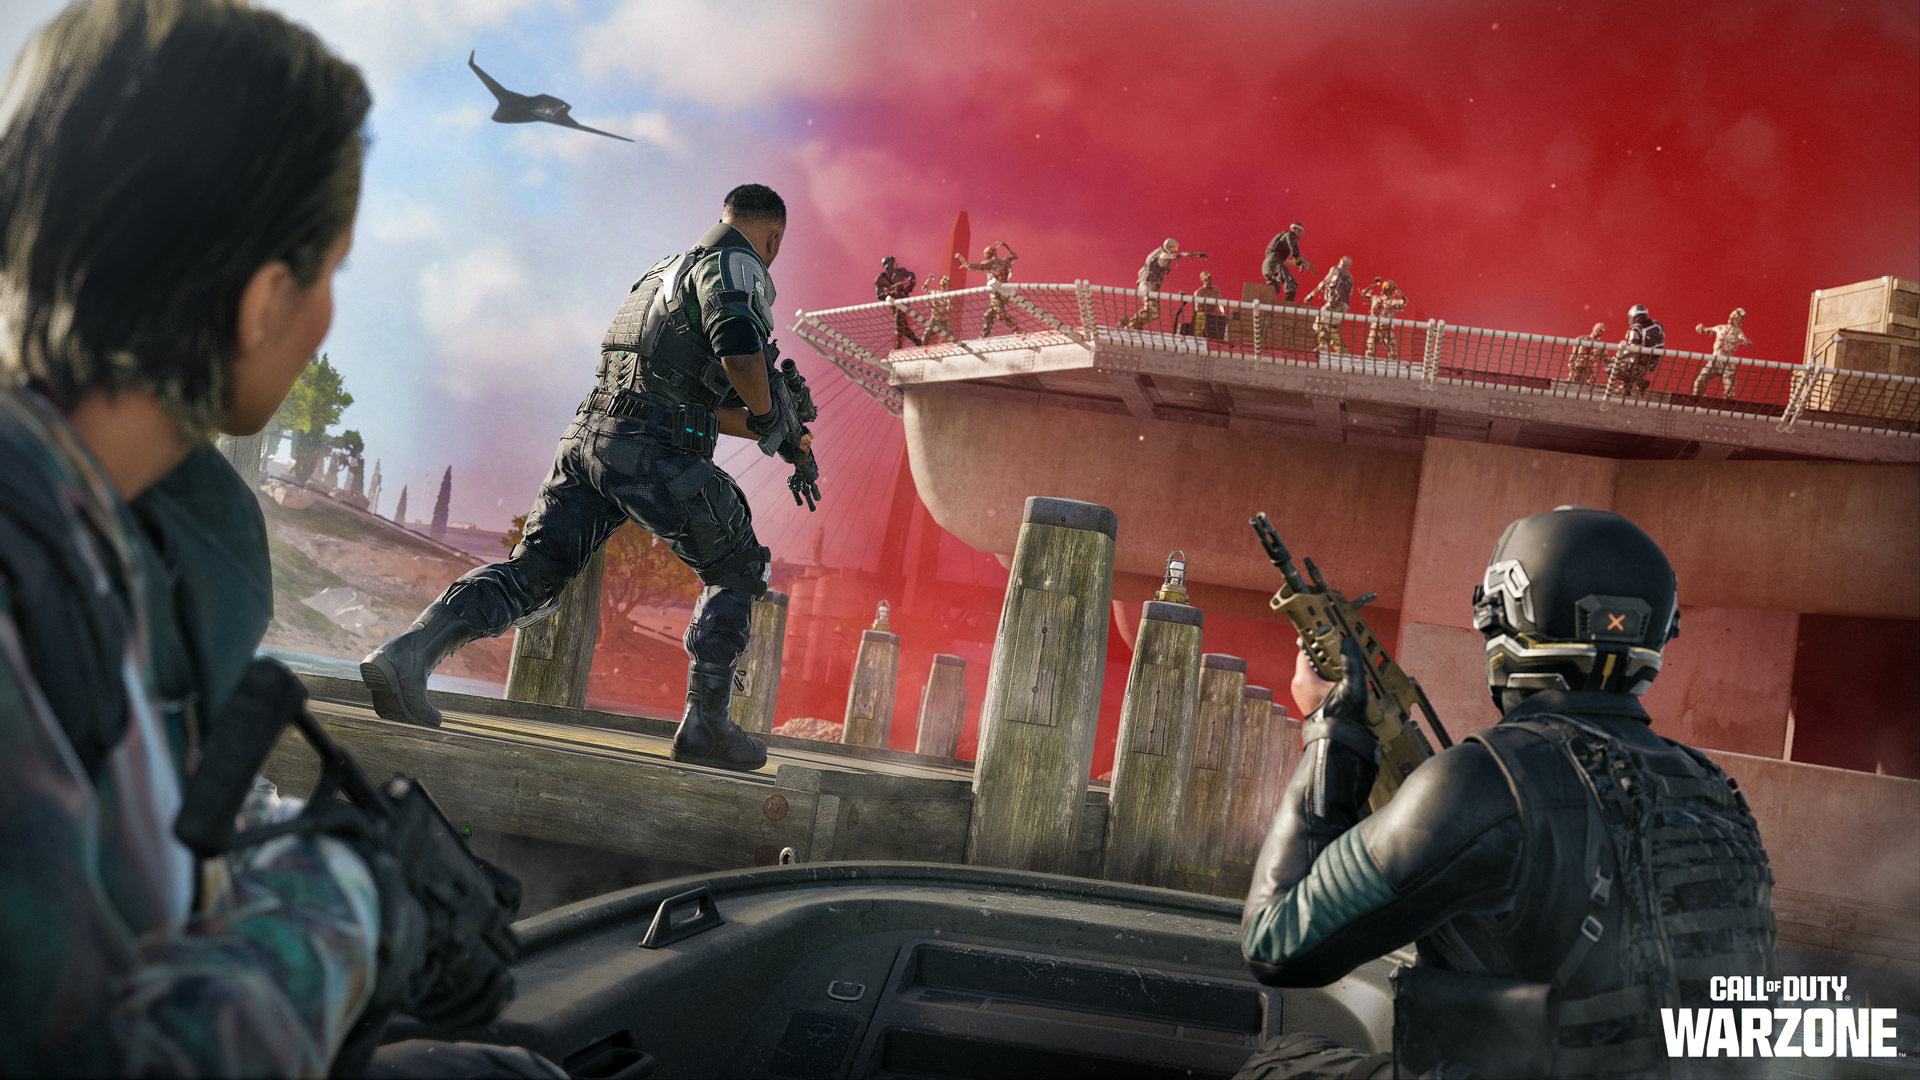
Cradle Breaches are optional areas to venture into and are time limited. Once the Cradle Gas Bomb disperses, the enemies and reward opportunities disappear. You need to weigh up the risks versus the rewards; breaches contain the best loot, but feature hordes of zombies, and though a shambling undead foe isn’t a major threat, they can distract you from your human rivals…
Cradle Breach Activity: Mangler

Summary: Slay a toughened Cradle Boss and secure impressive loot.
Rewards: Armor (Level 3) (and high-tier loot).
Overview: Once the Cradle Breach gas has finished expanding, either the Mangler Hunt or the Mystery Box activity will begin. In this Activity, an enemy Mangler appears to patrol the zone, with toughened armor and dangerous firepower. Squad coordination is expected to take it down, as inflicting damage secures a reward. The squad that eliminates the Mangler (or a rival team that swoops in to claim the dropped rewards from the Mangler’s corpse) can grab some particularly high-tier loot.
Cradle Breach Activity: Mystery Box
Summary: Defeat hordes of zombies and earn access to a strange, wooden box granting impressive loot.
Rewards: Exotic Weapons (and high-tier loot).
Overview: Once the Cradle Breach gas has finished expanding, either the Mangler Hunt or the Mystery Box activity will begin. In this Activity, you should check the vicinity for a crackling beam of electrical light emanating skywards from an old wooden crate. Known as a Mystery Box, this loot chest is locked, and requires you to slay zombies in the vicinity before it opens:
- Any players (including enemy squads) within the Breach can open the Mystery Box, once they slay a set number of zombies.
- The Mystery Box can be accessed several times until the Breach dissipates, or the box has been looted a set number of times, after which it disappears.
- The random rewards for each box access range from low-tier offerings, health and replenishment items, but a sizable chance to secure an Exotic Weapon, and even the Ray Gun, just like in the original Blackout!
Part 10: Additional Intel
Events and Challenges: Black Ops Royale Integrations
Black Ops Royale comes fully integrated into the Black Ops 7 and the Call of Duty: Warzone experience, with earnable rewards, unlockable content, and a large-scale Event you can access across all game modes. Here’s what to expect:
- New Weapon Progression: Play the mode and unlock all the Weapon and Prestige Camos for the new Season 02 Reloaded weapons: the Voyak KT-3 Assault Rifle and the Swordfish A1 Marksman Rifle.
- Exclusive Daily Challenges: Available in the main Call of Duty: Warzone menu, expect to earn XP for completing challenges within this mode.
- Weekly Challenges: Expect Weekly Challenges exclusive to Black Ops Royale.
- Calling Card Challenges: [CLASSIFIED].
Black Ops Royale Playlist Challenges
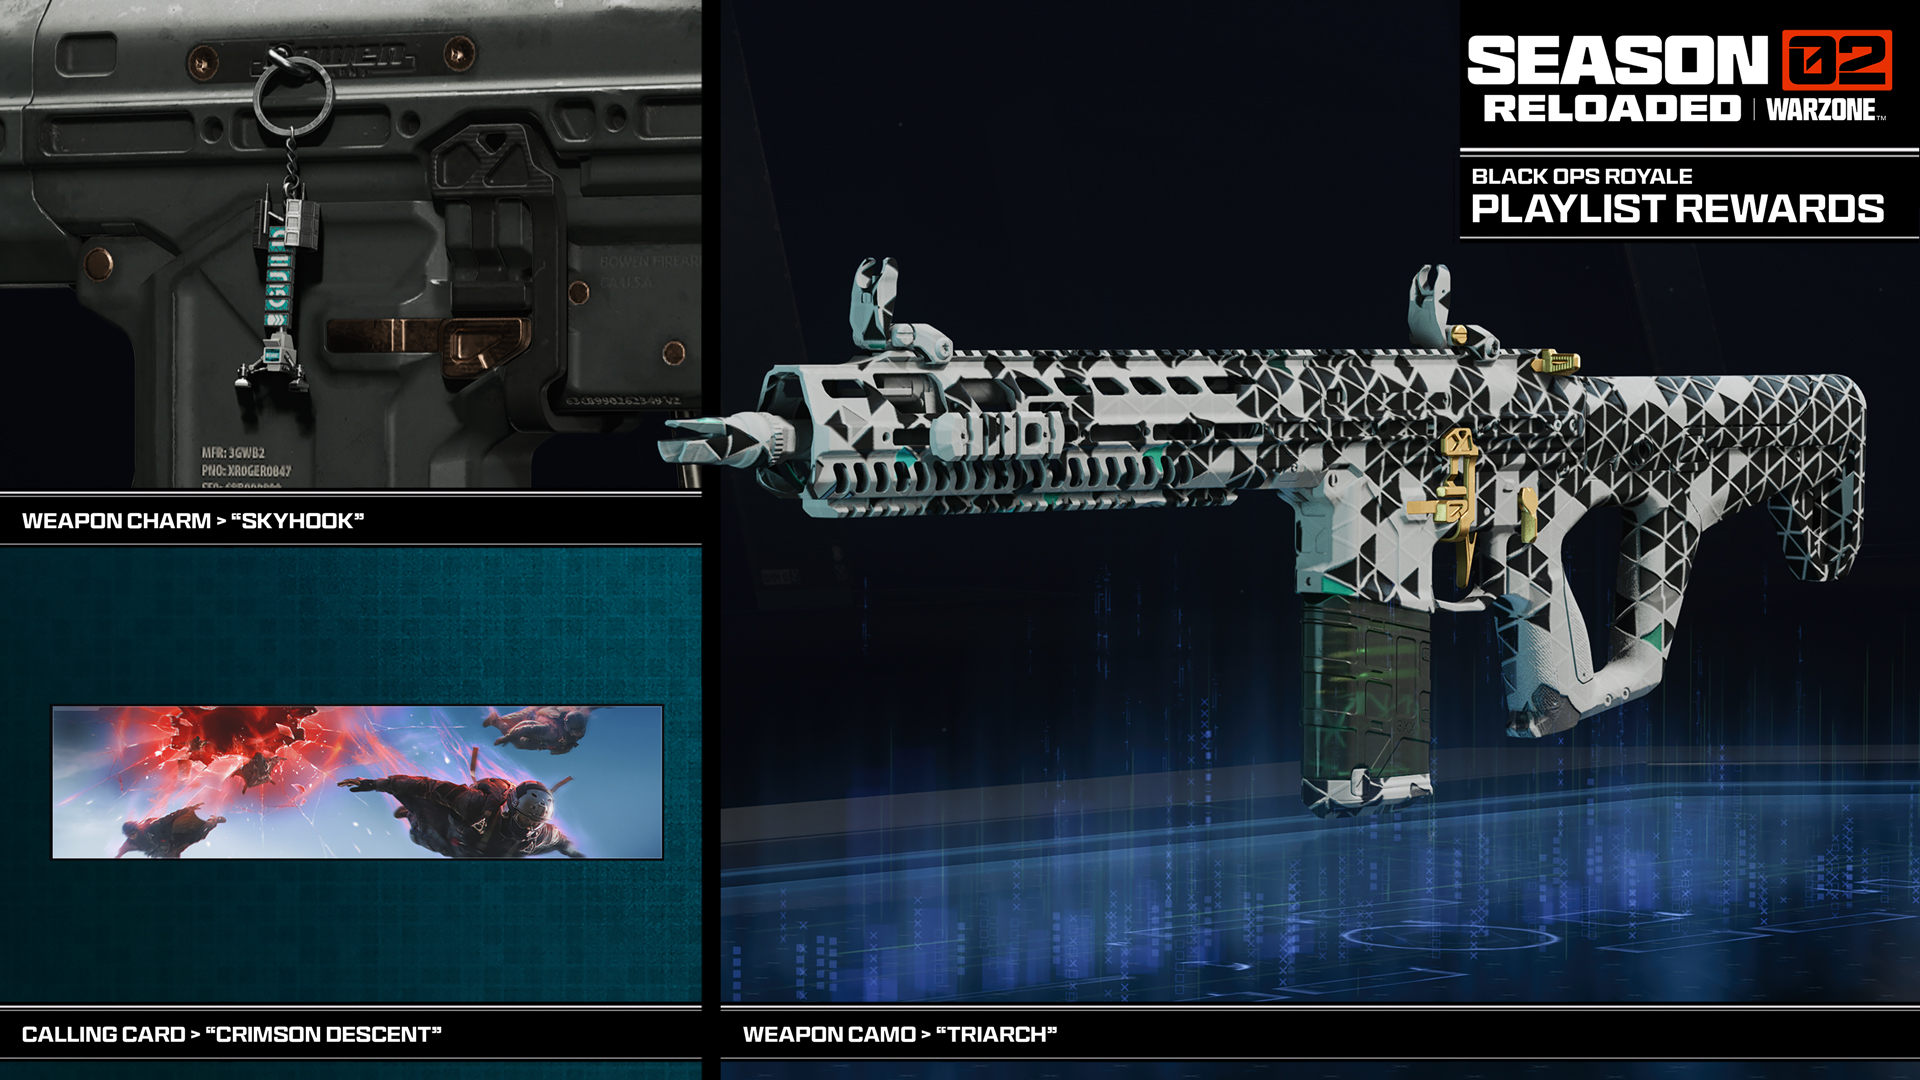
Accessible via a menu box to the right of the Black Ops Royale Playlist, there are three free rewards to earn just by playing the mode. Complete the following to earn them:
- Complete 10 Activities: “Skyhook” Redeployment Tower Weapon Charm.
- Three Top 10 Placements: “Crimson Descent” Calling Card.
- Open the Mystery Box 3 times: “Triarch” Guild Weapon Camo.
Operator Orders
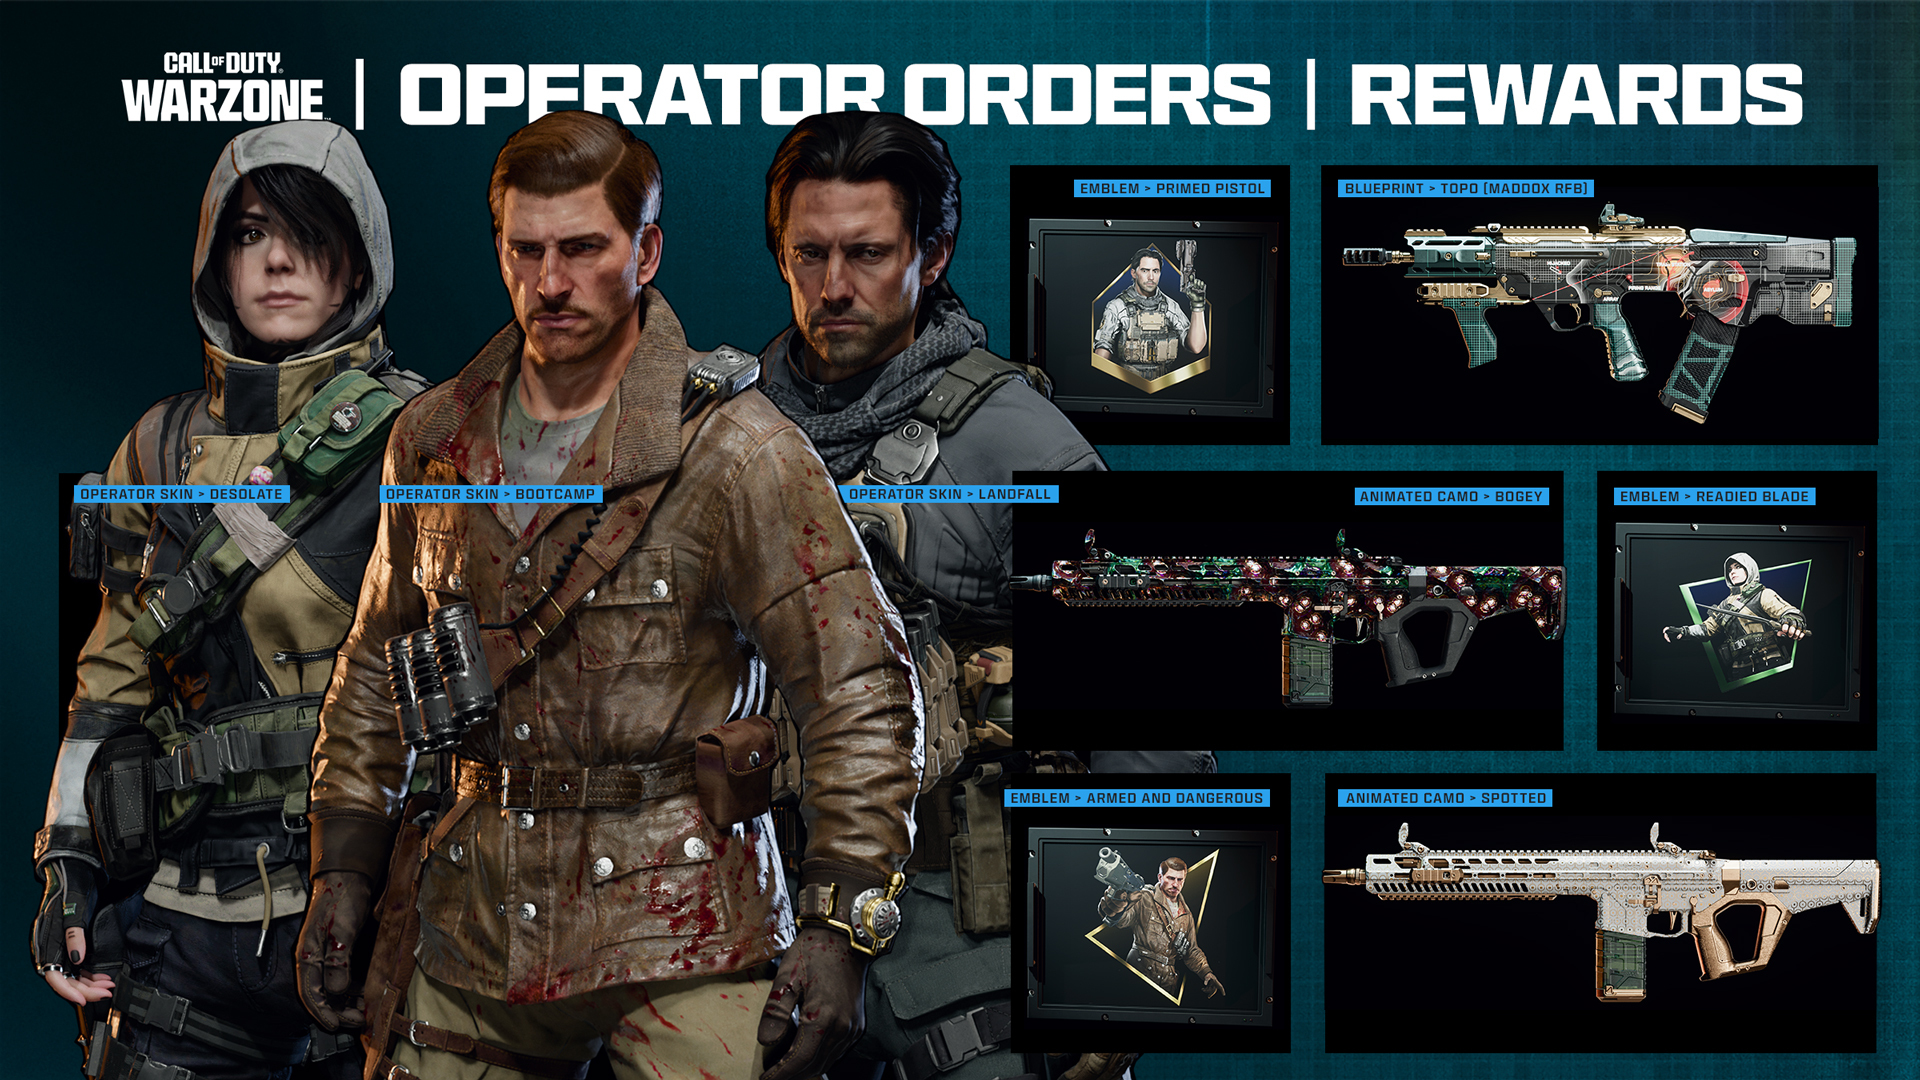
Like the original Blackout’s Operator Unlock Missions, there are rewards to find during your excursions across Avalon: clandestine orders available to those teams with a strength in recon as well as survival. While the Lobby menu showcases the rewards on offer to those who solve these mysteries of Avalon, the methods of retrieving these high-value items remain [CLASSIFIED]. Check out what’s on offer, including animated Weapon Camos and some extra-special Operator Skins!
- “Desolate” Operator Skin for Kagan
- “Landfall” Operator Skin for Mason
- “Bootcamp” Operator Skin for Dempsey
- “Bogey” Weapon Camo (Animated)
- “Spotted” Weapon Camo (Animated)
- “Topo” Weapon Blueprint for the Maddox RFB AR
- “Primed Pistol” Emblem
- “Readied Blade” Emblem
- “Armed and Dangerous” Emblem
Counter Skies Event and Event Pass (CM, MP, ZM, WZ)
March 17 to April 2
Rewards Include: Swordfish A1 (MR), Echo 12 Backlash Launcher (Attachment)
Drop into Black Ops Royale, or any game mode across Endgame, Multiplayer, Zombies, or Call of Duty: Warzone to earn XP and unlock rewards including a new weapon, Attachment, and a host of Black Ops Royale-themed content.
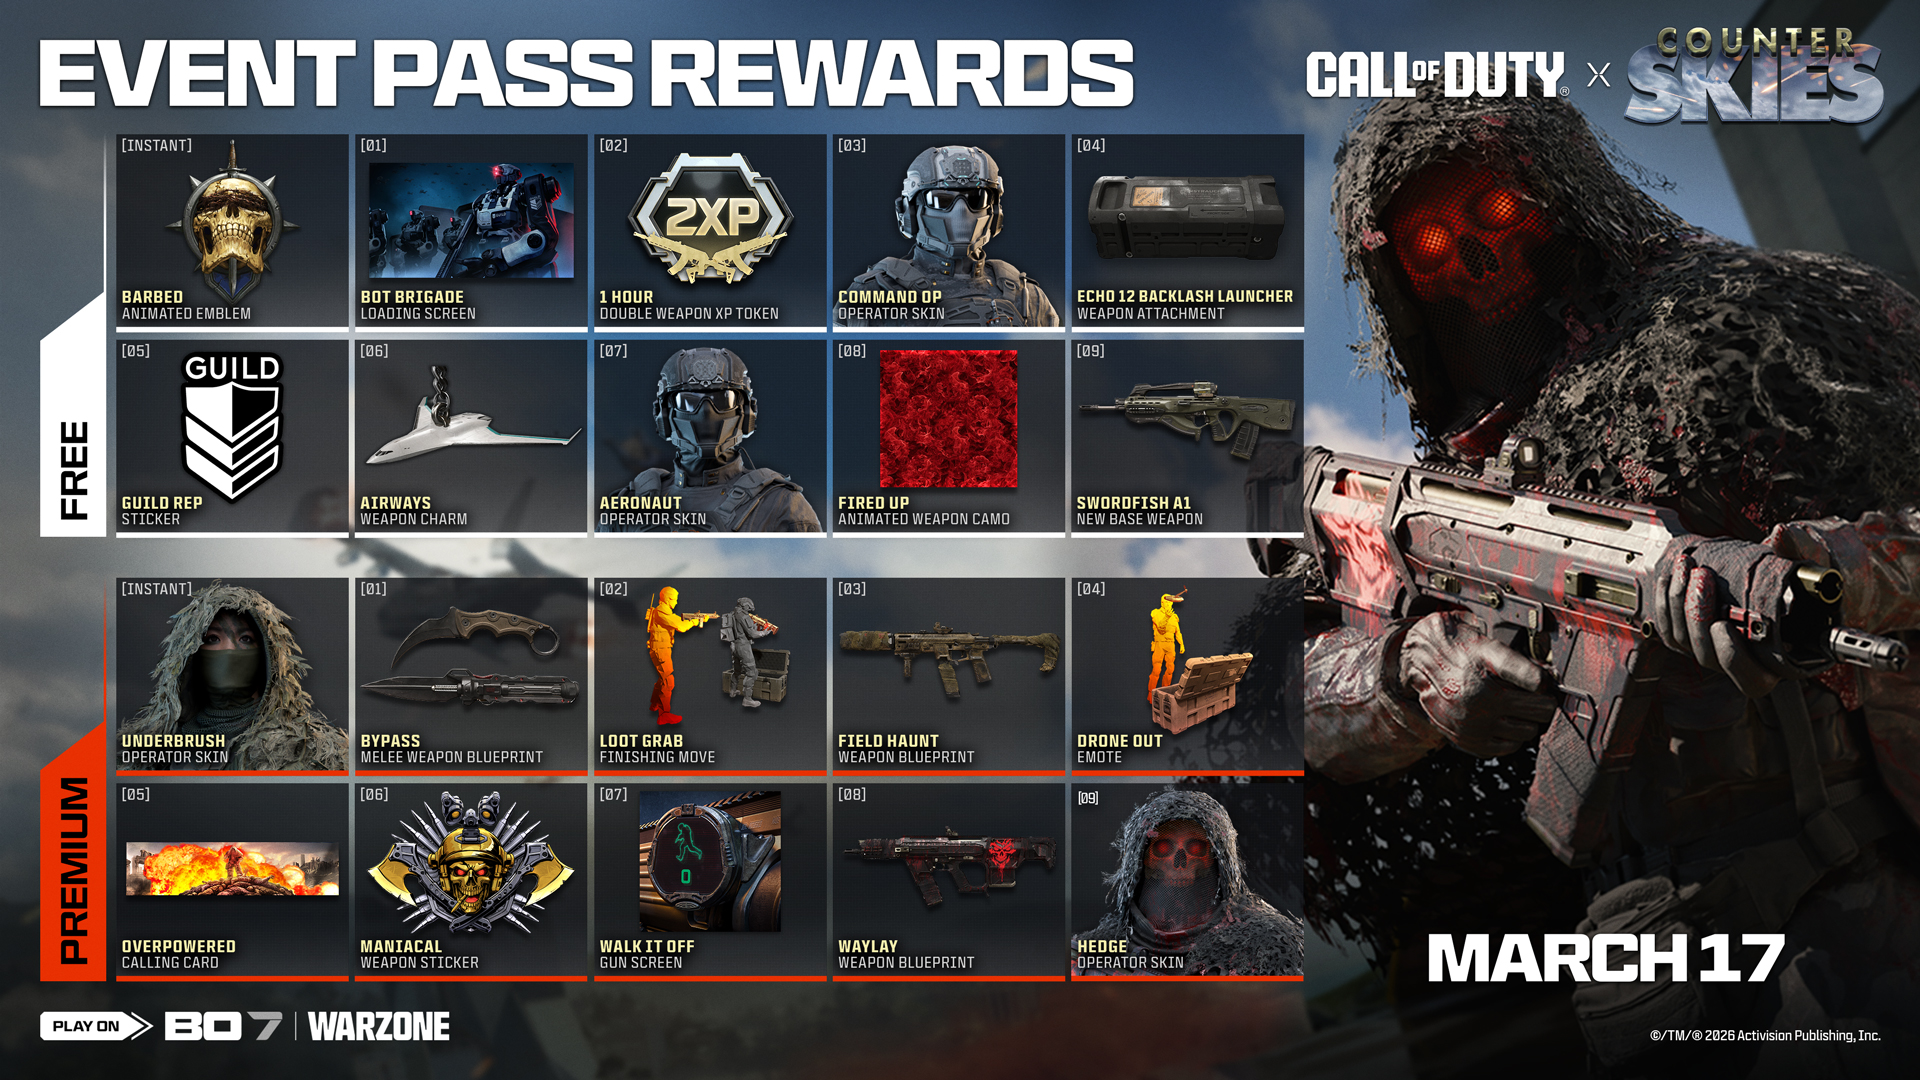
Operators dropping into “Operation: Eclipse” are recommended to focus on XP acquisition, as the results are outstanding in both the Free and Premium Reward Tracks. Progress to unlock the Swordfish A1 Marksman Rifle and the Echo 12 Backlash Launcher Attachment or access the Premium Track to earn some clandestine ghillie-suited skins, Weapon Blueprints, and more.
Free Track
Across all modes, XP is required as the following is acquired:
- One hour of 2WXP
- “Fired Up” Weapon Camo (Universal)
- “Airways” Weapon Charm
- “Guild Rep” Sticker
- “Bot Brigade” Loading Screen
- “Barbed” Emblem
- “Swordfish A1” Marksman Rifle (Base)
- “Echo 12 Backlash Launcher” Attachment
- “Aeronaut” Operator Skin
- “Command Op” Operator Skin
Premium Reward Track
While you complete modes for XP, optionally using any 2XP Tokens to quicken the process, Premium Reward owners also earn the following rewards:
- “Walk it off” Gunscreen
- “Maniacal” Weapon Sticker
- “Overpowered” Animated Calling Card
- “Drone Out” Emote
- “Loot Grab” Finishing Mode
- “Field Hunt” Weapon Blueprint
- “Bypass” Weapon Blueprint for the Ballistic Knife
- “Hedge” Operator Skin
- “Underbrush” Operator Skin
- “Waylay” Weapon Blueprint
Black Ops Royale: Mid-Season Midnight Launch Timing
Drop in with nothing but a knife and a pistol and go from zero to hero by looting the map, completing activities, and entering Cradle Bomb Zones for high tier loot to build your kit. Welcome to a higher-stakes, deadlier, start-from-nothing Call of Duty: Warzone. Can you survive?
Prepare your squadmates, adjust your Wingsuit, and throw out the Battle Royale rulebook. Season 02 Reloaded begins on Wednesday, March 11, then mark your calendars for the launch of Black Ops Royale on Thursday, March 12 at 9PM PT, or midnight Friday March 13 at (12AM ET) on the East Coast.
Avalon Tac-Atlas Now Live: Plan Your Black Ops Royale Infil Now!

Need to know the best place to land in Avalon during Operation: Eclipse? The official and free Black Ops Royale Tac-Atlas is now live, with information on all major points of interest! Click here for further important intel!
©/TM/® 2026 Activision Publishing, Inc.
For more information, please visit www.callofduty.com and www.youtube.com/callofduty, and follow @Activision and @CallofDuty on X, Instagram, and Facebook. For Call of Duty Updates, follow @CODUpdates on X.