Avalon Zone 1: Northwest
Avalon Zone 2: Northeast
Avalon Zone 3: Southwest Coast
Avalon Zone 4: South Central
Avalon Zone 5: East and Southeast
In readiness for your first infil into Black Ops Royale, it’s time to learn the lay of the land across Avalon, from the undulating golf course hillside to the ancient excavations, lavish casino, historic towns, and sizeable coastal defenses, all with additional minor points of interests marked.
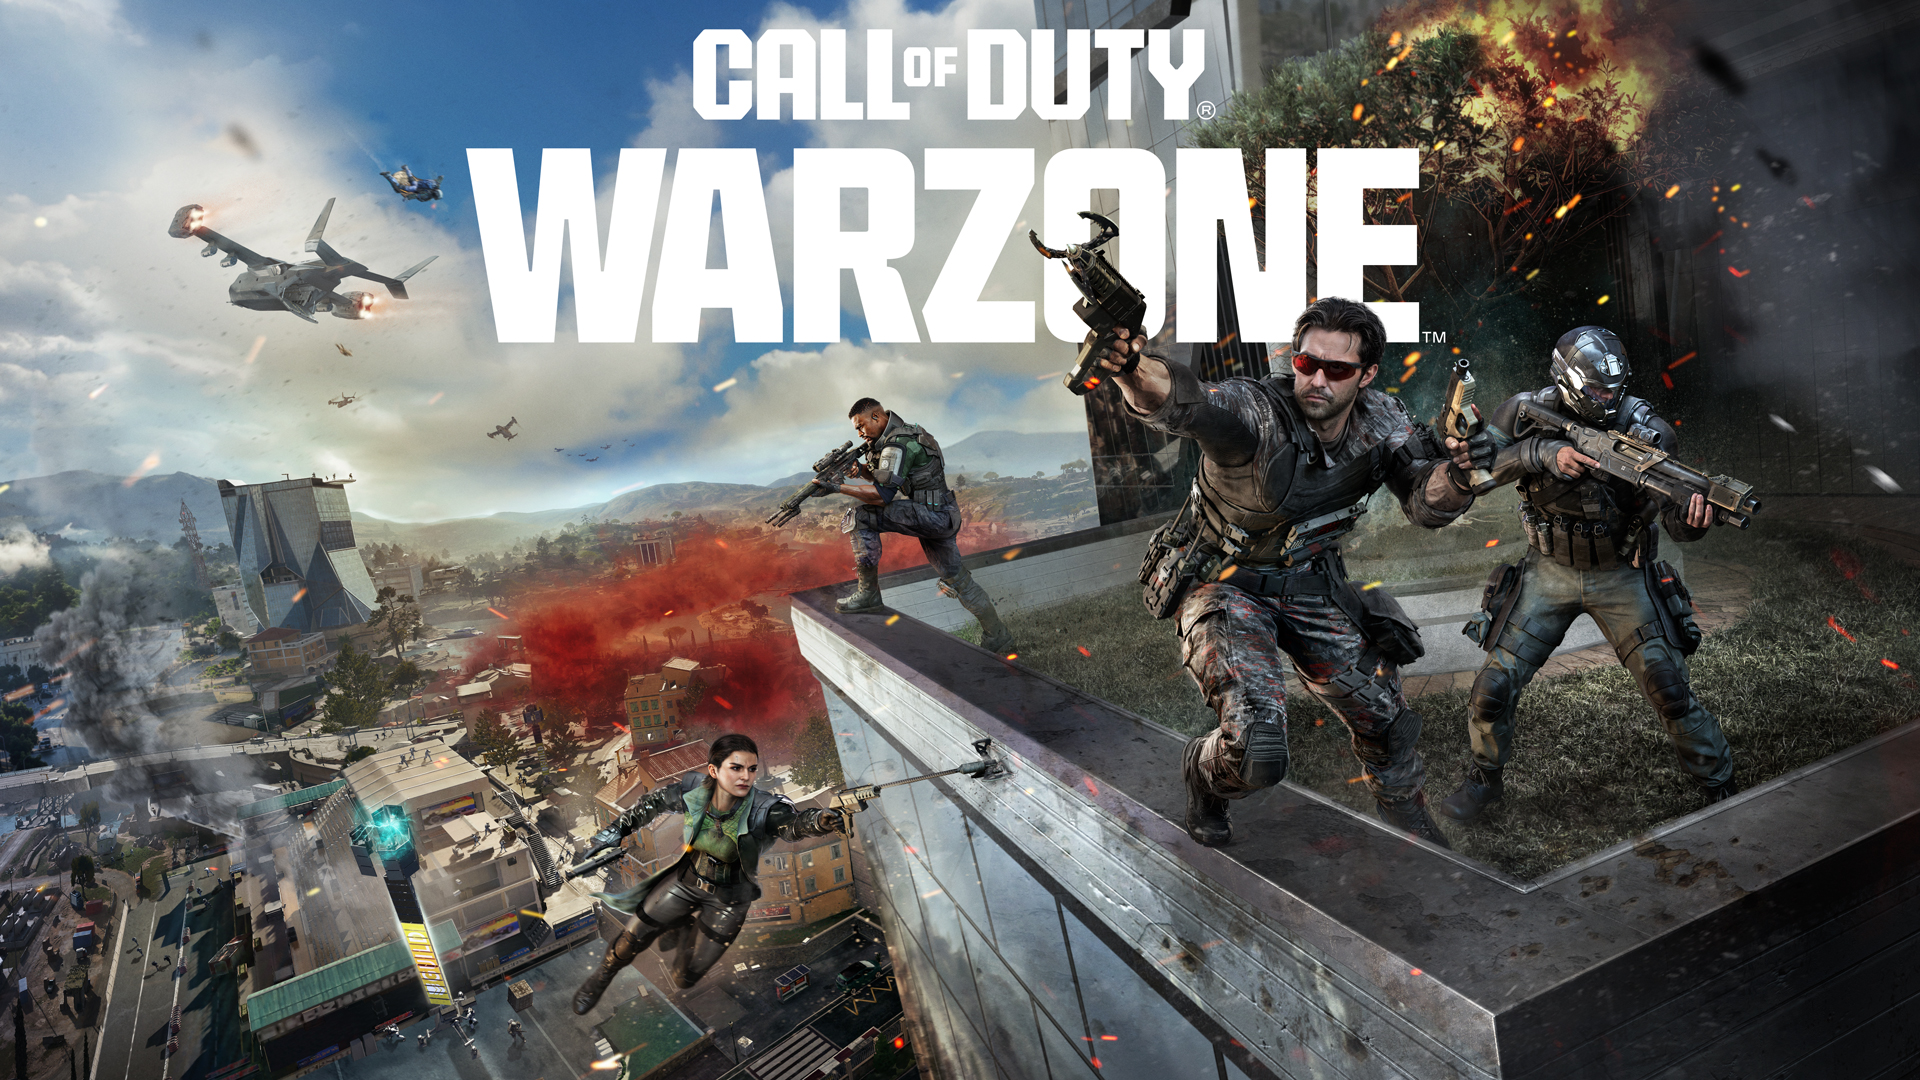
Welcome to Avalon
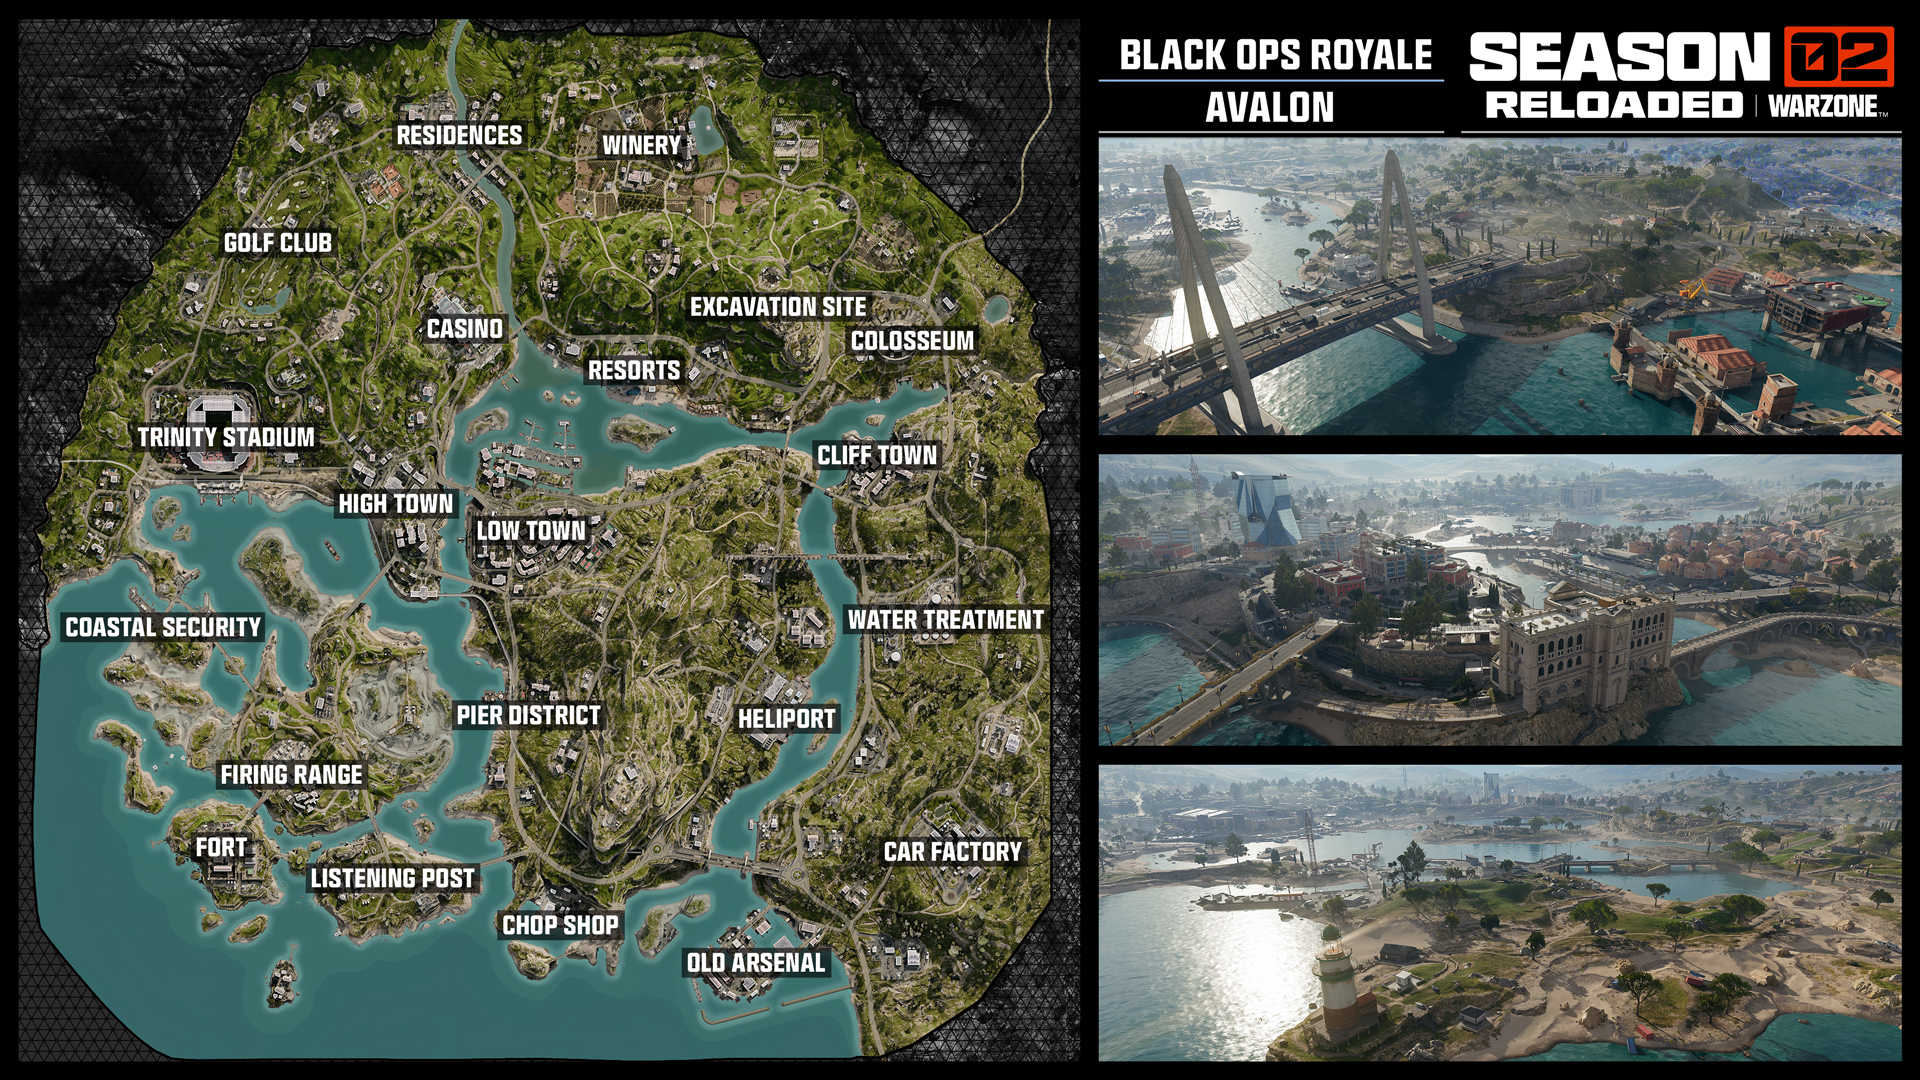
Welcome to Avalon! Before you drop into the new Call of Duty®: Warzone™ mode Black Ops Royale, it’s worth gaining tactical knowledge over the topography across this new map. Featuring new traversal opportunities and enhanced visual clarity compared to the Avalon map accessible in Black Ops 7Endgame, it’s worth studying the major and minor points of interest in readiness for battle.

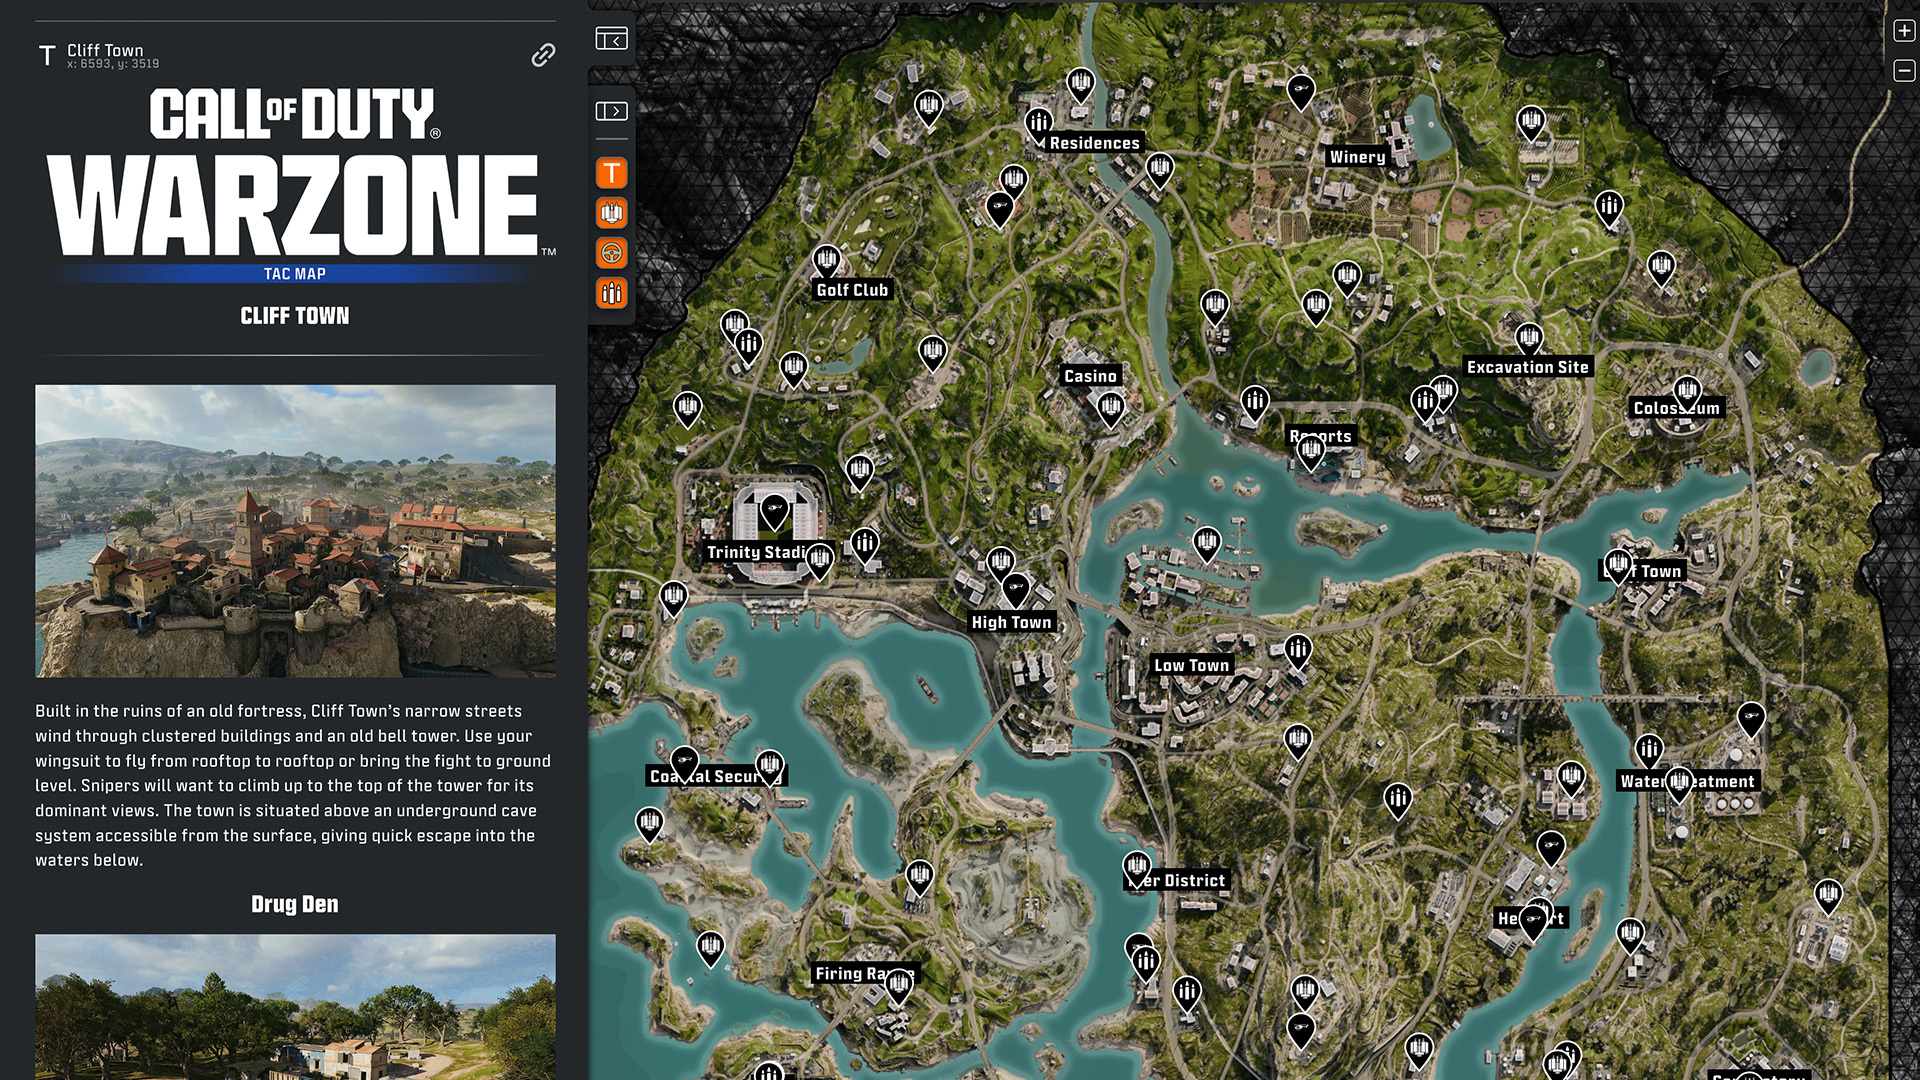
Free Avalon Tac-Atlas Available Here: For a comprehensive Tac-Map with areas of interest, as well as information on each point of interest via an interactive map (as shown above), ensure you bookmark the free Tac-Atlas, available here!
In-Depth Black Ops Royale Deep Dive Here: If you’re wanting all the intel on the new, Blackout-inspired Black Ops Royale mode for Call of Duty: Warzone, be sure to check out the Deep Dive Blog, available here!
Avalon Zone 1: Northwest
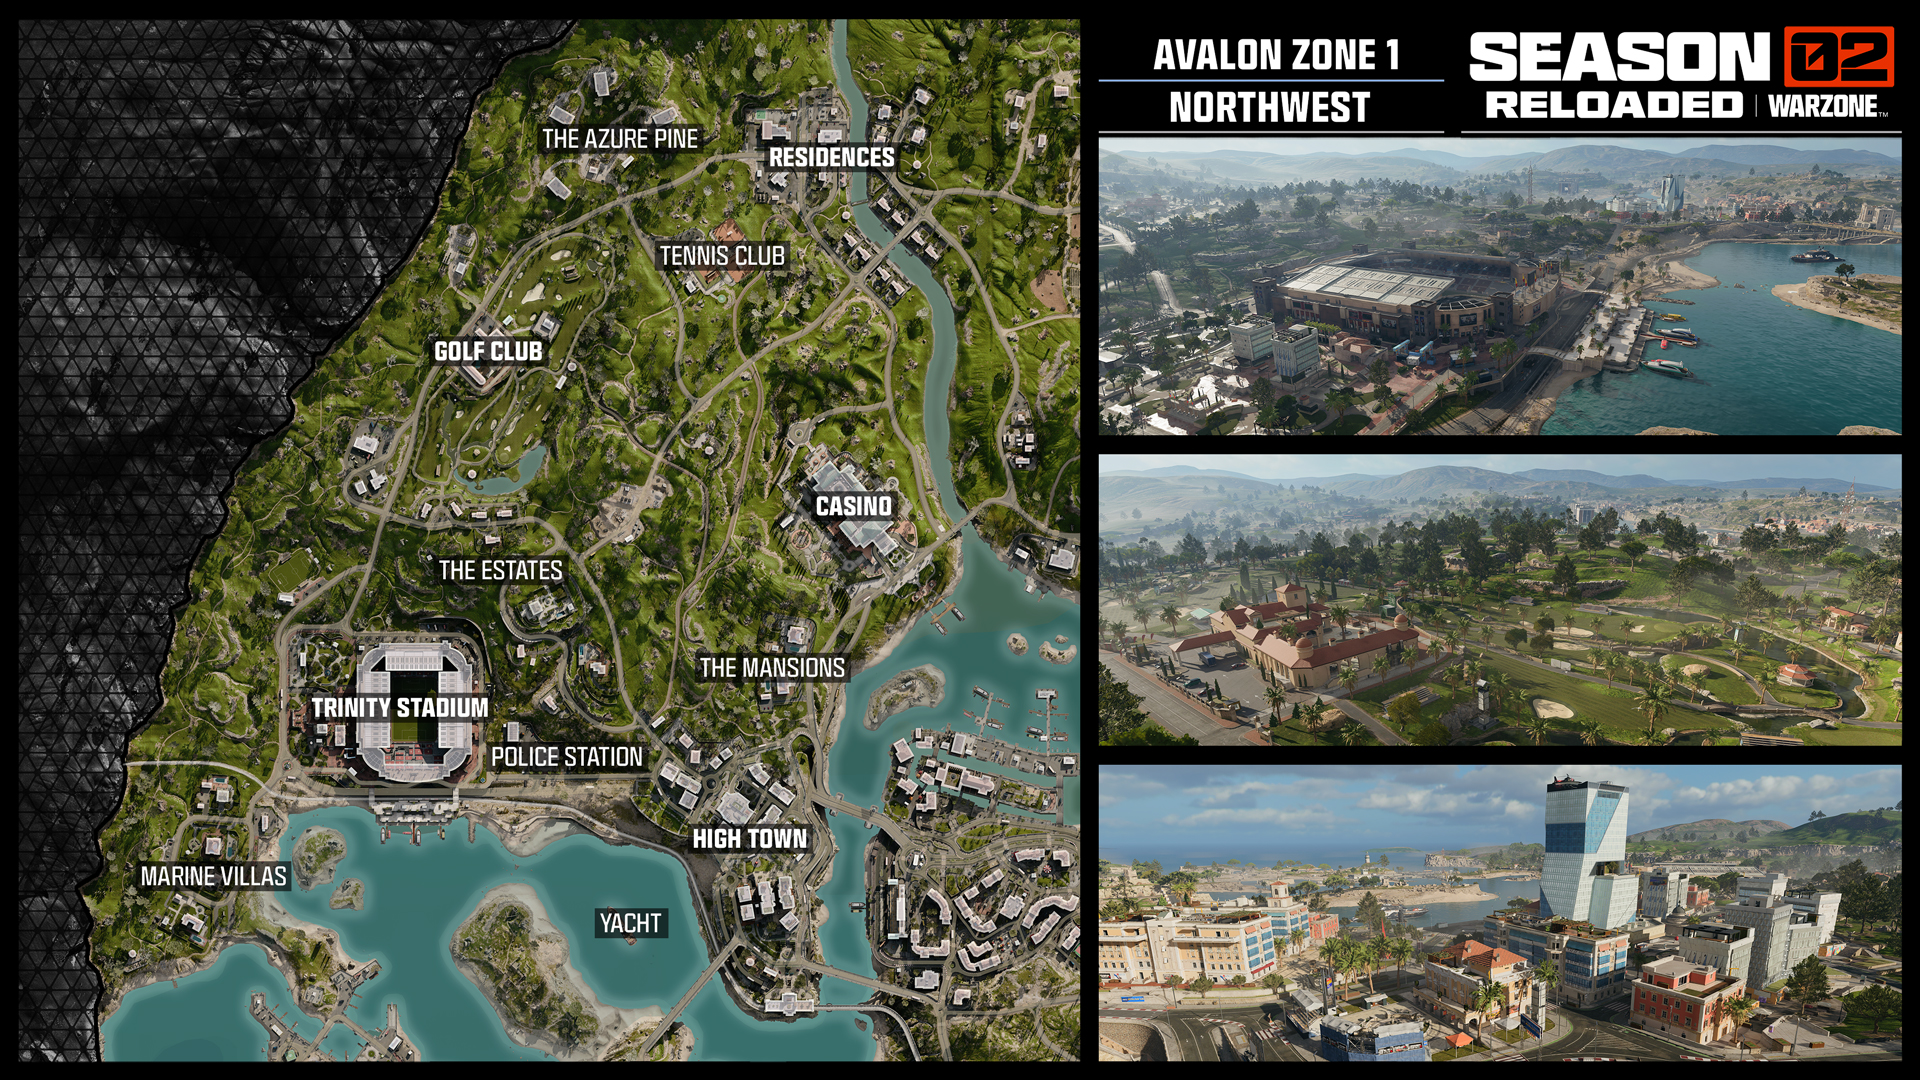
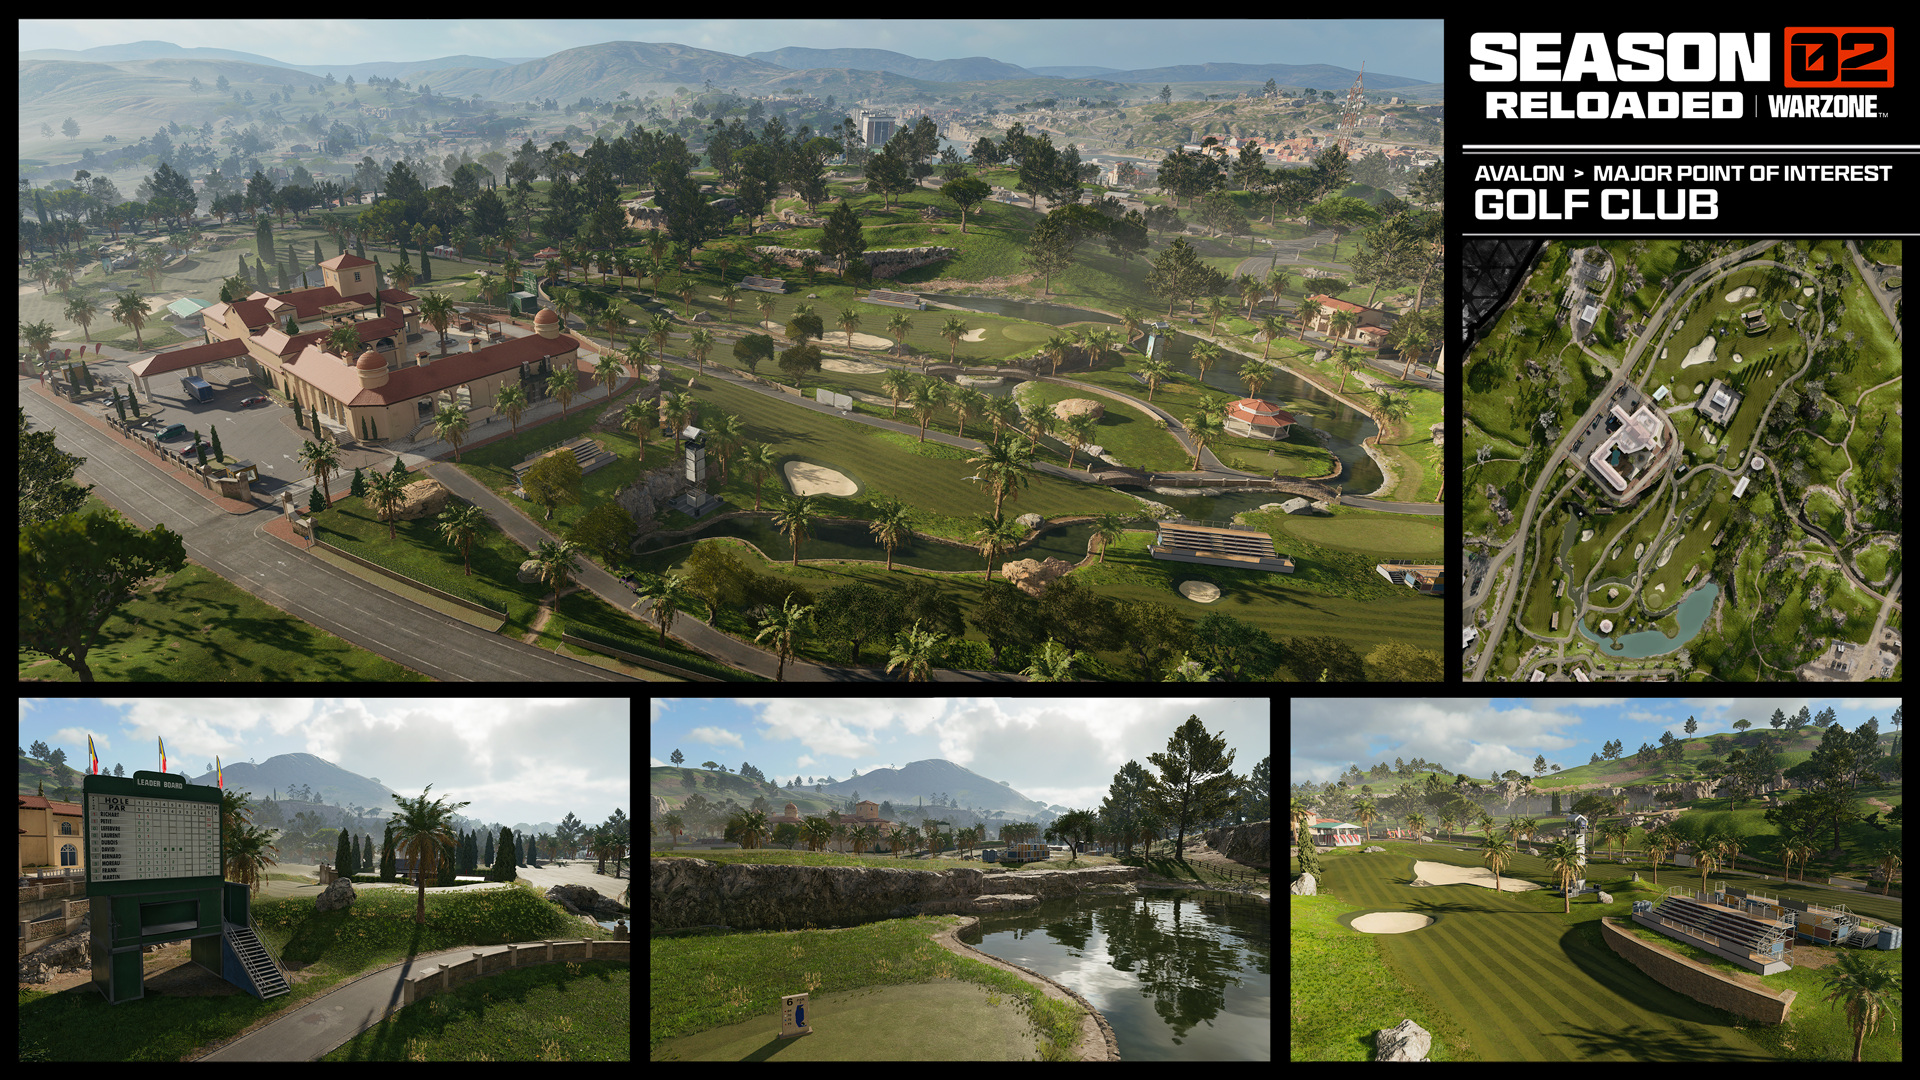
“Welcome” banners line the outer walls of the Golf Club, inviting those who drive on by or drop right in to make themselves at home. In this homage to the Hazard Multiplayer map from the original Black Ops, move into the elegant Champ Green clubhouse at the top of the hill to command the main grounds. The course fills the surrounding hillside, sloping gently down toward Trinity Station and the Casino with a stopover at the Tennis Club on the way to Residences up north. Surrounded by lots of tree cover and hills, the Golf Club is a good place to take your time and loot for a bit before moving on. If you get caught unaware on the green, dive into a sand trap for quick cover.
Residences
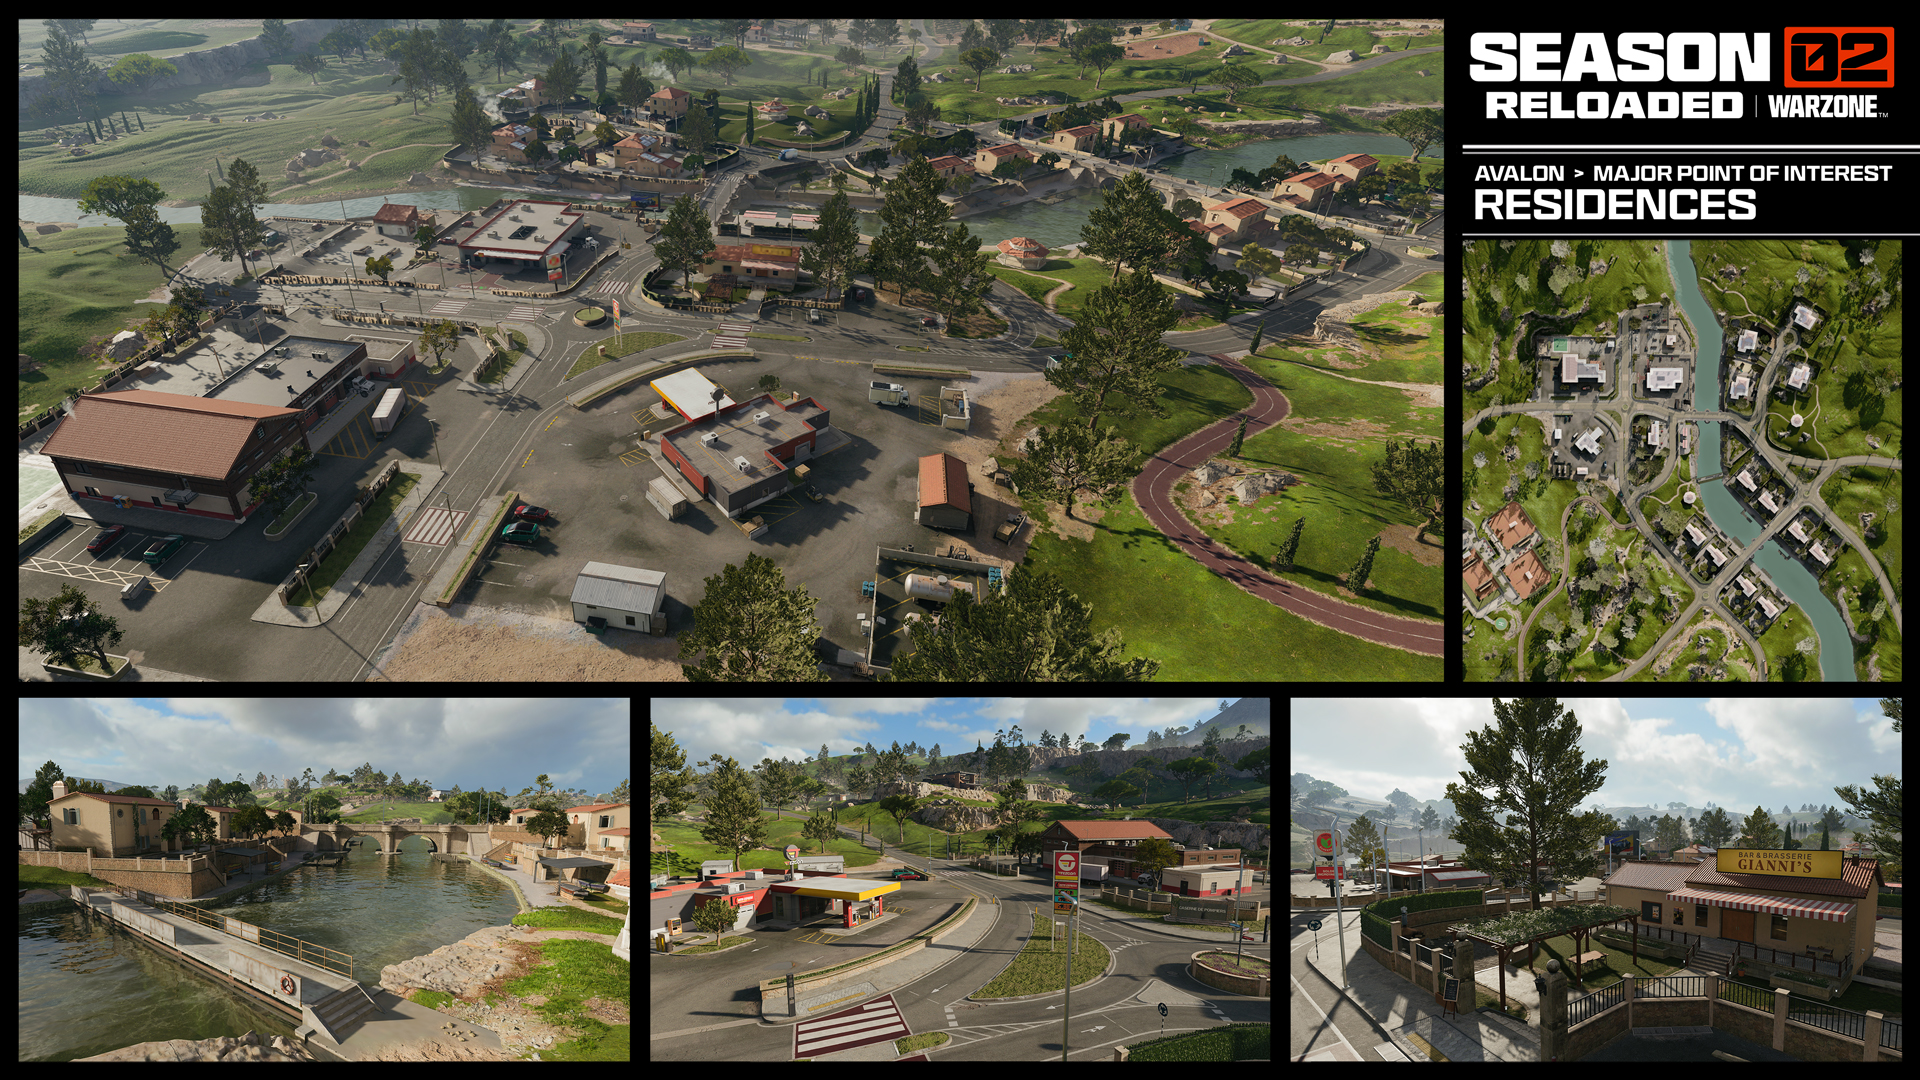
The extensive roads branching through this suburban enclave make it an ideal playground for vehicles with road access in and out of town toward the Golf Club, Casino, and Winery. Homes and commercial buildings sit on both sides of the river, surrounded by supporting POIs including the Tennis Club and the Azure Pine, a scenic estate far up the northern mountain.
Tennis Club
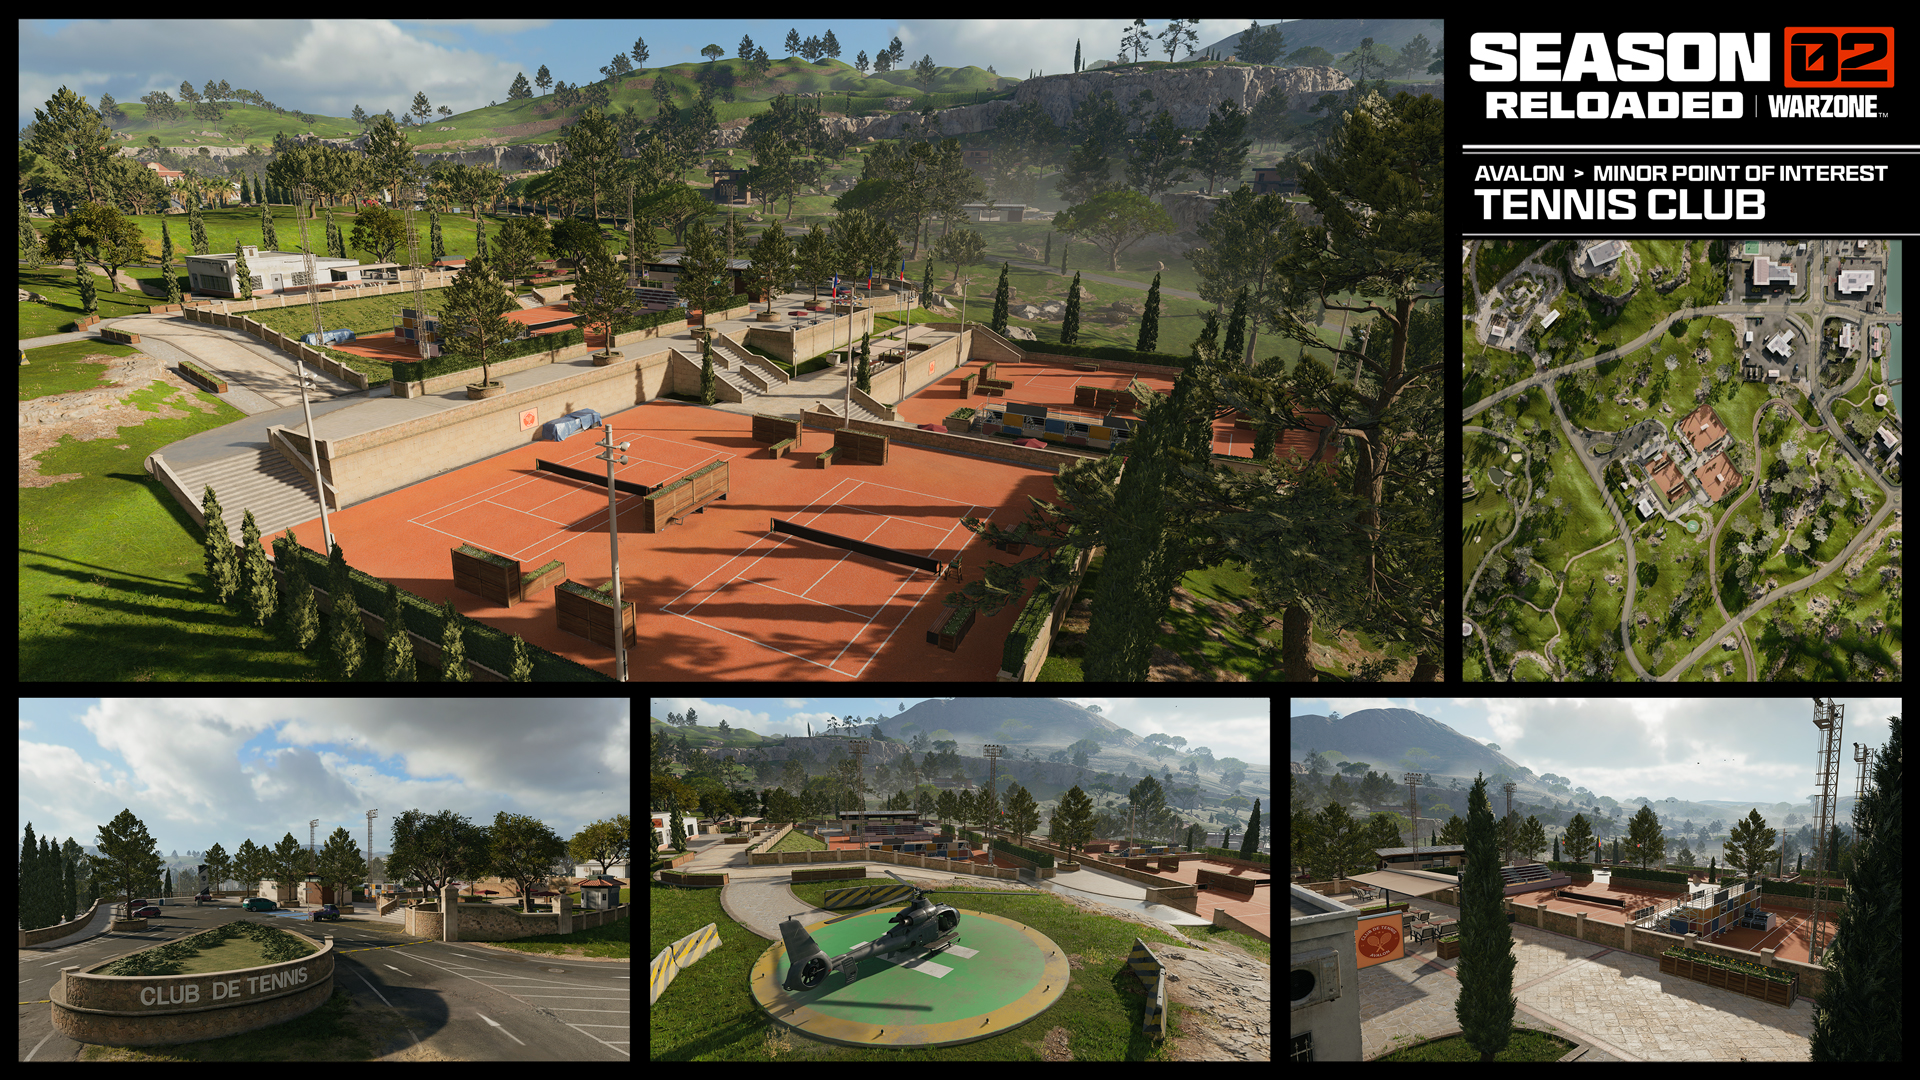
Before you can make your way to the Golf Club, you may need to fight through the Tennis Club first. This multi-level uphill battle has a few places to take cover, but most of the fighting will be done by using the hills and elevation to your advantage. Take refuge in the club house if you’re under fire or gather up some Attachment Kits and Armor while you can.
The Azure Pine
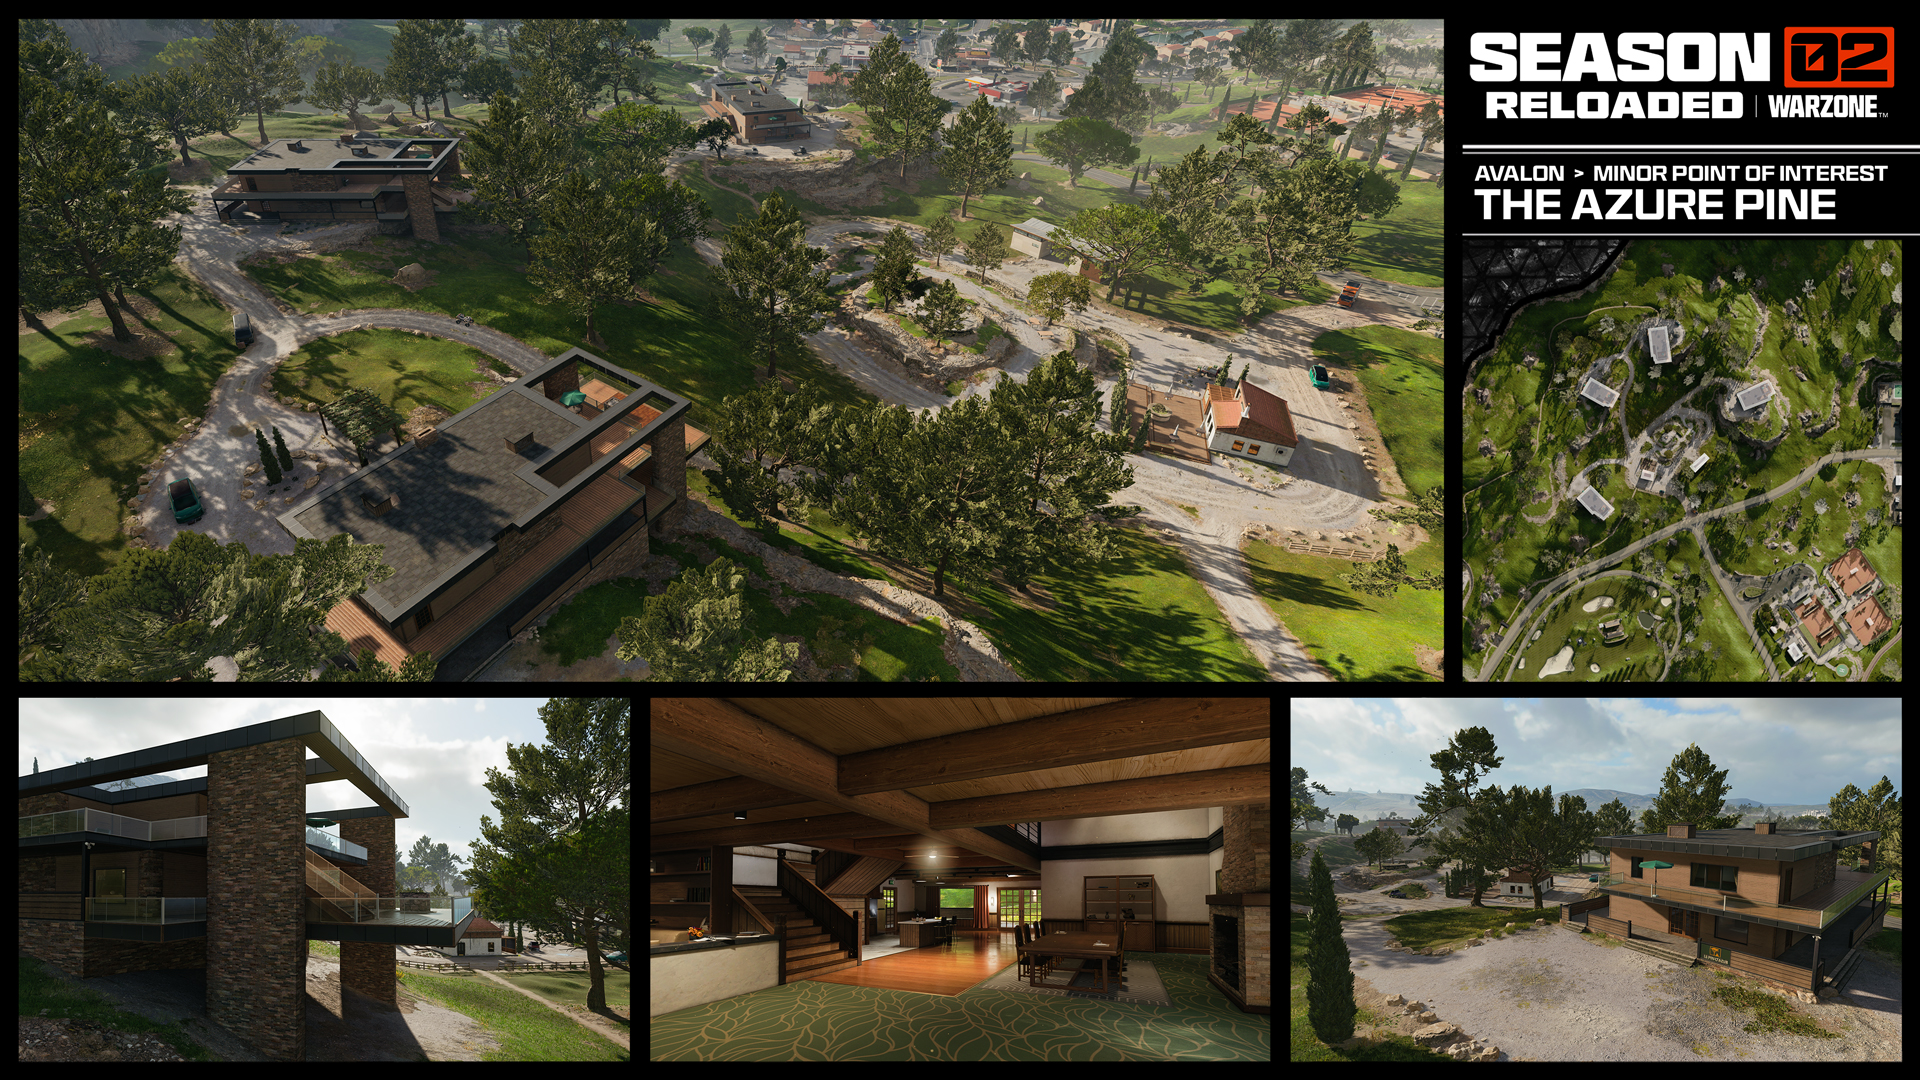
Directly to the west of the Residences location is a rustic luxury resort in the mountains. With some minor elevation, the Azure Pine has a wonderful view of the northern half of Avalon. With the many trees and large cabins, using this resort to plan your next move is a great plan. Loot the cabins on the edges of the property and remember to peek down the hill to both the east and south to catch some unsuspecting enemy squads.
Trinity Stadium
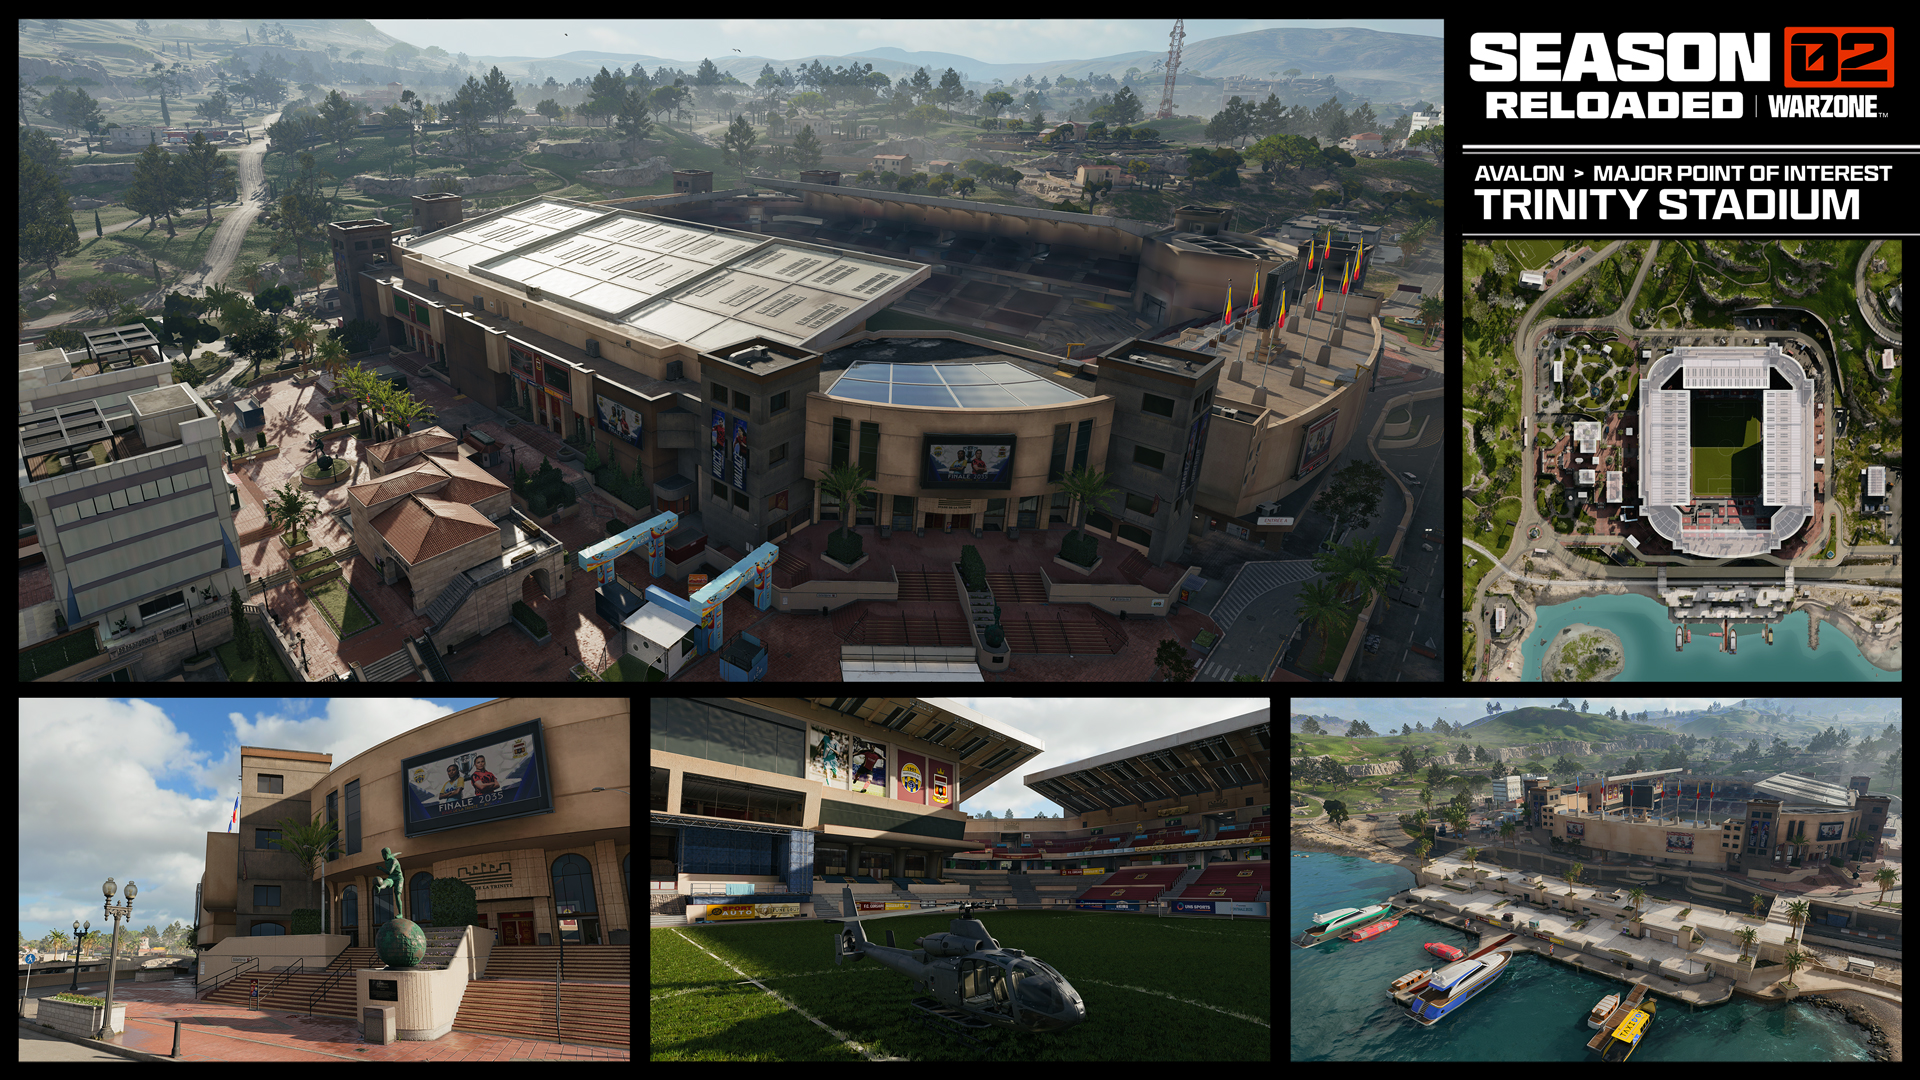
Trinity Stadium — home to the Red Card Multiplayer map from Black Ops 6 — towers over the river between High Town and the humble Marine Villas tucked in the corner facing Coastal Security. Fight through the Stadium’s multilevel interior, a collection of long hallways wrapping around the field. There are multiple access points onto the pitch and stands, with Ascenders rising to the roof inside and out. For closer combat, head to the Police Station just east of the arena.
Marine Villas
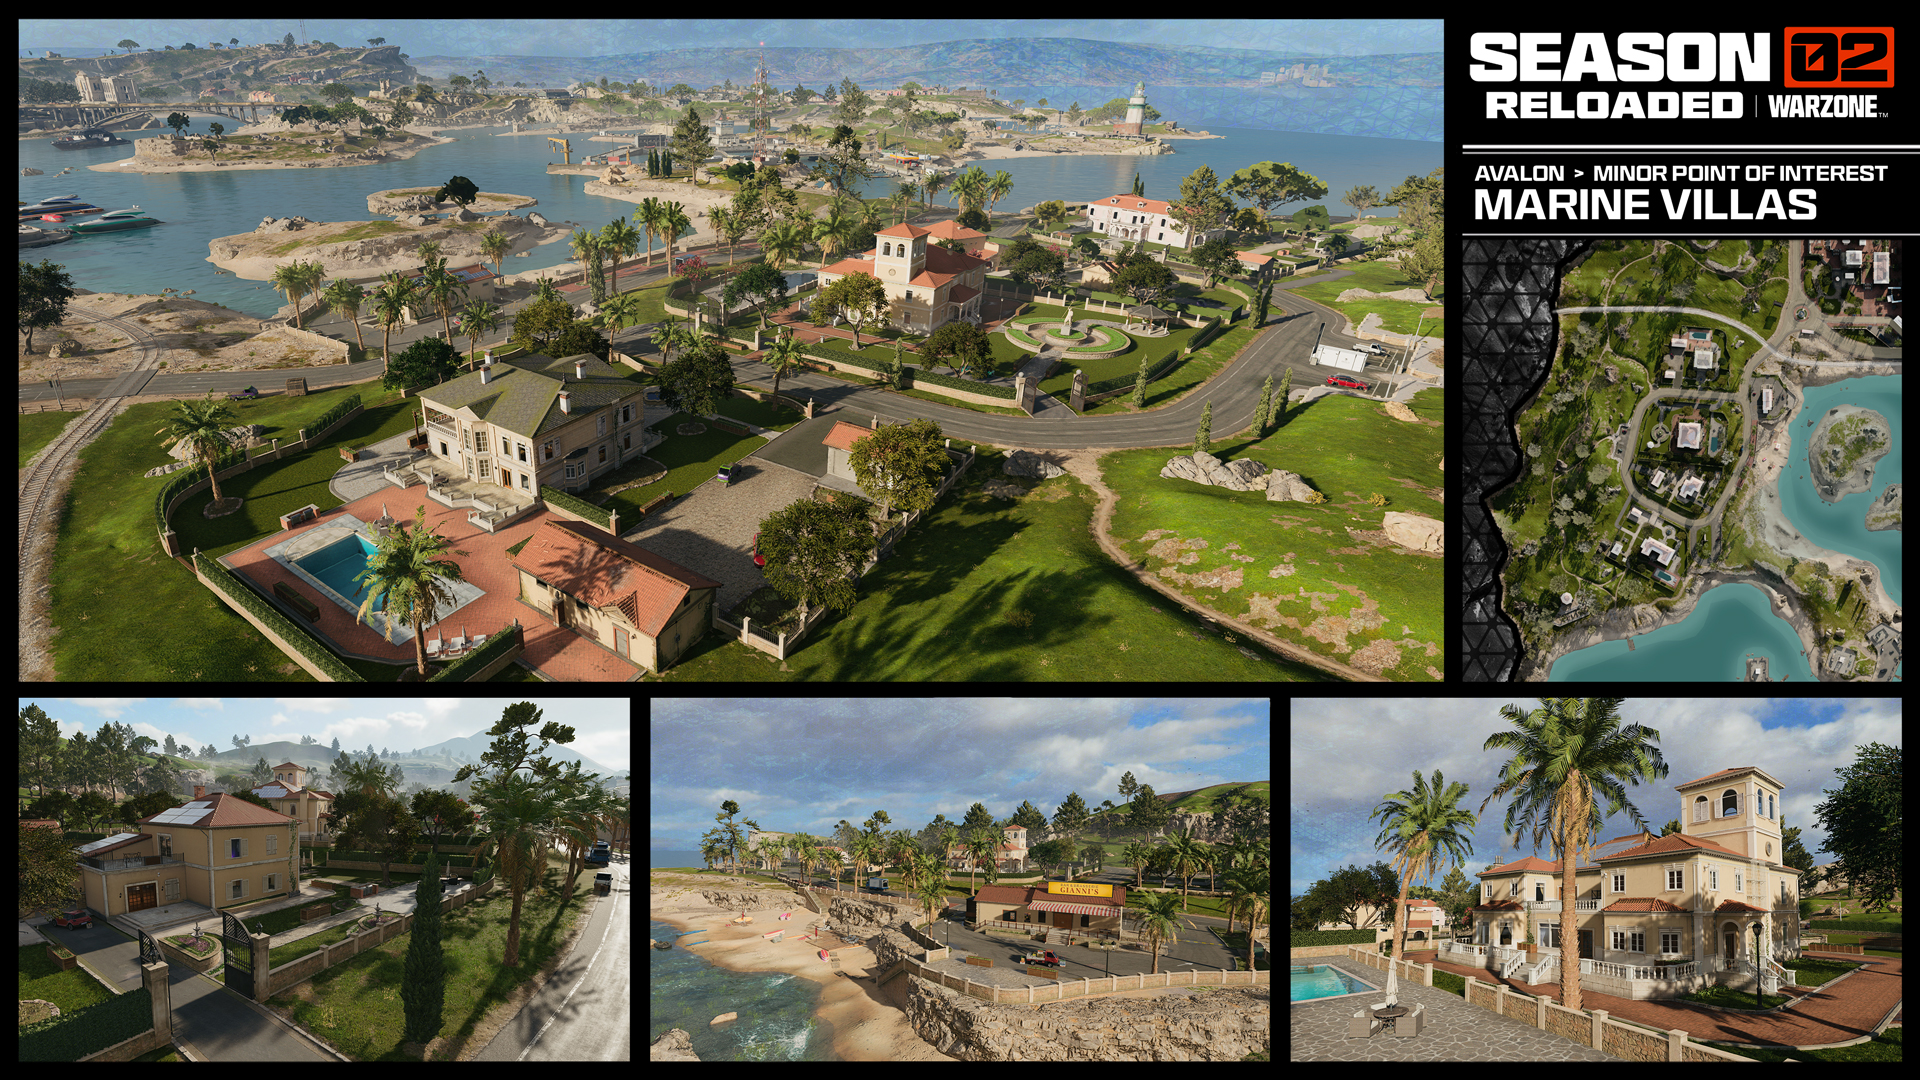
Marine Villas sits right on the western edge of Avalon and splits the river up between Trinity Stadium and Coastal Security. With four different Villas and several auxiliary buildings, there is plenty to search through and use as cover. As an edge POI, it’s quite useful to utilize against rotating squads and a perfect spot to begin any match.
Police Station (Stadium)
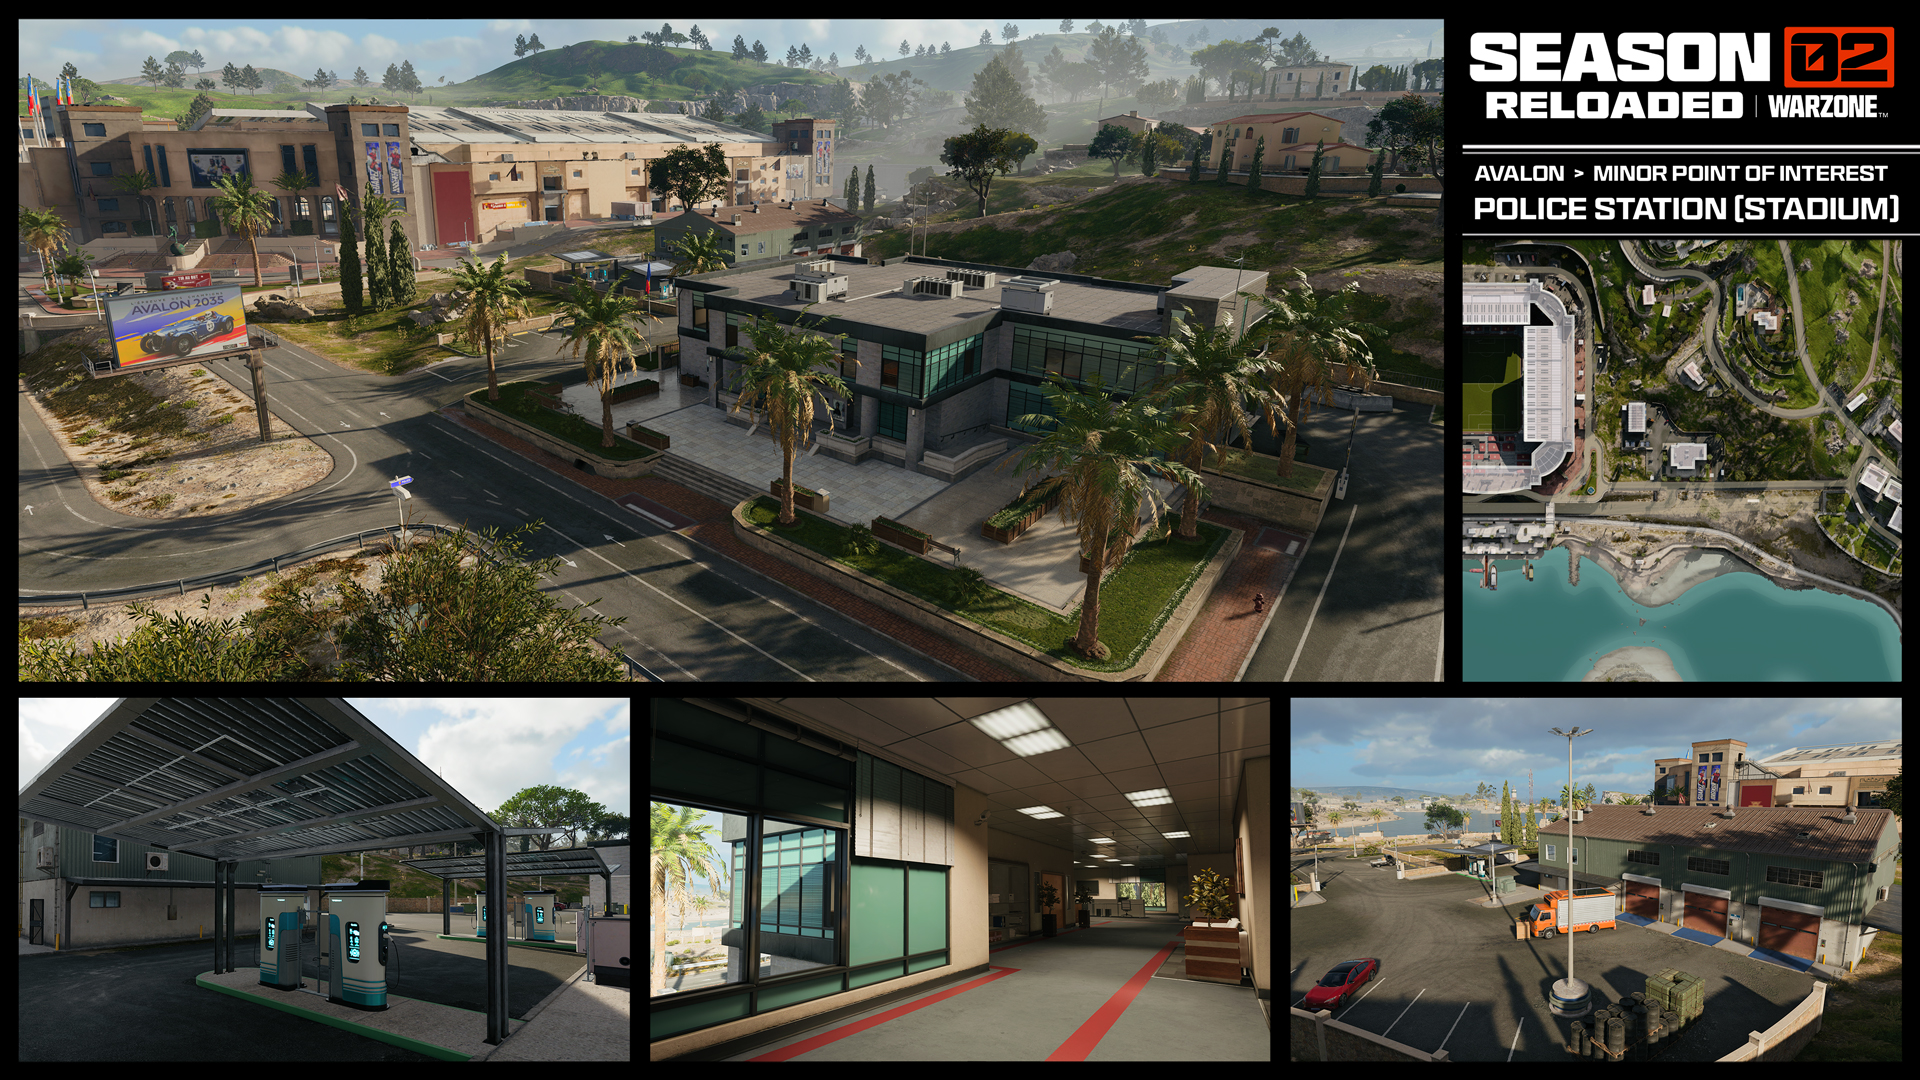
Positioned close to the soccer stadium in case of a fracas, this Police Station has a nearby warehouse, and rapid deployment to the hillside, east to High Town, or south into the coastal bay and tidal flats. Come here for a bolster to your ammunition and use the building as cover when planning your next moves.
Casino
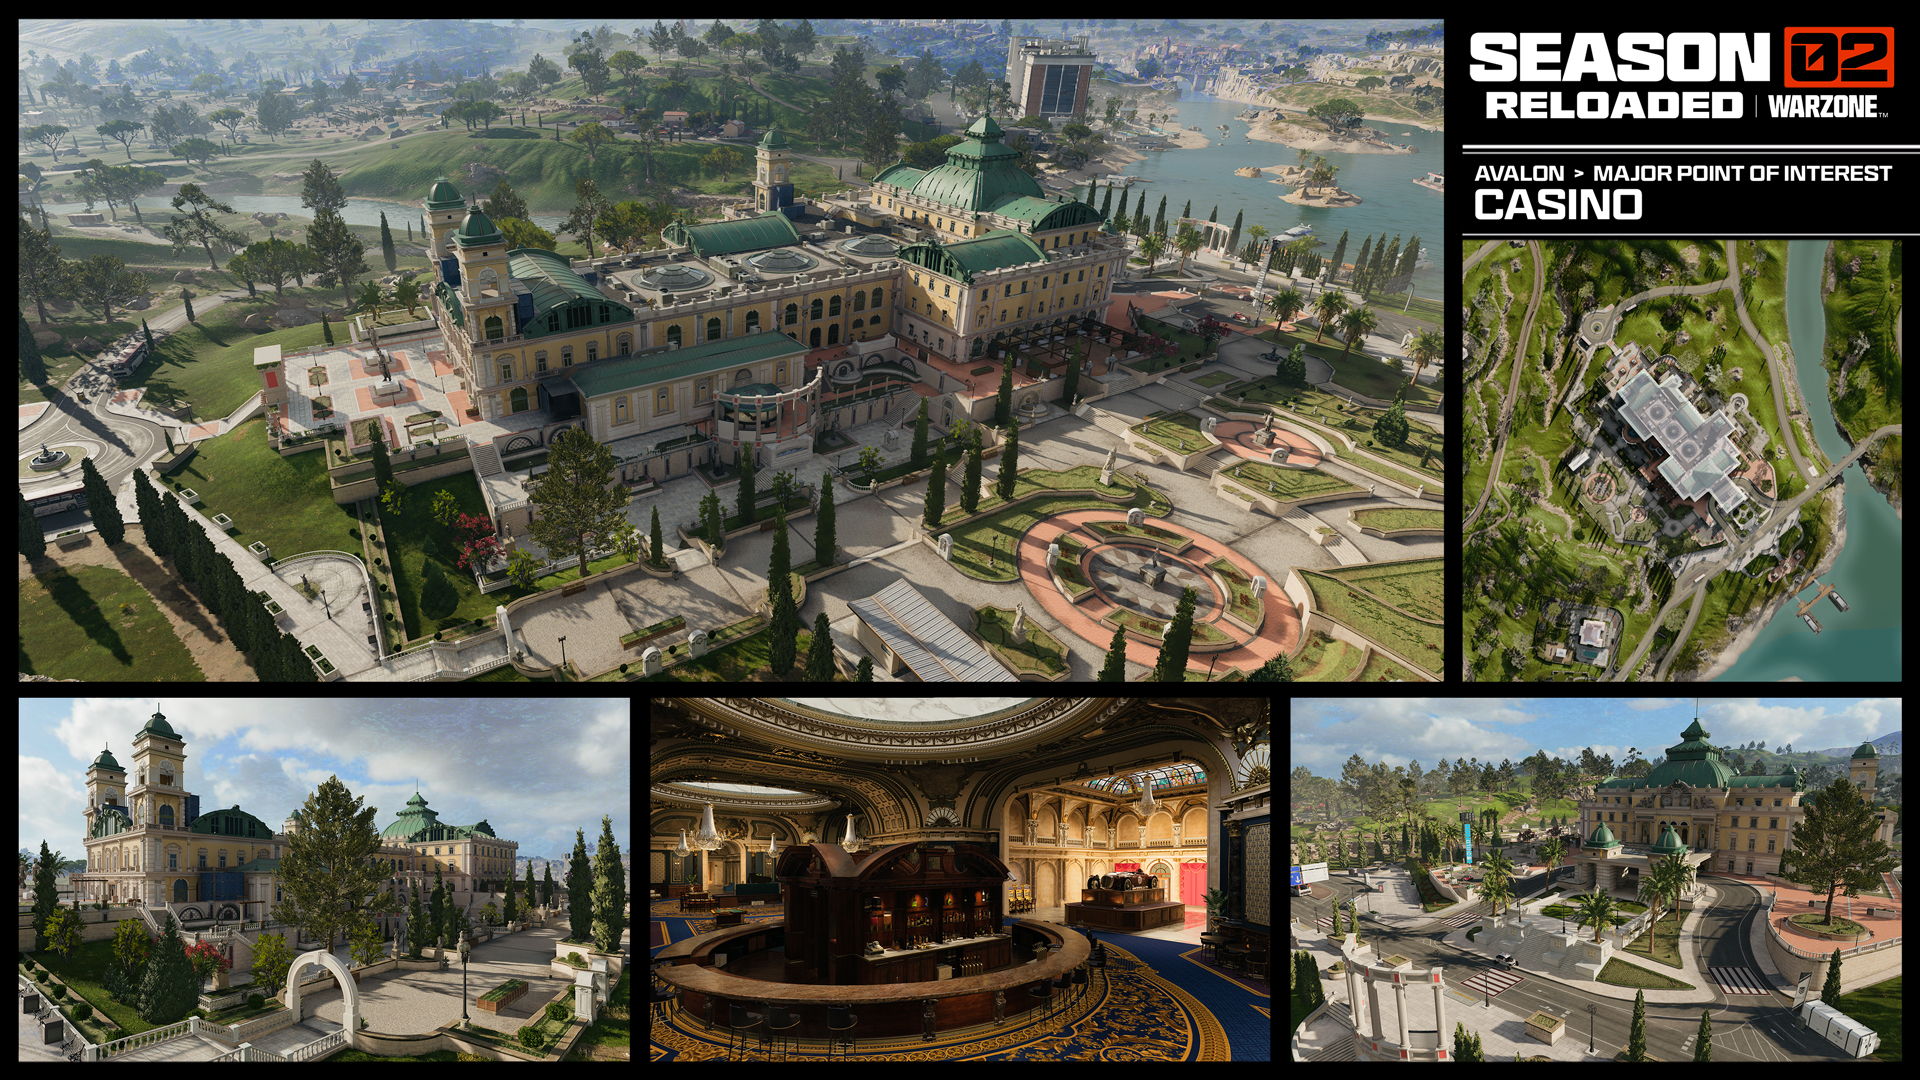
A showcase of riches, the Casino spares no expense with a luxurious interior featuring a grand piano, round bar, slot machines, and tables spread out along a massive ground floor. On the inside and along the outer walls, Ascenders zip up to the roof overlooking the grounds. Outside, statues line the walkways around a courtyard and down toward the shoreline into Low Town.
The Mansions
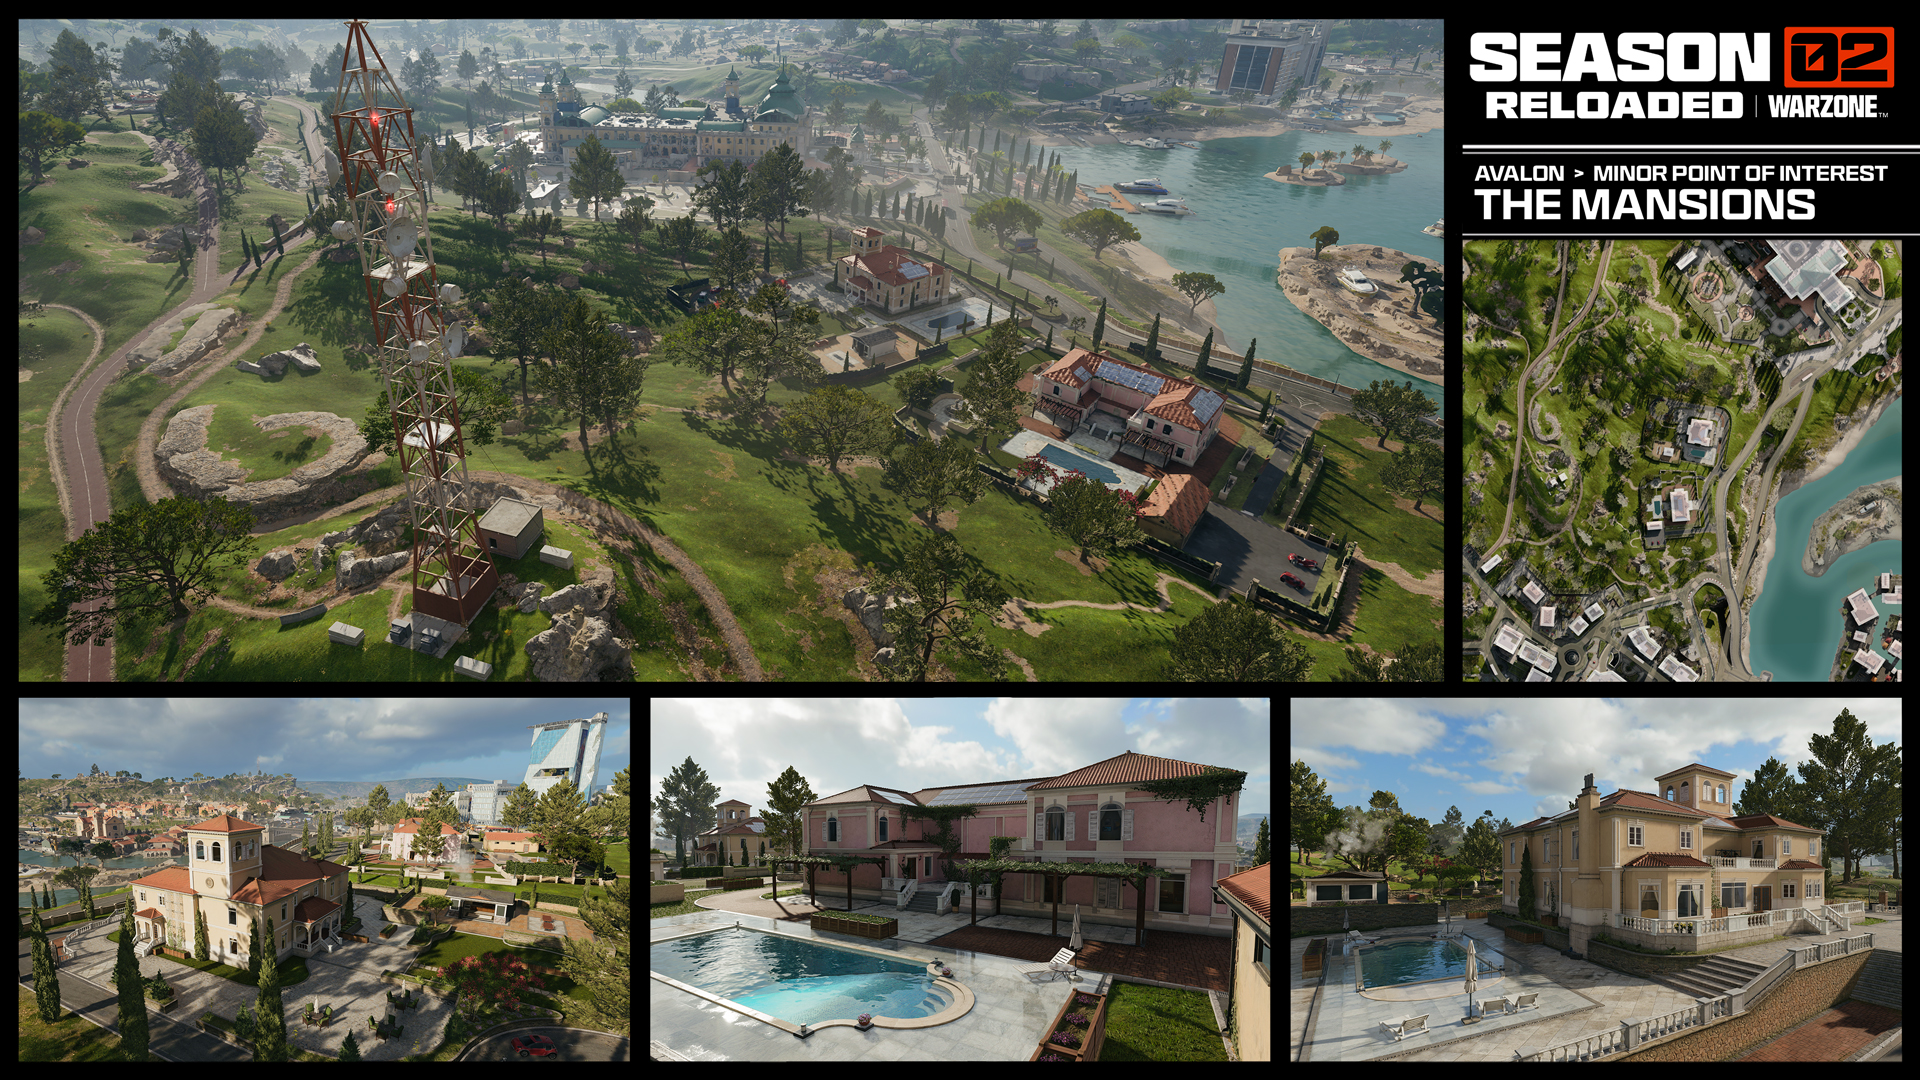
The last and most important stop between the Casino and High Town are the Mansions. Specifically, there are two large Mansions that sit along the main road and right next to the water, sitting under a communications tower. Each home is surrounded by its own courtyard and can be treated like a small compound. Cut through these mansions to hide your approach to High Town.
The Estates
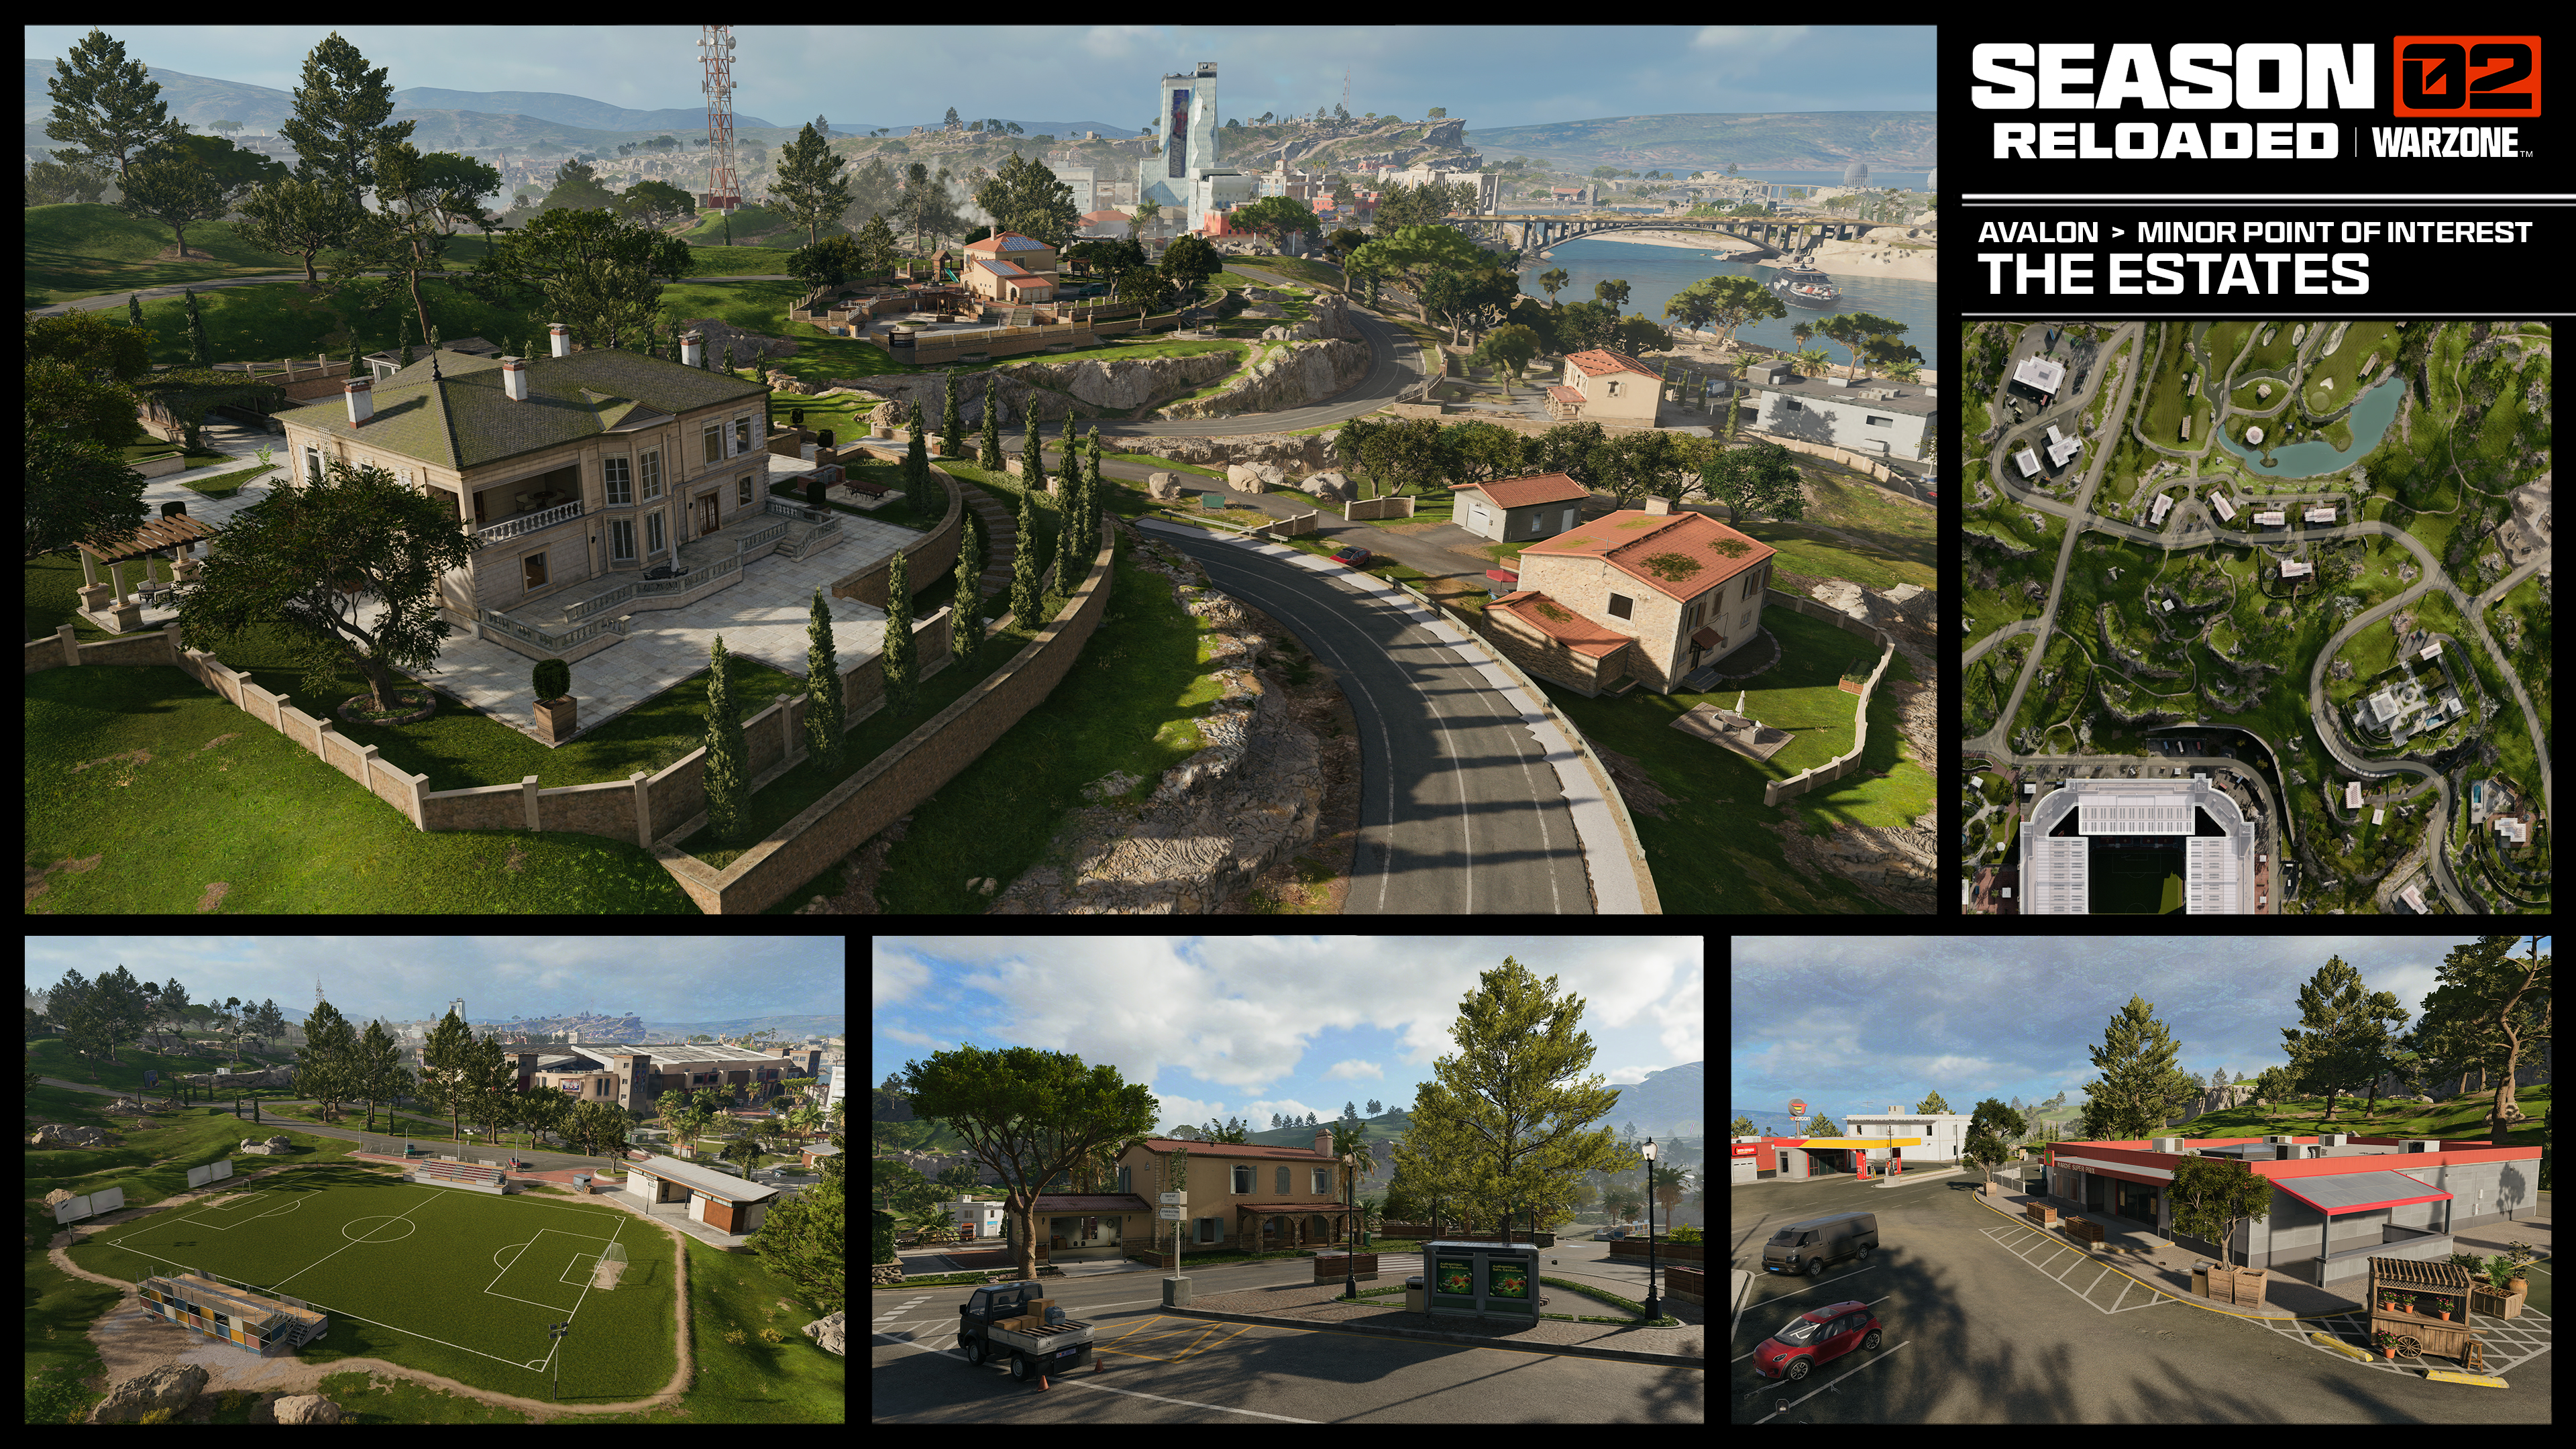
The Estates is a collection of luxury residences, with some still in early construction. Up on the hill and sitting between three major POIs is a hillside filled with luxury homes. Rotating through this location is both fast and highly dangerous. Stick to the houses and you will have the advantage of cover and elevation or dare to traverse the open roads and climb the retaining walls between properties. If you have the high ground, feel free to linger, but if not, stay on the move and get through The Estates quickly.
High Town
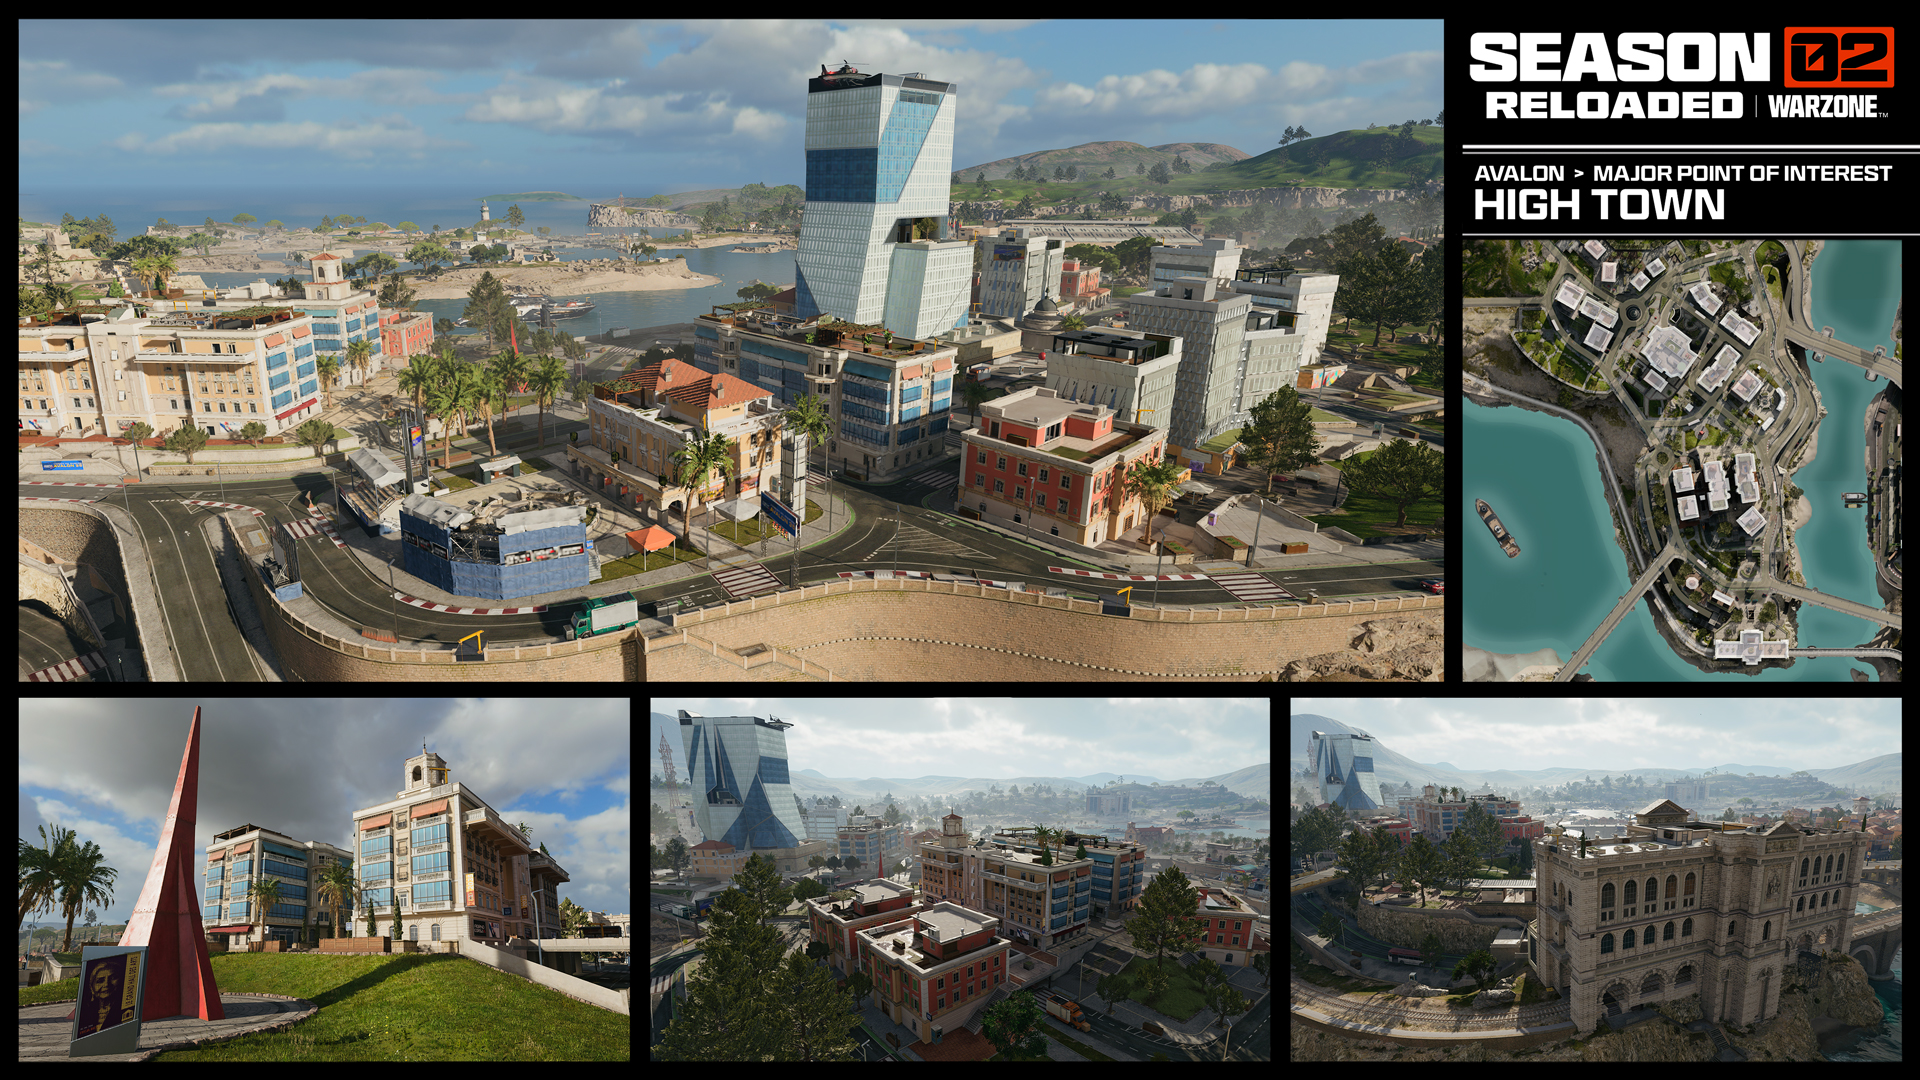
Right on the border of the central river, High Town earns its name with a cluster of tall buildings surrounding a skyscraper giving one of the highest viewpoints in all of Avalon. A network of parks and roads mingle throughout the populated area. Exploring this section can be a lucrative source for increasing your weapons and gear as your squad clears out threats in the dominant downtown area. Watch for vehicles traveling by sea, air, and land as they are all threats to High Town.
Yacht
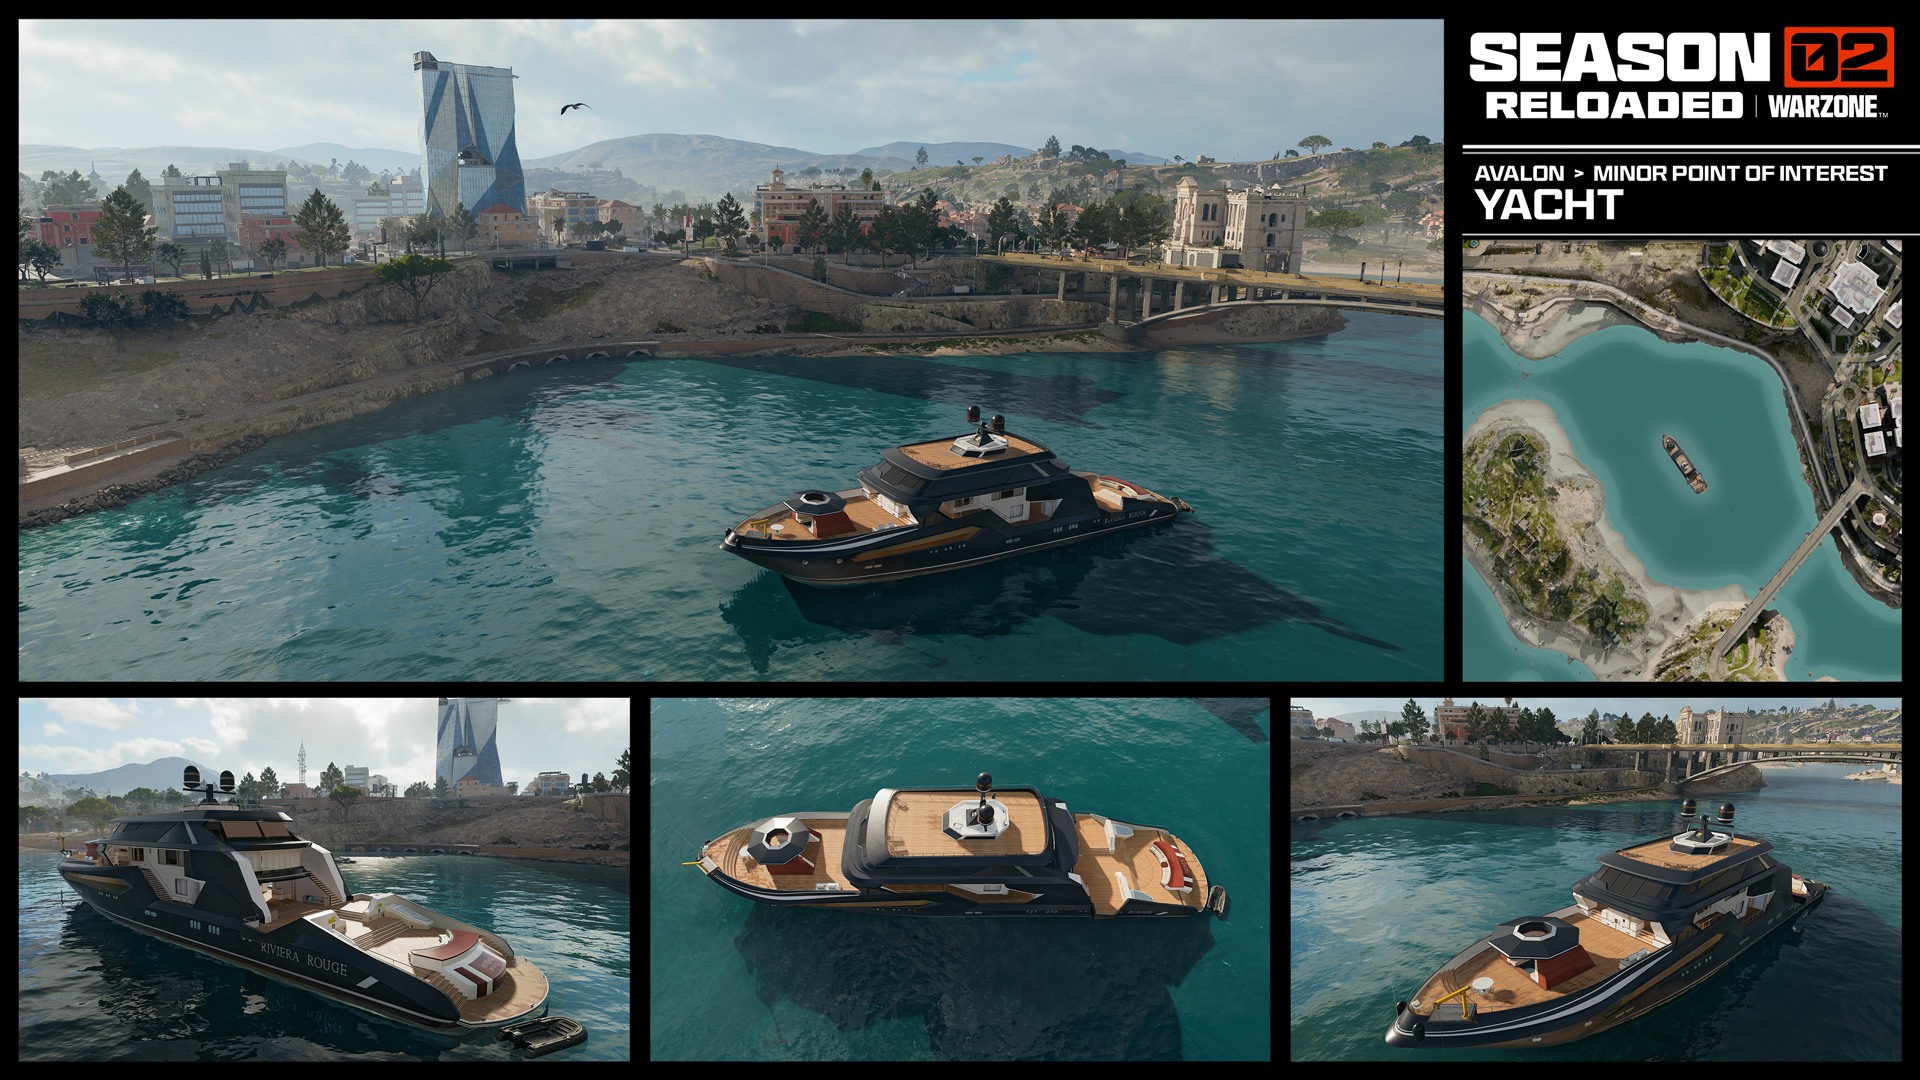
Familiar to players of the Black Ops 6, the Yacht resembles the Lifeline Multiplayer Map and sits in the middle of the water between High Town and Coastal Security. Although moving between the Yacht and the land on either side of the ship can be tricky, with the help of a few vehicles, controlling this spot can give your squad a place to breathe and scout out High Town before infiltrating the POI.
Avalon Zone 2: Northeast
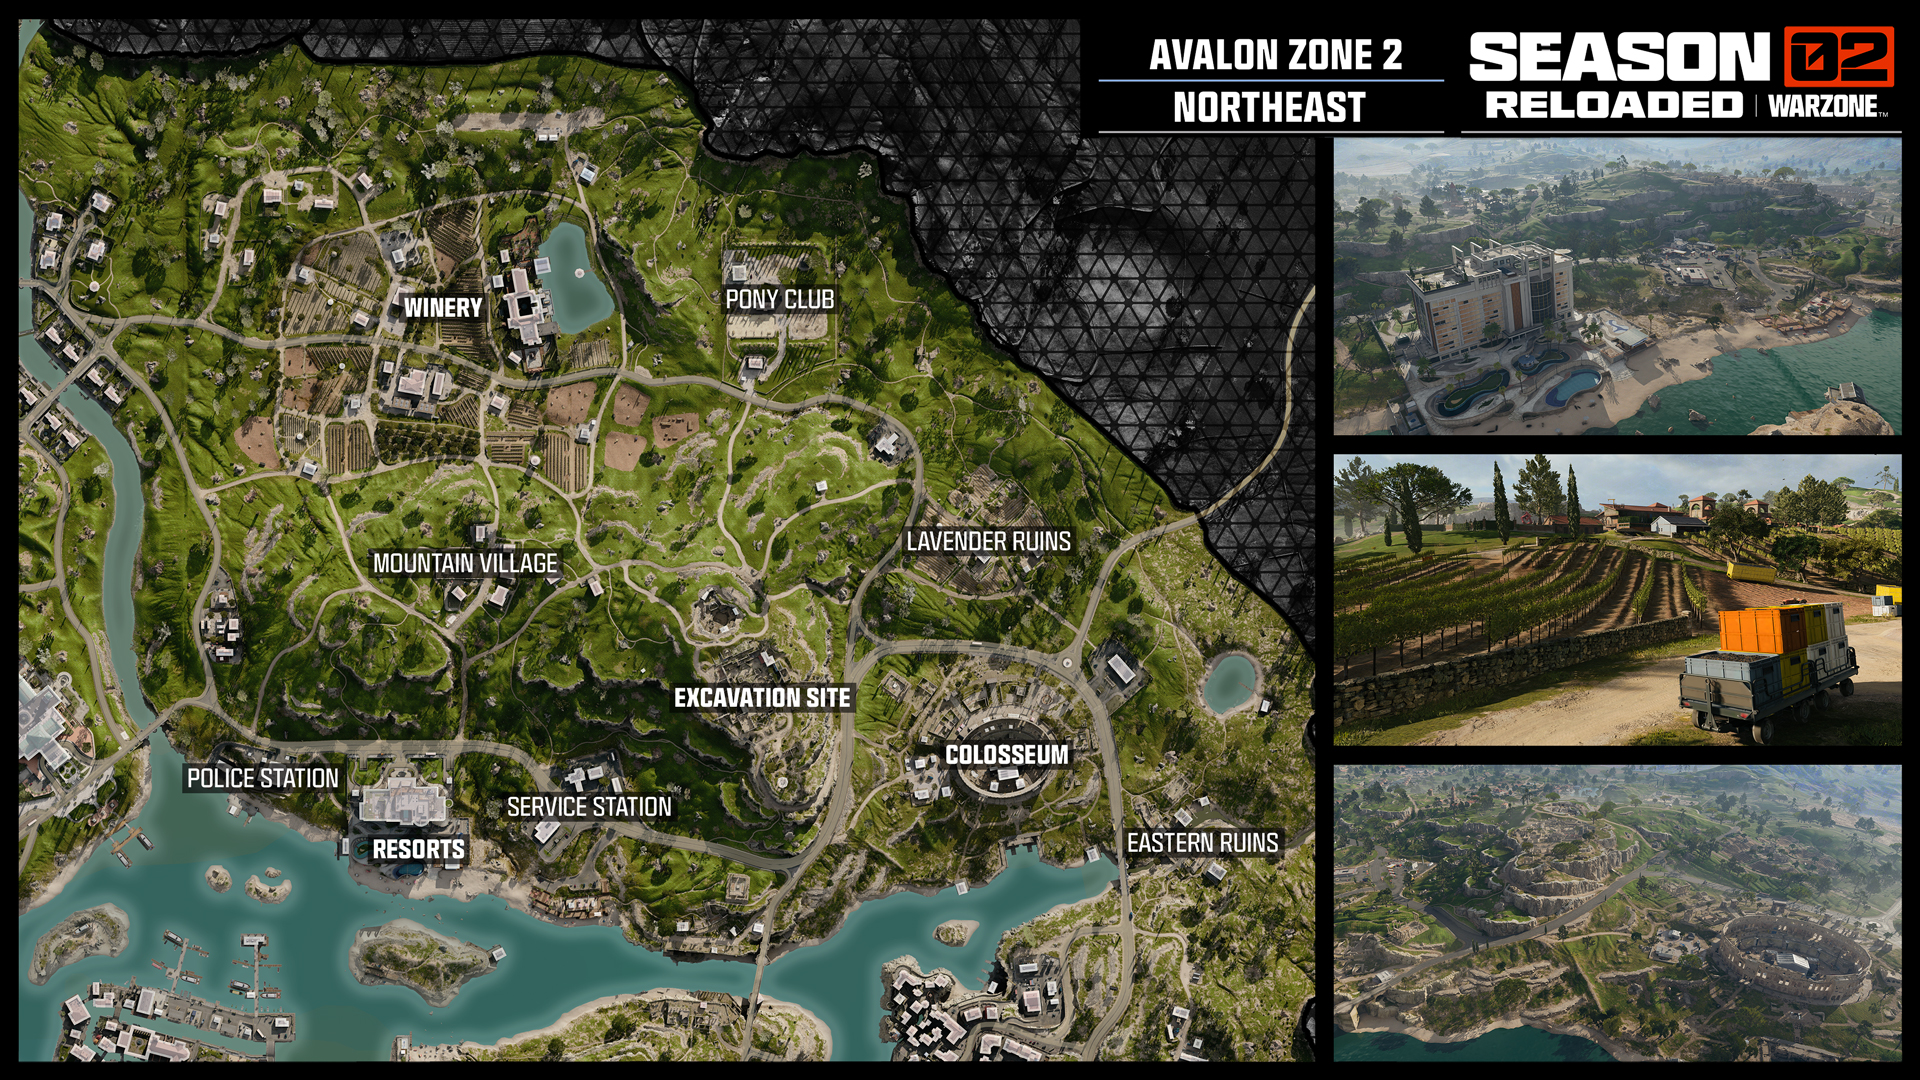
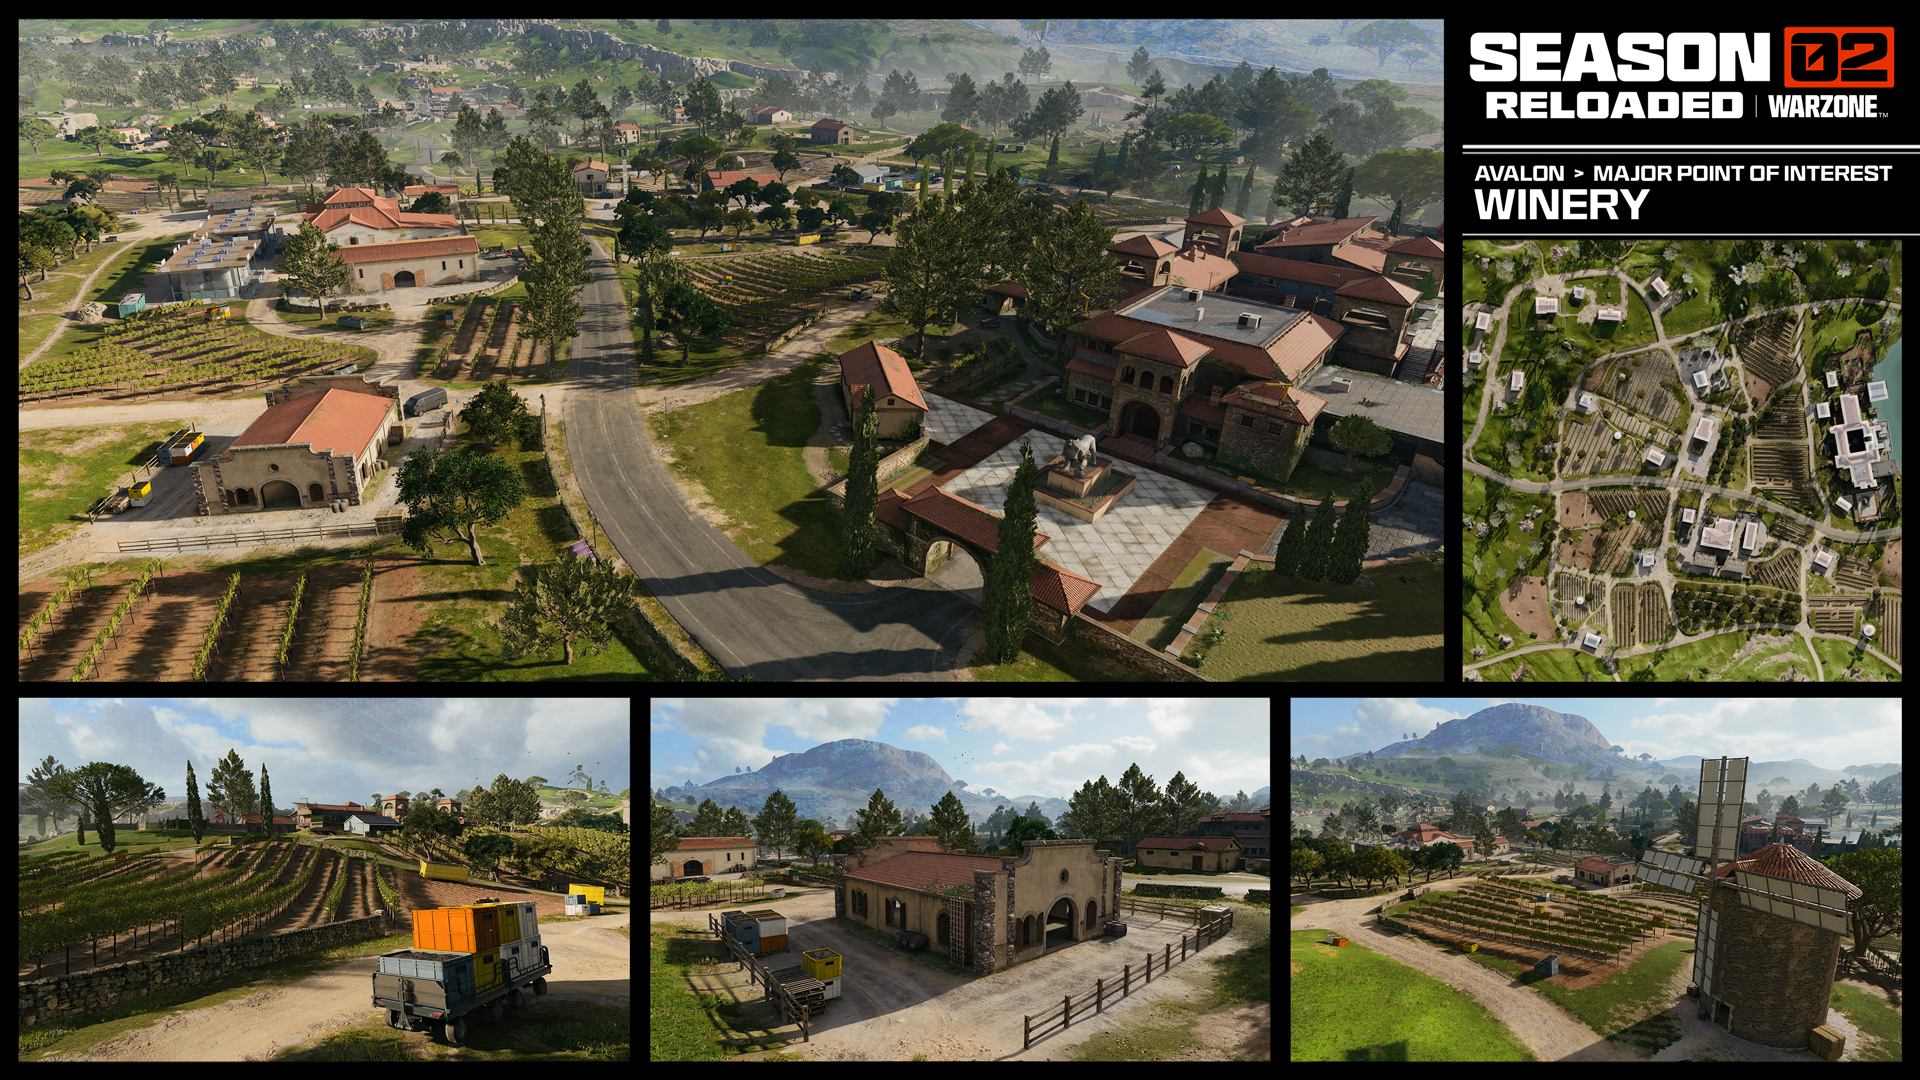
The Winery’s vineyards spread out over a large portion of the northern sector of Avalon. Because the Winery is mostly flatter land and small hills, it’s important to take advantage of the tree lines and smaller buildings along your path. Use the soft cover of the vineyards to obscure your movement and look for vehicles and Ammo Caches while traversing the Winery to be confident you and your squad aren’t caught in a tricky situation.
Mountain Village
Directly to the South of the Winery is the Mountain Village. Named for its position on the mountain, the Mountain Village sits above the Winery and has an advantageous view over a few POIs, including the Pony Club to the northeast and a part of Resorts to the south. Because of this, it’s a great spot to make your initial drop or to flow through as you anticipate the next circle.
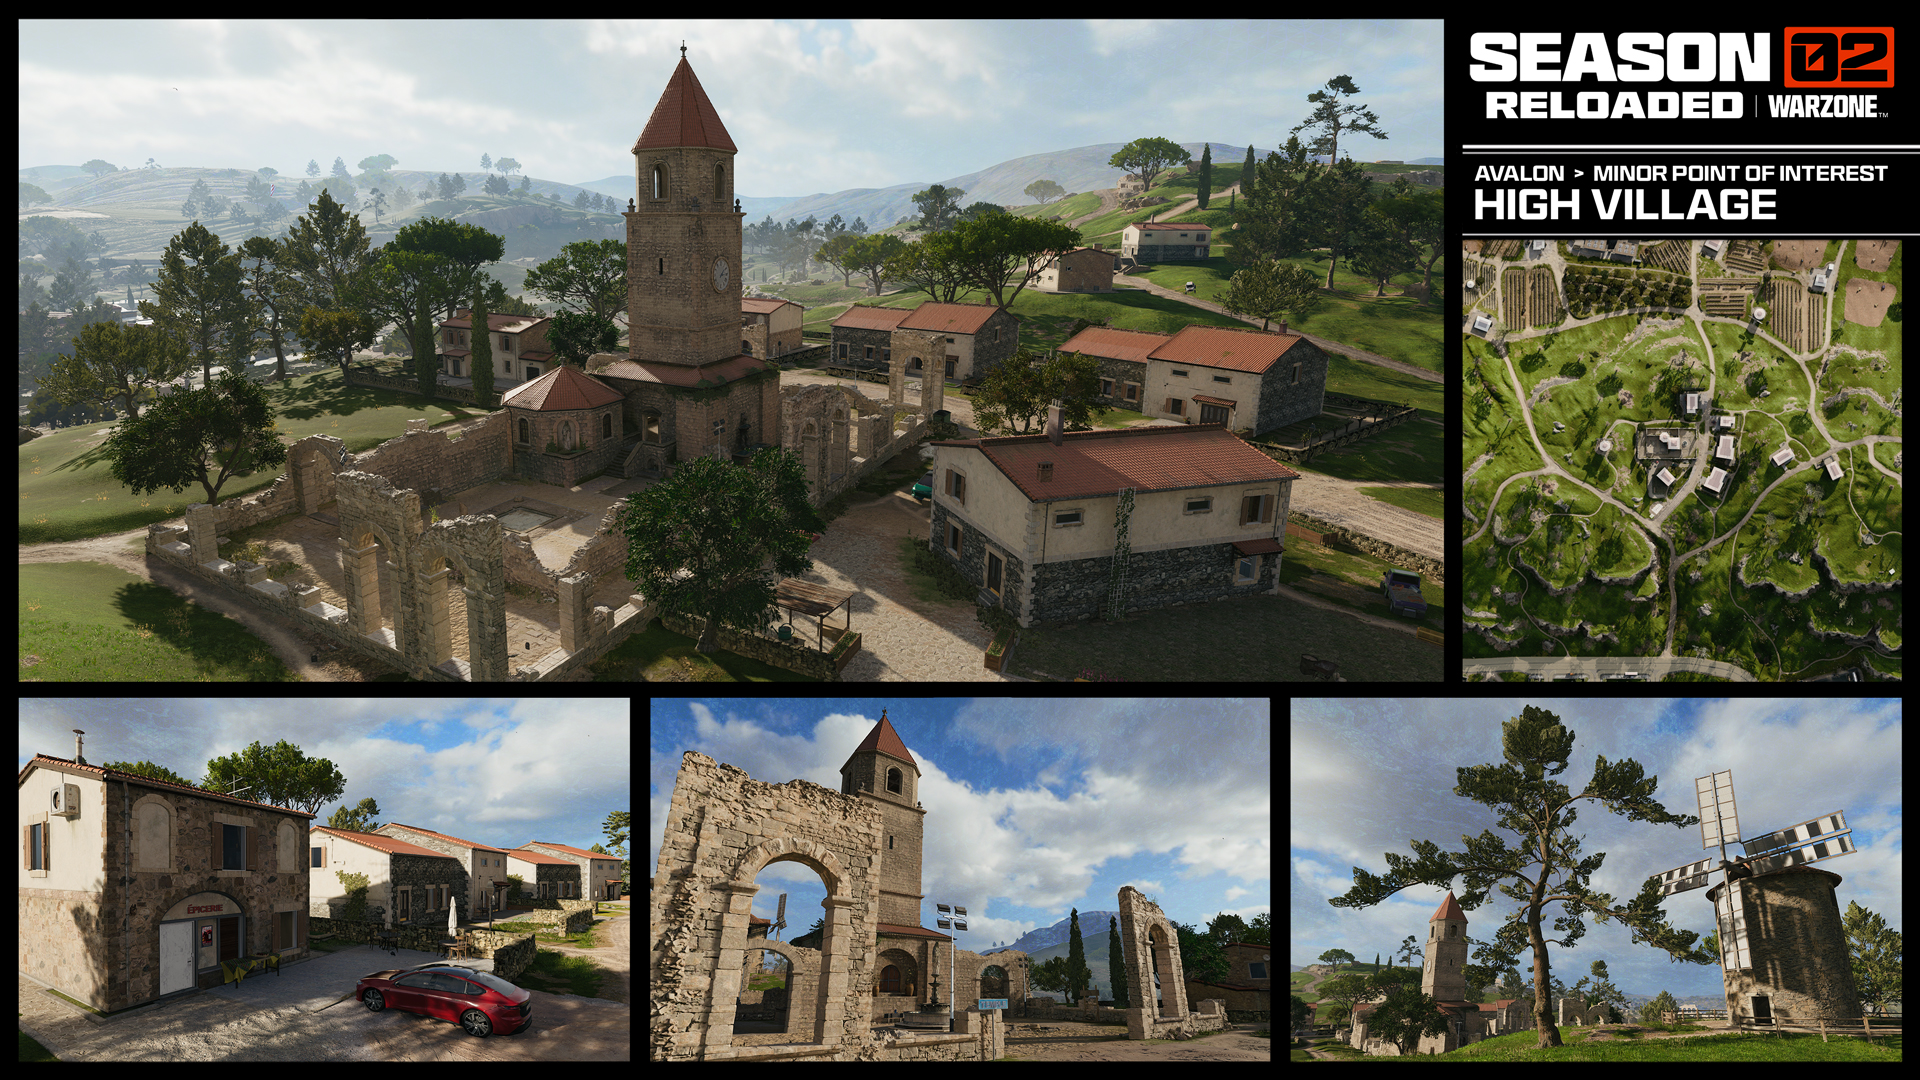
Pony Club
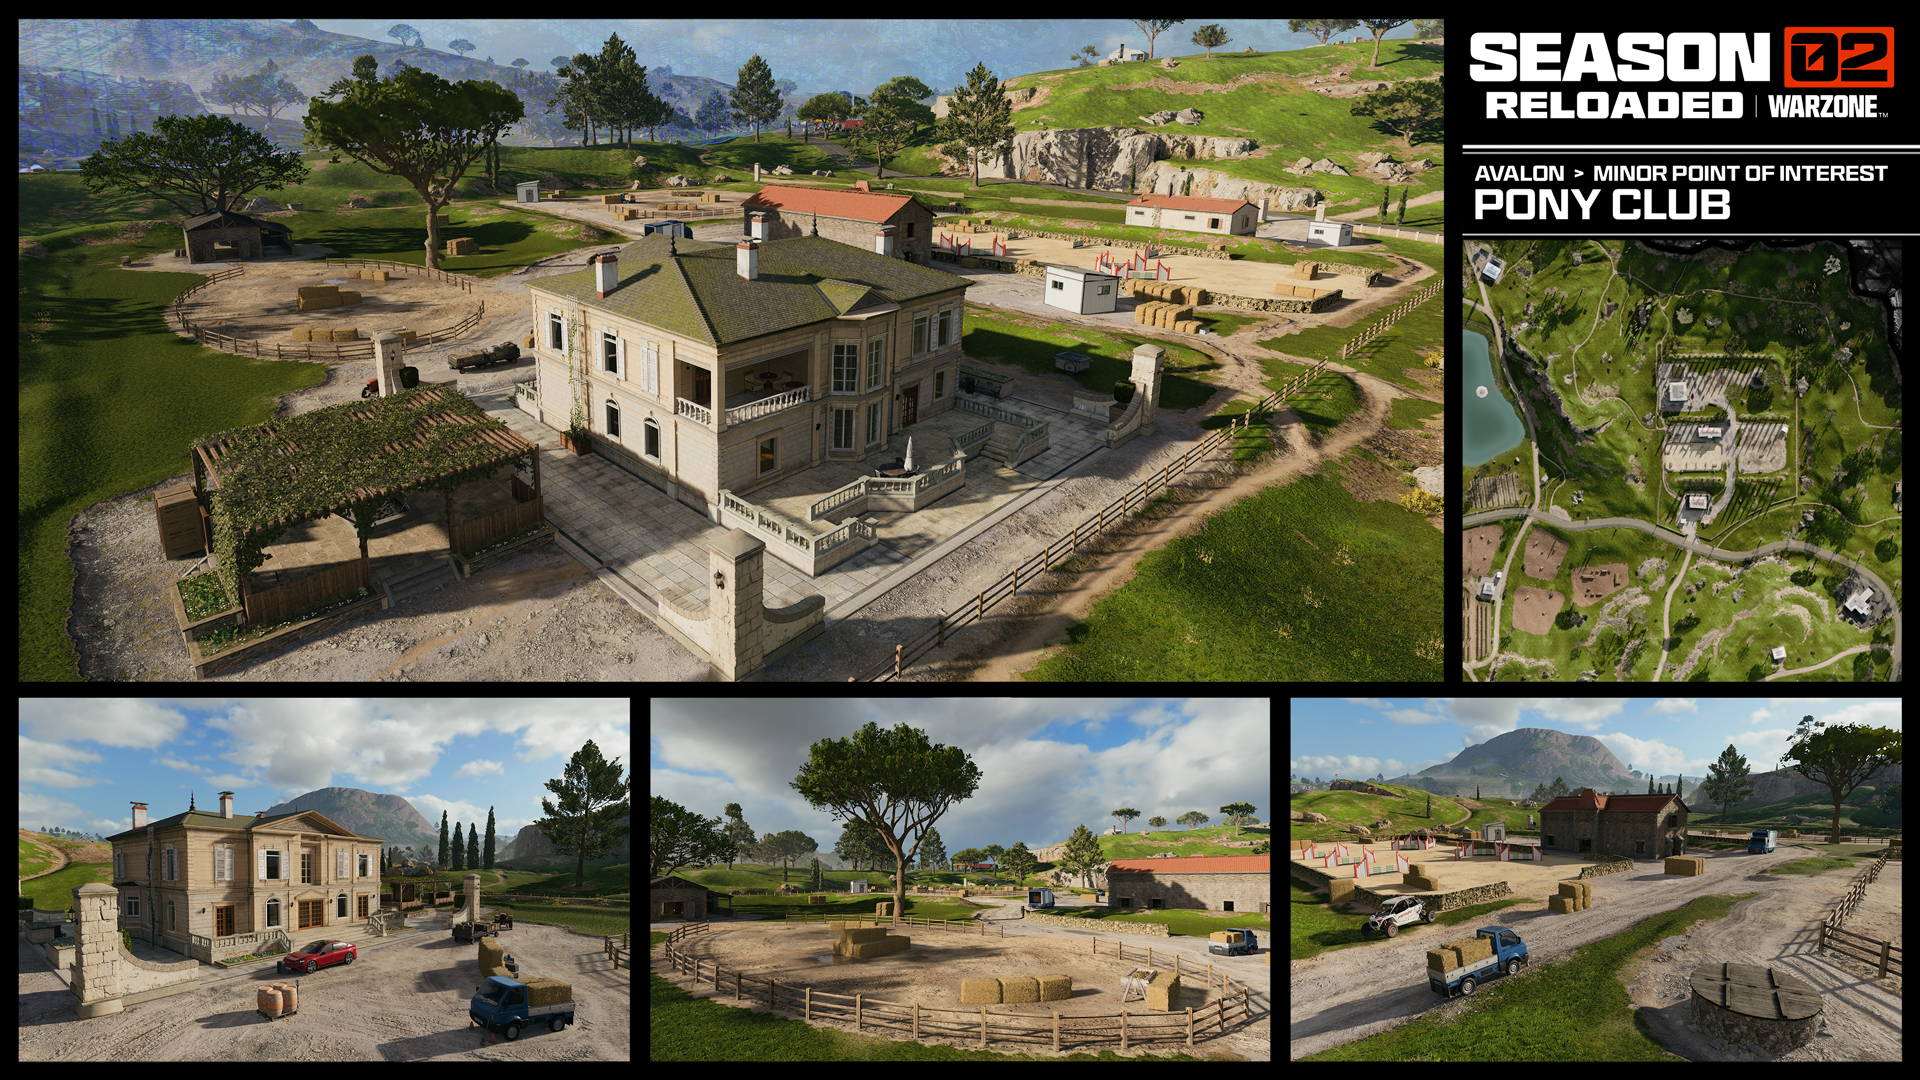
The Pony Club is perfect for open air gunfights and passive early rotation for squads fresh out of a fight and need to regroup. Very close to the edge of the map, not much time should be spent here, however it’s a great place to grab some ammo and maybe a few upgrades without much fear of being fired upon without being able to return fire.
Resorts
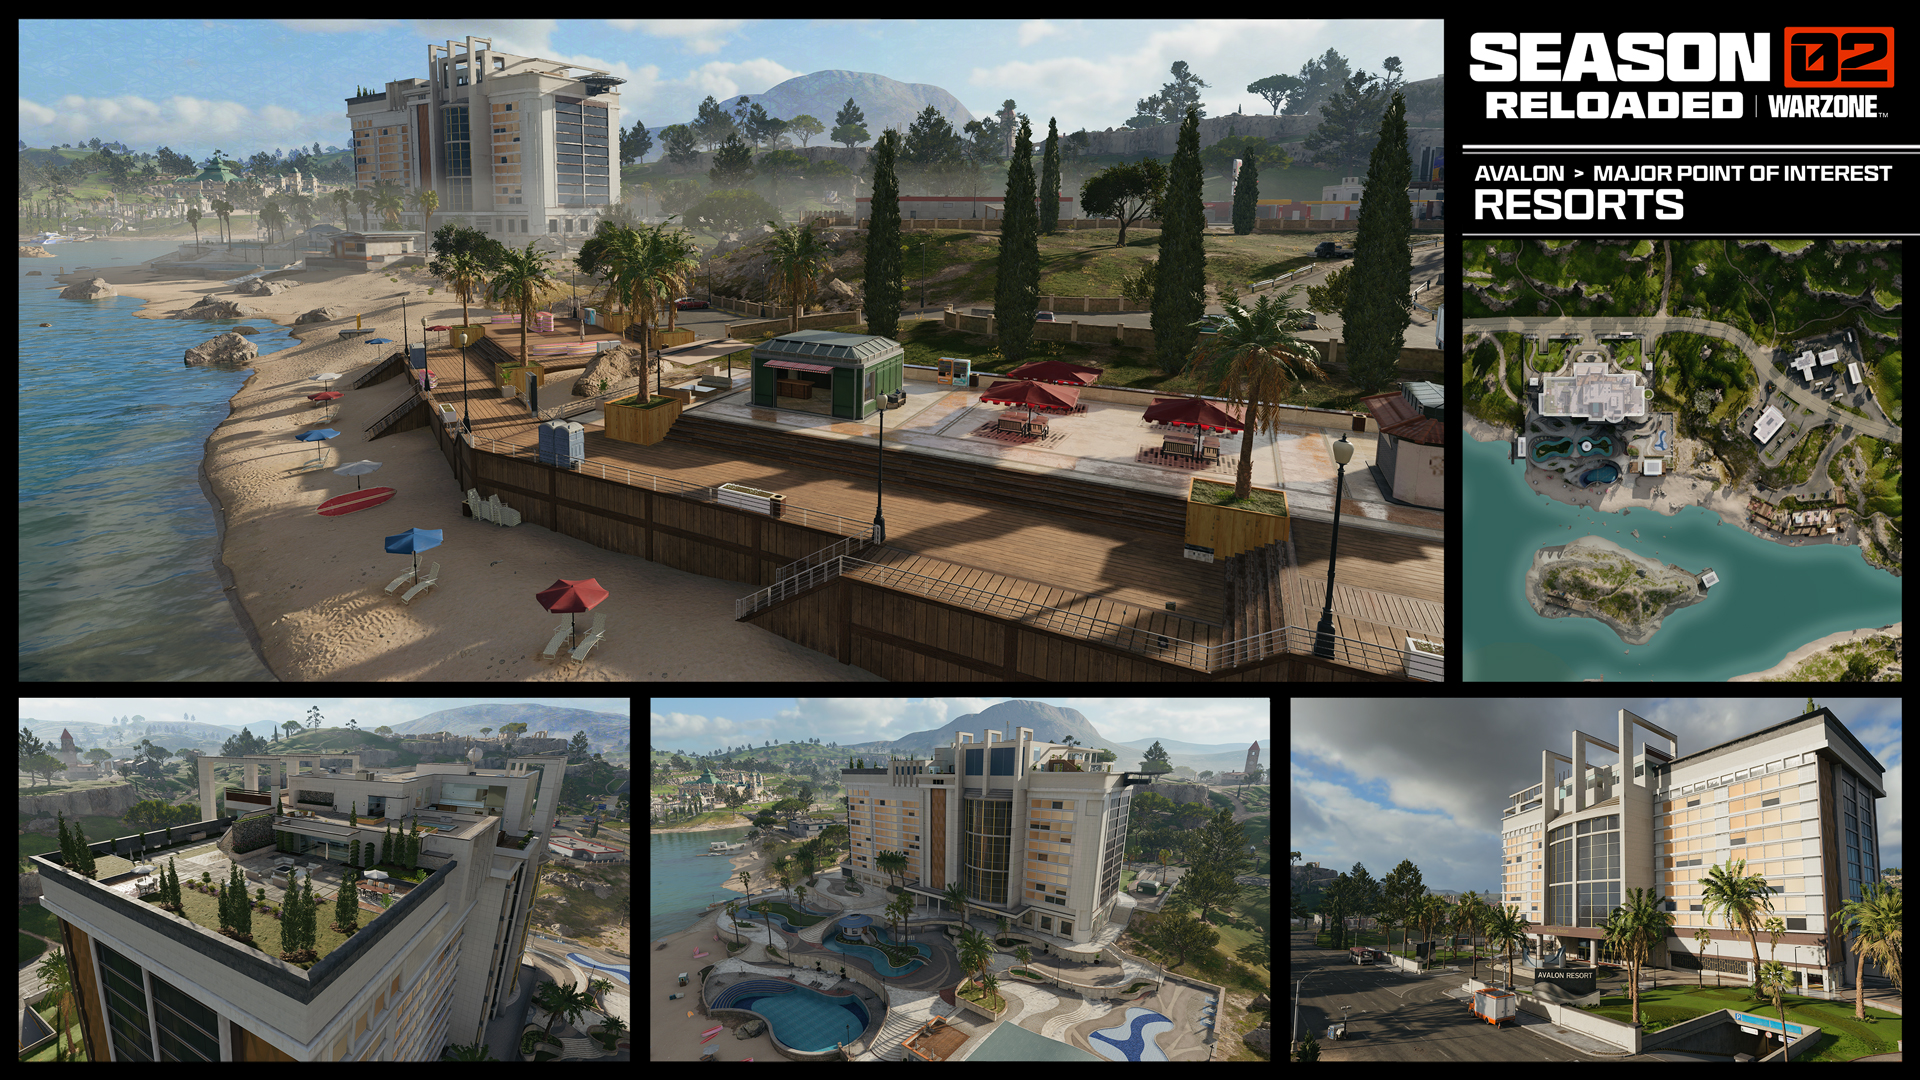
The Avalon Resort is a massive and stunning building, complete with underground parking and access to its grand lobby. Latch onto an Ascender in the elevator shaft to reach the penthouse at the top, an extravagant estate based on the Skyline map from Black Ops 6. From the Resort rooftop, enjoy free reign with your wingsuit to cross the river, hit up the Casino, or move inland toward the Excavation Site and Winery. Although it sits low and near the water, Avalon Resort towers over the region and can act as a great watch tower.
Police Station (Resorts)
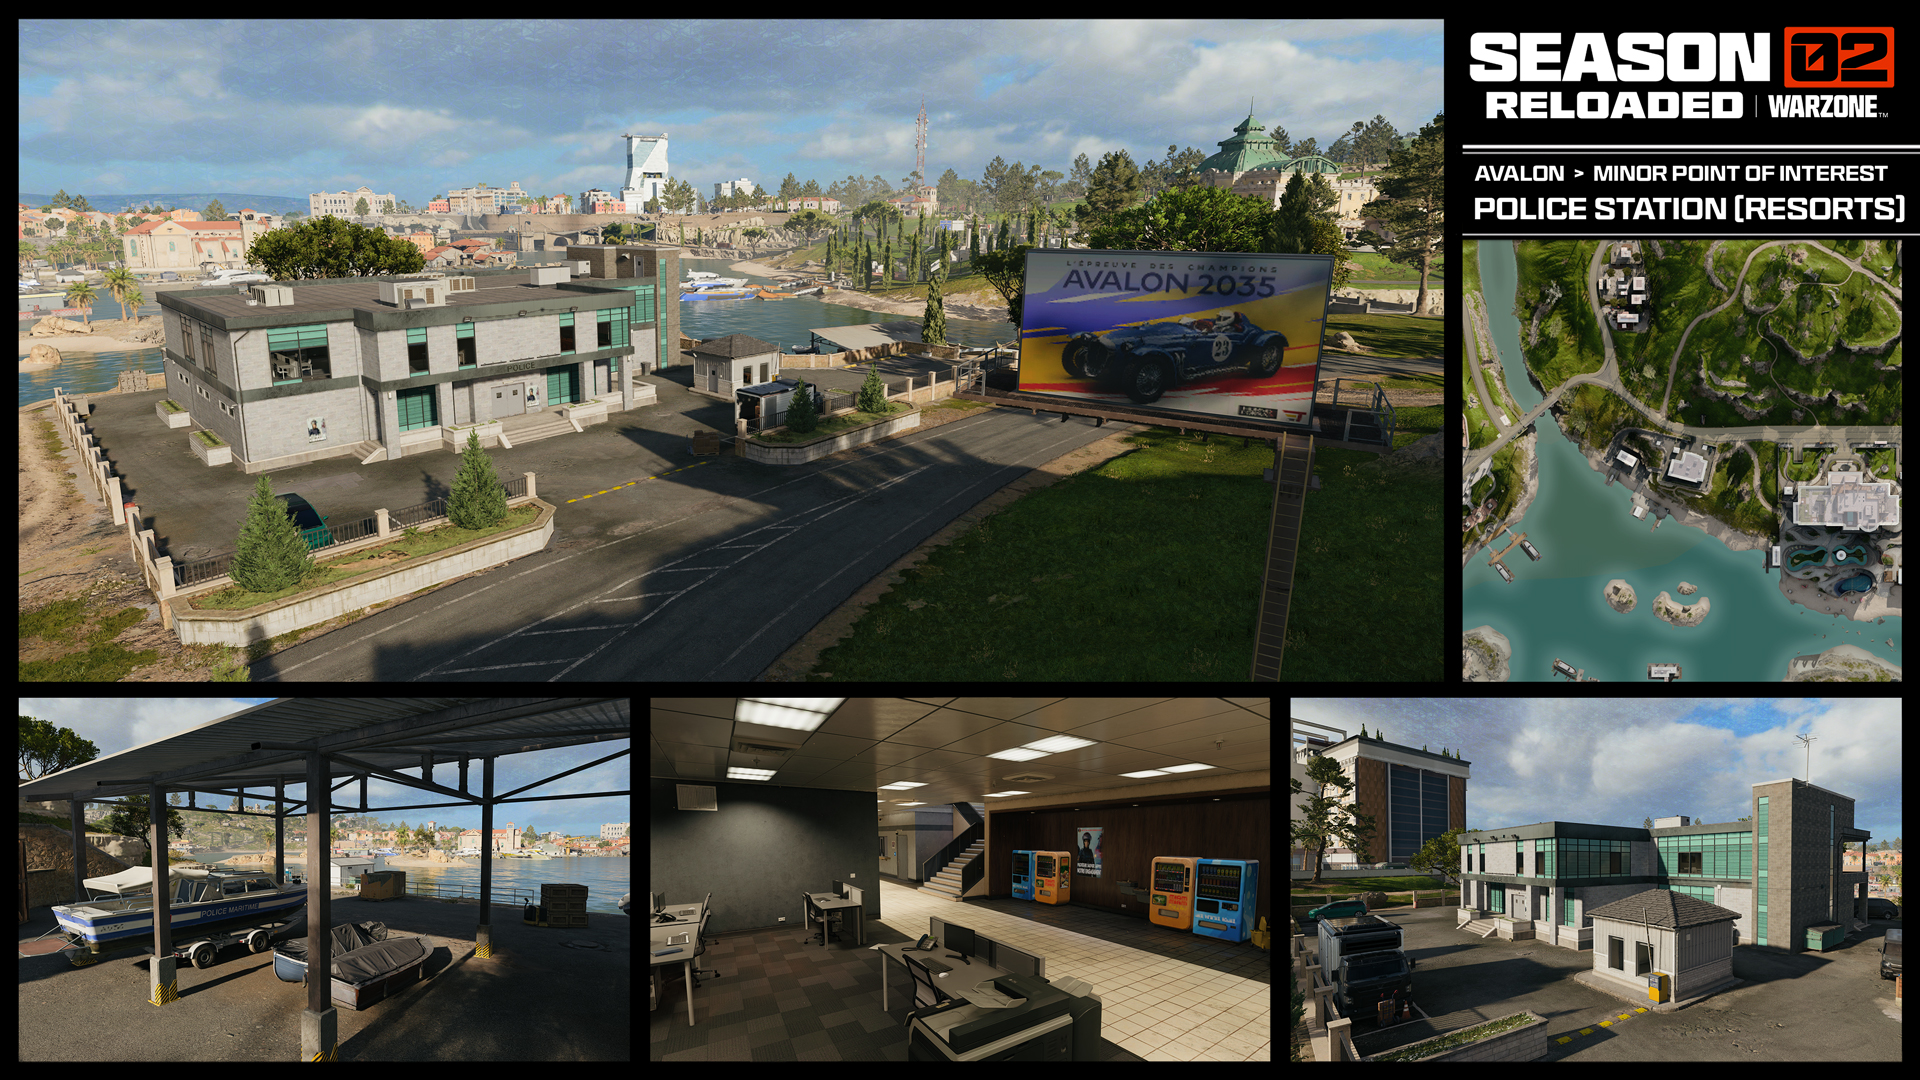
The Police Station sits in decent proximity to the Avalon Resort, which means that taking a fight with any squads within the Resort may not be a good idea. However, if you have cleared the Resort or have just gotten away from a fight, the Police Station is the perfect location to re-up your ammo and Armor Plates. Police Stations are well equipped with everything you need to get back to 100%. Then if you’re in need of a quick getaway or just need to get to the other side of the map, look at the dock to see if there’s a Tactical Raft nearby.
Service Station
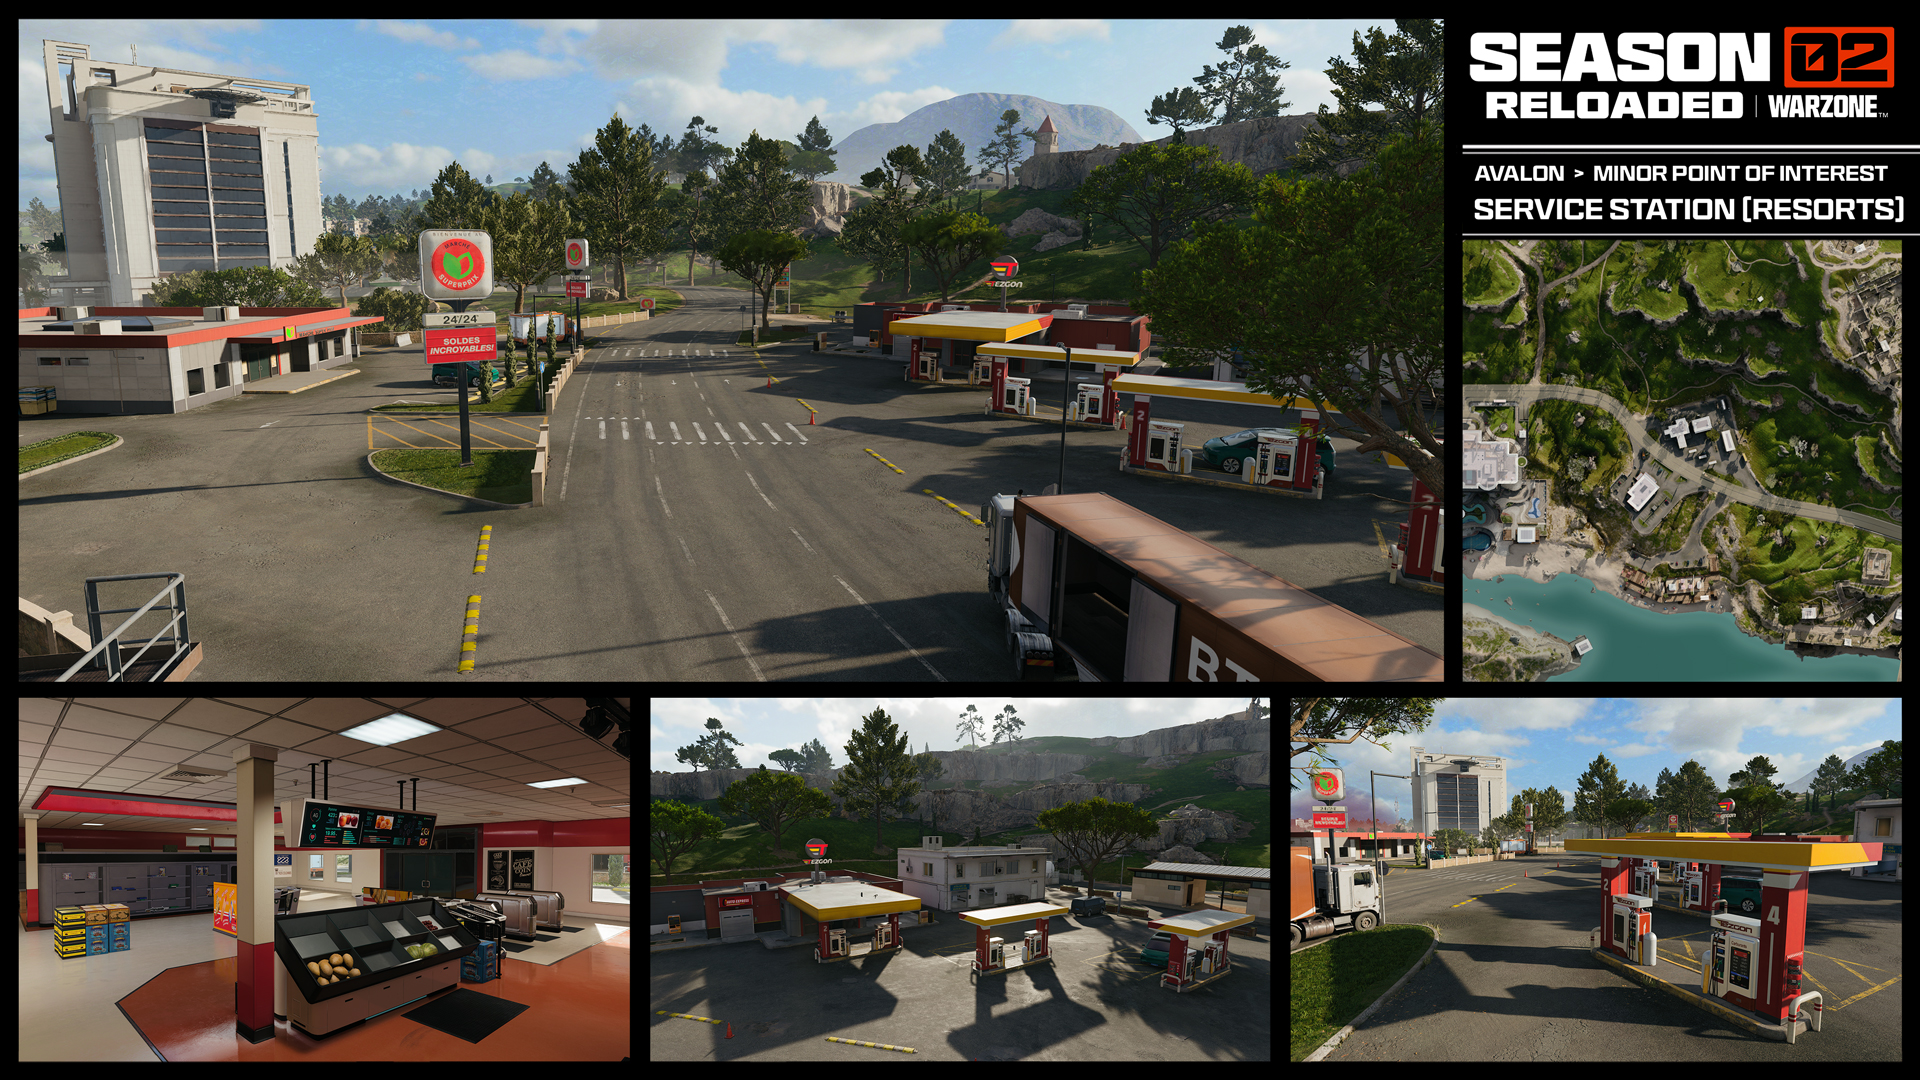
On your way into the Avalon Resort, don’t forget to make a quick pitstop at the Service Station along the main road. It can provide cover for your squad if you’ve already been spotted by enemies at the Avalon Resort. The Service Station provides four different buildings and a quick escape into the hills to the north.
Excavation Site
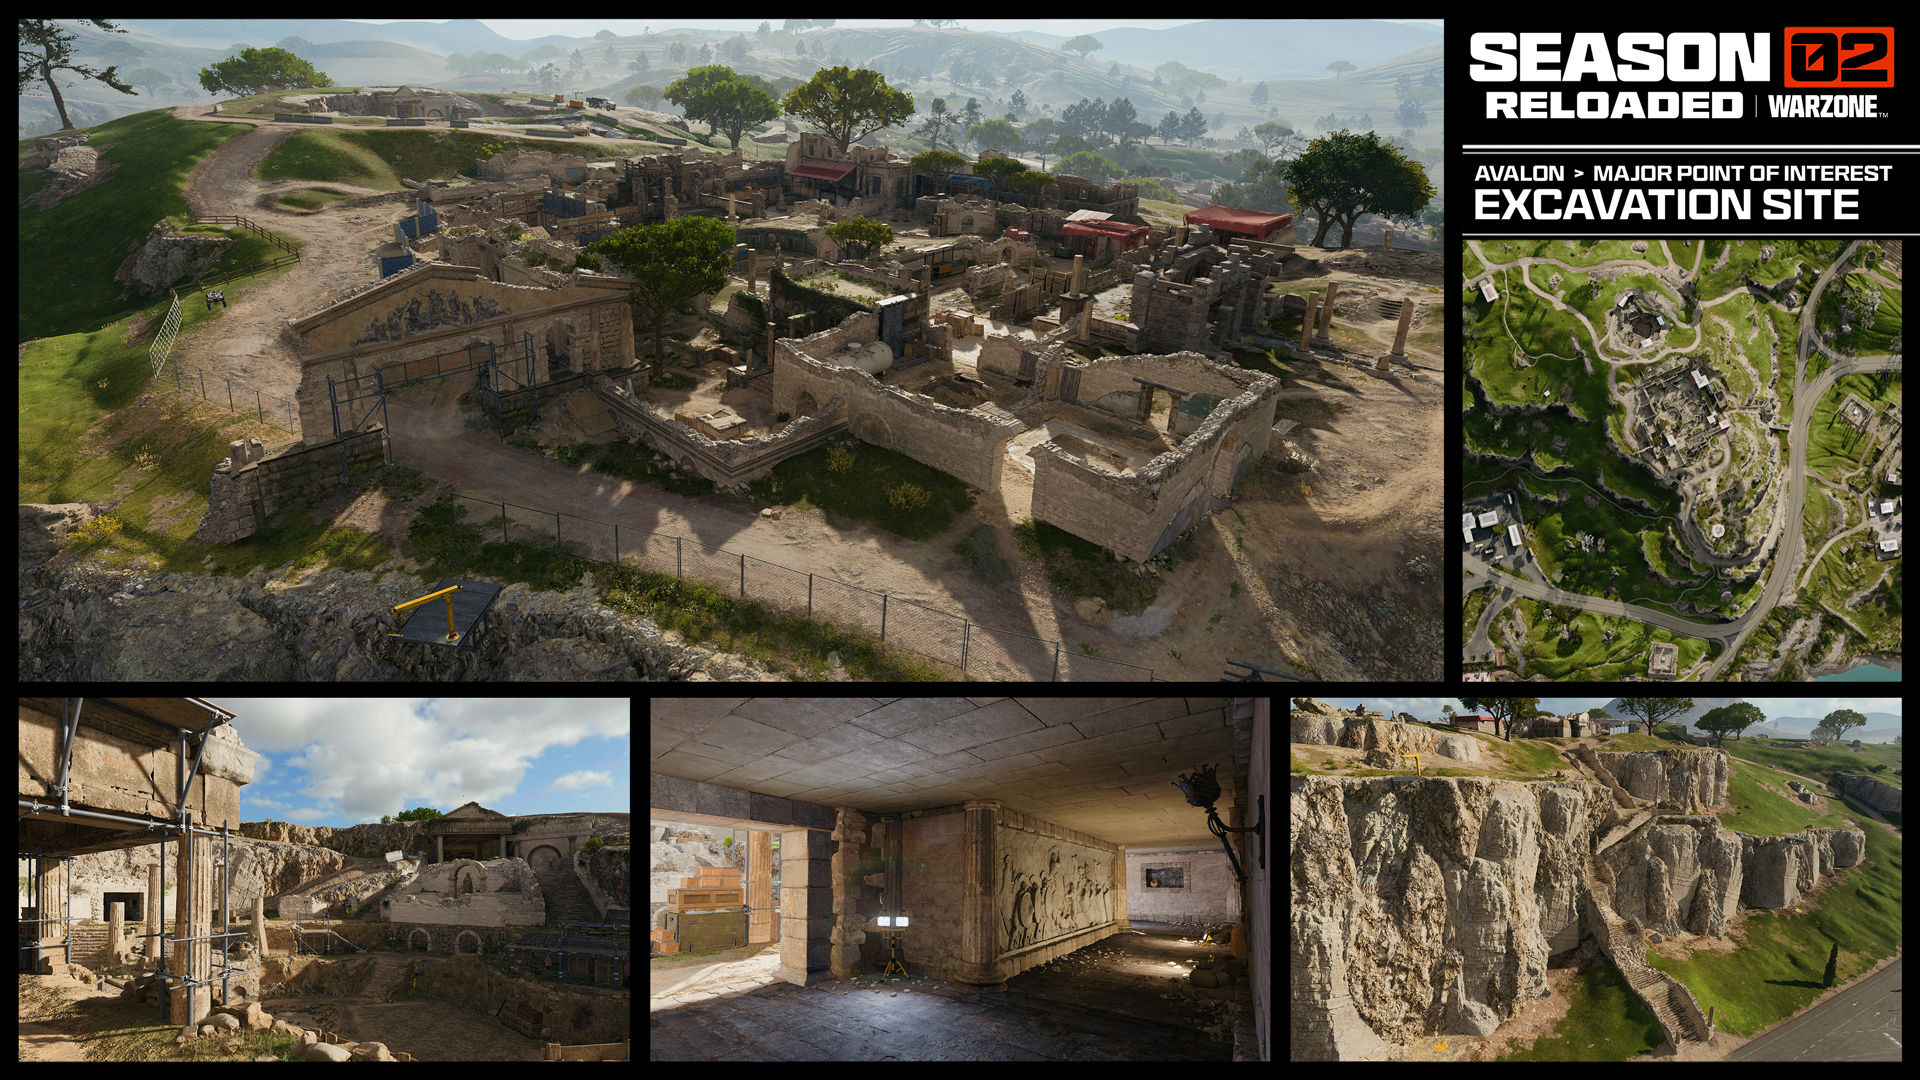
Unearthed from a mountain towering over Avalon with extravagant views toward the River, the Colosseum, and the Avalon Resort, the Excavation Site is made up of ruined structures from the area’s ancient past. Archeologists have been hard at work, digging into the earth leaving a mix of crumbled walls and trenches. Use the extensive cover to funnel enemies into more easily managed angles and take off from the clifftops in your wingsuit to soar to your next target.
Colosseum
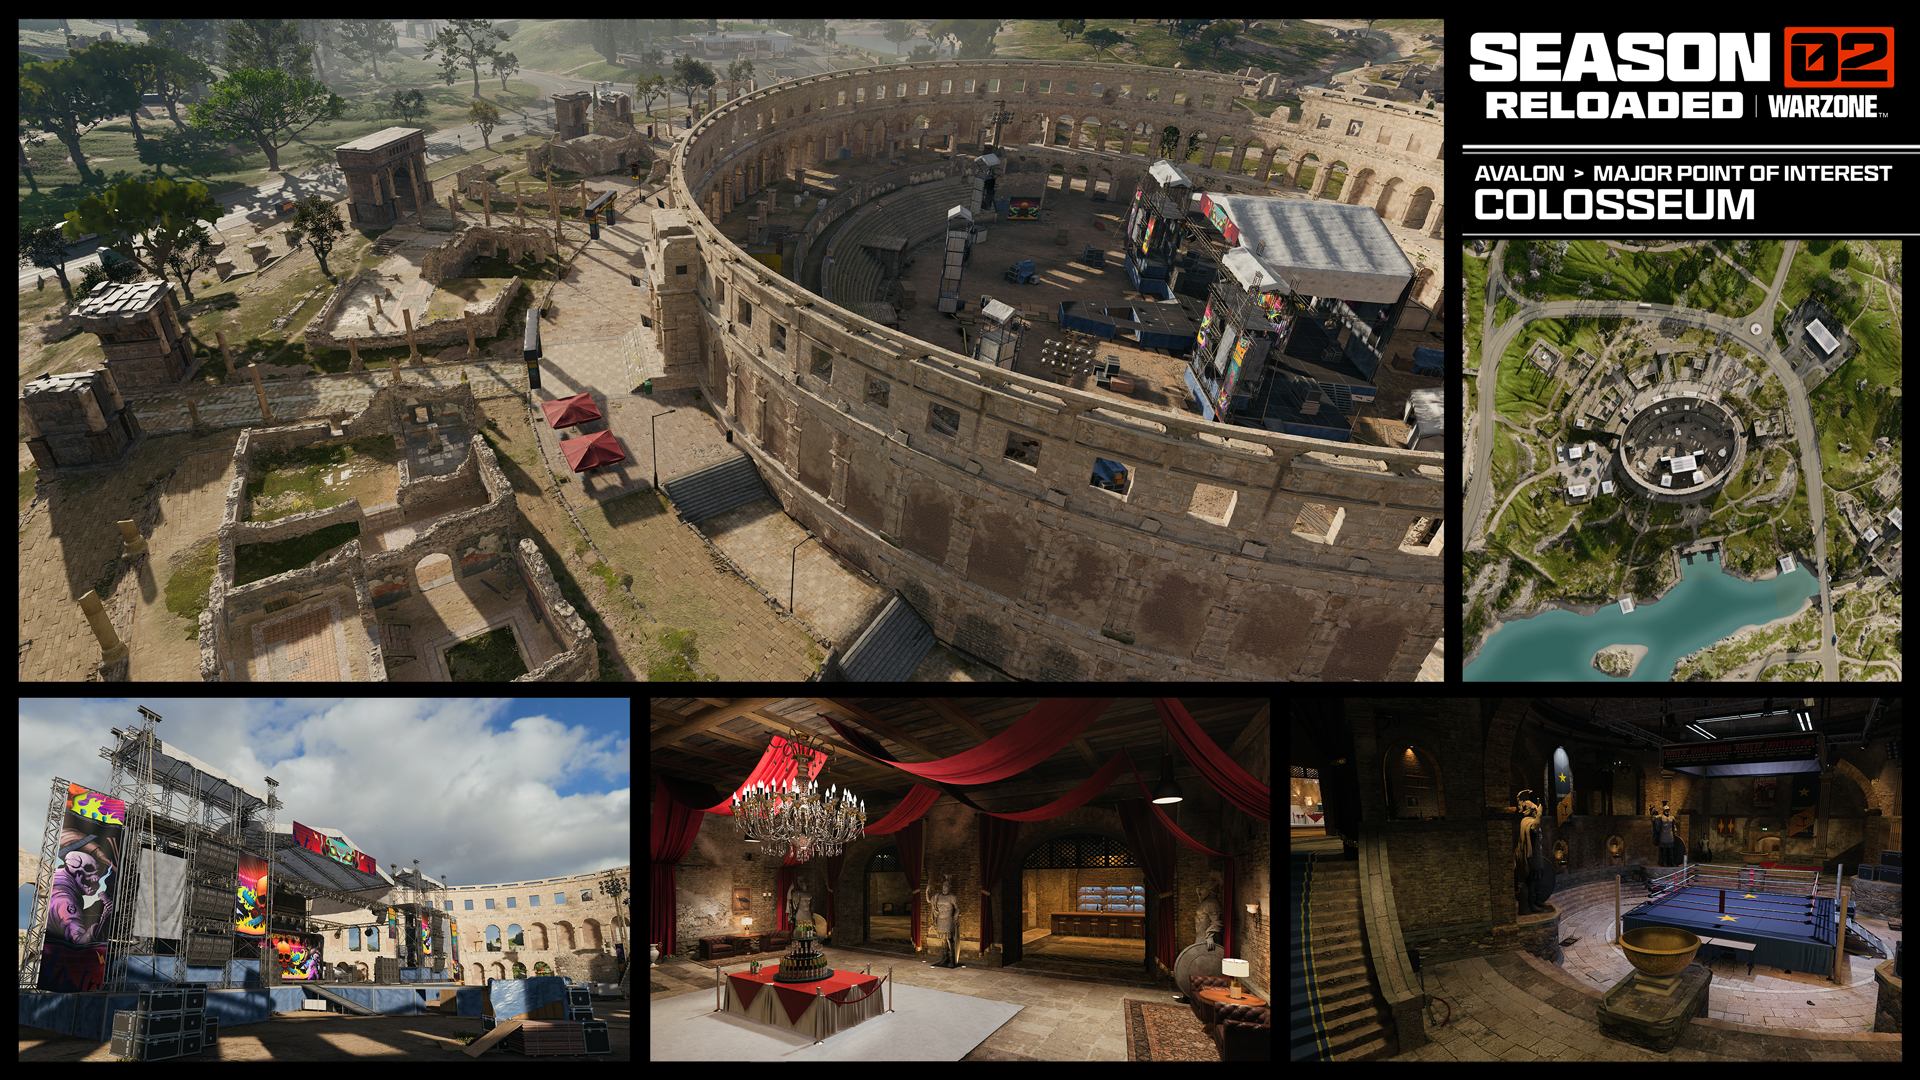
The Tour du Monde Rock Festival stage dominates the center of the Colosseum. Ascenders line the inner walls with in and out openings all around. Some crumbled ruins extend out from the arena with roads branching toward smaller points of interest in the surrounding hillside. If things get rough, cross south back over the river into Cliff Town or escape to the Northeast and take cover in the Visitor’s Center.
The grounds are sunken and enclosed by the Colosseum walls, not to mention the underground VIP area and fighting ring are all a sight to behold. Pay attention to the circle timer, because you may not see the circle collapsing on your position until it’s too late.
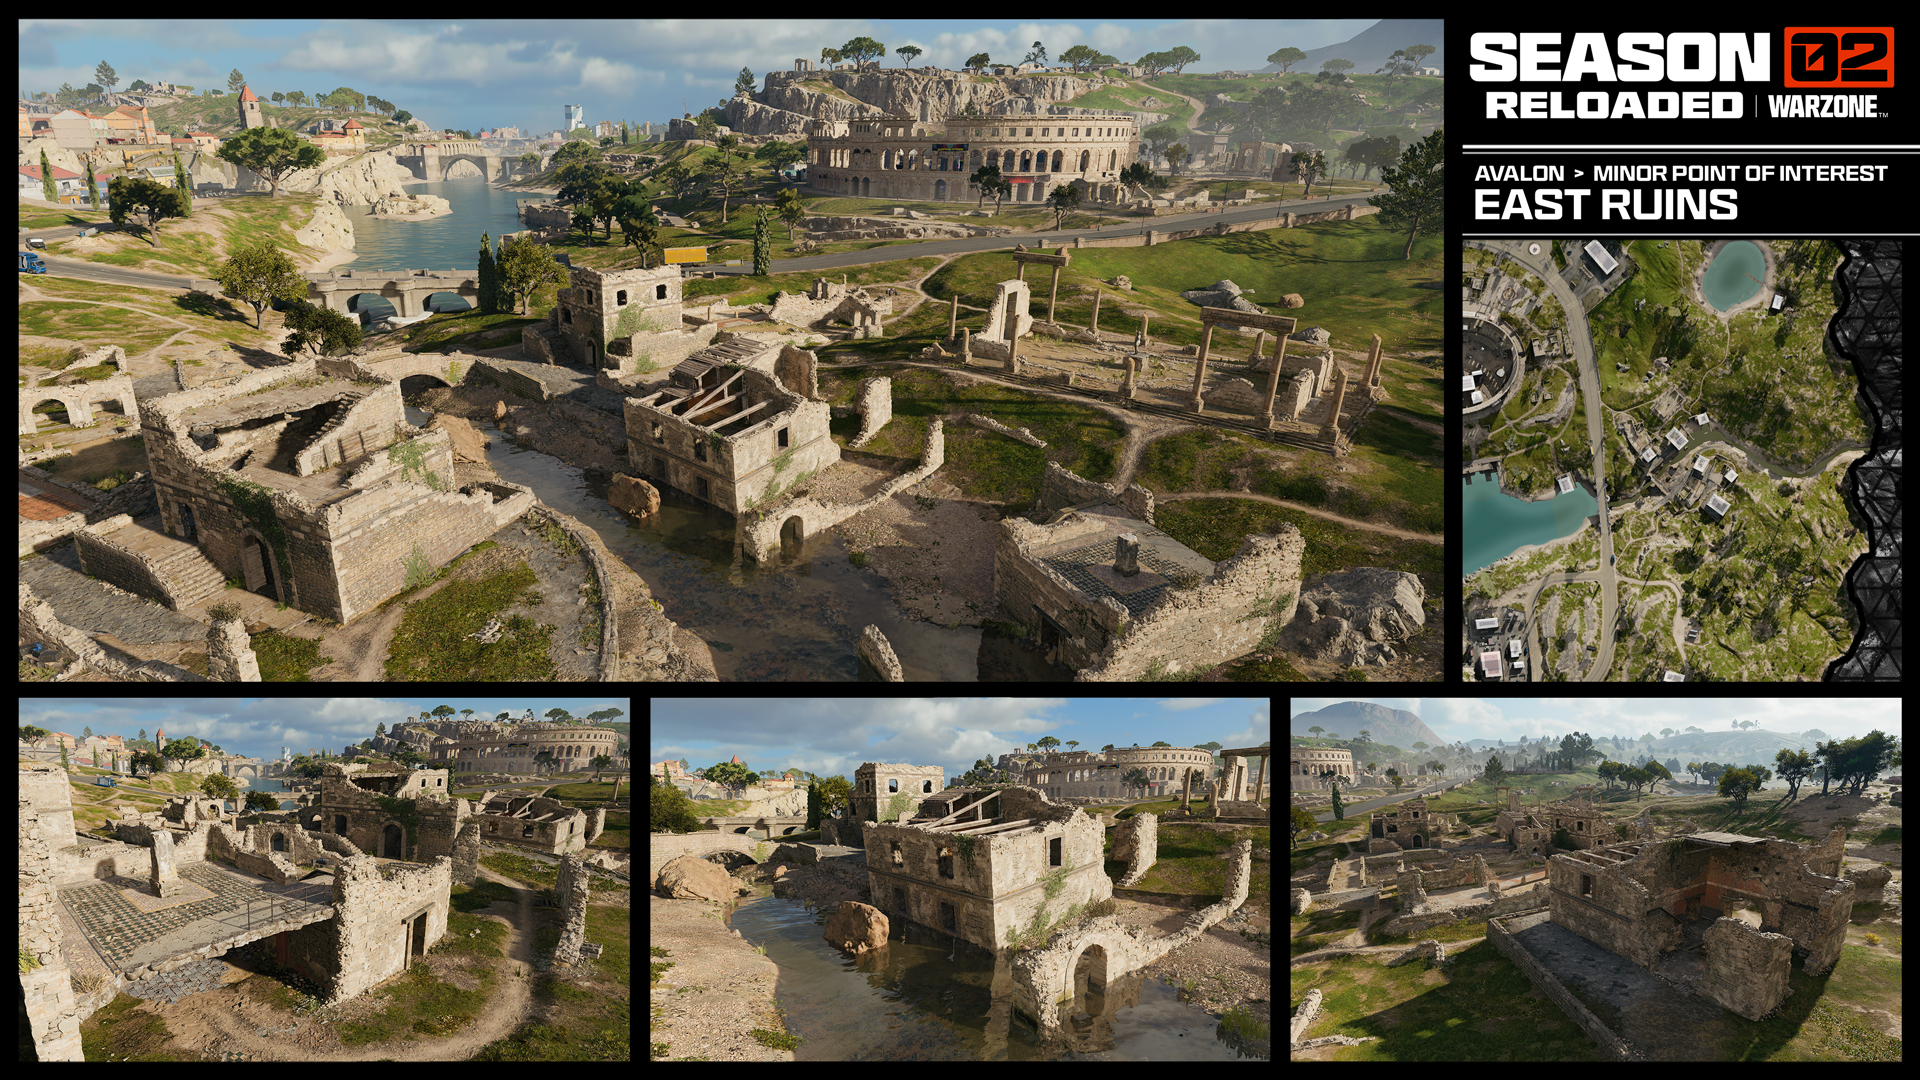
Eastern Ruins
To the east of the Colosseum’s outer ruins is a small river, close to a rarely traversed field and pond. Close by is a small ancient settlement, half sunk into the soft soil, and offering cover opportunities for those skulking close to the border of the map.
Lavender Ruins
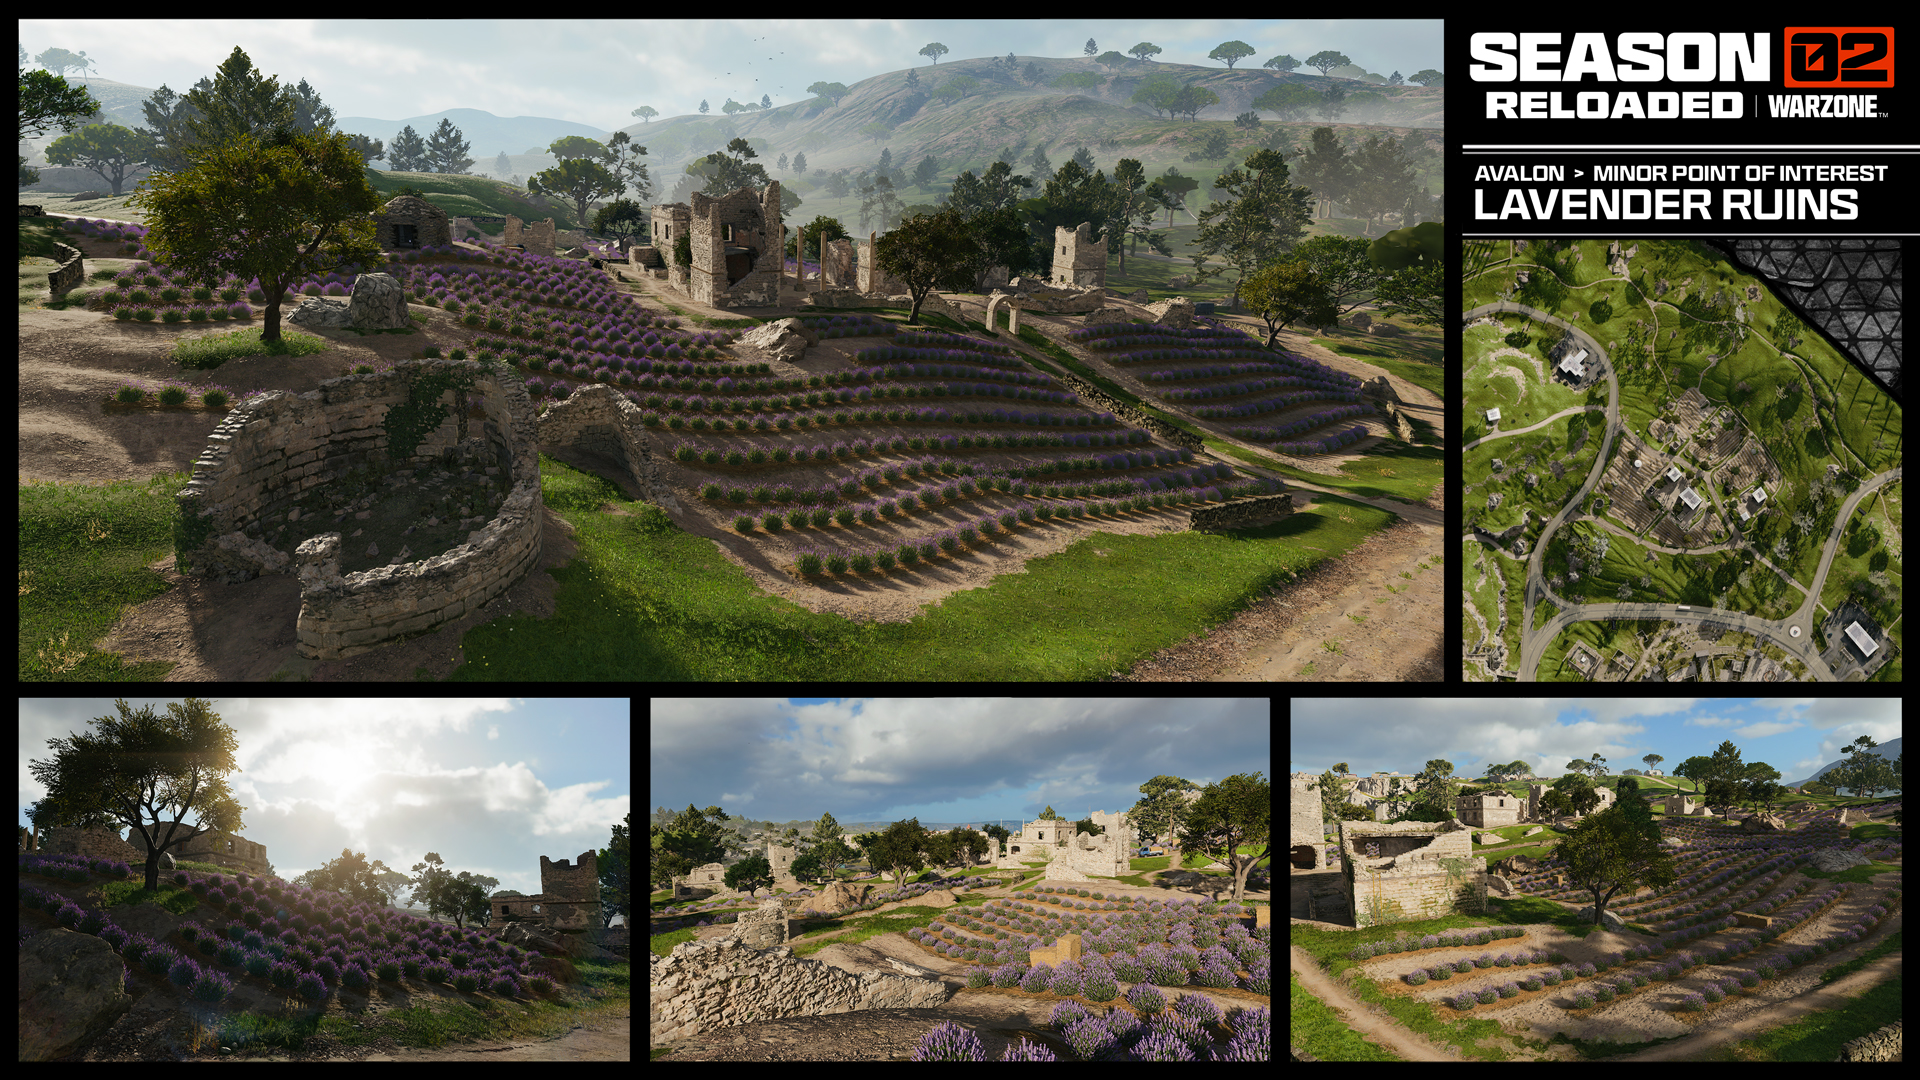
The Colosseum can be a very highly contested area, especially at the start of a match. The Lavender Ruins provide a nice alternative drop location. Search the ruins for some good starting gear and ammo before you attempt to take on the squads within the Colosseum or before heading to the Winery.
Avalon Zone 3: Southwest Coast

A Lighthouse illuminates the coast and claims the highest point in Coastal Security. A collection of islets and sandy sea beds circle the main security office, its scattered layout giving the advantage of keeping fights focused as your squad clears the area island by island. Once you’ve established a foothold, it’s time to cross the water or make your way into the Firing Range.
Firing Range
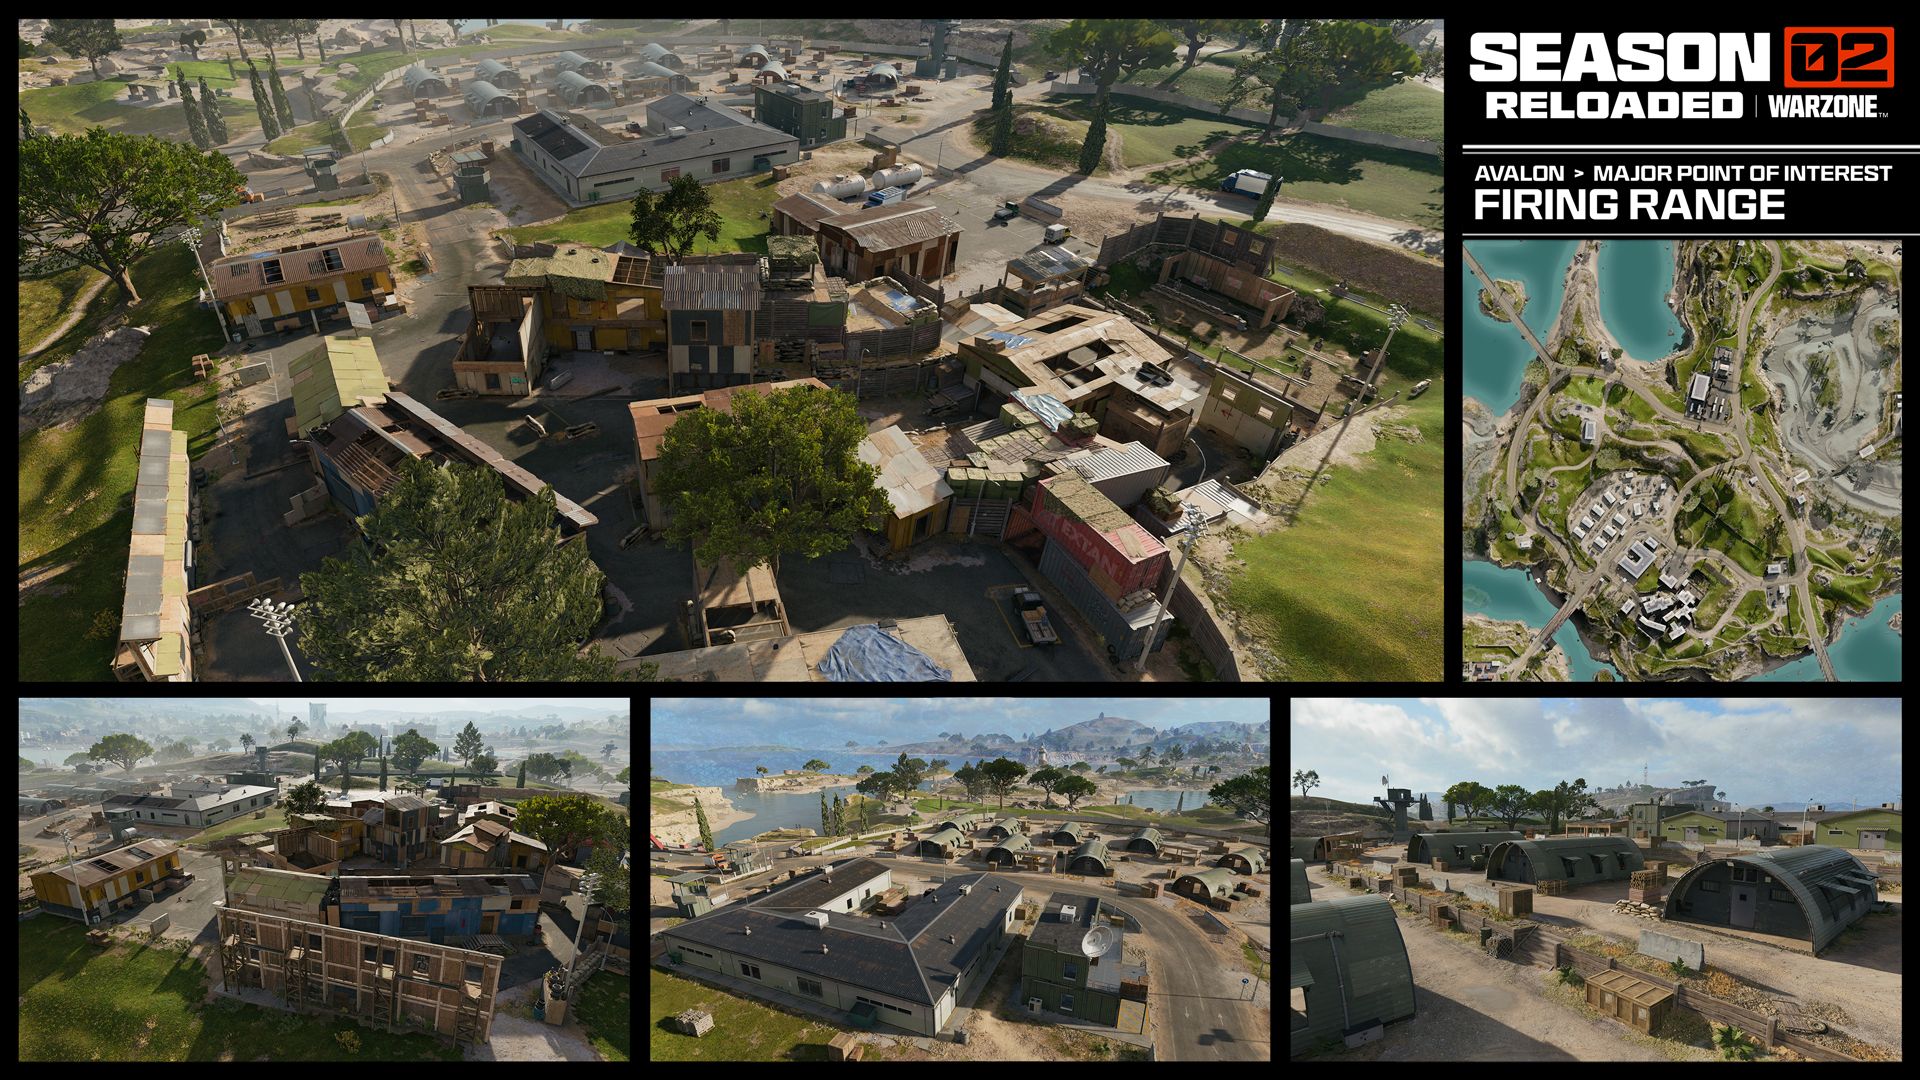
Rows of bunkers line the outer Firing Range under the view of a towering radar array. Further inland lies a central U-shaped dining hall near the iconic Firing Range Multiplayer map layout. You’ll need to spend some time and learn the layout of the actual Firing Range if you plan on taking control of this POI, simply because there are a lot of places for you and other players to escape and outplay each other. While Firing Range isn’t in the center of Avalon, it can be the center of attention throughout most matches.
Military Outpost
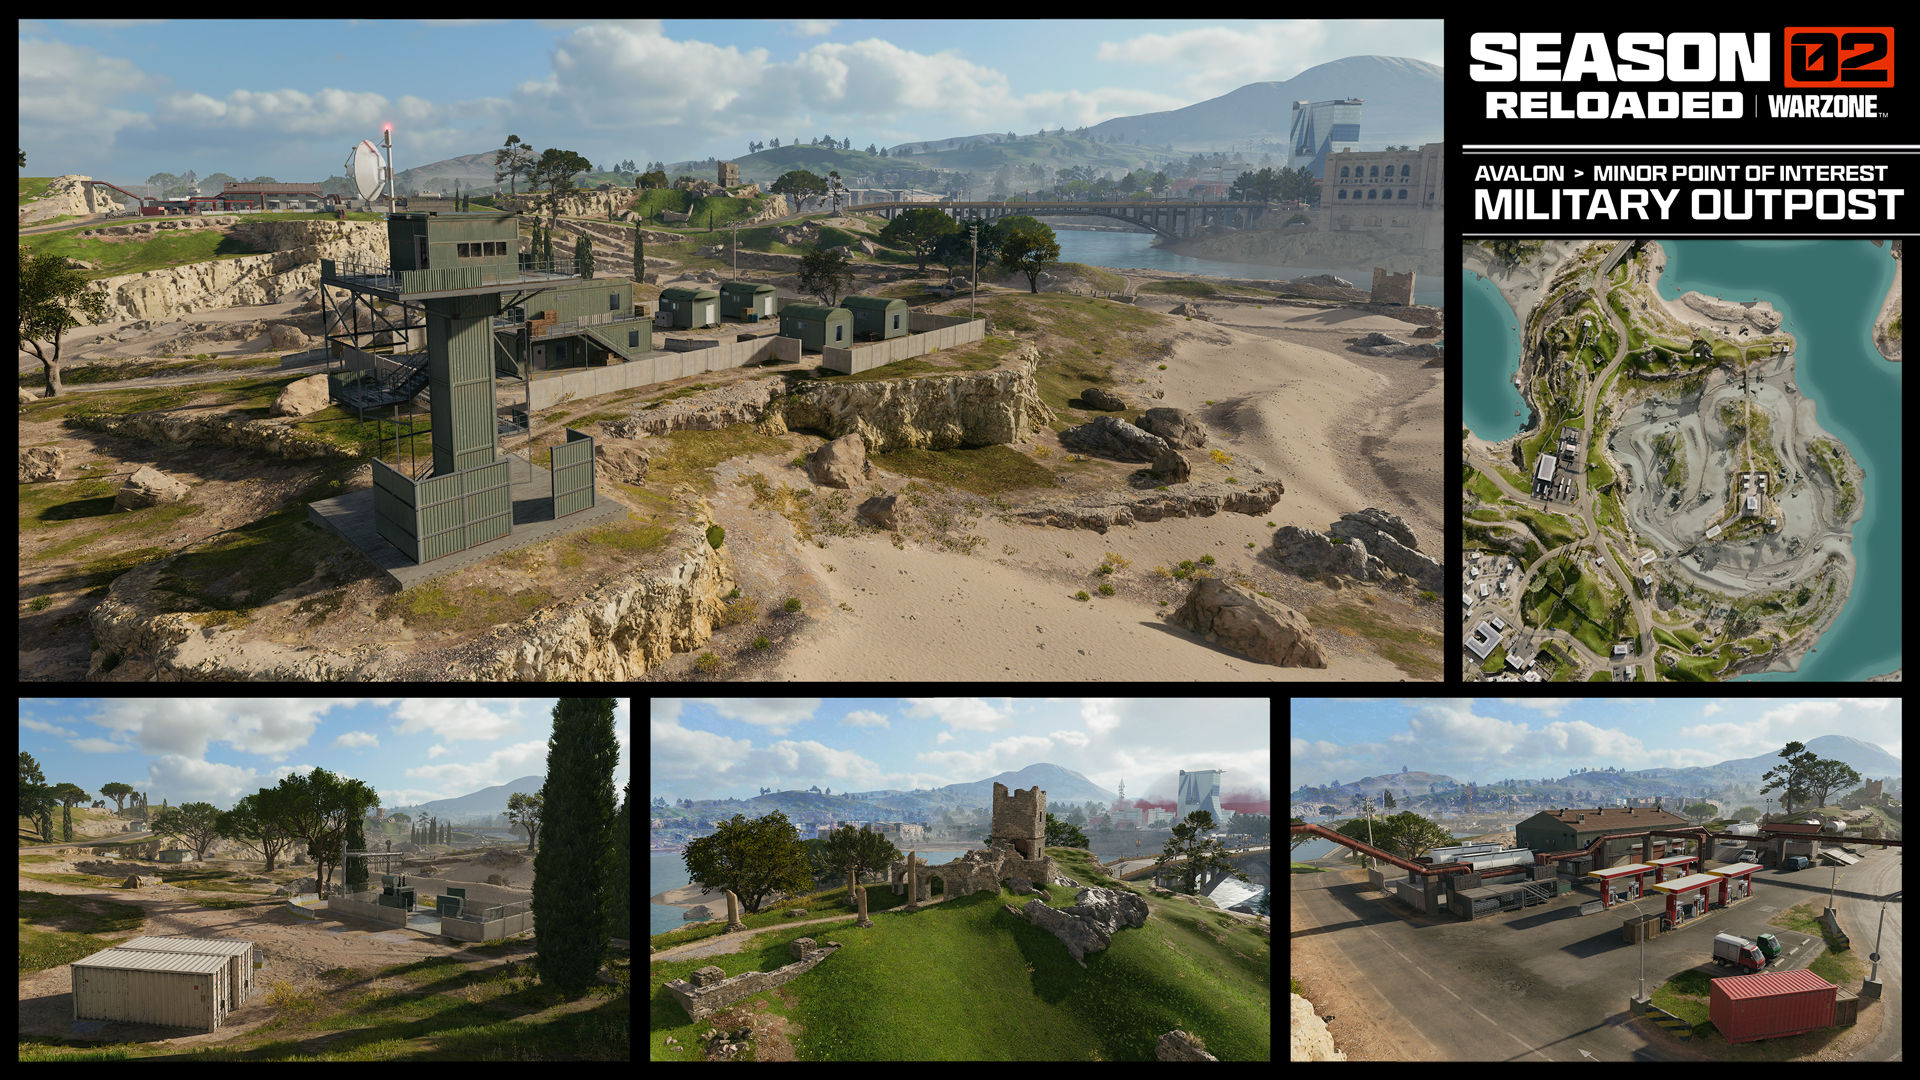
The Military Outpost near the Firing Range is a small but important location on the island. Slightly elevated over the surrounding area, the top of the hill can see in all directions toward most adjacent POIs. Because of the concrete walls, steel buildings, and watch tower, the Military Outpost serves as a great vantage point. Consider using its vantage points to decide which direction to attack next. Further away from the outpost is a gas station supplying the area with fuel, and the remains of a small stone lookout tower from medieval times.
Fort
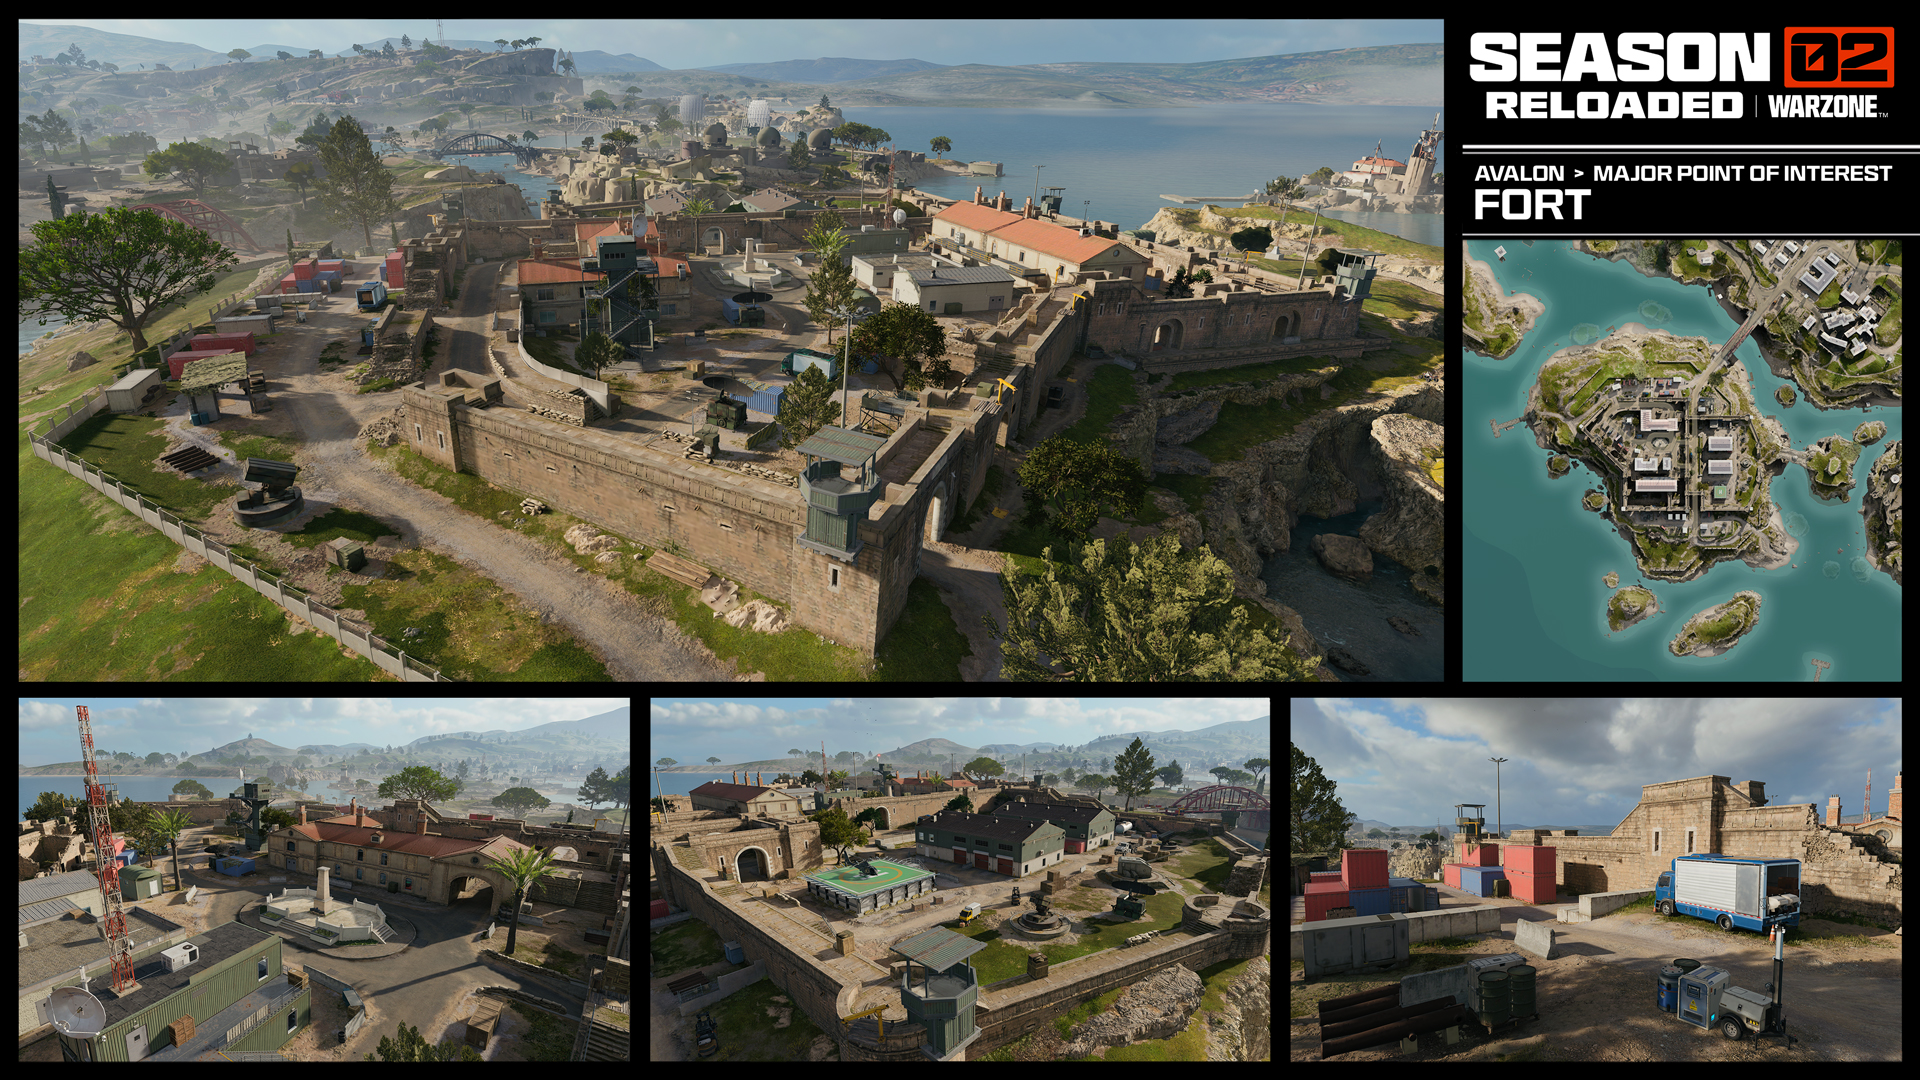
The old Fort d’Avalon sits in the southwestern corner of the map near the large southern body of water. Traverse the parapets and use the scattered towers to whittle down the enemy forces from above before moving into the Fort’s large interior facilities. If you’re feeling brave, hijack a watercraft and take a tour of the Cursed Rock near the map’s southern boundary.
Cursed Rock
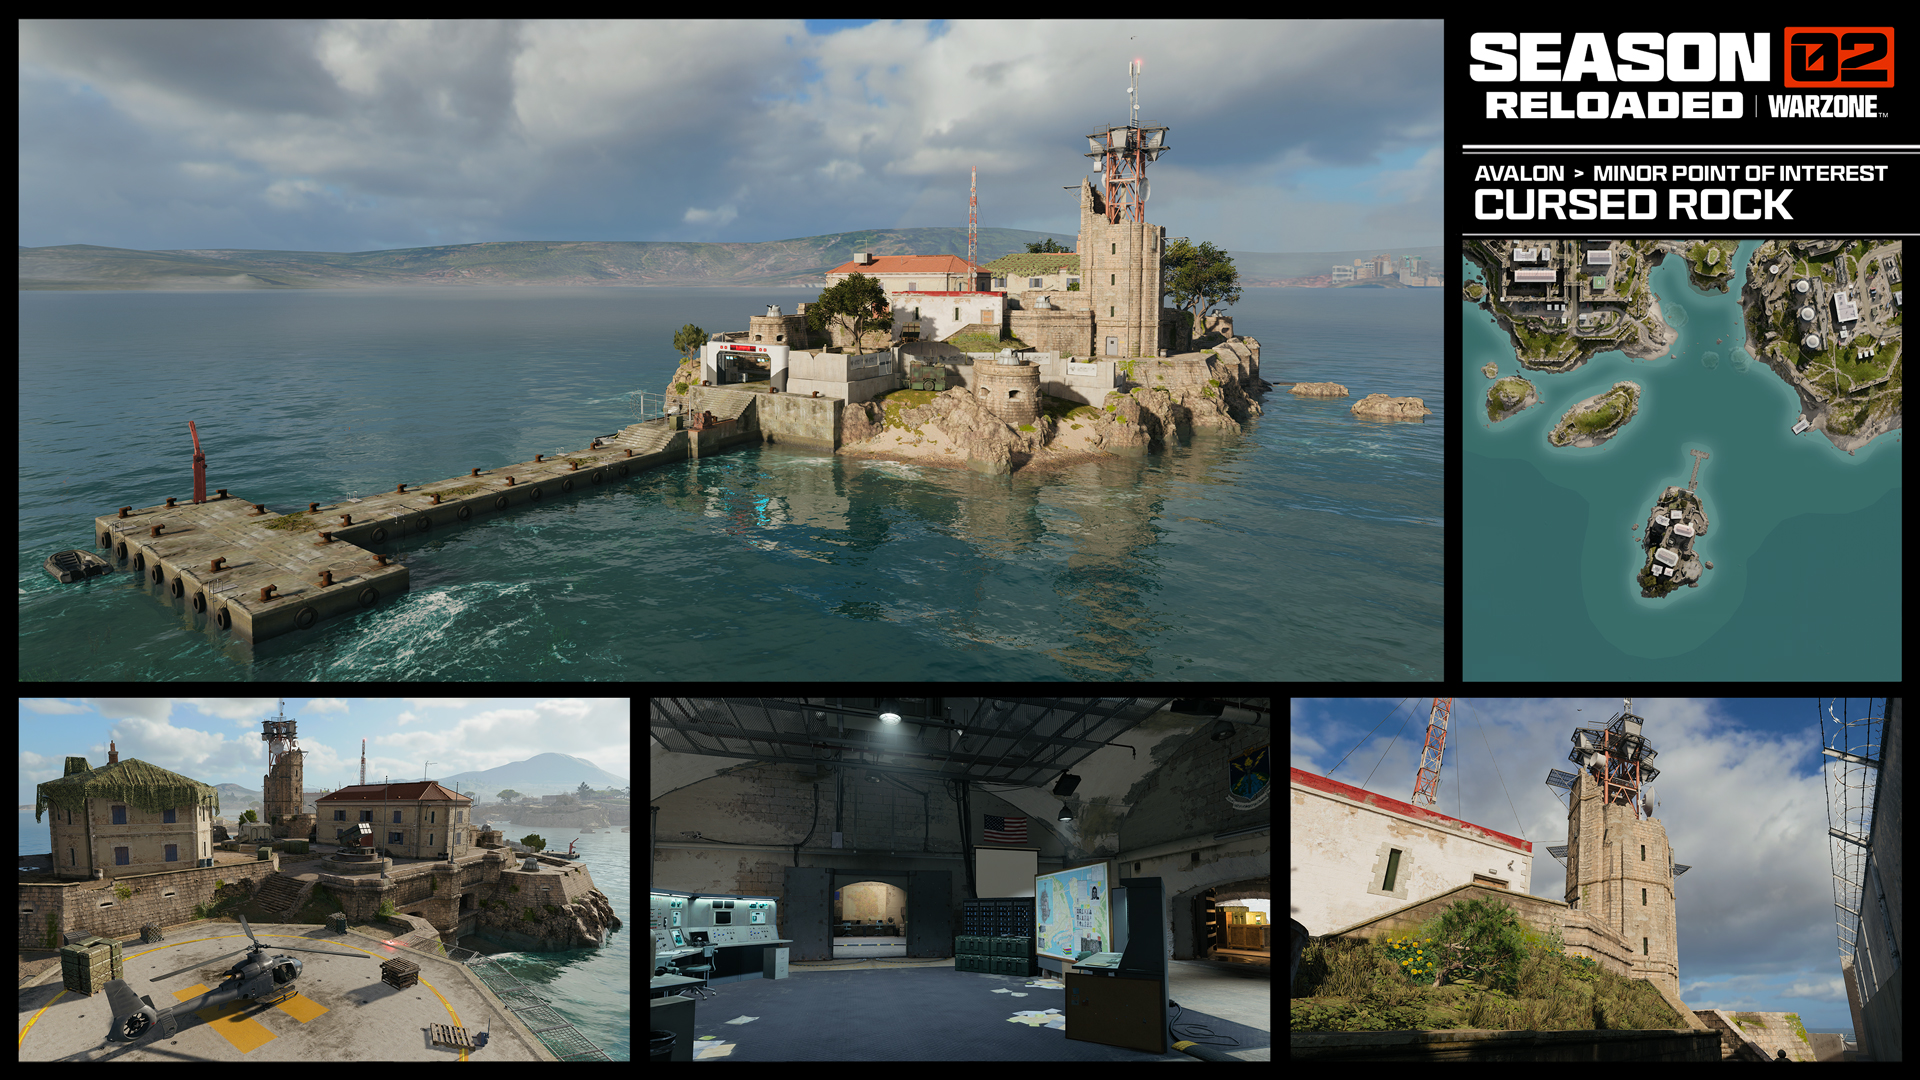
Home to the Protocol Multiplayer map and Training Course in Black Ops 6, the Cursed Rock is located by itself in the middle of the water. Surrounded by nothing but ocean, the only way to get here is by sea or by air. While taking control of this island can serve a squad with bravery quite well, if the circle does not roll your direction, you may have to make a daring escape.
Listening Post
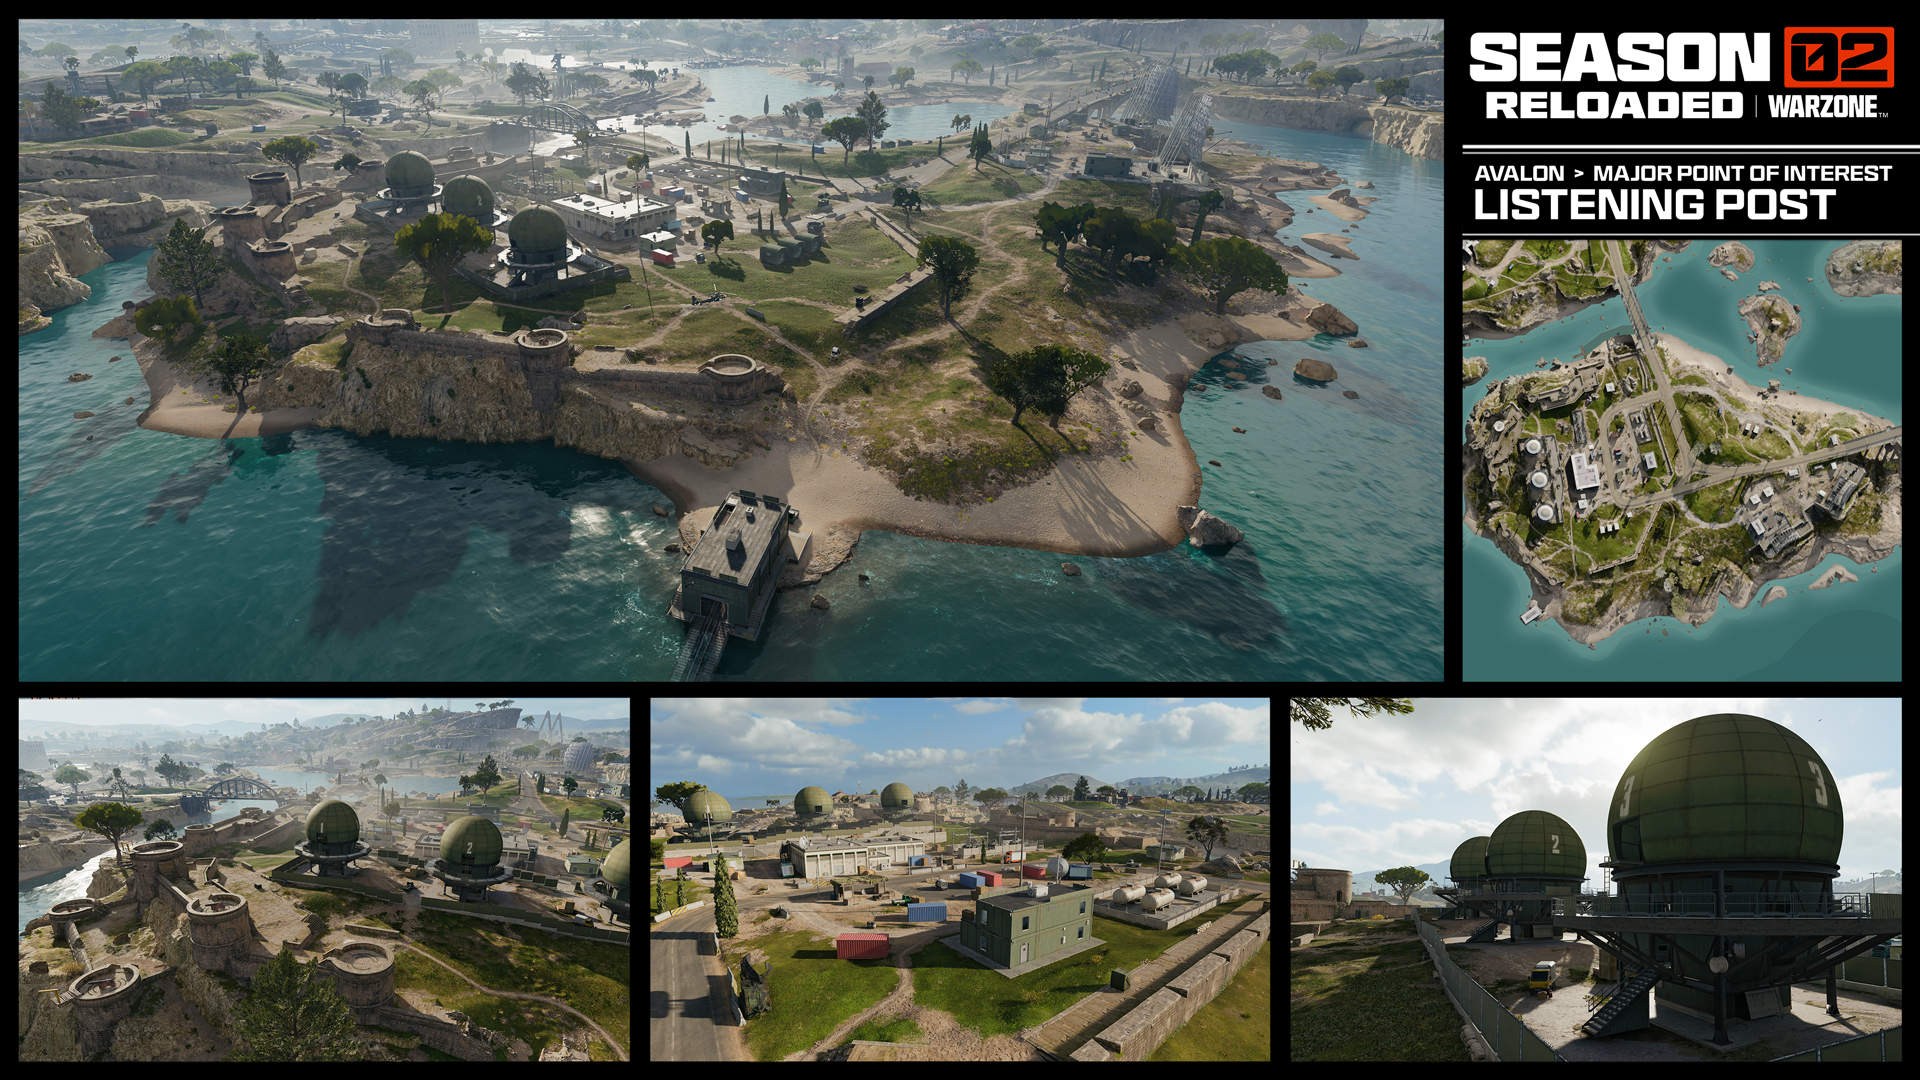
A pair of Radars face the water near the bridge leading into the Listening Post. Scattered buildings and radar equipment line the low, rolling terrain. A short stone wall surrounds the area, easily scalable for an attack on the installation. Note the strong fortifications on the northwestern tip of the island, with the highest tower giving access to a Zipline straight into the Firing Range or the island exterior of the Fort.
Radars

The Radars are home to a choke point and ambush spot for those attempting to take the bridge and head East or stop any squads from leaving the same bridge. Take advantage of the radar dishes to gain a bit of elevation and spot enemies headed your way.
Avalon Zone 4: South Central

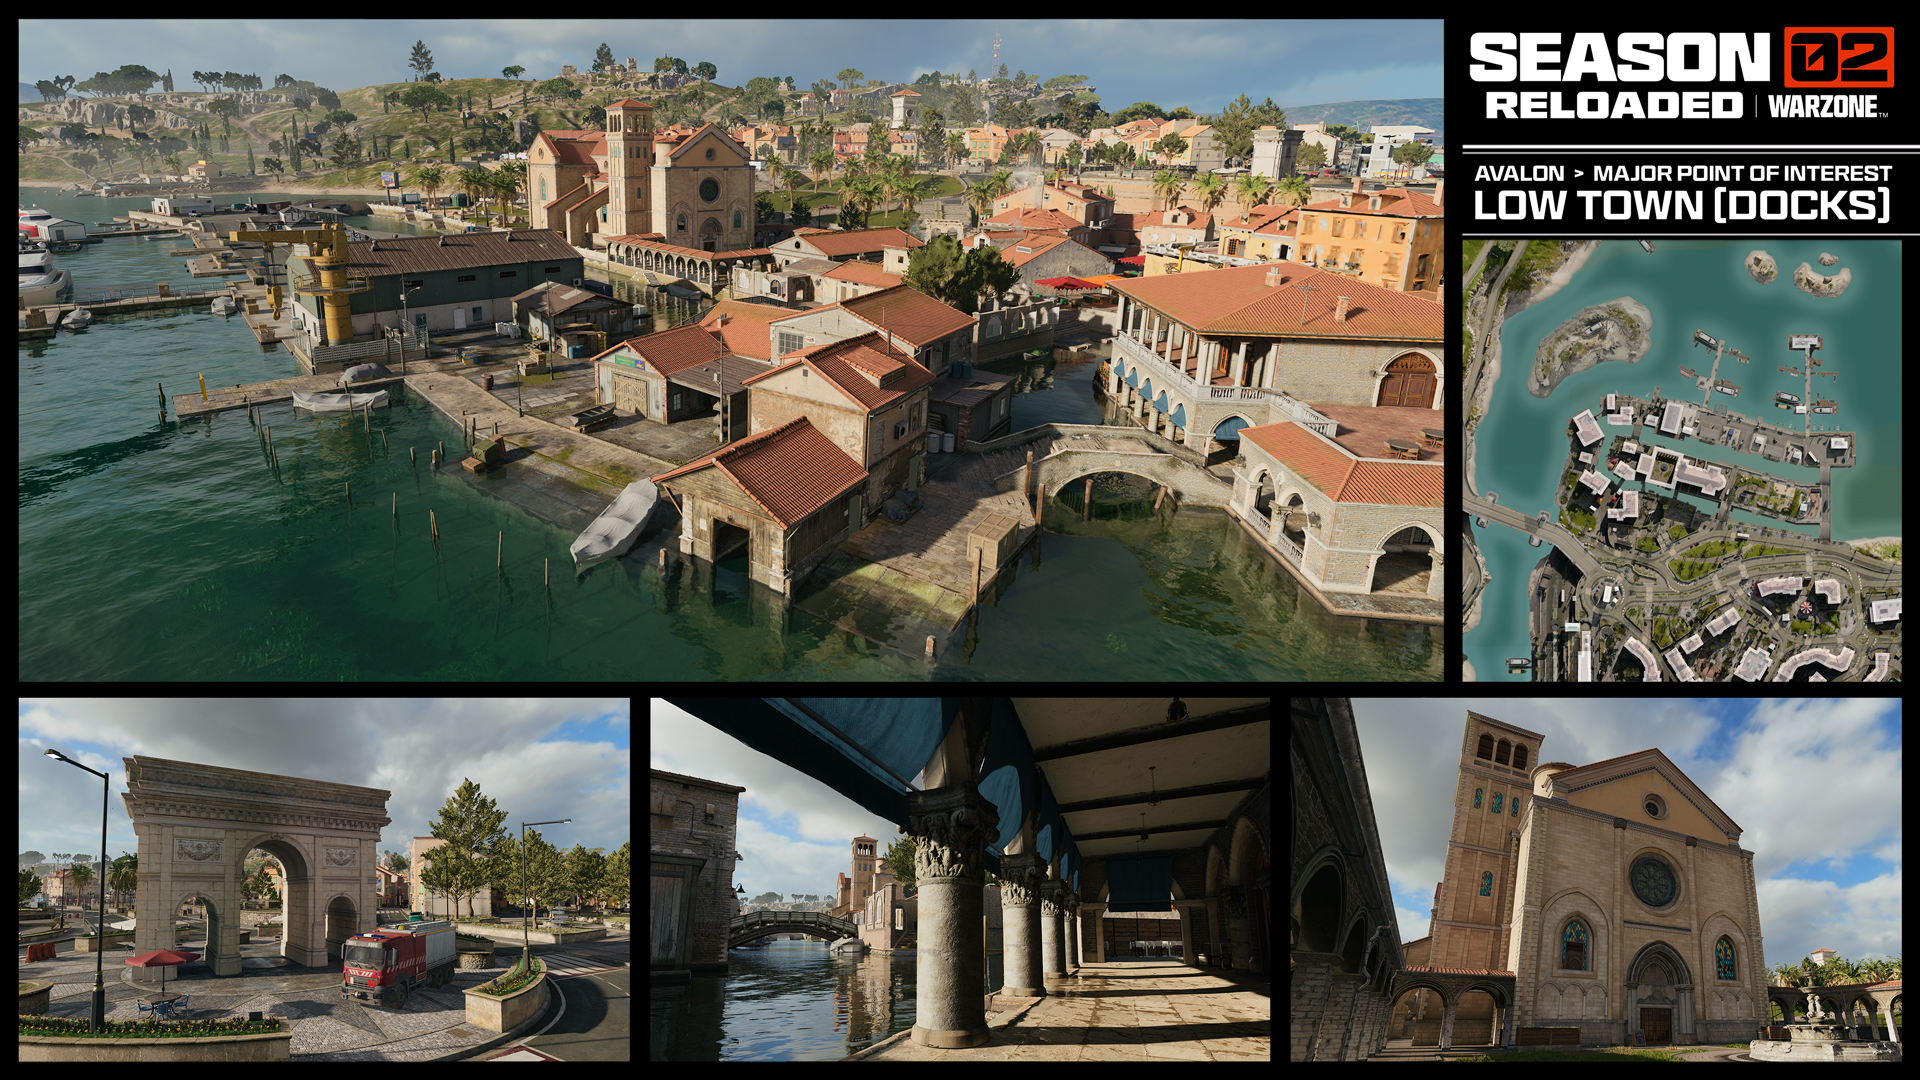
Low Town and the Marina claim one of the wider locations on the center island of Avalon. As shown by the advertisements all throughout town, Low Town has been transformed into a racetrack for the Avalon 35. Using your wingsuit and the area’s network of Ascenders and Ziplines, you can glide from one rooftop to another, testing your strength in one of the map’s more centralized locations. Keep an exit plan in mind, whether that’s falling back to High Town or escaping to higher ground in the Ruins Overlook.
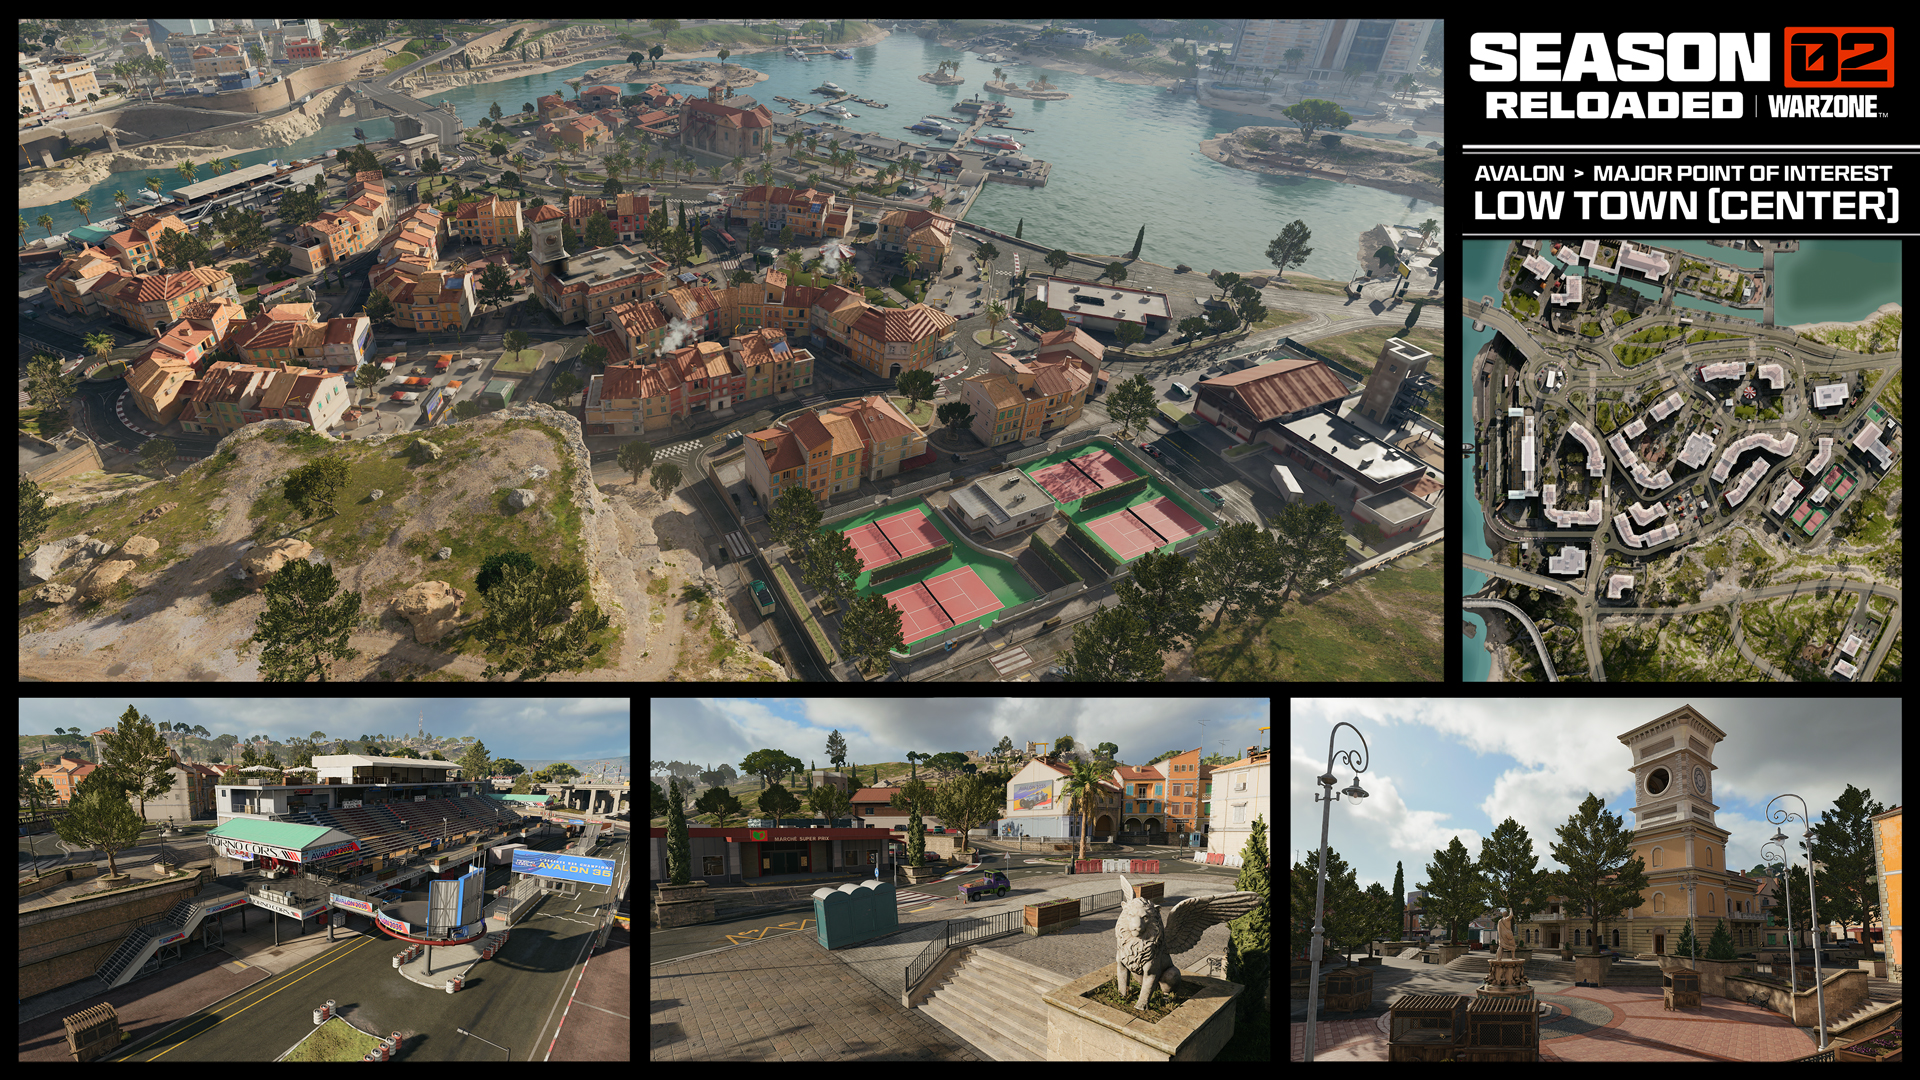
Across this point of interest, the lower docks offer rapid aquatic deployment opportunities, featuring the Low Town Multiplayer map from Black Ops 6, as well as a tour of the old cathedral and monument. Further into the main settlement itself, the close buildings and winding roads around a central square require teams to stay on high alert as enemy squads can approach from any direction, leading to exciting close- and long-range fights. Take to the rooftops to check for incoming foes.
Hillside Apartments
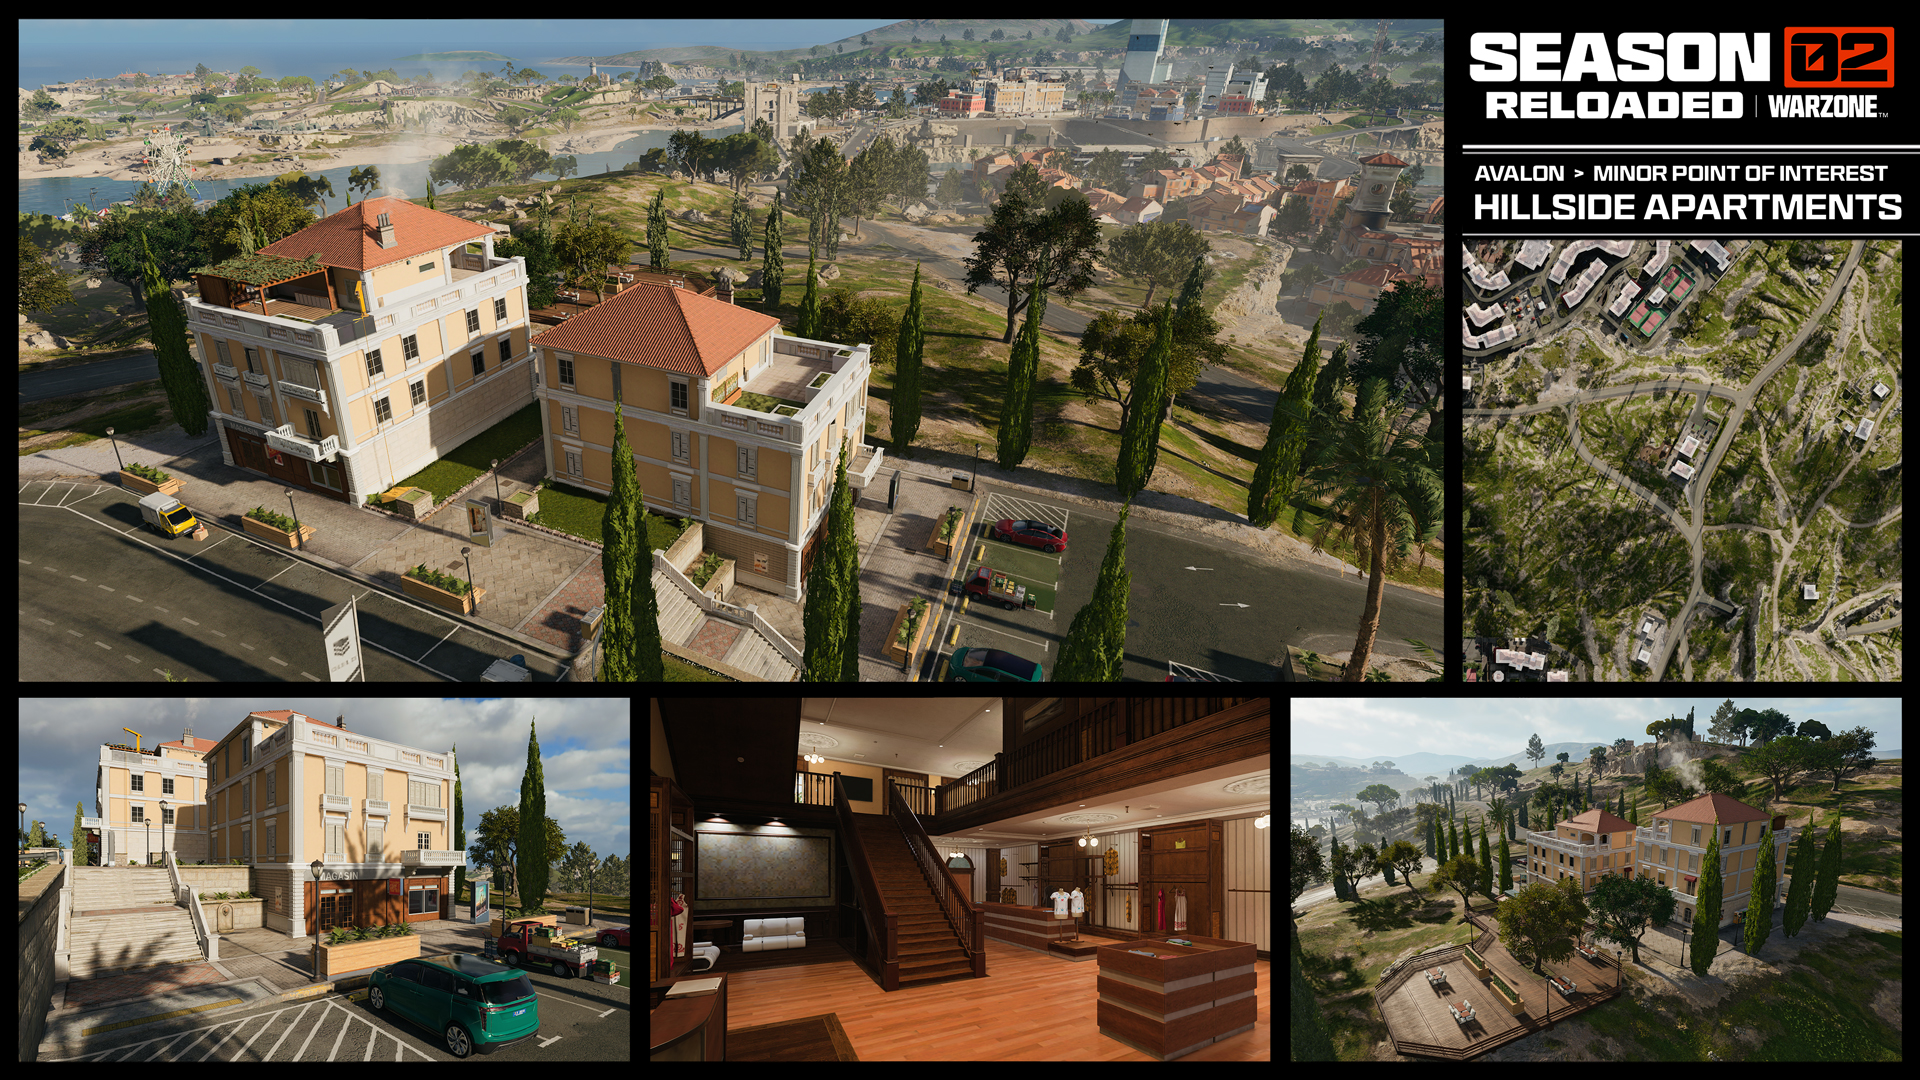
Two large apartment buildings offer exceptional views down to Low Town, as well as tactical opportunities for spotting and hunting foes.
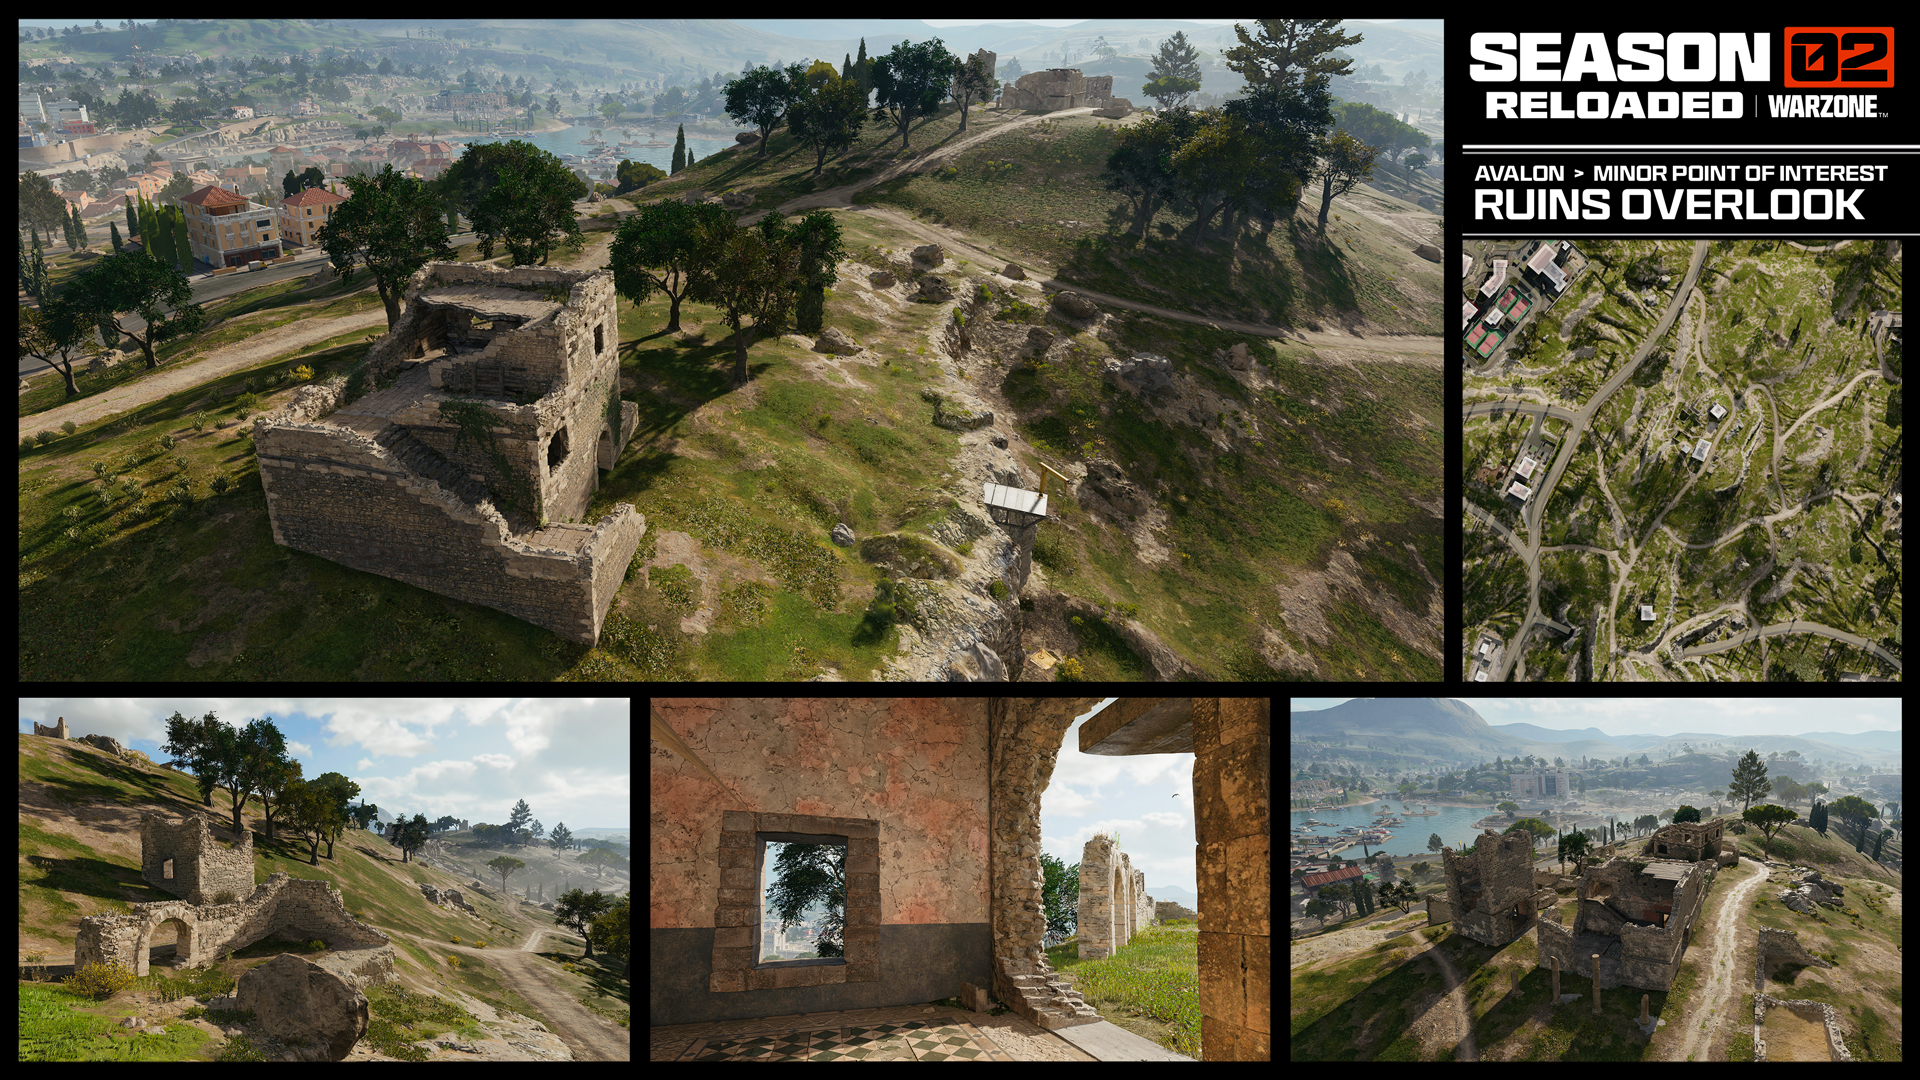
Ruins Overlook
The Ruins Overlook sits almost at the same elevation as the Communication Tower, providing visibility to the vast majority of Avalon. This gives squads a lot to work with when planning their next move. As a smaller location, dropping here could be a great idea, so long as there isn’t another squad to compete with for loot. If you’re in a pinch and need to retreat to the Ruins Overlook, it might also be a great location to grab some ammo and Armor Plates.
Pier District
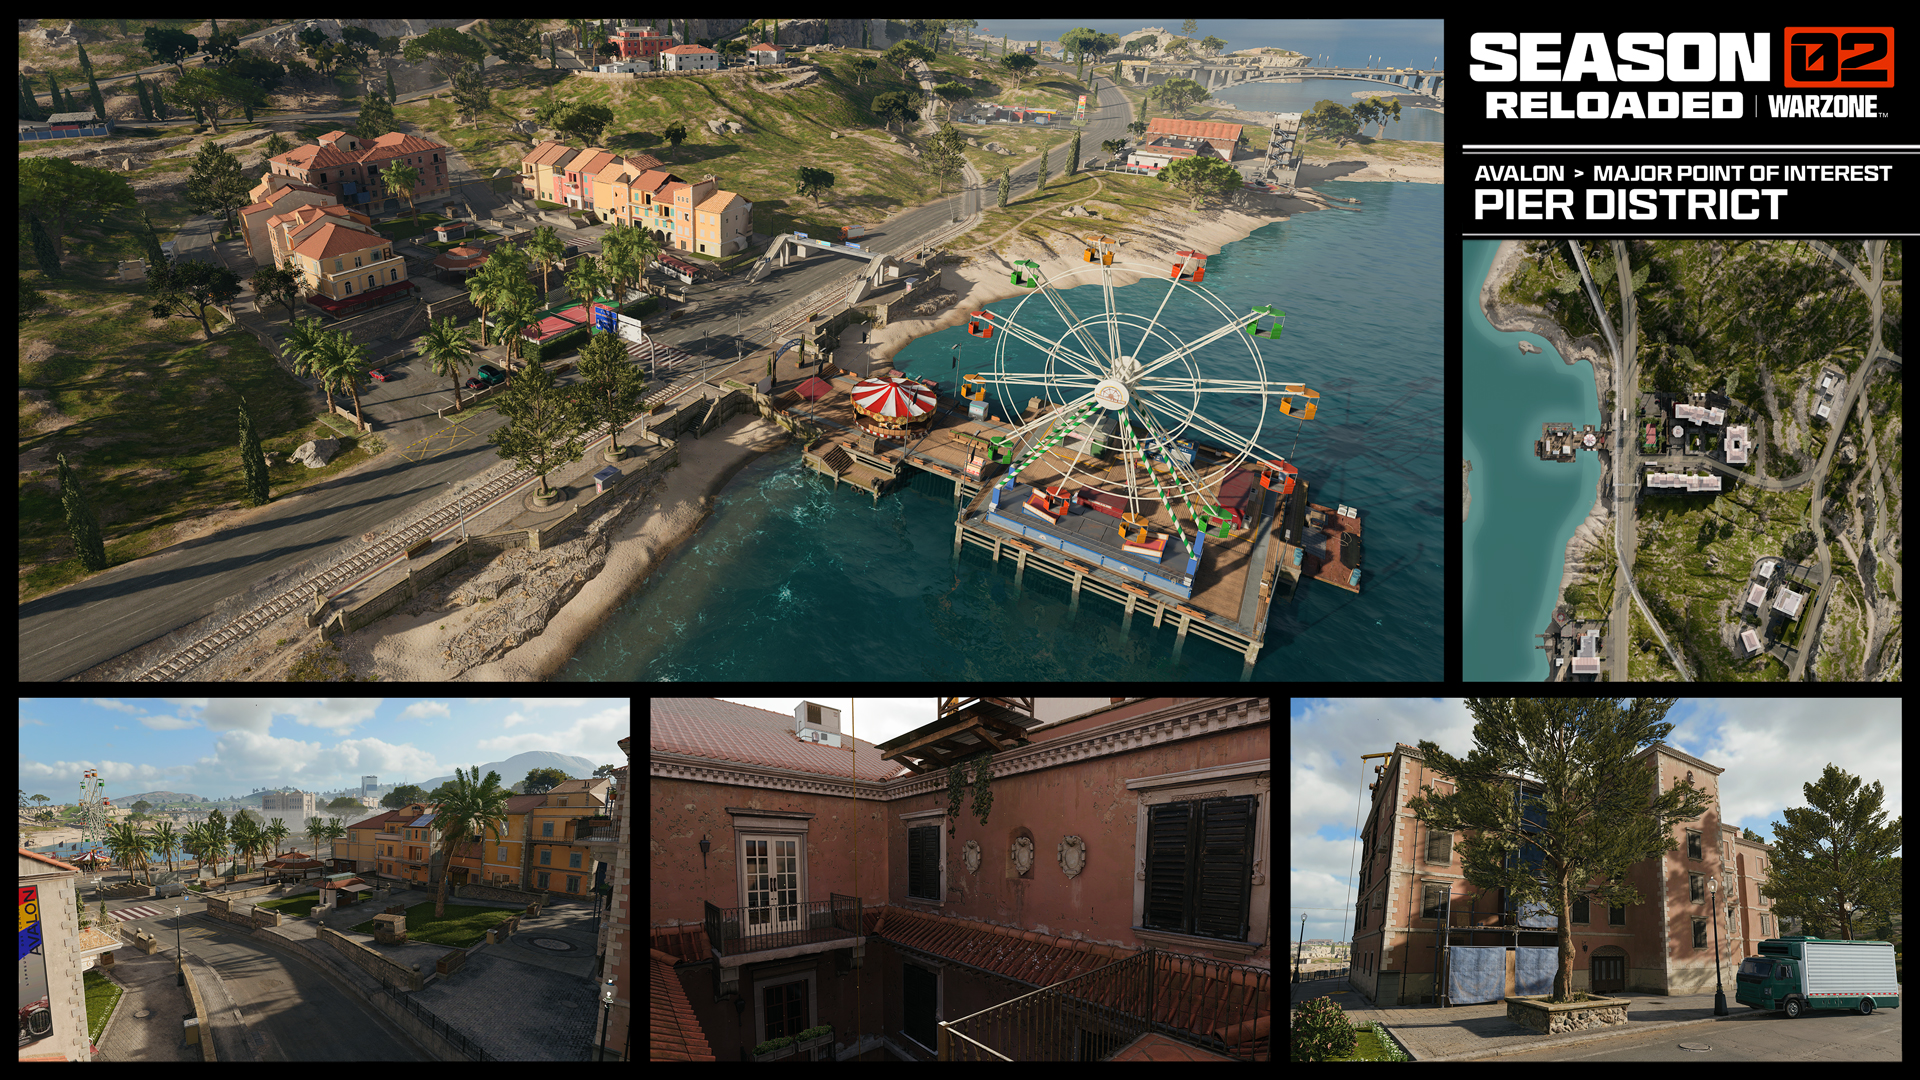
The Pier District entertains its guests with a carousel and Ferris wheel on the water next to a tennis court supporting a gathering of mid-sized buildings. An assortment of Ascenders and Ziplines help to navigate the rooftops, while the interiors bring Operators into tight room-to-room combat. The Business Quarter lies just up the hill to the south, the terrain behind it rising to the Heliport. Home to the familiar dual apartment penthouse from Stakeout in Black Ops 6, use the Pier District to set up a garrison and buy some time while you plan your next move.
Fire Station
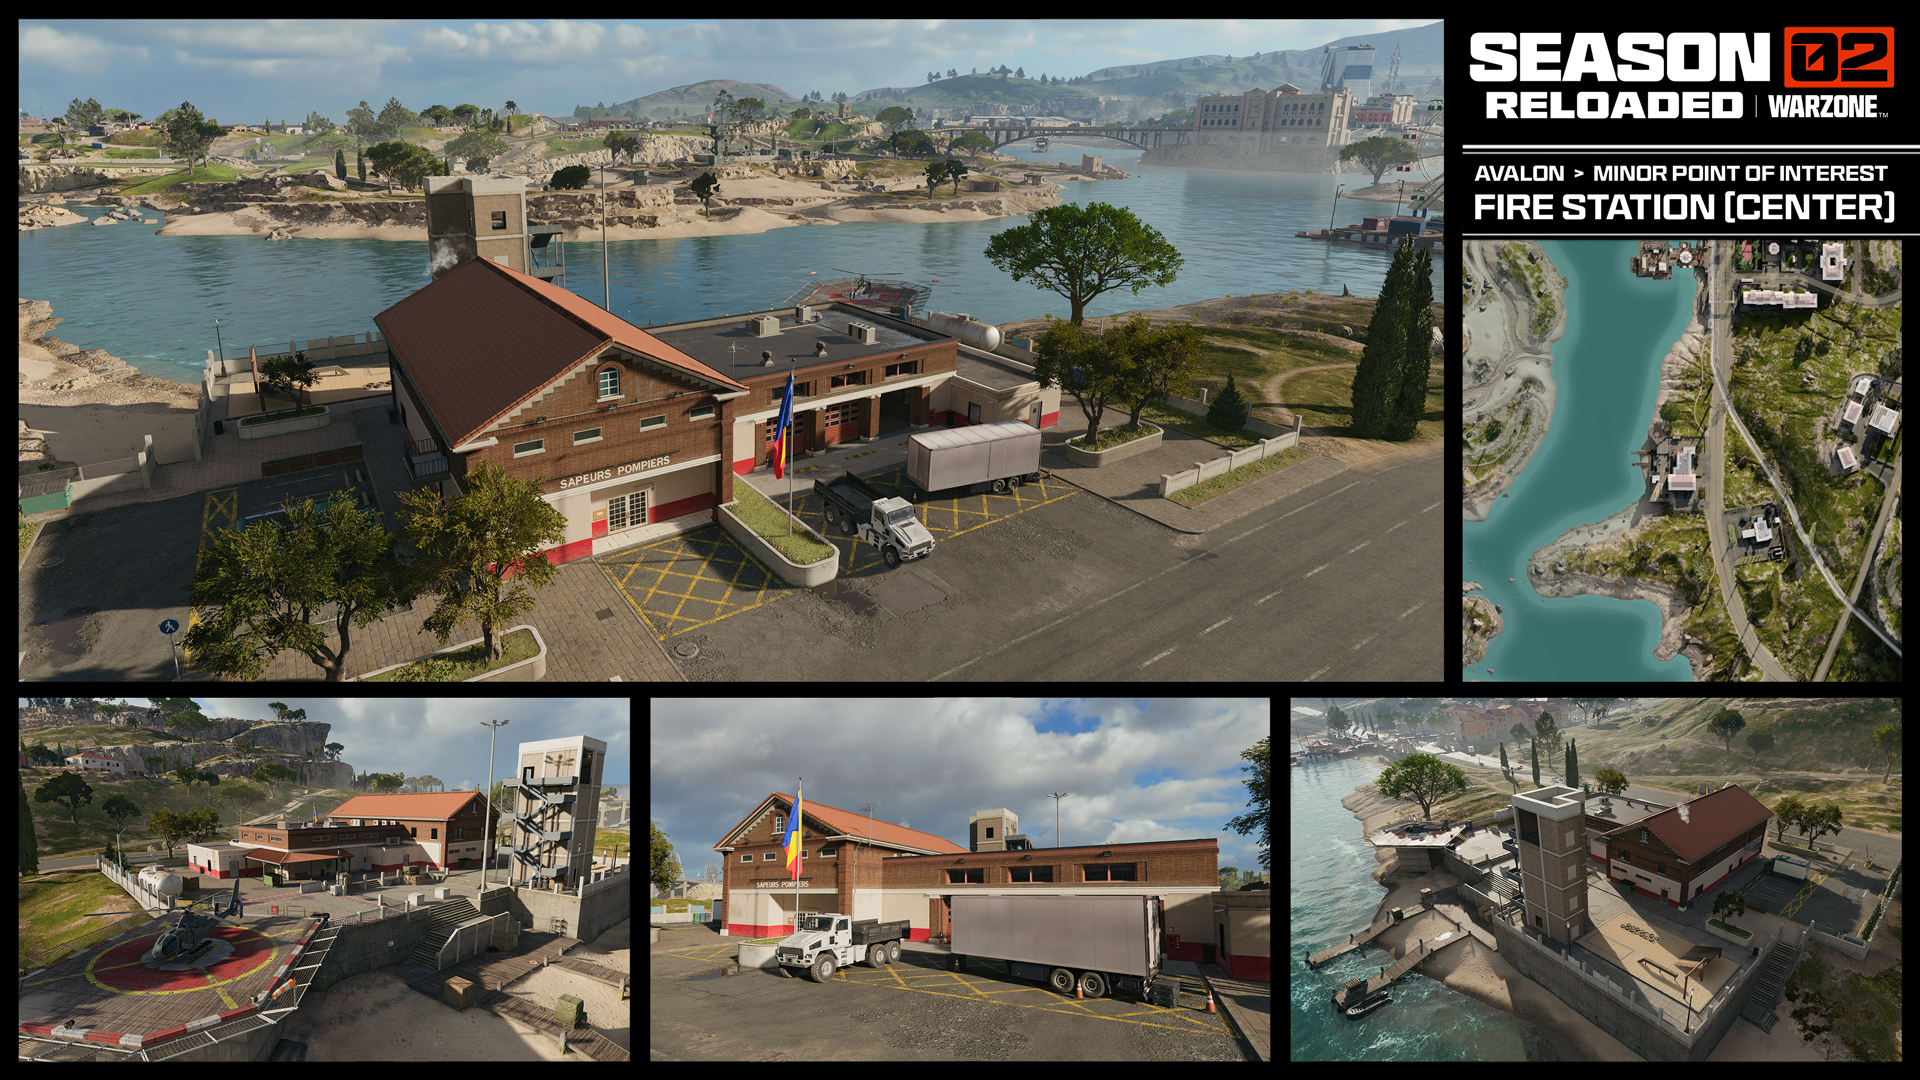
Just South down the main road from the Pier District is the Fire Station. Another great spot to land if the major POIs are overcrowded. Gather some gear and make a getaway via sea, air, or land. With Cargo Truck, Tactical Raft, and Heli spawns at the Fire Station, there are all kinds of options.
Business Quarter
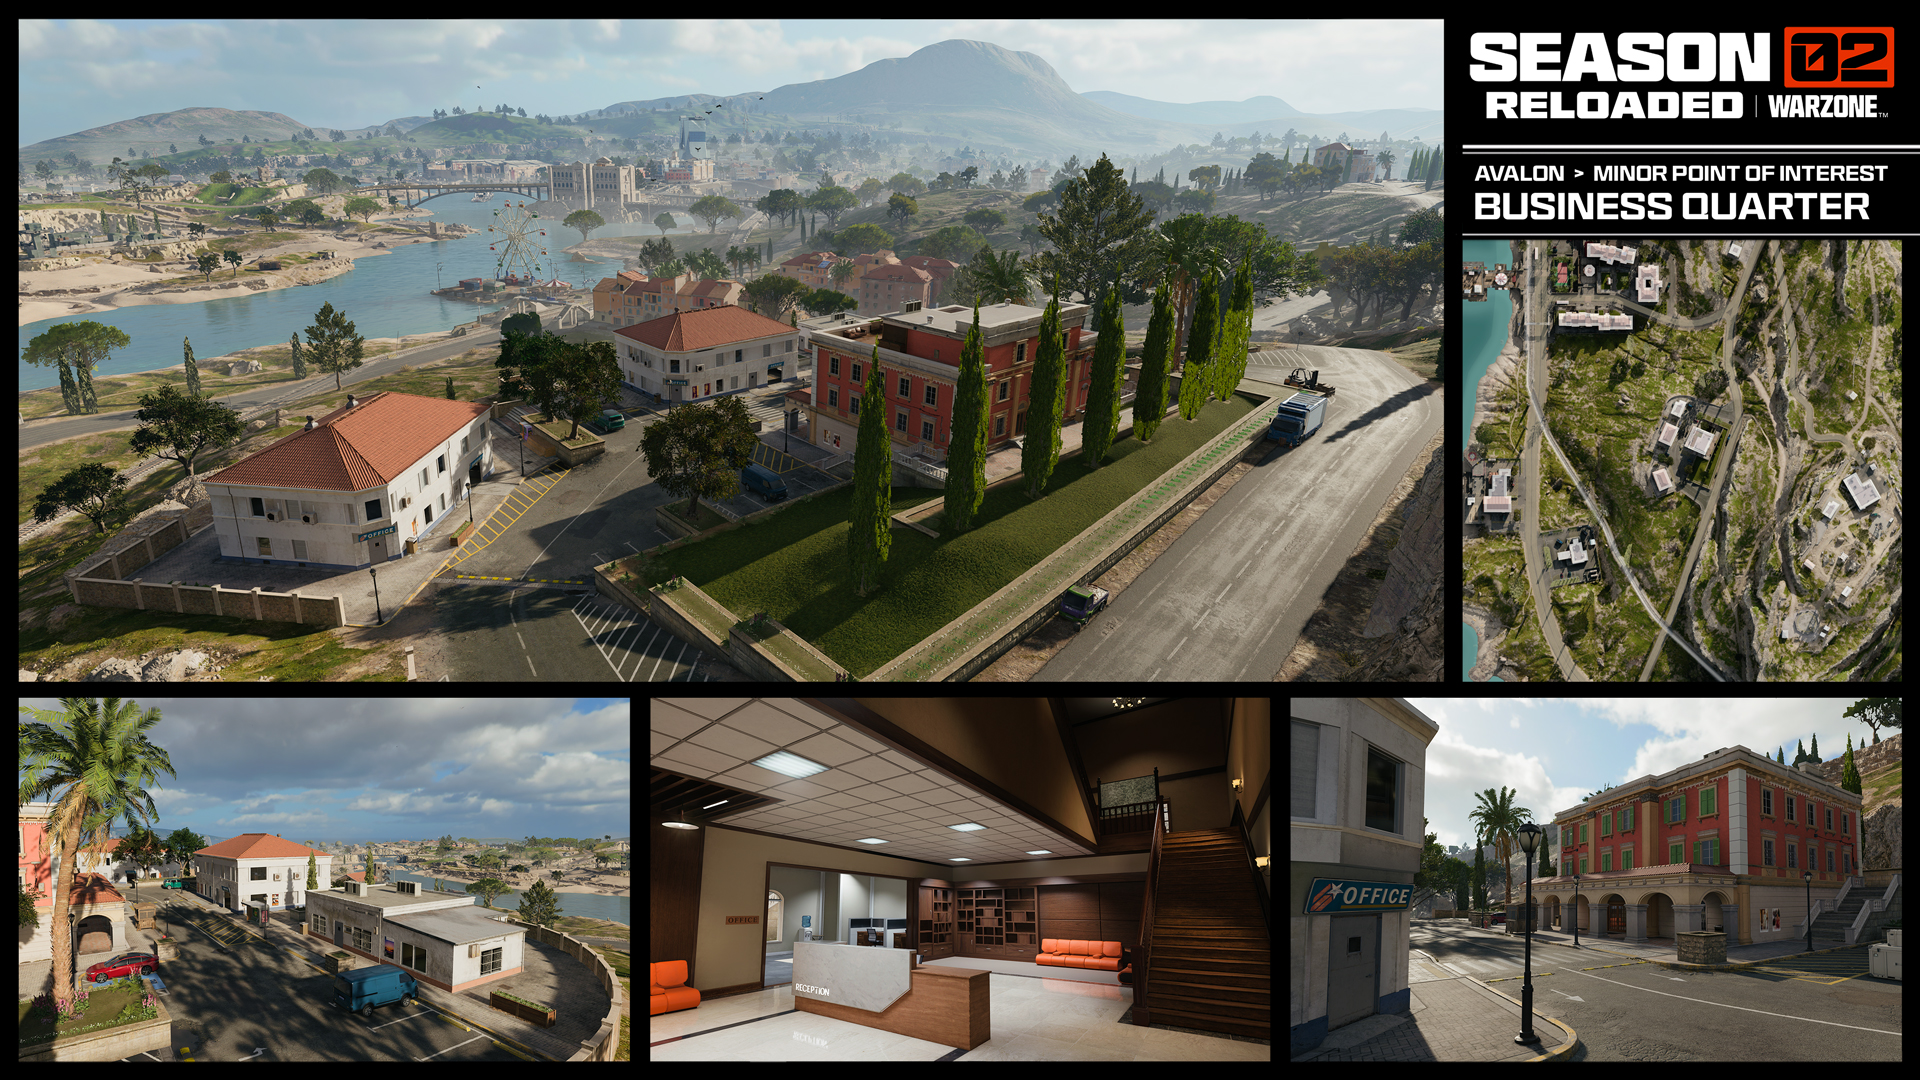
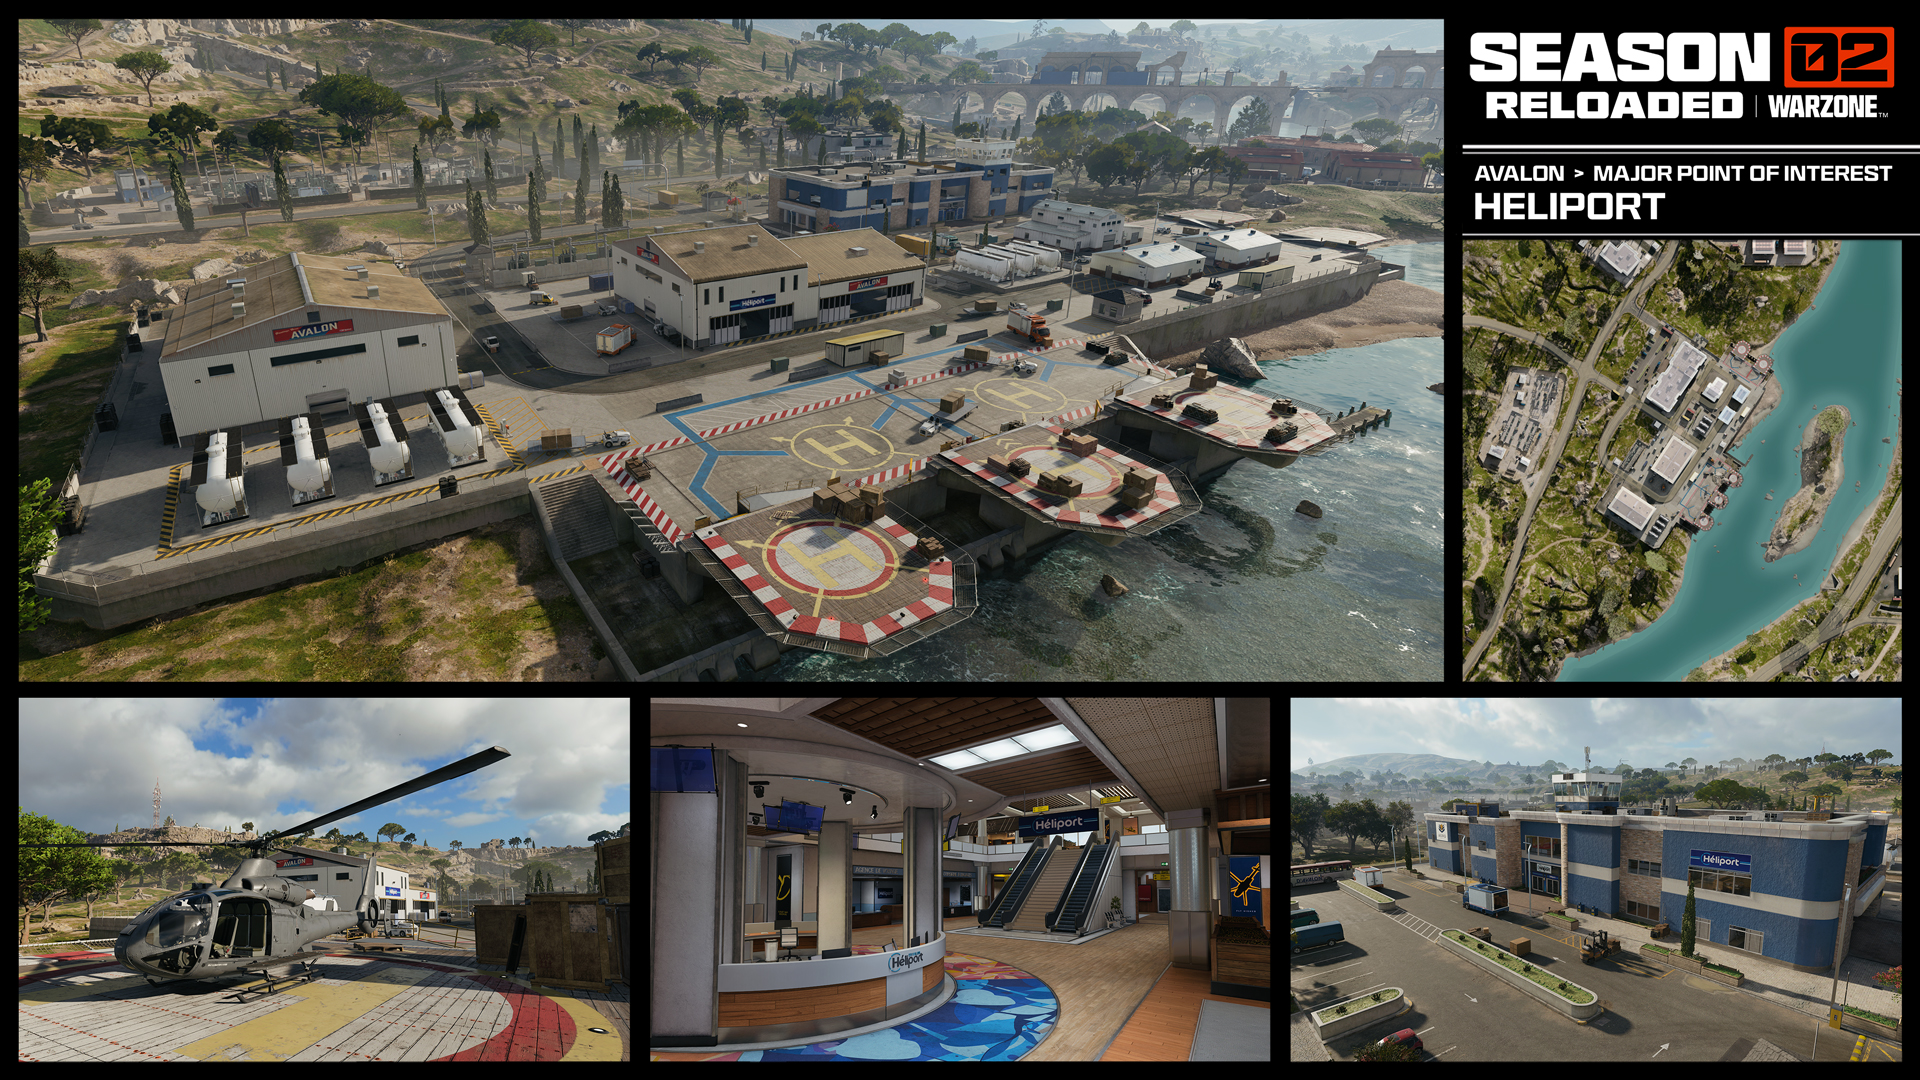
Helipads line the border of this commercial Heliport. A handful of large buildings sit on the roadside near the helipads, including an air traffic control tower that is attached to the Aero Innovations building and maintains an incredible view. Further inland lies a Substation, the Police Station, and the Art Warehouse north up the coast, including rows of brick buildings housing a taste of Avalon’s fine art collection.
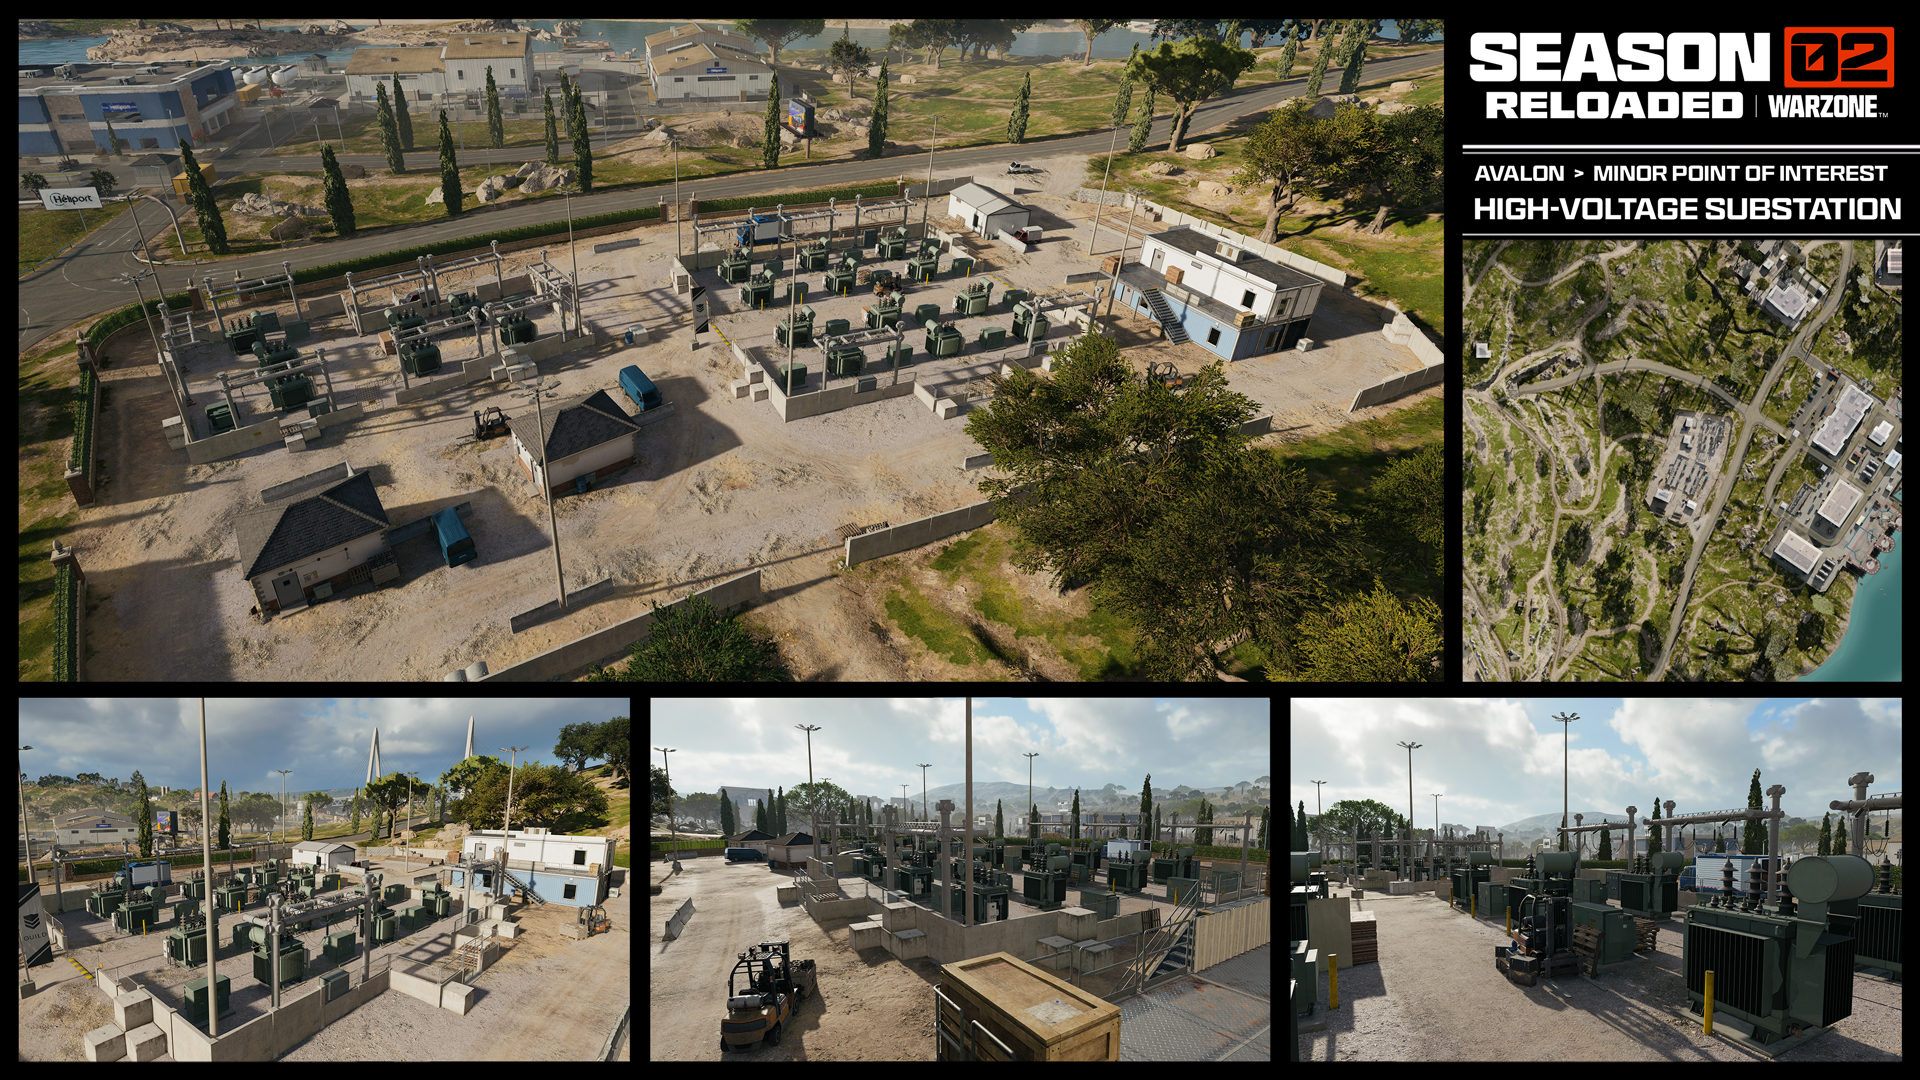
High-Voltage Substation
Make a quick stop at the Substation, a useful location for gathering loot and seeking protection from enemy squads in the Heliport. Run through the Substation to check for goodies and maintain the tactical advantage before heading up the hill to the Communication Tower.
Police Station
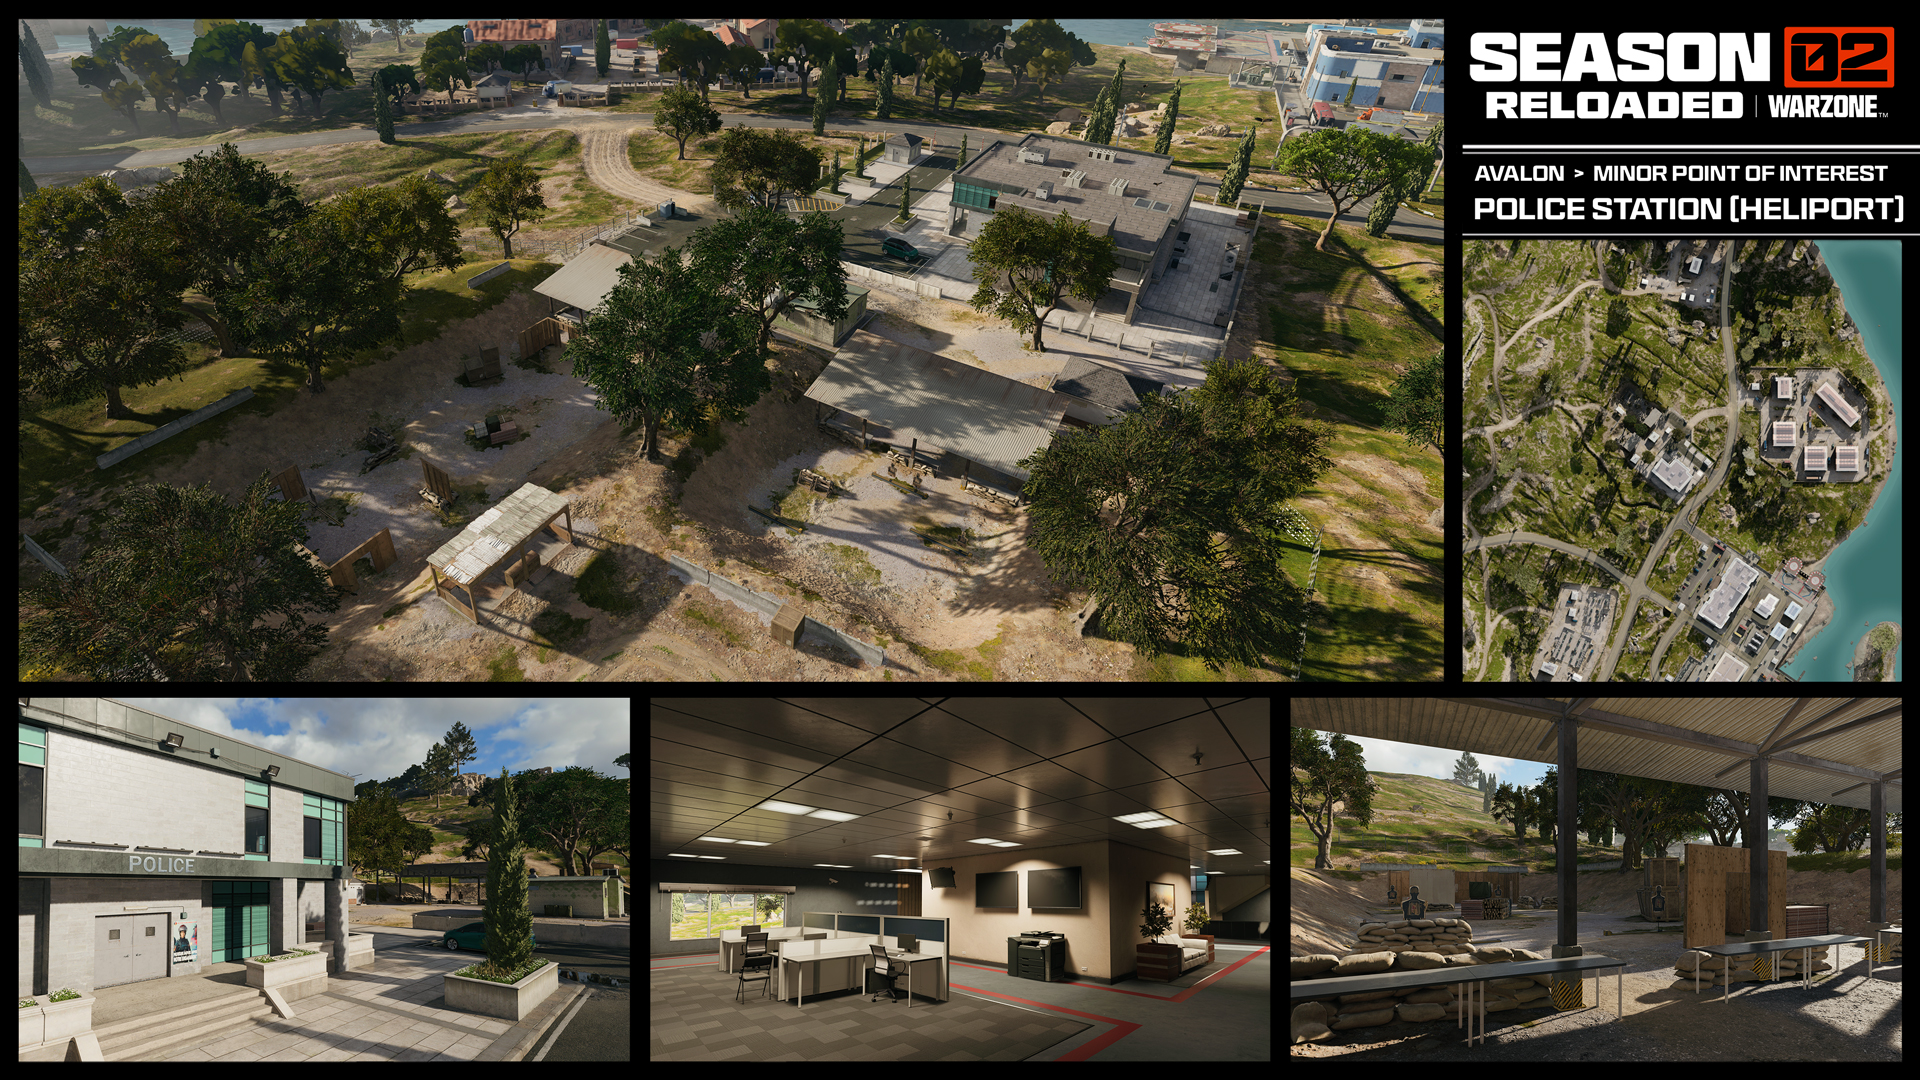
Use the mountain skirting this POI strategically, protect your flank as you approach the Police Station, or hole up in the main building for protection and ambush squads descending the cliffside. As it may be difficult to see what’s heading your direction on the horizon, the same can be said about enemy squads and their ability to see your exact location. Loot up at the Police Station before daring to climb the mountainside.
Art Warehouse
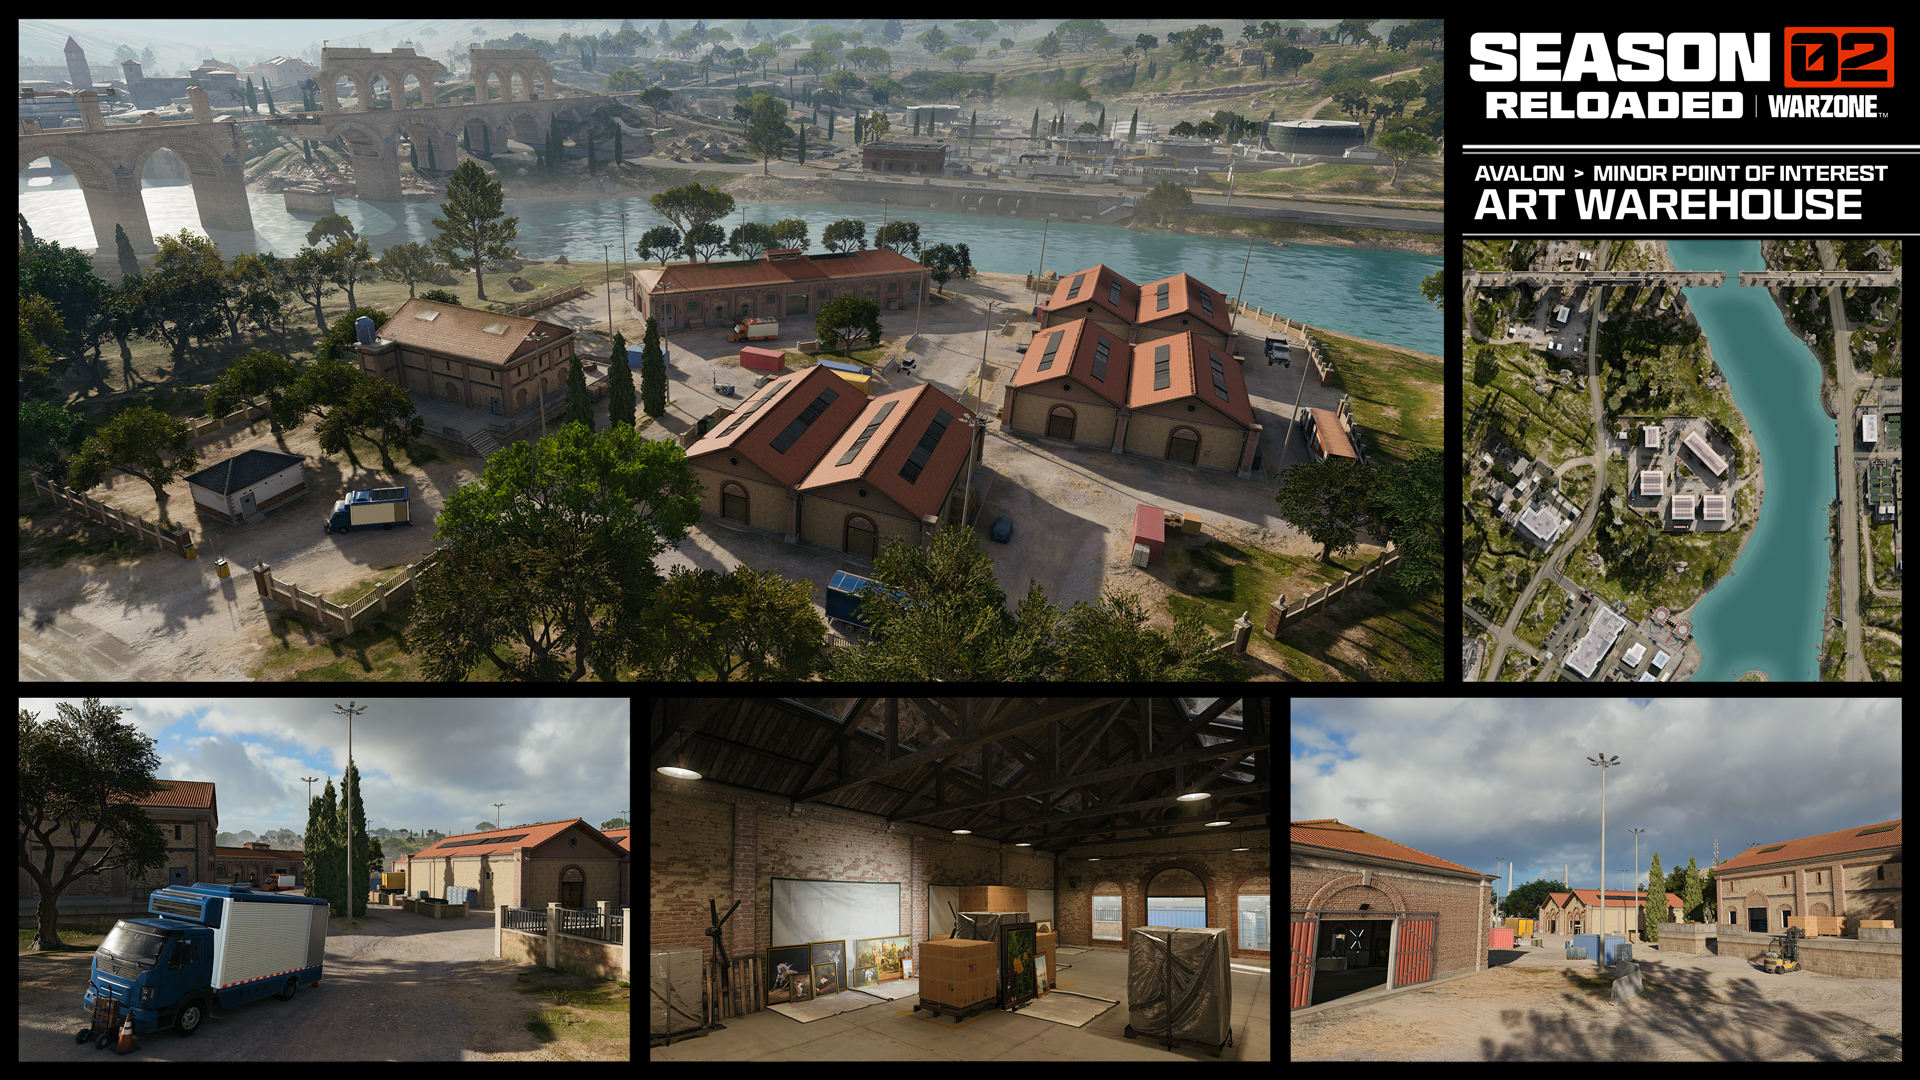
Just North of the Heliport, right before you reach the Aqueduct is the Art Warehouse. A compound with five major buildings and a whole lot of reasons for players to be interested in the location, expect the Art Warehouse to always be popular. Whether squads are dropping into get their first bits of weapons and upgrades, or they’re there to redeploy their squadmates, there might be an enemy player around any corner.
Chop Shop
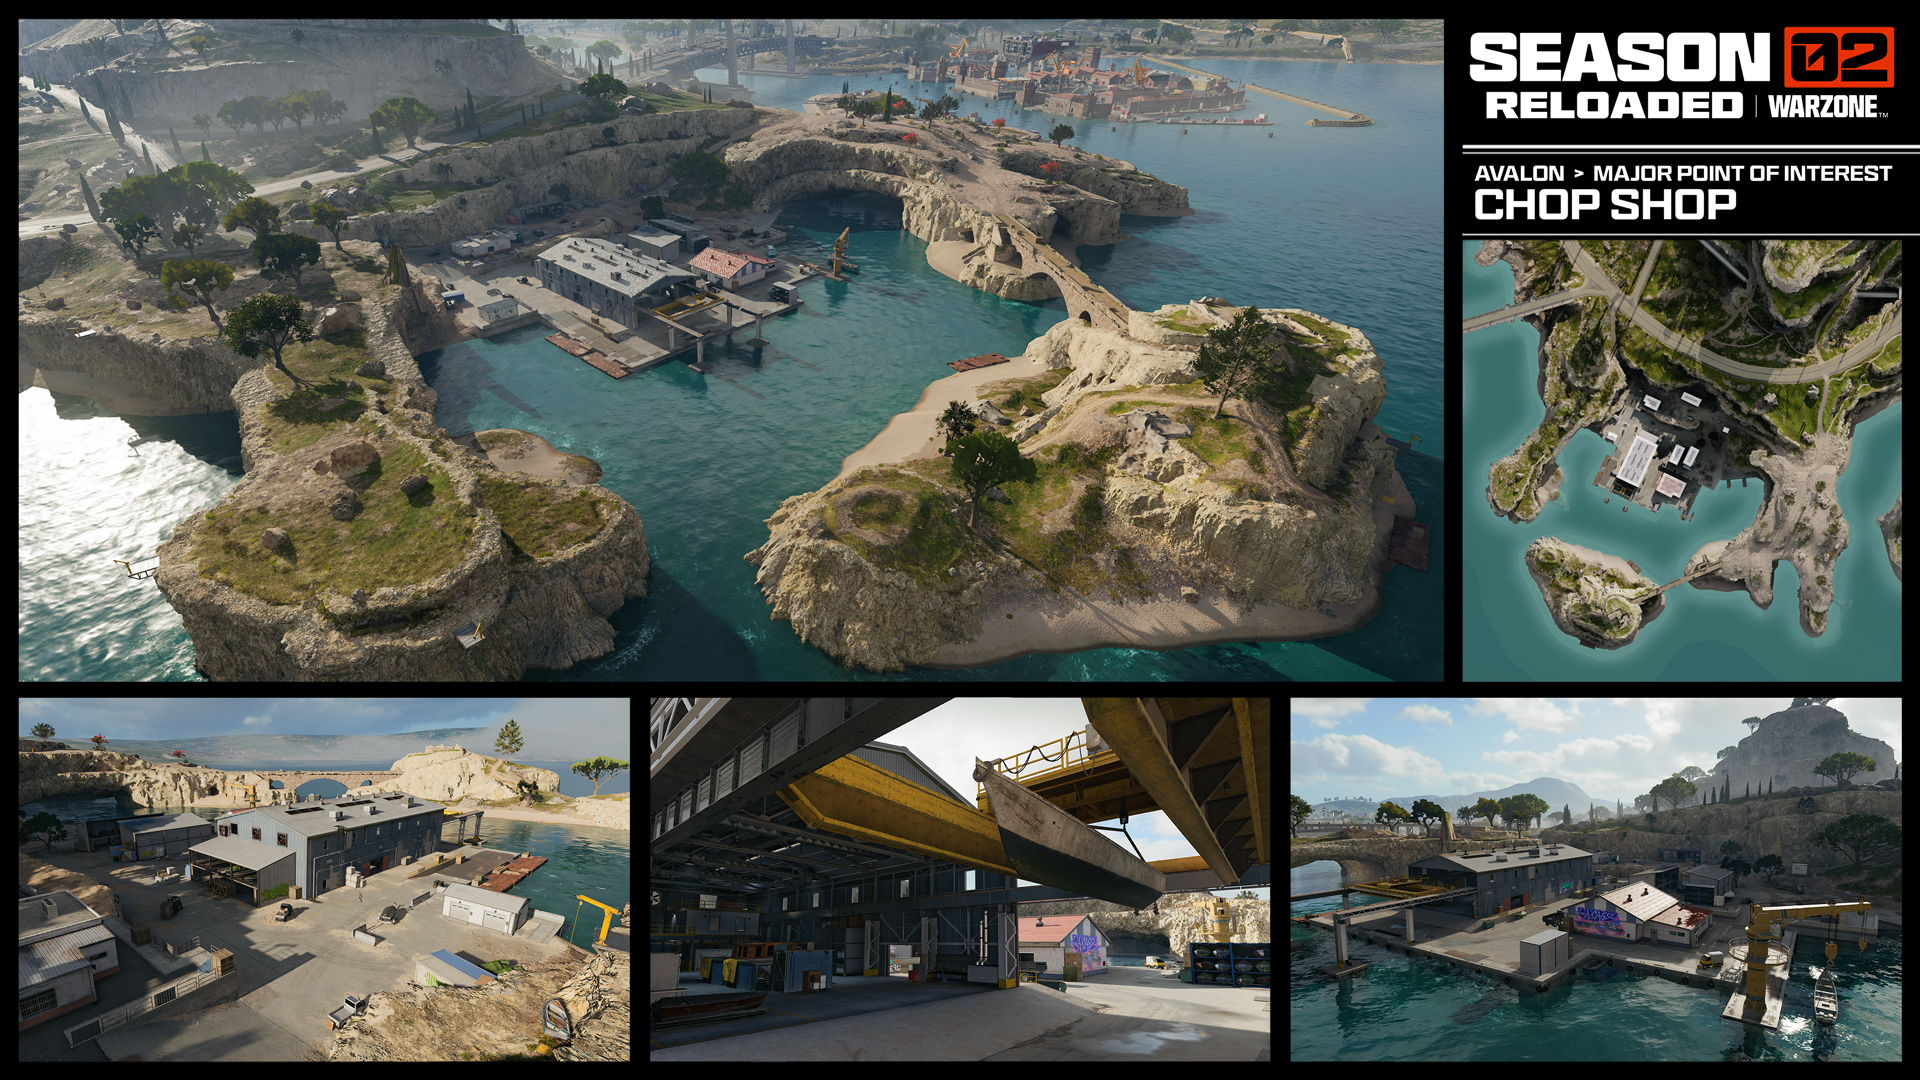
A graveyard for boats being stripped for parts, the Chop Shop sits on the southern coast in a scenic cove. A pair of garages and some storage units sit close to the water, while inland the terrain sharply rises to the main road. Take the western bridge to cross over to the Listening Post pushing up toward the Communication Tower, go east to the Old Arsenal, or take up defensive positions around the upper rocky peninsulas.
Communication Tower
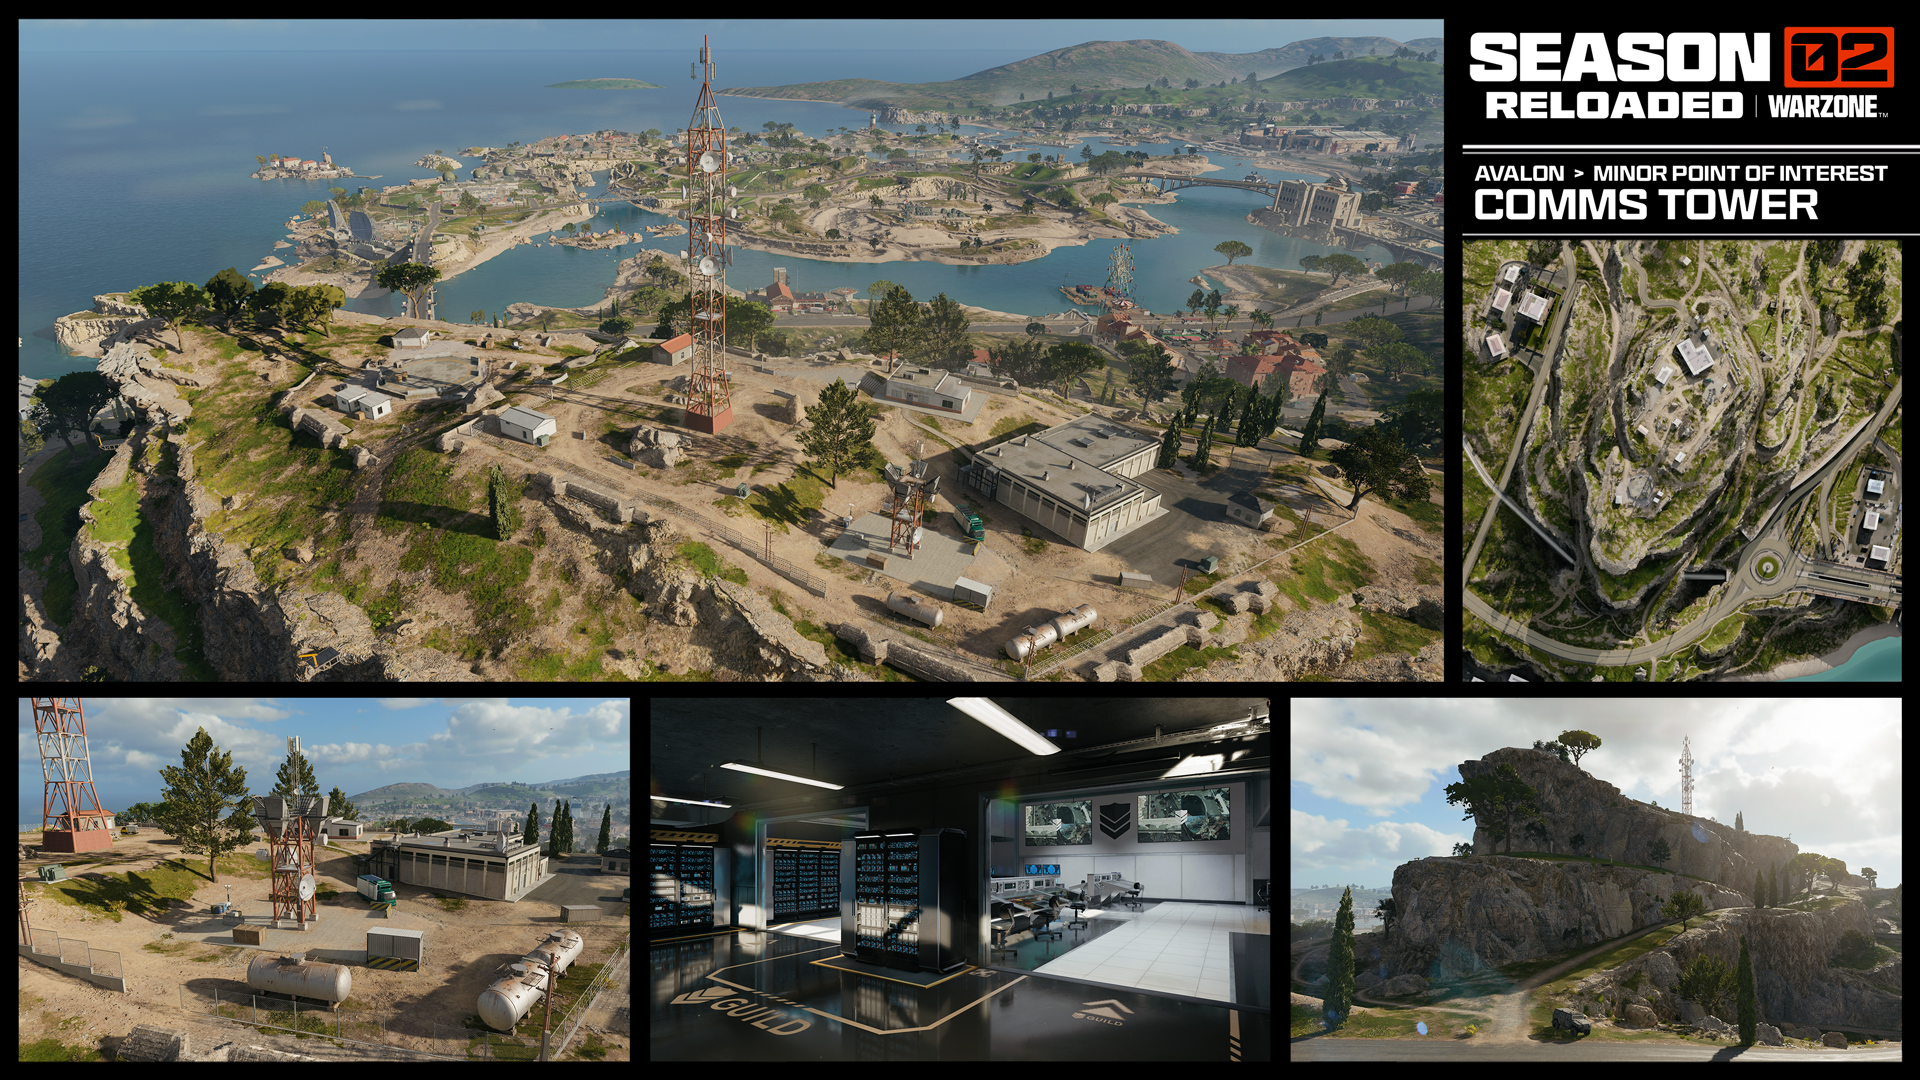
By far the tallest point on the map, the Communication Tower sees everything. Not only can this location be used to scout out most of the map, especially where the next circle is going to land, it also has many options for loot and vehicles. Head to the helipad on the southern end of the hilltop and see if you were lucky enough to secure a Heli spawn.
Avalon Bridge
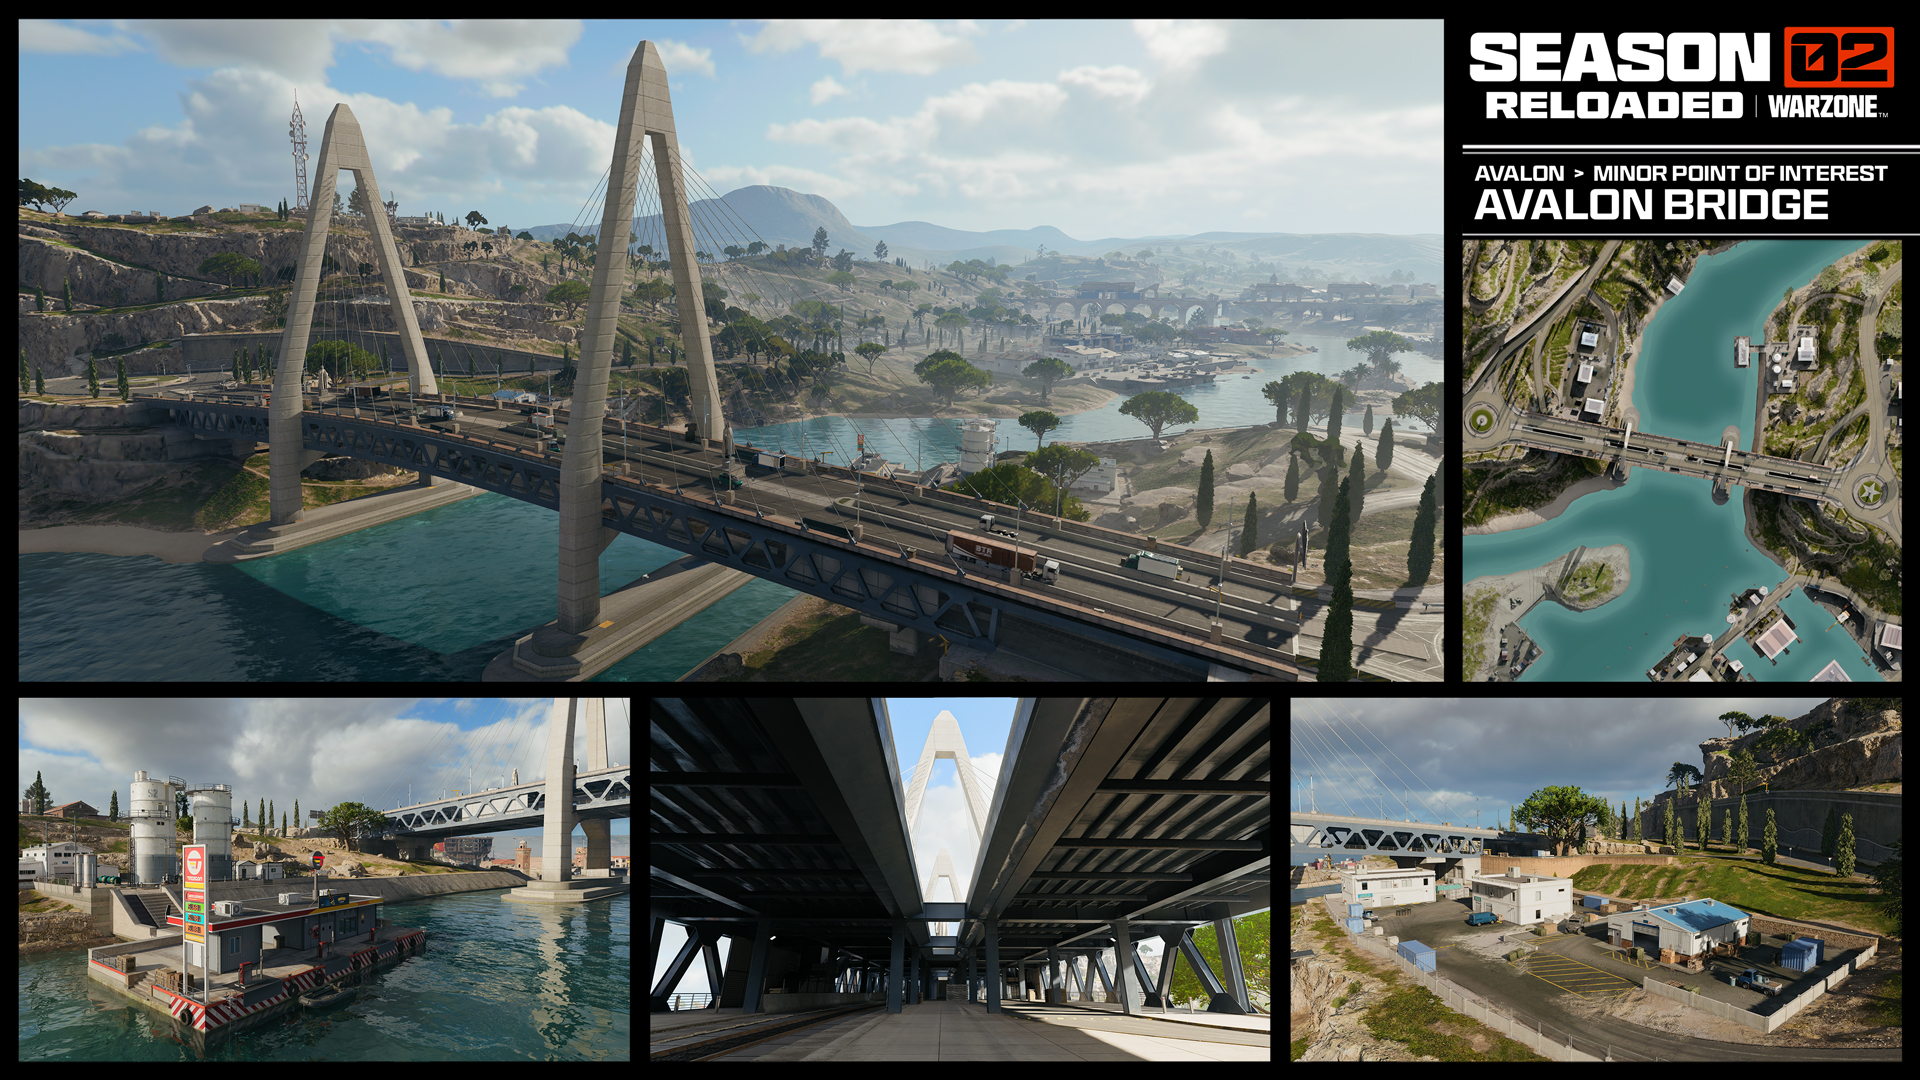
An impressive feat of modern engineering, the Avalon Bridge may be filled with defensive cover opportunities across its upper span, but there’s a covered lower rail and roadway allowing safer traversal options, especially in vehicles. Note the rail tunnel that leads west from the bridge, as well as the network of connected roadways linked to a roundabout either side of the main structure.
Avalon Zone 5: East and Southeast
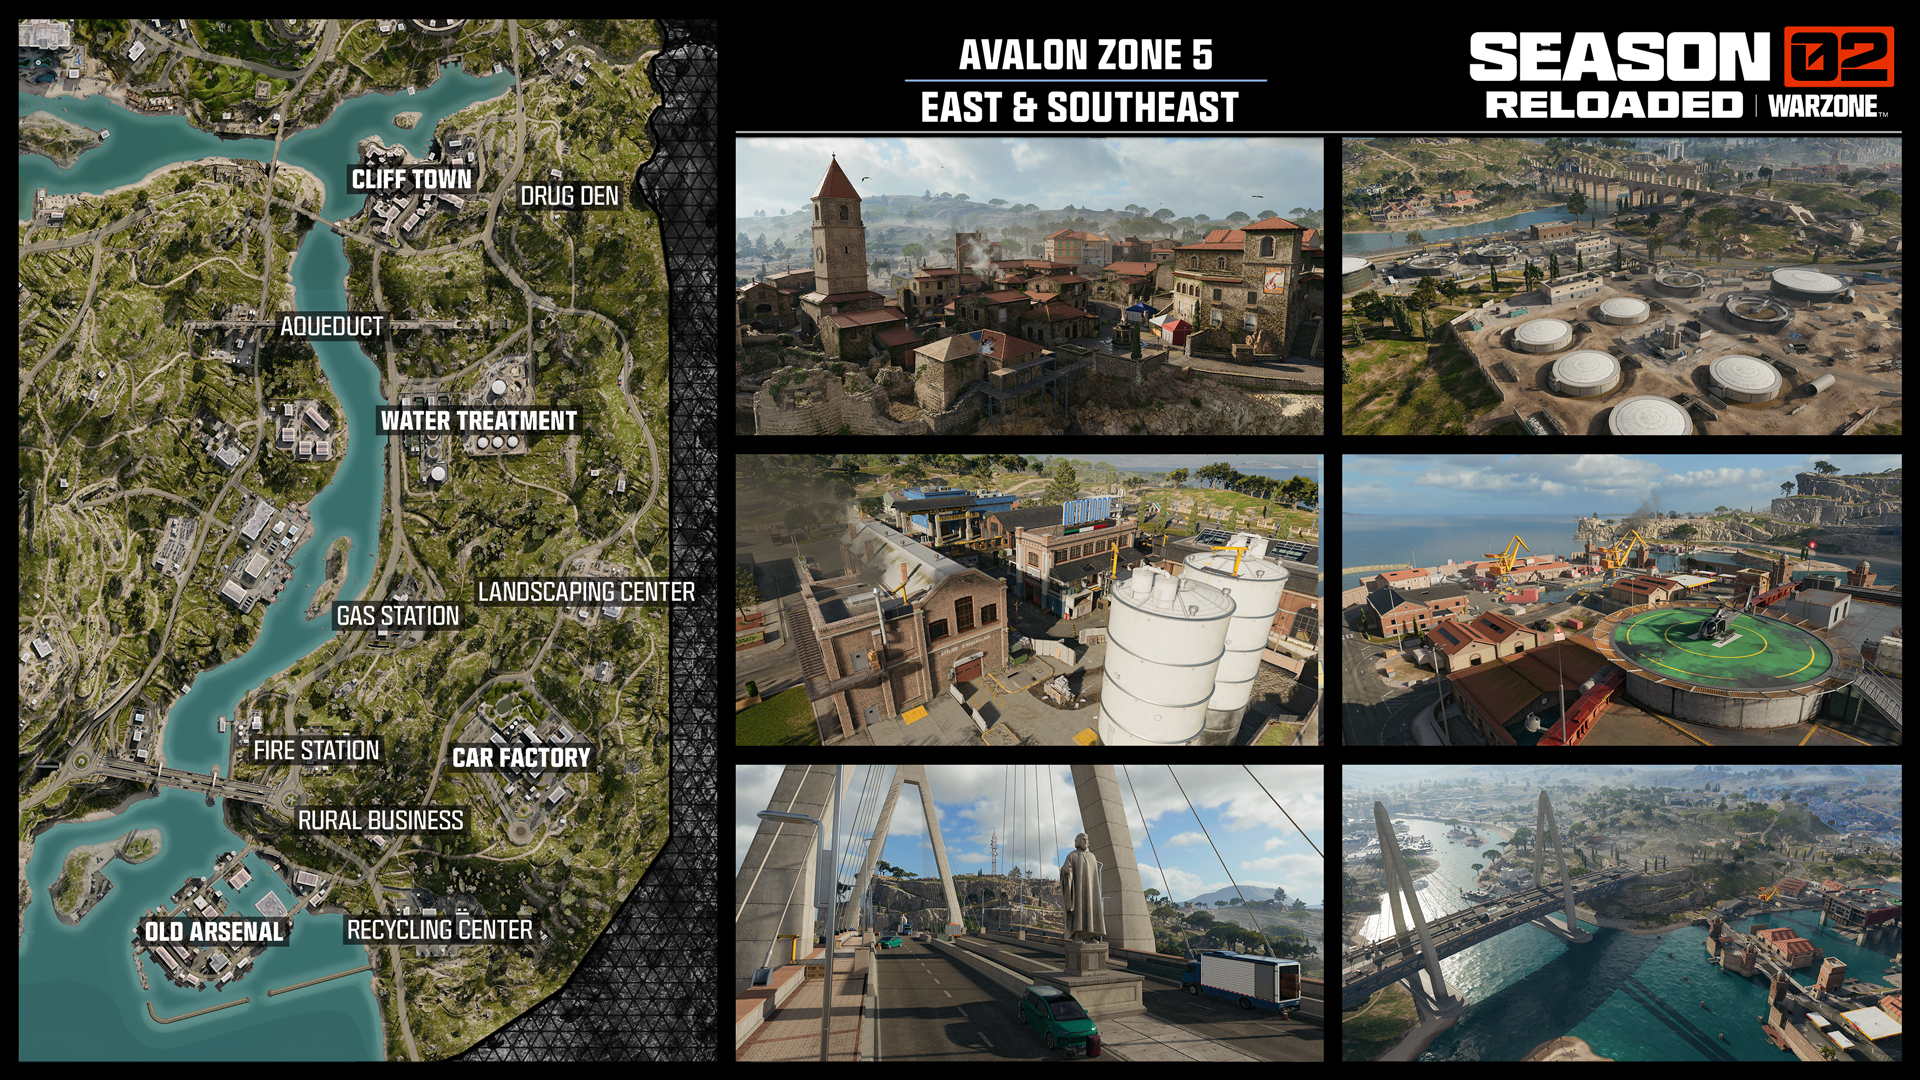
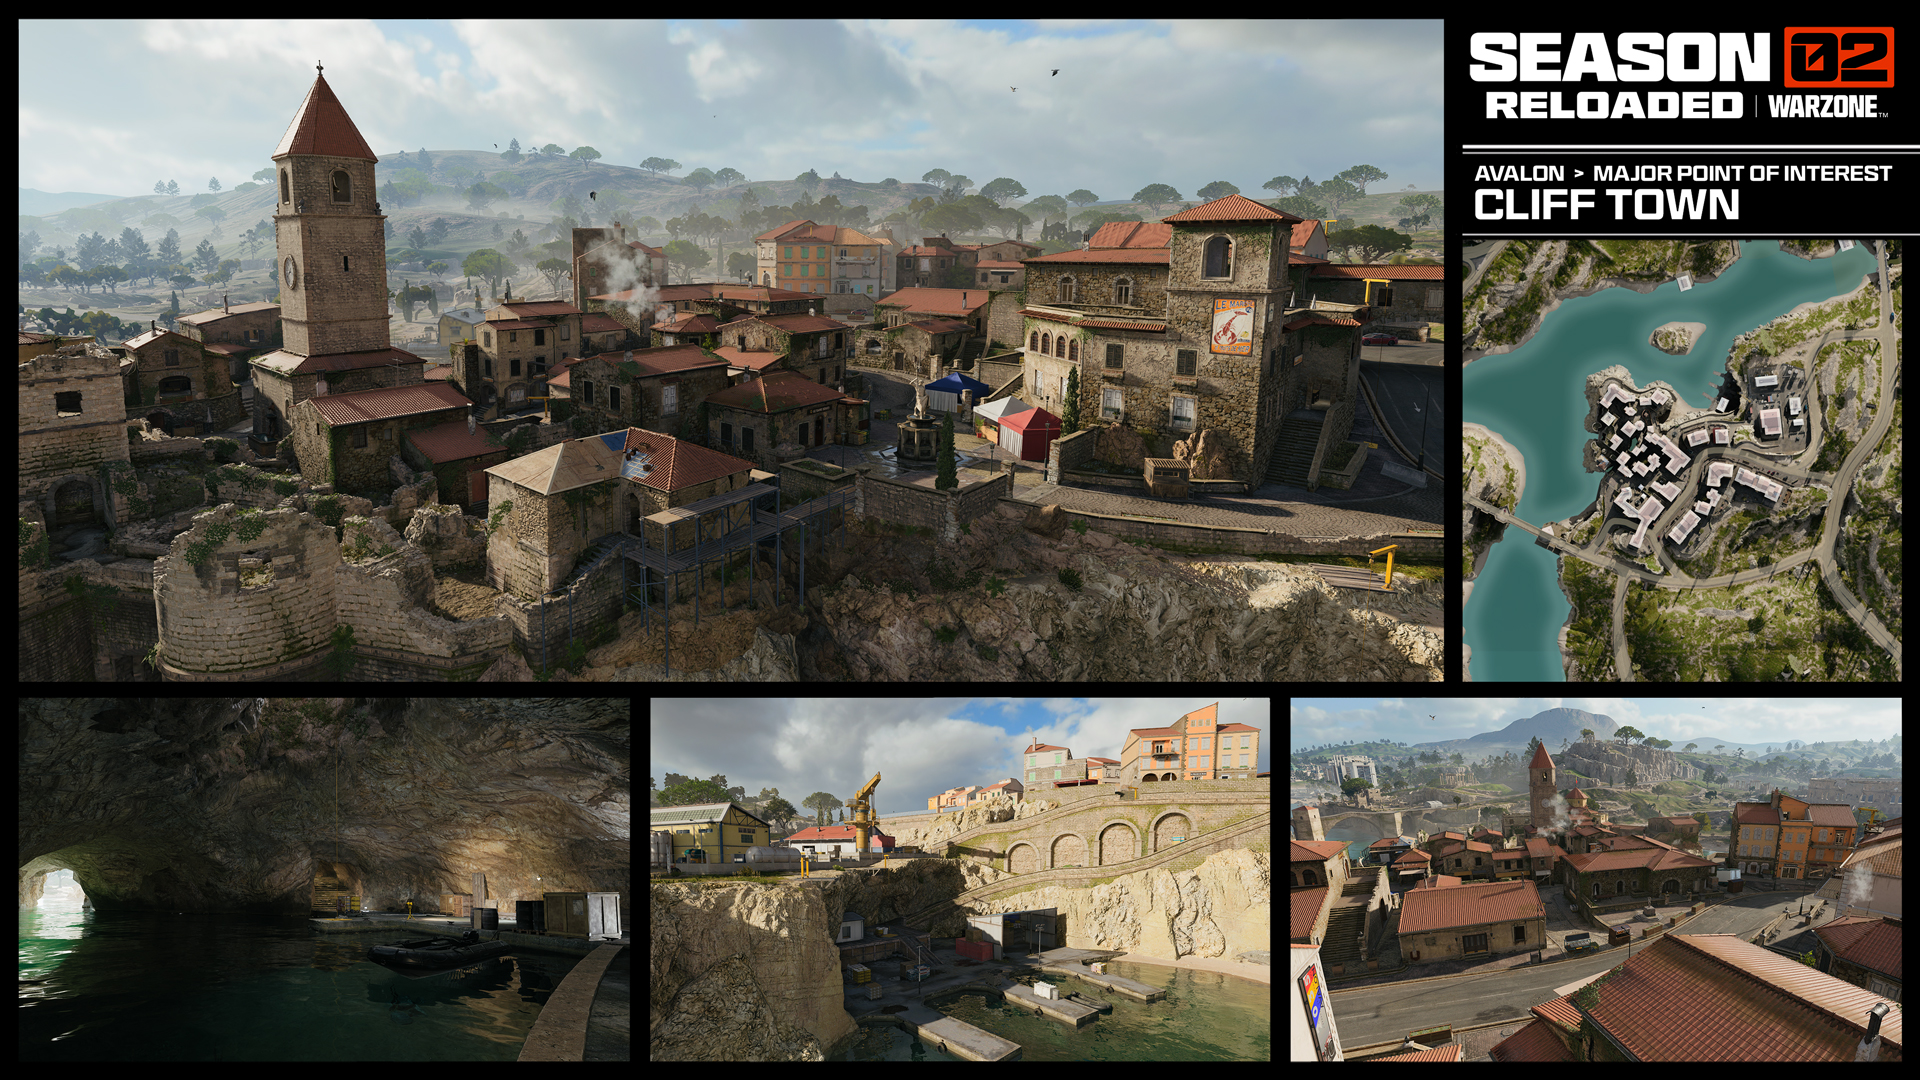
Built in the ruins of an old fortress, Cliff Town’s narrow streets wind through clustered buildings and an old bell tower. Use your wingsuit to fly from rooftop to rooftop or bring the fight to ground level. Snipers will want to climb up to the top of the tower for its dominant views. The town is situated above an underground cave system accessible from the surface, giving quick escape into the waters below. Along the coast to the south, look for Ascenders climbing up to the Aqueduct including ziplines that run all along the topmost level.
Drug Den
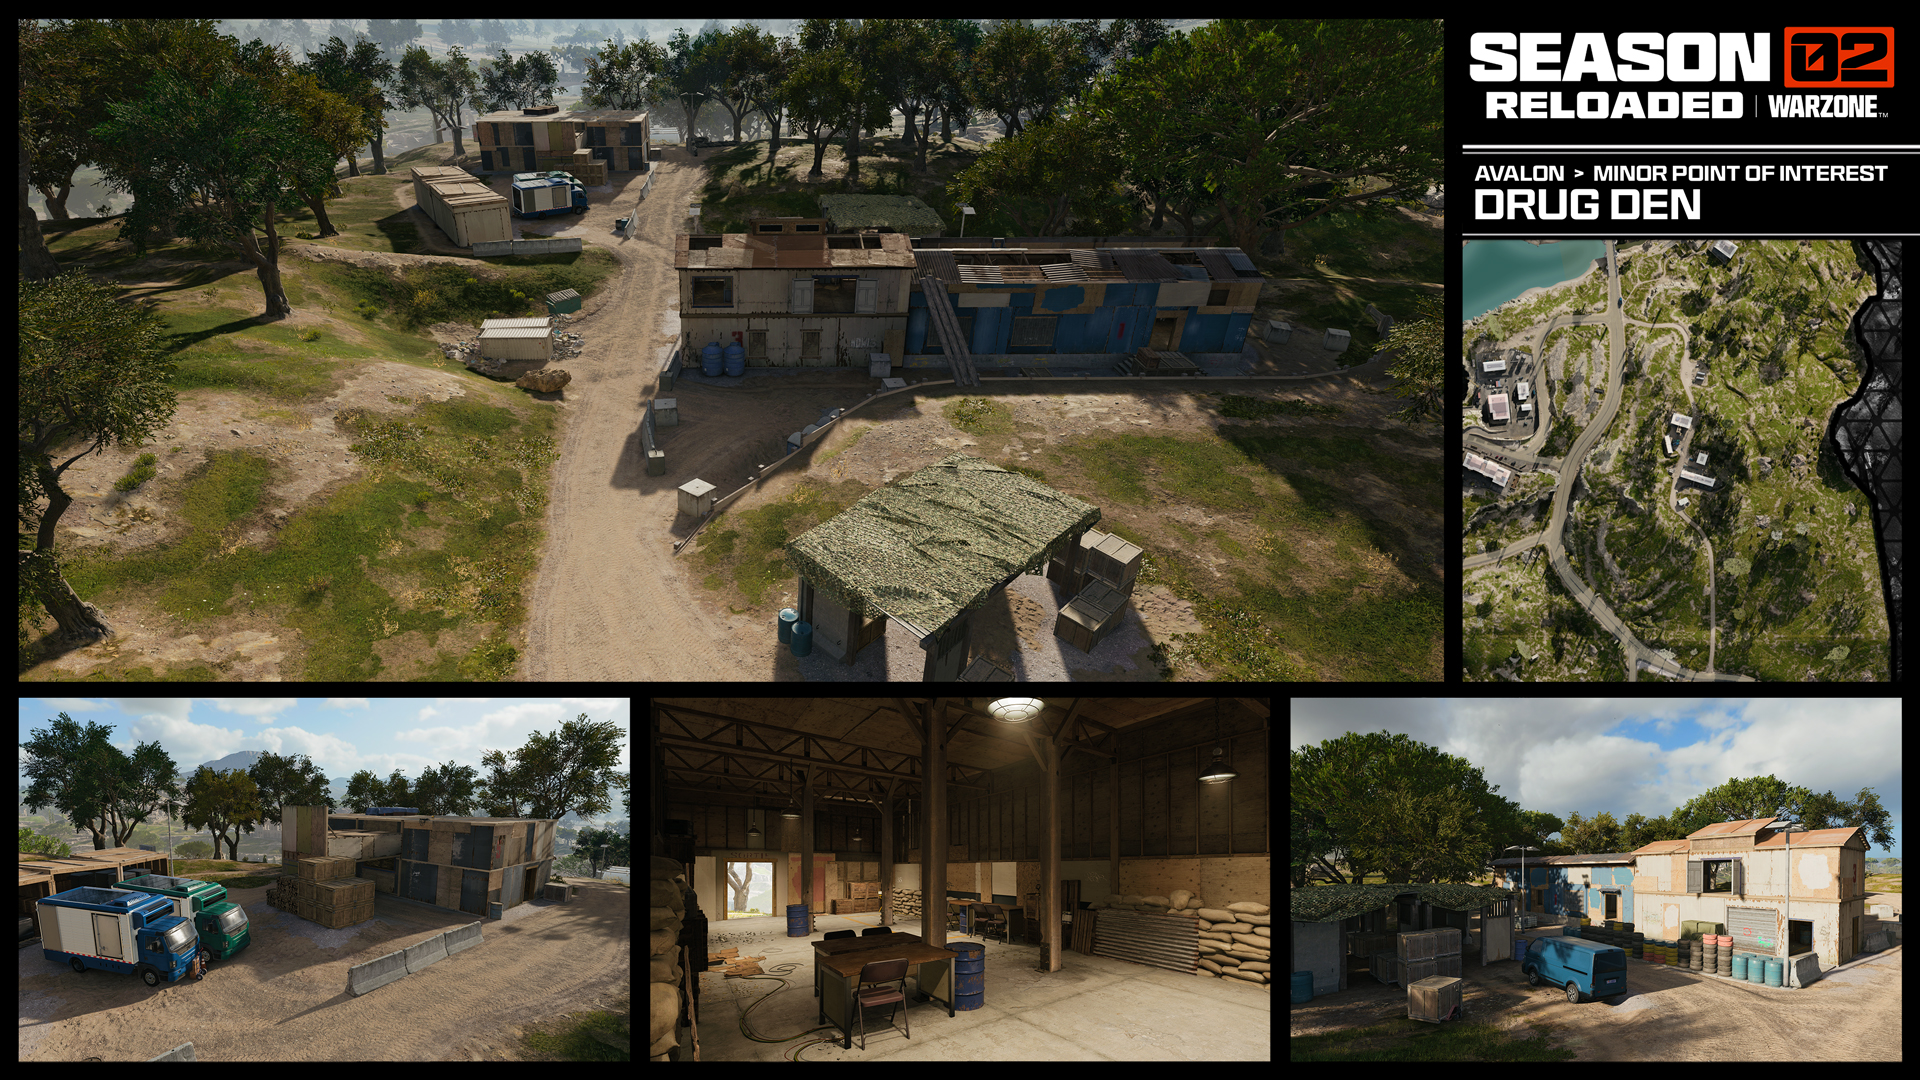
Just up the hill to the east from Cliff Town is a small compound of dilapidated buildings. Surrounded by a tree line and a road that runs through it, Drug Den is both an excellent rendezvous point for squads attempting to retreat from a heated battle within Cliff Town or to avoid a dangerous Cradle Breach. While Drug Den isn’t considered a major POI, it sits just off the main road that runs through Avalon. Set up an ambush for travelers along the road as you scope out Cliff Town or prepare for any vehicles rolling through any of the side roads nearby.
Water Treatment

Downhill from Cliff Town, Water Treatment sits low on the river, an industrial flatland made up of silos, filtration tanks, piping, and warehouses. Most of the buildings are similar in height, uniformly low to the ground with circular tops, giving plenty of room to maneuver. On the ground, use the large structures to protect your flank and funnel enemy forces to push the fight to your advantage. If you want a stealthy approach, enter the site using the underwater pipes.
Aqueduct
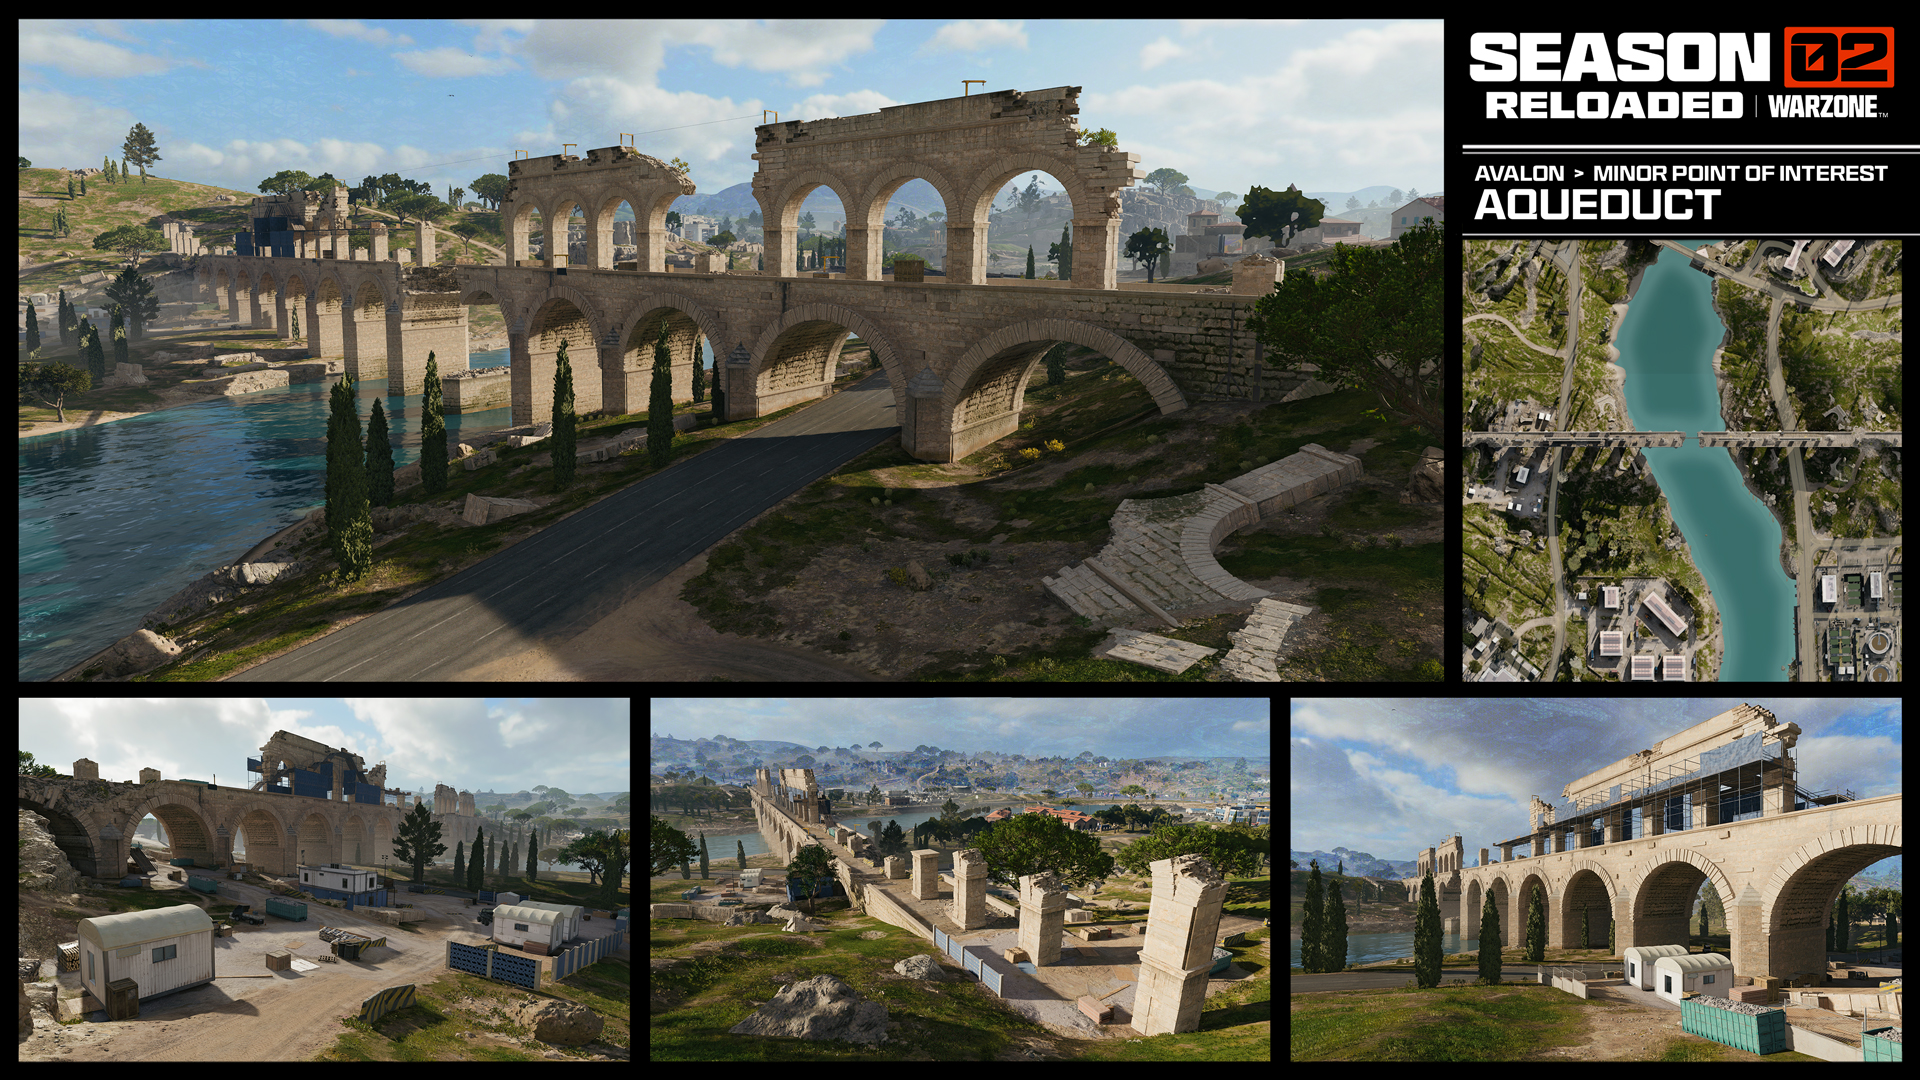
Perpendicular to the main road that connects Water Treatment to Cliff Town is a large aqueduct that serves as a useful bridge for quick transit across the water. Travel along the Aqueduct’s main level or over it via a collection of ziplines on the level above. With the top level having a modicum of hard cover, there are many ways to play and navigate the Aqueduct, however you will have to keep your attention on your flanks because they’ll be highly vulnerable.
If you or other squads choose not to place themselves directly onto the Aqueduct, the structure can be used to cut off long sightlines from the north or south. Use it to cut vision from a distance and counter-snipe enemy squads.
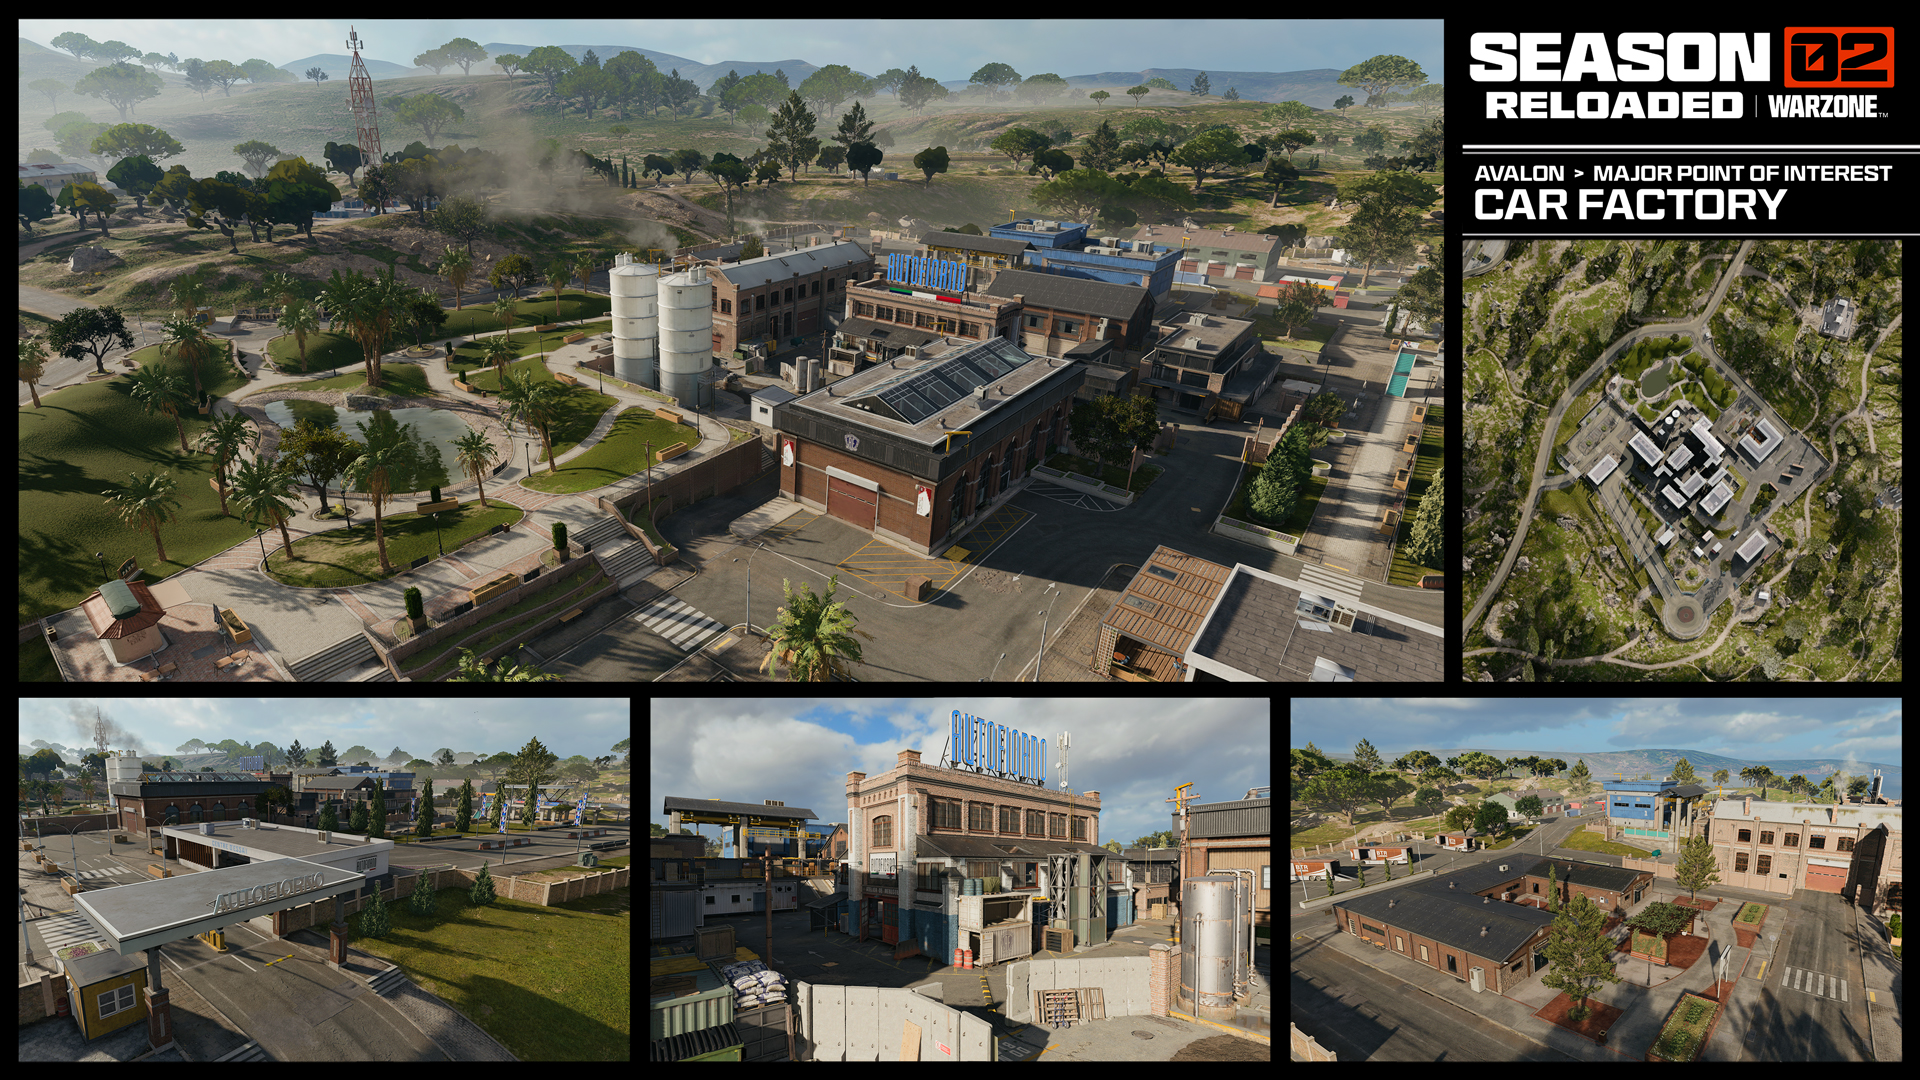
Car Factory
Several mid-sized factory buildings fill a tight square in this industrial zone modeled after the W.M.D. Multiplayer map from Black Ops 6. Move inside to battle in open spaces like the assembly room and showroom or scale up to the rooftops to fight from above. For an unbeatable view, zip up the Ascenders that reach to the tops of the two white silos. A Landscaping Center, Gas Station, and test track border the factory before opening up into the rugged hillside.
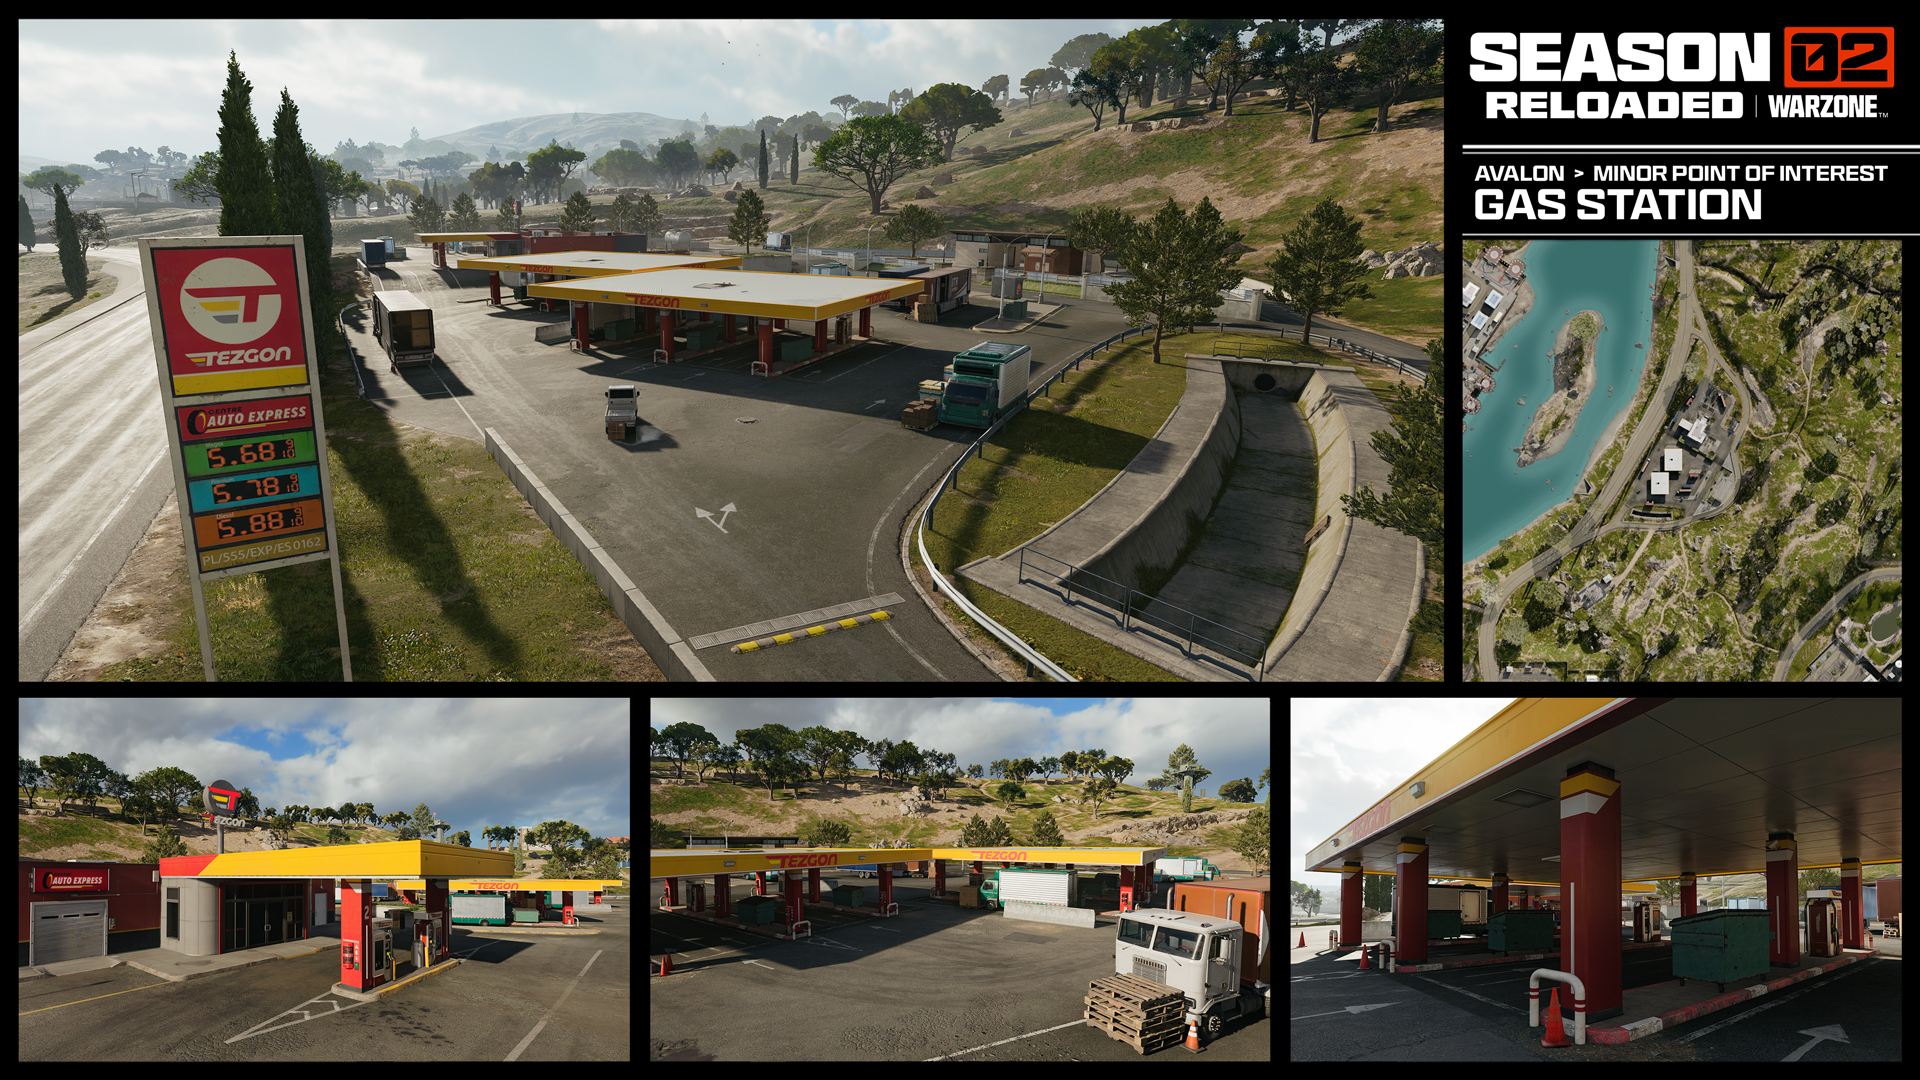
Gas Station
The Gas Station sits quite low in the valley and directly under the hill up to the Car Factory. Squads residing here should be ready to take on incoming forces from the main road or from the Car Factory. However, the sightline from the station to the Heliport is rather direct. Taking carefully timed shots to break down enemy squad defenses may give your team the opportunity to advance before you’re overwhelmed.
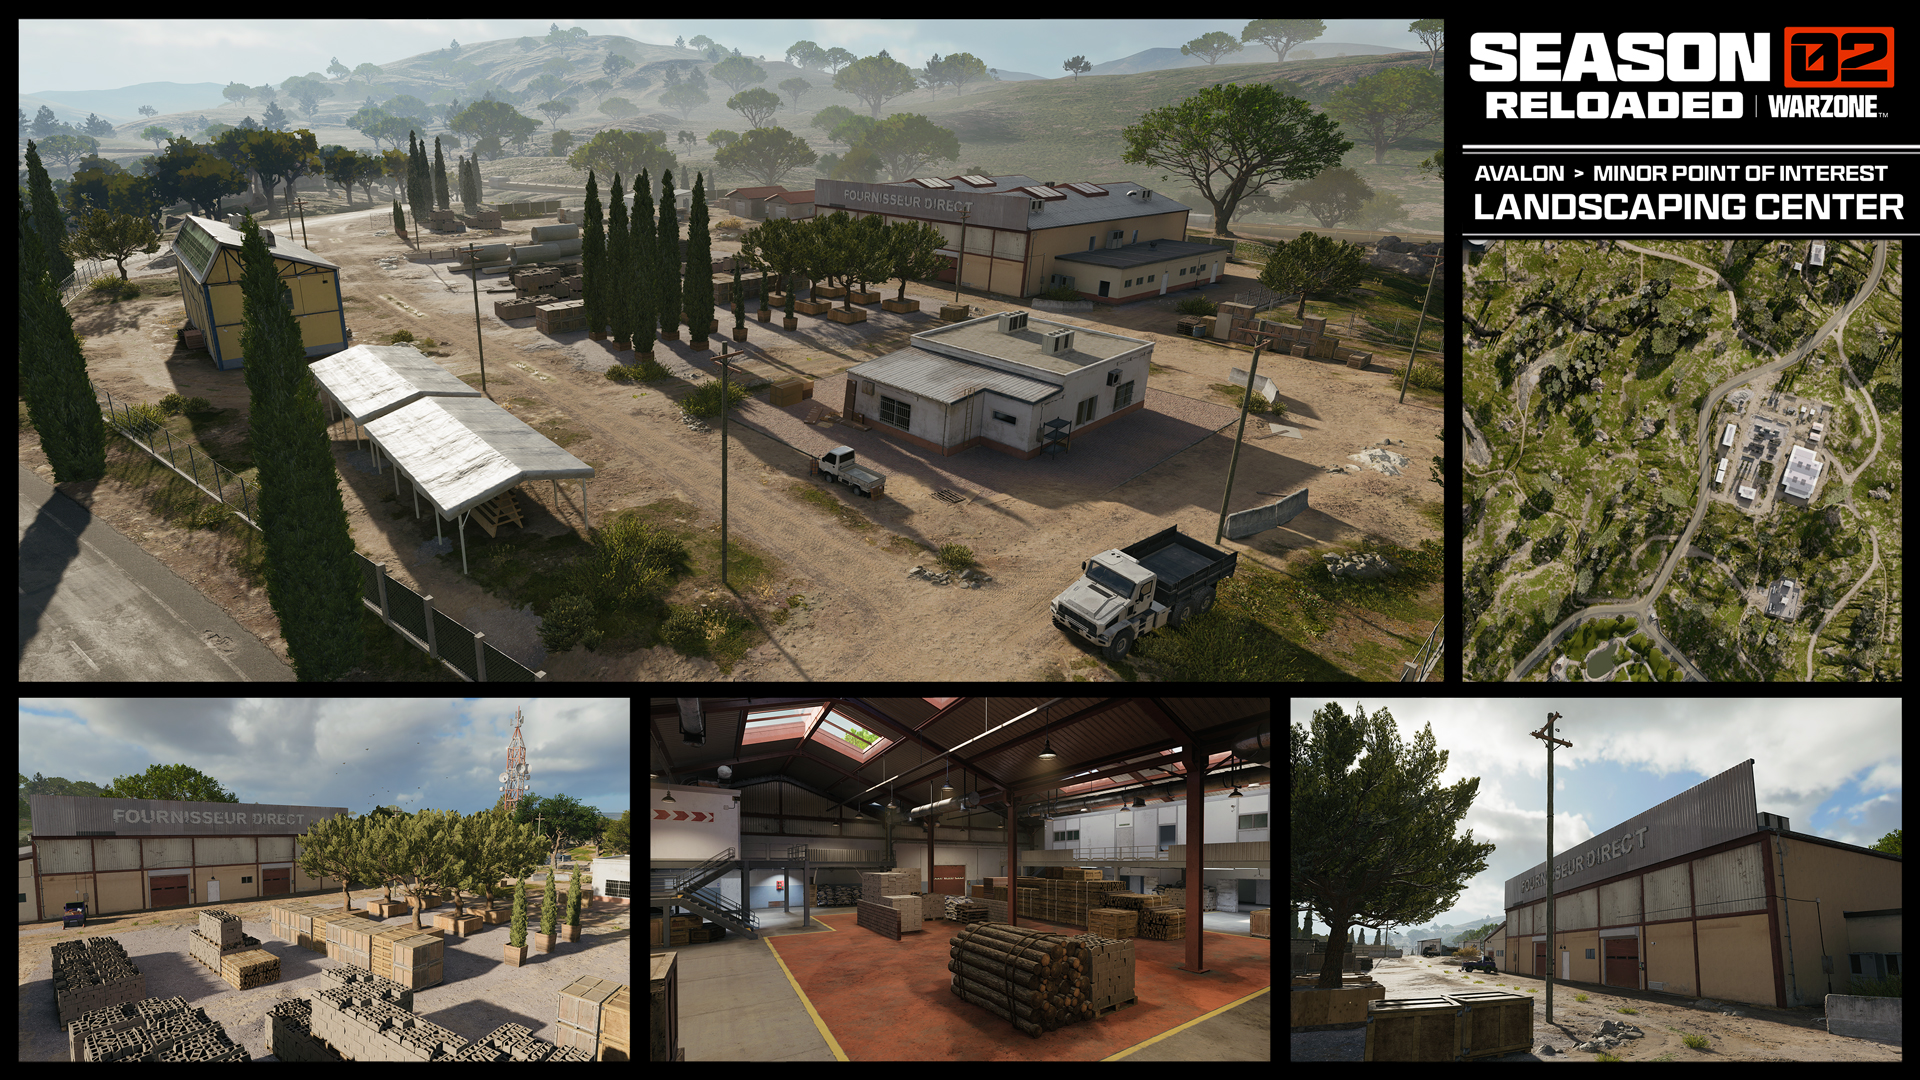
Landscaping Center
The Landscaping Center is loaded with large piles of building materials and trees ready to plant which provides a highly dynamic arena for a firefight. With buildings on either side and small roads that run through the Landscaping Center, this location is primed for a nonstop, action-packed, few minutes at any point in the match. Once you’ve cleared it out, take a peek to the west and scope out the Gas Station or Water Treatment facility and plan your next move.
Old Arsenal
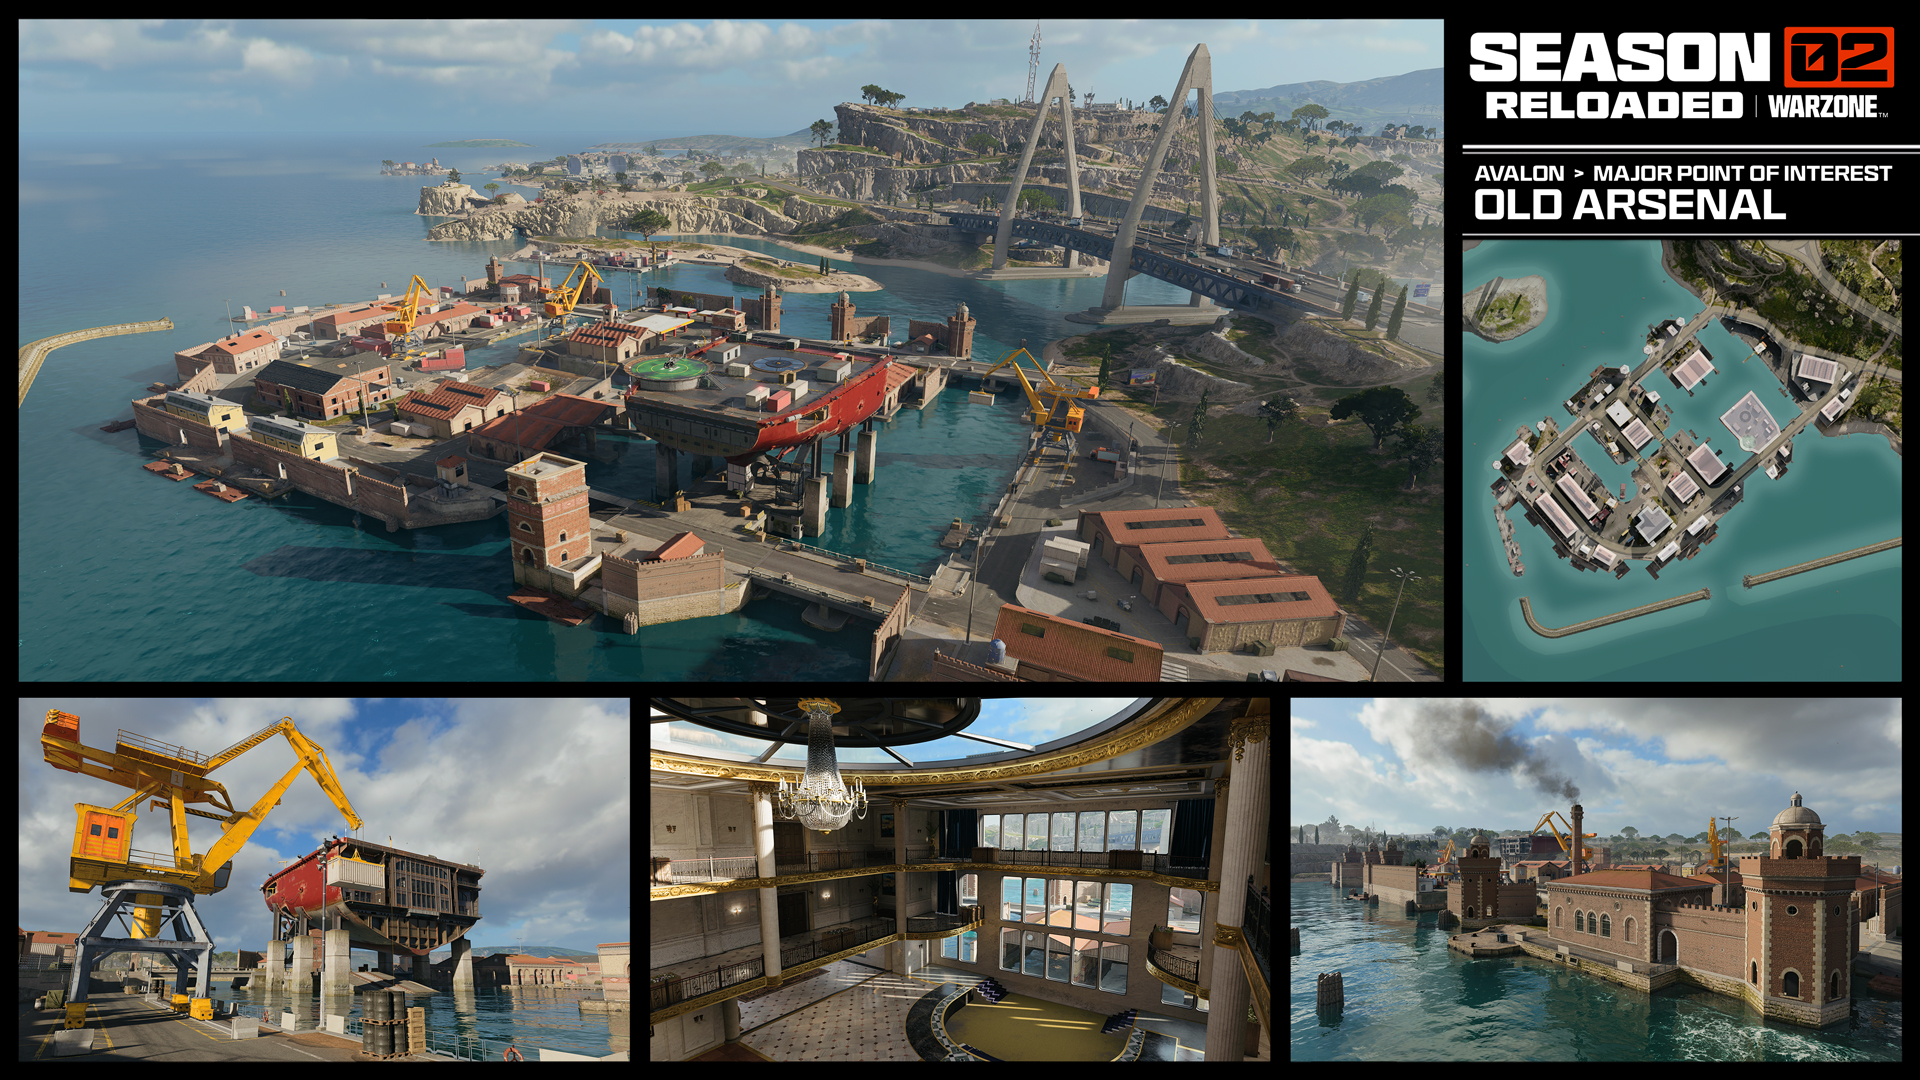
The Old Arsenal protrudes from the mainland over the water. A mixture of low buildings and cranes fill the streets under the shadow of an old luxury ship hull raised on concrete stilts. Seek out watercraft along the shore to take advantage of the open waterways. Inland from the Old Arsenal, Operators will encounter rugged uphill terrain and pockets of buildings like the Recycling Center and Fire Station.
Recycling Center
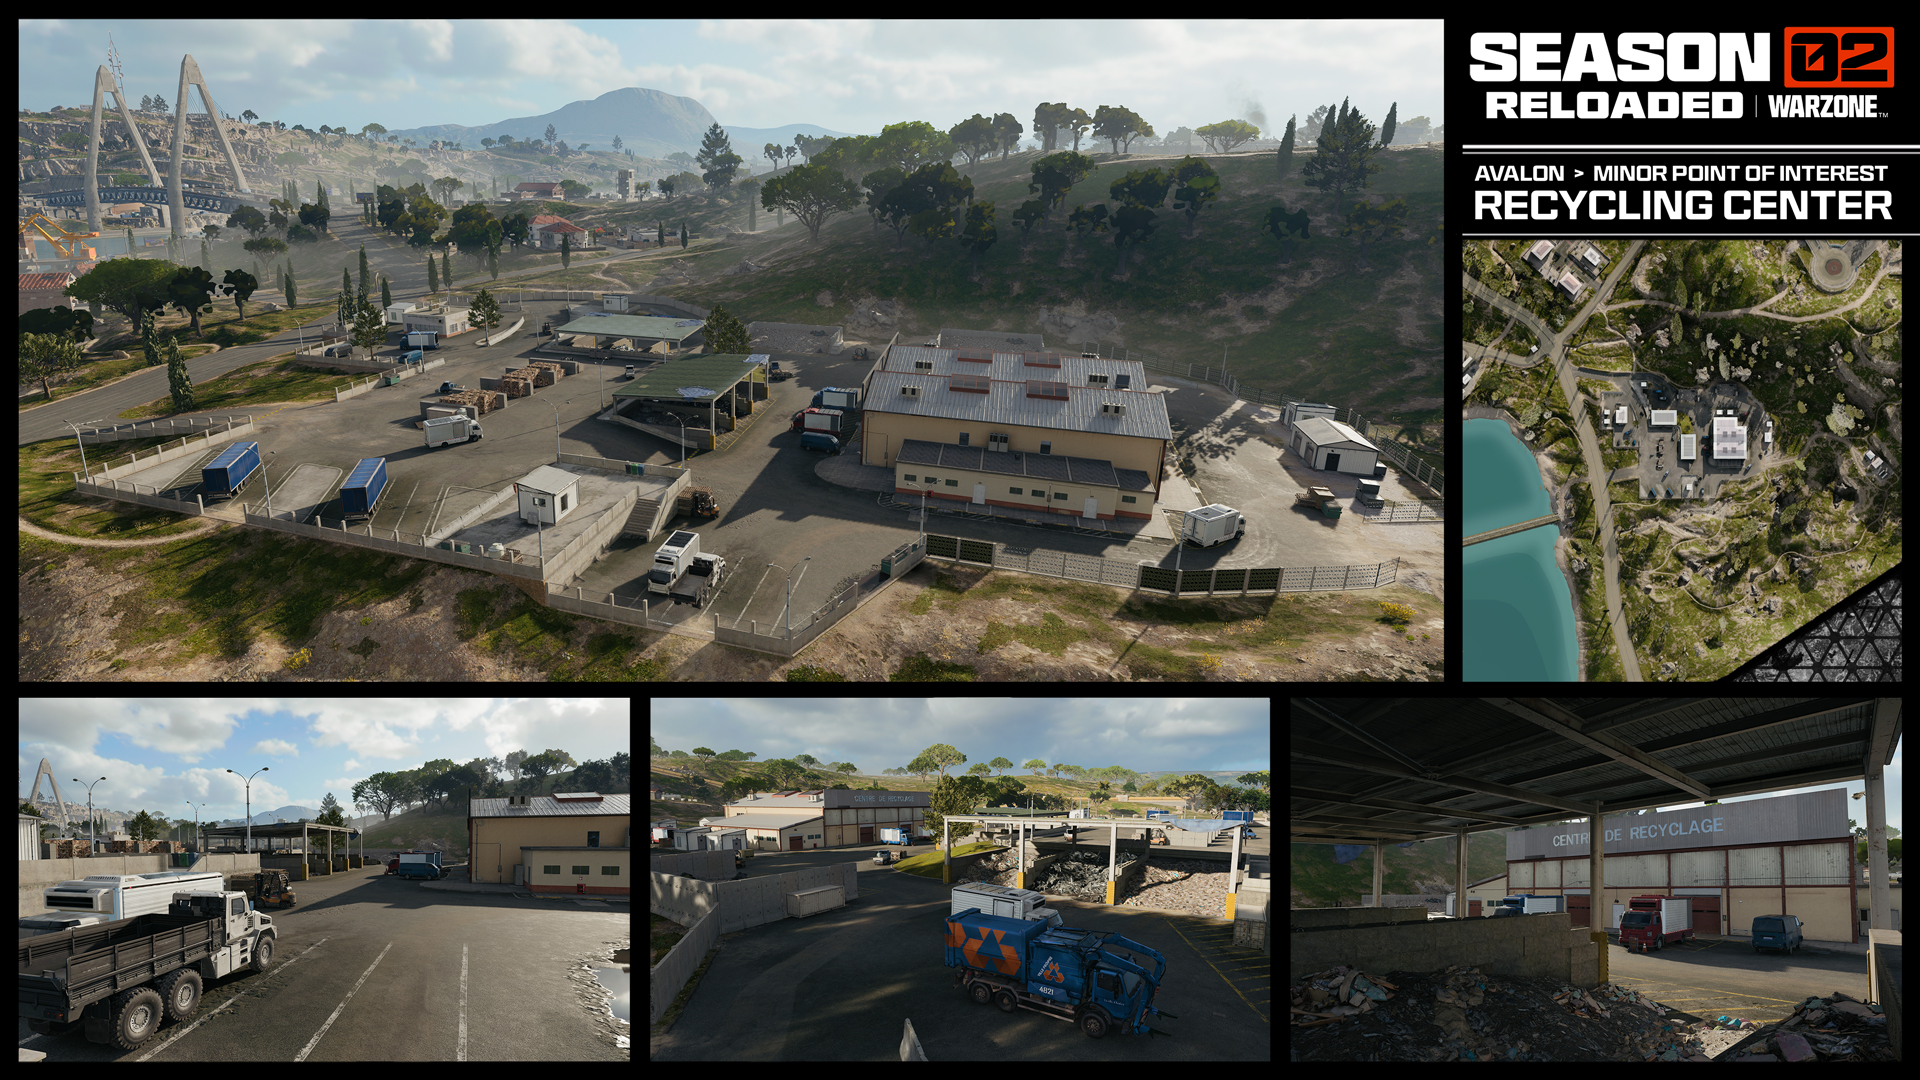
Although the Recycling Center is rather open, utilize the fact that it is located on the edge of the map as well as the overhead rooftops to passively cover your flank while you loot here. This minor POI serves as a great drop location as there is plenty to gather and pickups to upgrade your arsenal before you’ll need to leave.
Fire Station

The Fire Station is located at a major crossroads at the southeastern end of the map, sitting right next to the Epic Bridge and in between the Old Arsenal and Car Factory. Whether you’re setting up an ambush or you know enemy squads are nearby, if you’re looking for action, the Fire Station is the place to be. Use the training tower and Cargo Truck to spot and move to your next location without having to worry about too many surprises.
Rural Business Space
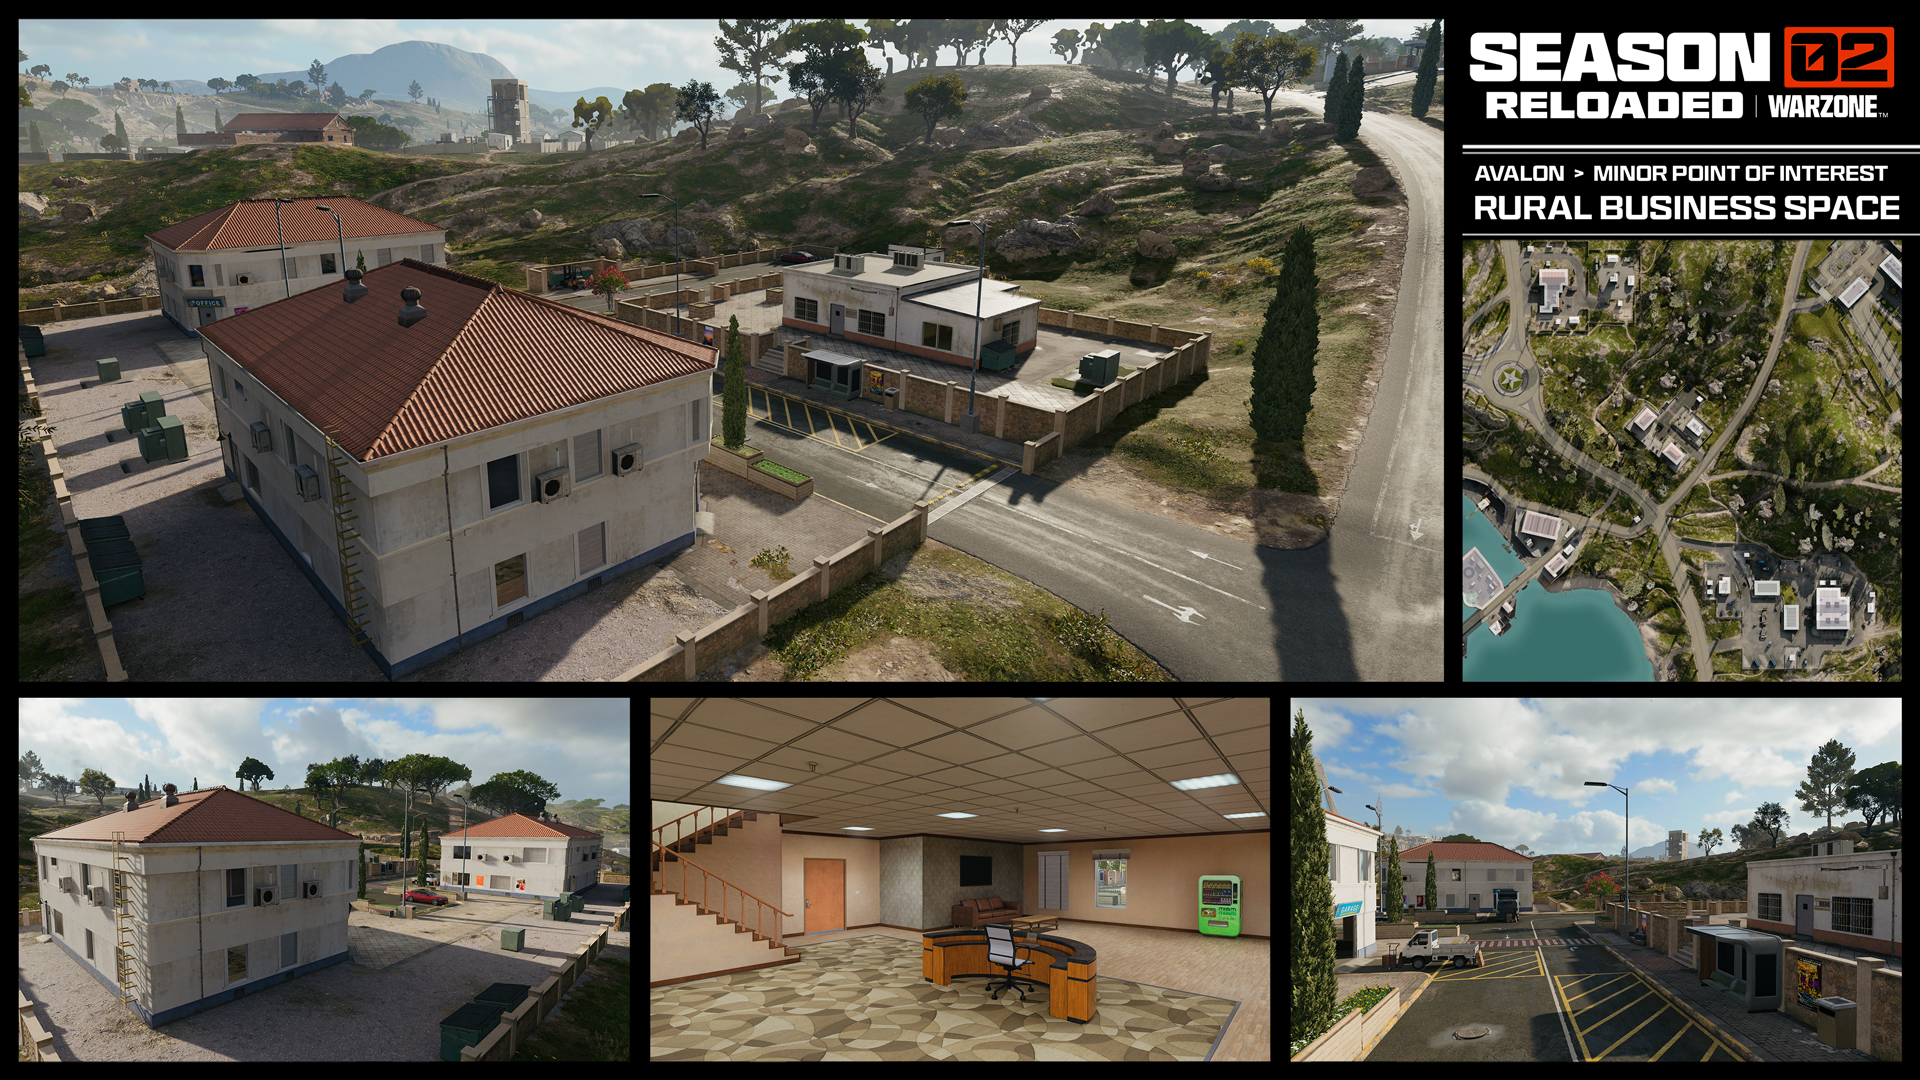
With two two-story buildings and a smaller single story, this Business Space is a minor stronghold in a major location. Just off the main road, it sits near the Fire Station, giving it a prime vantage point against any approaching squads. It sits right underneath the hill from the Car Factory, so expect some action especially after the first few minutes of any match.
©/TM/®2026 Activision Publishing, Inc.
For more information, please visit www.callofduty.com and www.youtube.com/callofduty, and follow @Activision and @CallofDuty on X, Instagram, and Facebook. For Call of Duty Updates, follow @CODUpdates on X.